# Supervisor
# Noticeboard - Supervisor Section
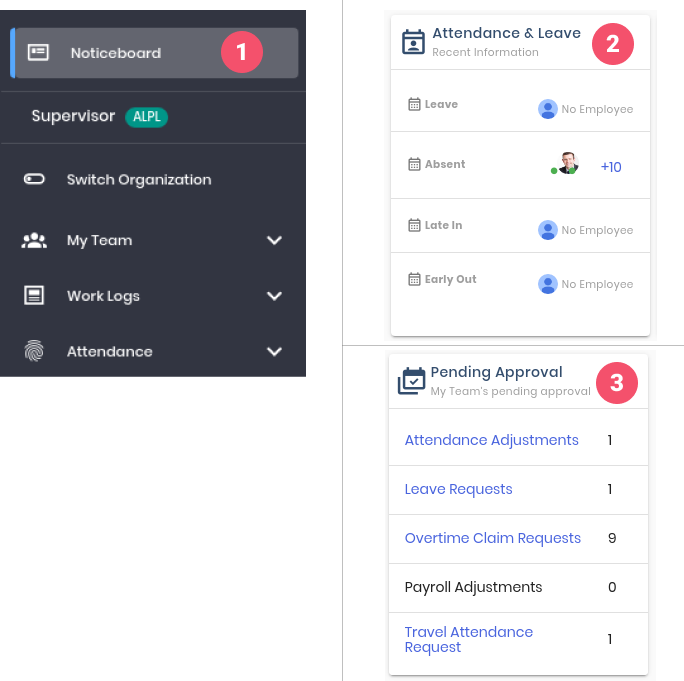
To go to the supervisor section, scroll down on the sidebar
- To view the overview of the team's attendance, leave and request details scroll down on the right side of the noticeboard.
- Here, supervisor can see the overview of who is on Leave, Absent, Late In and Early Out details
- Here, supervisor can see the overview of the pending approval requests details.
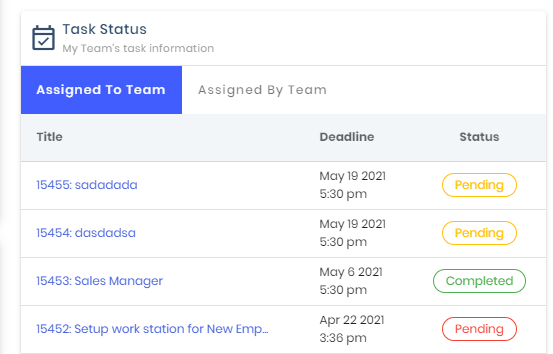
- Here, supervisor, can see all the tasks that have been assigned to his team or assigned by his team. Within the noticeboard, the supervisor can also view the title, deadline and status at a glance.
# My Team
# Overview
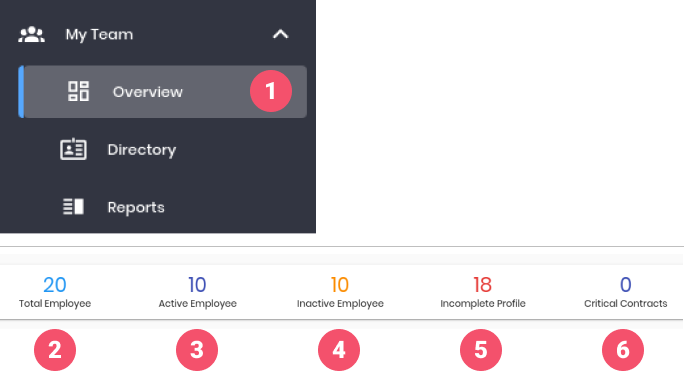
To go to the overview page of supervisor section
- Go to 'My Team' on the sidebar, click on the 'Overview'
- Click on the number above 'Total Employee' to view the list of the total employees
- Click on the number above 'Active Employee' to view the list of the active employees
- Click on the number above 'Inactive Employee' to view the list of the inactive employees
- Click on the number above 'Incomplete Profile' to view the list of the employees whose profile is incomplete.
- Click on the number above 'Critical Contracts' to view the list of the total employees whose contracts are about to expire.
# Directory
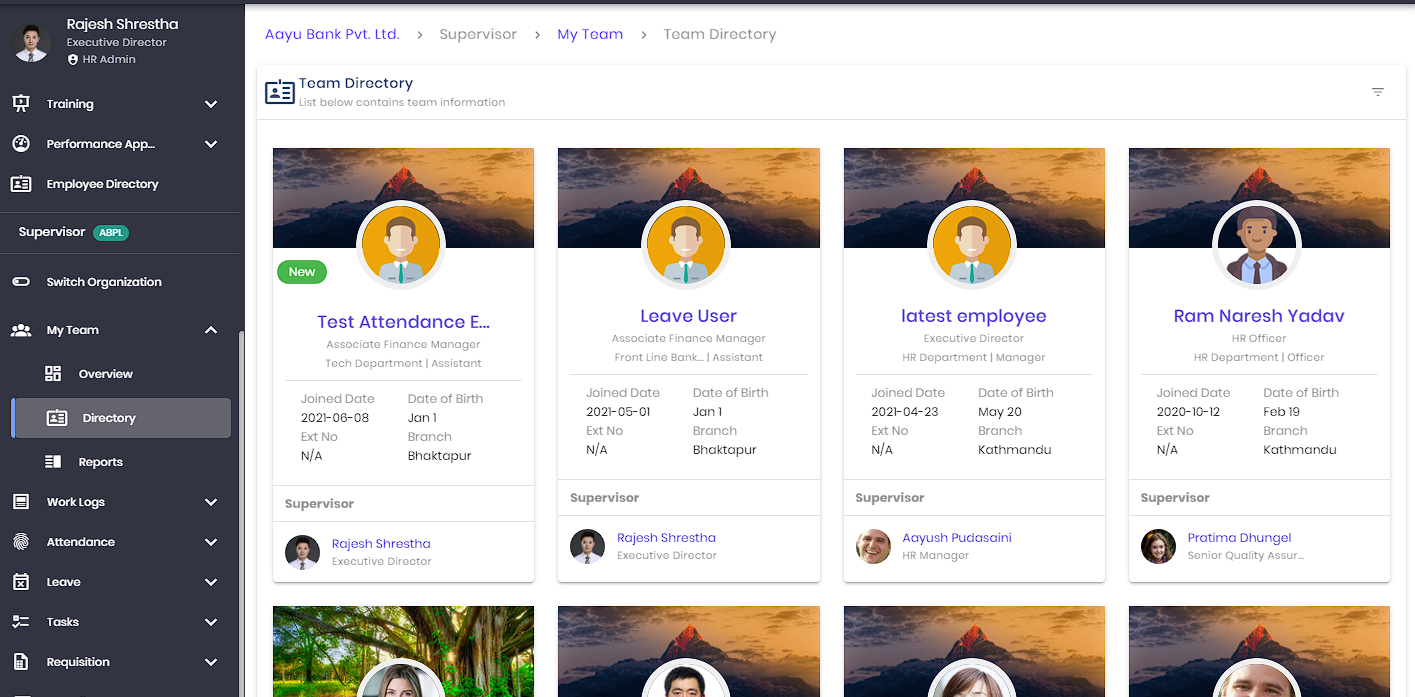
- Here Supervisor can view all team members details.
# Reports
# Contract Status
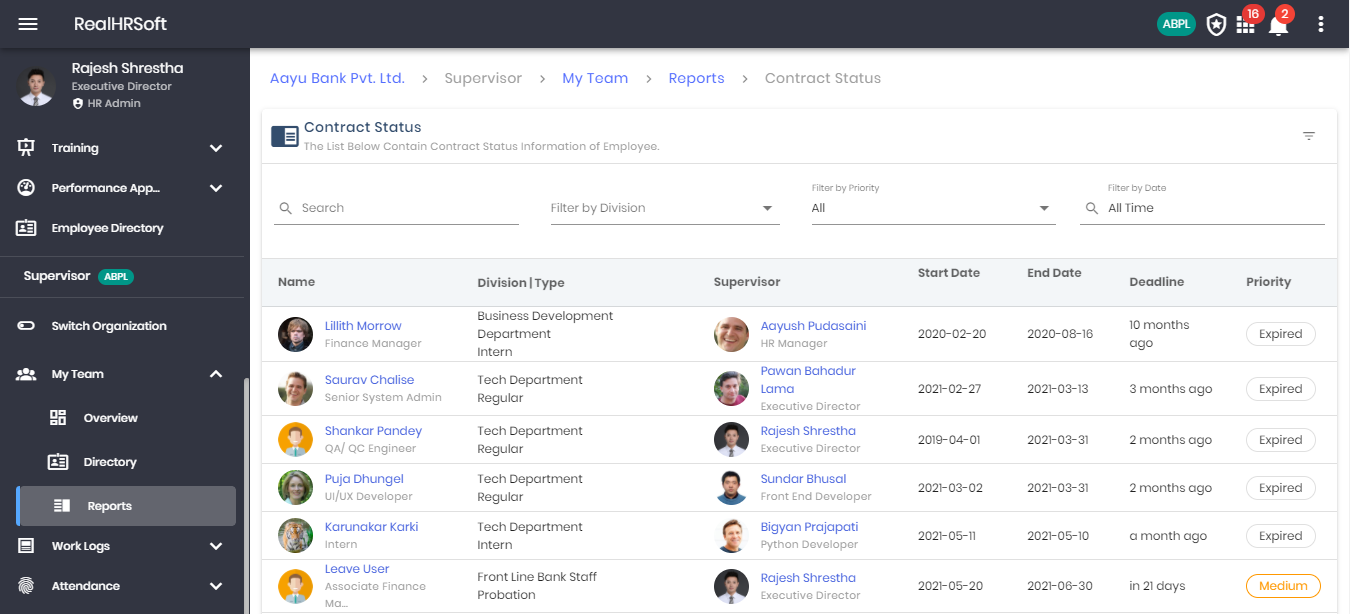
- Supervisors can view a report that highlights the list of their team members along with their current contract status. They may also view the employment contract details of the employees and search for an employee of list of employees based on their division, priority of contract status or date
- Supervisor’s can easily navigate and view their team’s Contract Status report by scrolling to the “Supervisor” section in the sidebar and clicking on “My Team”. Within the Report section, they will find the “Contract Status”.
# Profile Change Requests
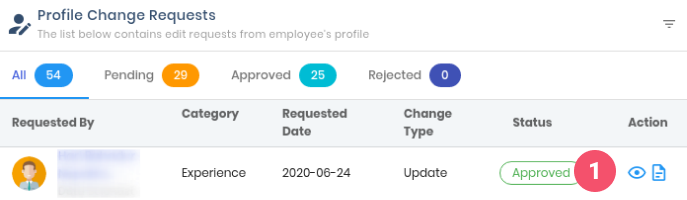
Here, change request sent by the team members are displayed.
- Click on the 'View change request' icon to view the details of the request.
- Supervisors can view the team's request to make changes to their profile and also view their current status of such change request using the platform. While the privilege to accept the changes lies in the hands of the HR, the supervisor can view the details of change request as well as view the general information history too.
- Supervisor’s can easily navigate and view their team’s Profile Change Request report by scrolling to the “Supervisor” section in the sidebar and clicking on “My Team”. Within the Report section, they will find the “Profile Change Request”.
# Work Logs


Work Log
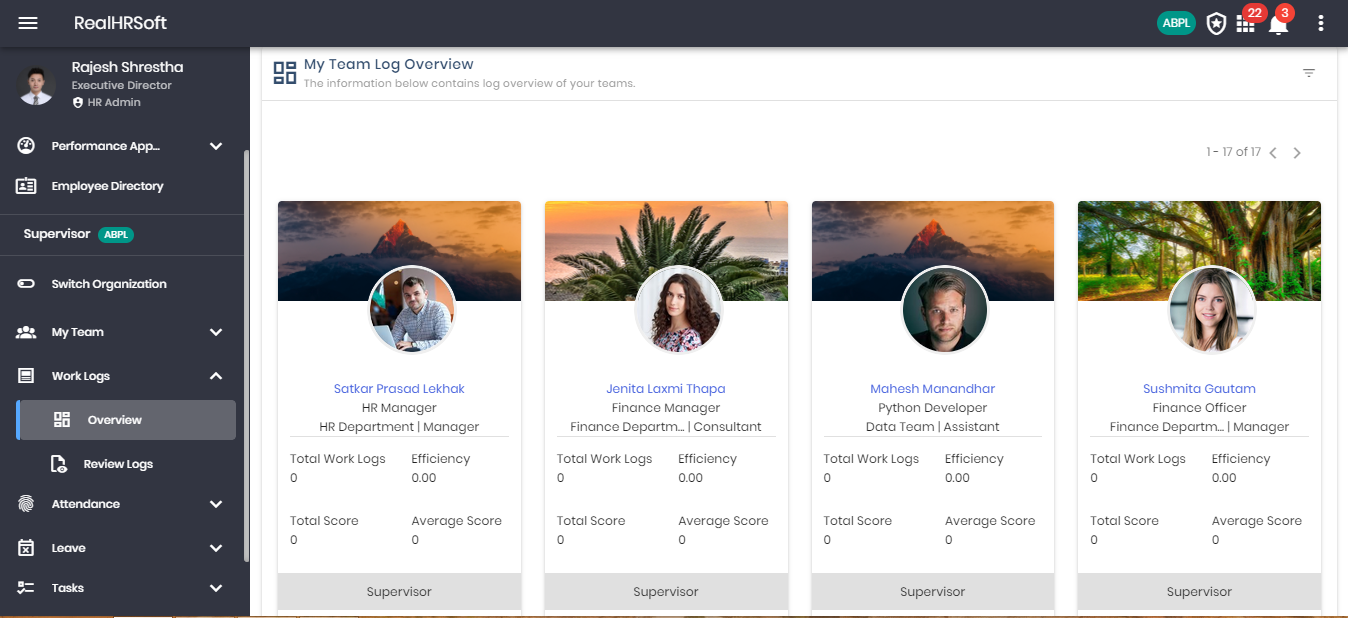
- Go to “Work Logs” under Supervisor in the sidebar. Click on “Overview”
- View the team members basis detail along with total work logs, efficiency, total score and average score by the employee, Additionally, you may also view his supervisor
- Click on “Review Logs” to view the work logs pending your approval.
- Click on the “Employee Name” to view the Employee profile details.
- Click on the “Action” button to rate the work log for the employee
- View the log information posted by the employee.
- Score the worklog for the employee by shifting the scale on the right. Score is displayed below.
- Write additional review for detailed information on the feedback of work log for employees.
# Attendance
# Overview
[ ]
]
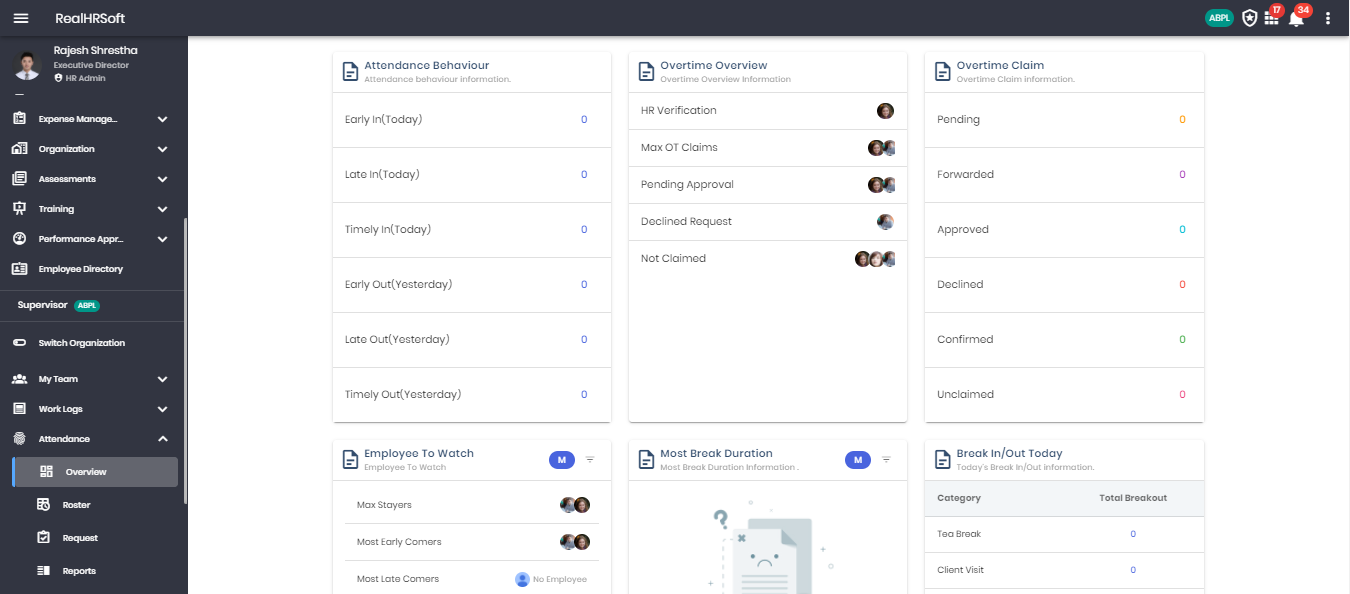
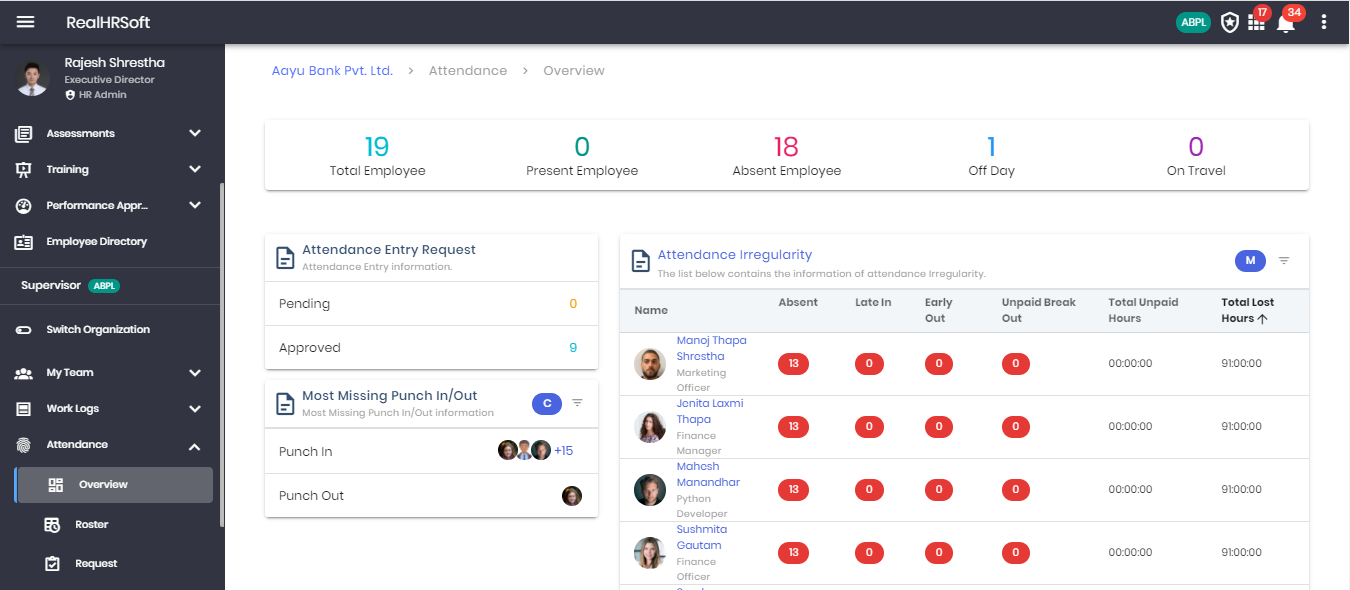
- Go to “Attendance” under Supervisor in the sidebar. Click on “Overview” for a summary of the team’s attendance.
- Click on the number above “Total Employees” to display the list of employees within the team.
- Click on the number above “Present Employees” to display the list of employees that are present today in the team.
- Click on the number above “Absent Employees” to display the list of employees that are absent for the day within the team.
- Click on the number above “Off Day” to display the list of team members with an off day assigned to their shift.
- Click on the number above “On Travel” to display the list of team members that have applied for On Travel attendance for the day.
- Displays the list of team members that have applied for Attendance Entry requests and the requests that are pending & approved..
- Displays the list of “Most Punch In/Punch Out Missing” employees, you may filter it for a specific date range.
- Displays the list of employees within the team with attendance irregularities for the month. You may also filter it for different date ranges, shift, division or branch.
- Displays the list of employees with attendance behaviour information. Click on the number followed by attendance behaviour to list the employees in that fall in the respective criteria.
- Displays the list of overtime overview information. Employee icons will follow each information.
- Displays the overtime claim information. Click on the number followed by the information to get a list of such requests.
- Displays the list of employees to watch based on their attendance behaviour such as max stayer, most early comers etc.
- Displays the list of today’s total break in/out for each category.Click on the number followed by each category to view the list of employees and their break in/out information.
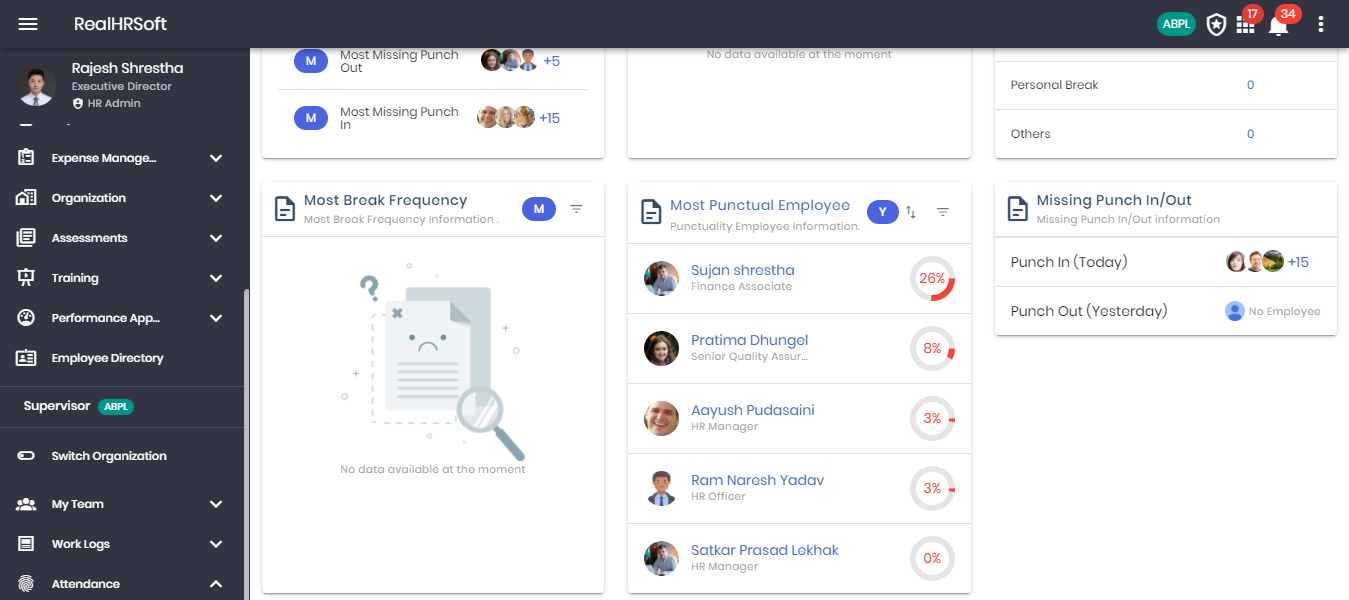
- Displays the list of employees with most break duration information for the month. You may also filter by date.
- Displays the list of employees with most break frequency information for the month. You may also filter by date.
- Displays the list of employees with most punctual employees for the year. You may also sort it to view the list of employees with least punctual attendance. Additionally, filter the list by date.
- Displays the list of employees with most missing Punch In/Out.
# Roster Management
Roster Management
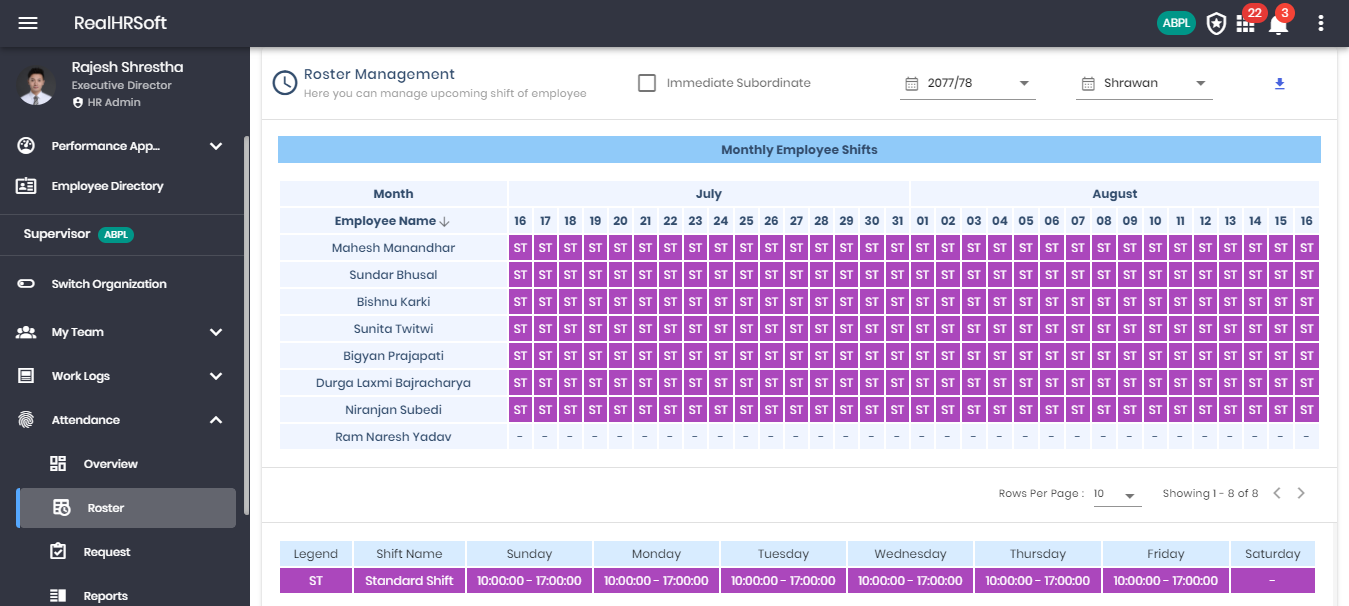
- Go to “Attendance” under Supervisor in the sidebar. Click on “Roster”
- Choose between your immediate subordinate or your entire team using the checkbox
- Choose the finance year for the roster management
- Choose the month for the roster management
- Sort the name of the employees by ascending or descending order by clicking on “Employee Name”
- Click on a single date or select multiple dates to assign a working shift for the employees. The shifts must be created before hand and the shifts can only be assigned from the next day upto a period of a month.
- Choose between the number of rows (employees) to be displayed in the page.
- Go to the previous or next page of employees.
- View the legends which show the shift name and the shift timing for each day of the week.
# Request
# Attendance Entries
To take action on the attendance adjustment requests :
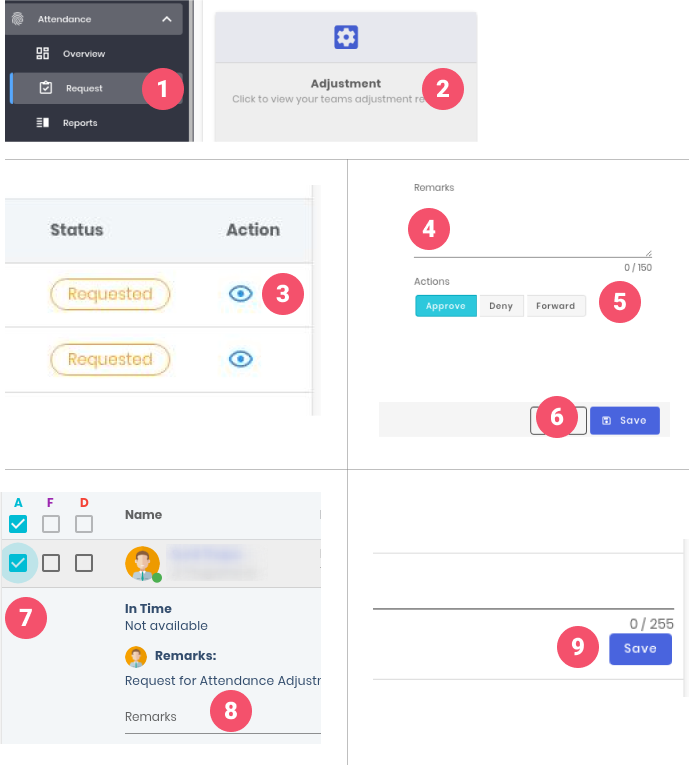
- Go to 'Attendance' on the supervisor section of the sidebar, click on the 'Requests'
- Click on the 'Adjustment'
- Click on the 'View Details' icon on the Action column. When supervisor clicks on the notification of the attendance adjustment same popup will open.
- Provide the 'Remarks'
- Select the action to perform (Approve/Forward/Deny)
- Click on the 'Save' button.
- To take action in bulk, select the checkbox A for Approve, F for Forward and D for Deny
- Provide the 'Remarks'
- Click on the 'Save' button
# Overtime Claim Requests
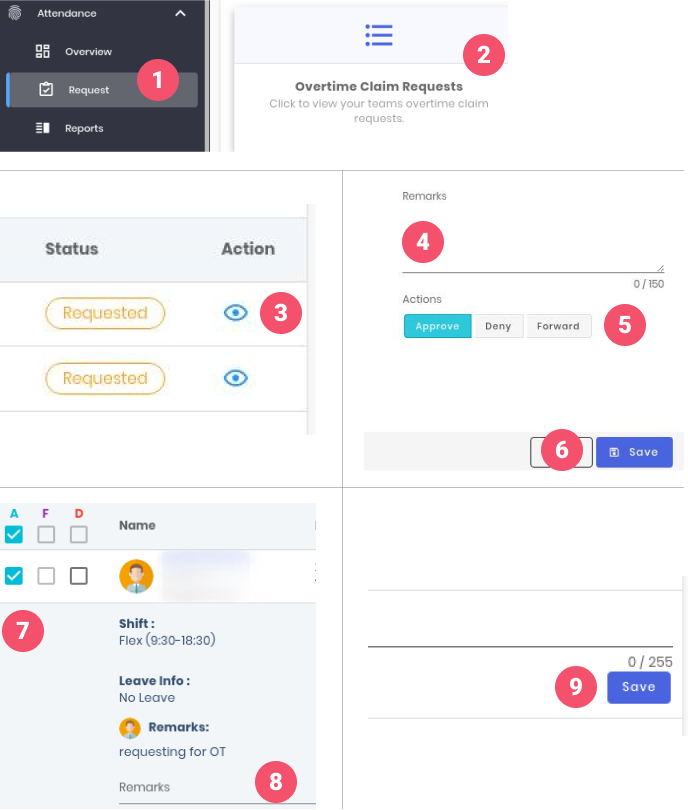
To take action on the Overtime claim requests :
- Go to 'Attendance' on the supervisor section of the sidebar, click on the 'Requests'
- Click on the 'Overtime Claim Requests'
- Click on the 'View Details' icon on the Action column. When supervisor clicks on the notification of the attendance adjustment same popup will open.
- Provide the 'Remarks'
- Select the action to perform (Approve/Forward/Deny)
- Click on the 'Save' button.
- To take action in bulk, select the checkbox A for Approve, F for Forward and D for Deny
- Provide the 'Remarks'
- Click on the 'Save' button
# Travel Attendance Request
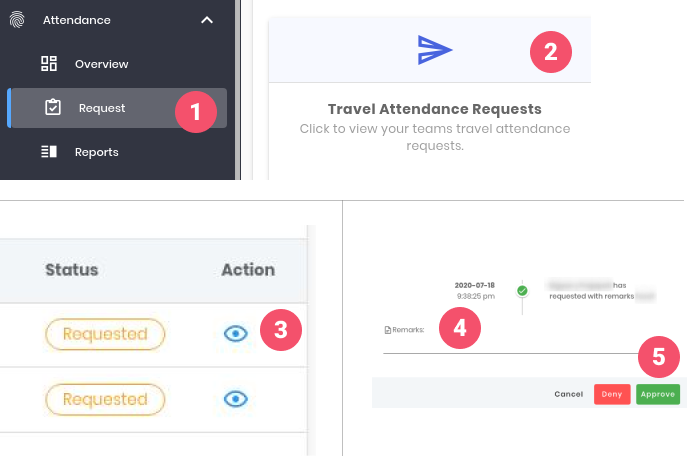
To take action on the travel attendance requests :
- Go to 'Attendance' on the supervisor section of the sidebar, click on the 'Requests'
- Click on the 'Travel Attendance Requests'
- Click on the 'View Details' icon on the Action column. When supervisor clicks on the notification of the travel attendance request same popup will open.
- Provide the 'Remarks'
- Click on the (Approve/Deny/Forward) button.
# Pre Overtime Request
To take action on the Pre Overtime Request :
- Go to 'Attendance' on the supervisor section of the sidebar, click on the 'Requests'
- Click on the 'Pre Overtime Requests'
- Click on the 'View Details' icon on the Action column When supervisor clicks on the notification of the pre overtime request same popup will open.
- Provide the 'Remarks'
- Click on the (Approve/Deny/Forward button).
# Credit Hour Request
To take action on the Credit Hour requests :
- Go to 'Attendance' on the supervisor section of the sidebar, click on the 'Requests'
- Click on the 'Credit Hour Requests'
- Click on the 'View Details' icon on the Action column. When supervisor clicks on the notification of the Credit Hour request same popup will open.
- Provide the 'Remarks'
- Click on the (Approve/Deny/Forward) button.
# Timesheet Request
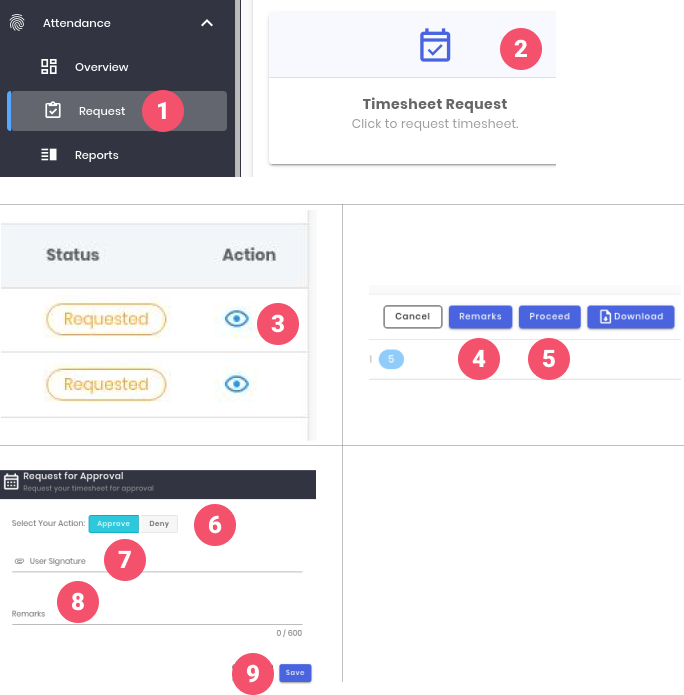
To take action on the timesheet requests :
- Go to 'Attendance' on the supervisor section of the sidebar, click on the 'Requests'
- Click on the 'Timesheet Requests'
- Click on the 'View Details' icon on the Action column. When supervisor clicks on the notification of the timesheet request same page will open.
- Click 'Remarks' to view Remarks History
- Click on the 'Proceed' button to take action.
- Choose an action to take 'Approve/Deny'
- Select and upload the supervisor signature
- Provide the 'Remarks'
- Click on the 'Save' button
# Web Attendance Requests
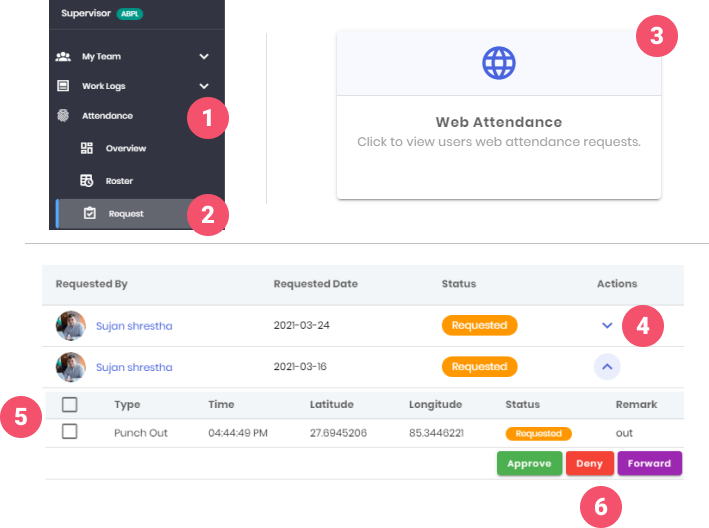
When web attendance of the team members are needs to be approved by the supervisor, follow these steps:
- Go to the supervisor section click on the ‘Attendance’ and
- Then on ‘Request’.
- Click on the ‘Web Attendance’
- Expand the request by clicking on the ‘V’ icon on the action column.
- Select the requests which require the action.
- Click on the desired action ‘Approve’, ‘Deny’ or ‘Forward’ to take action.
# Travel Attendance Delete Request
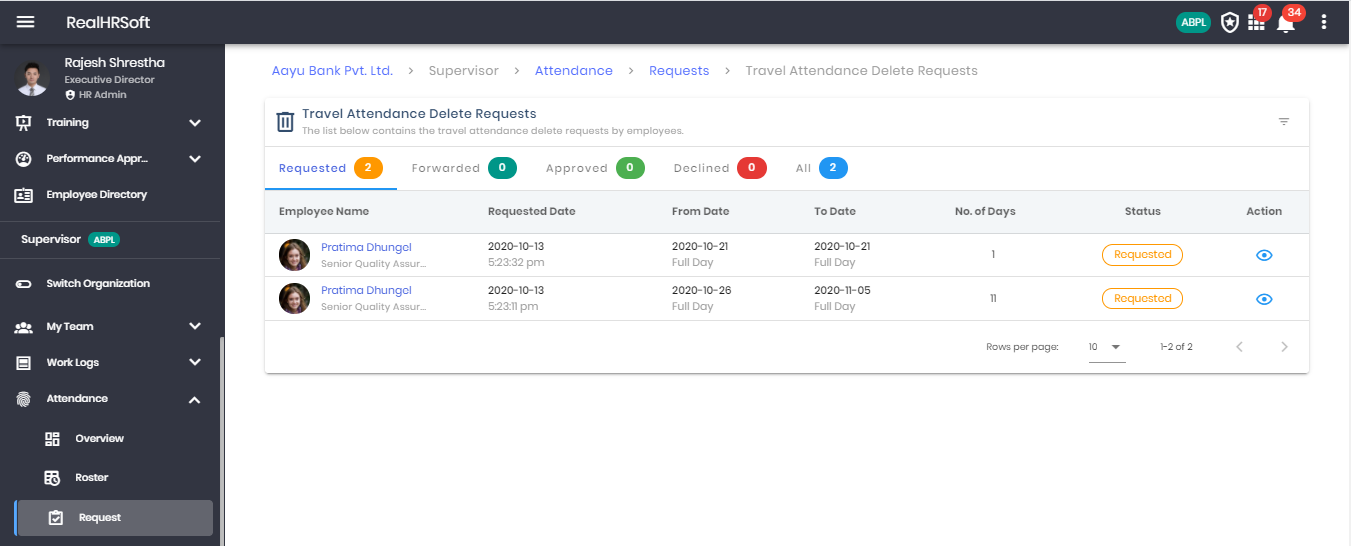
This feature is useful in cases when the travel attendance is applied beforehand and approved but the employee has not travelled. The employee can request for the same and get this approved.
- Go to “Attendance” under Supervisor in the sidebar. Click on “Request” followed by “Travel Attendance Delete Request” to view the table containing the list of employees that have deleted their request for travel attendance. This list can be further filtered based on their current status.
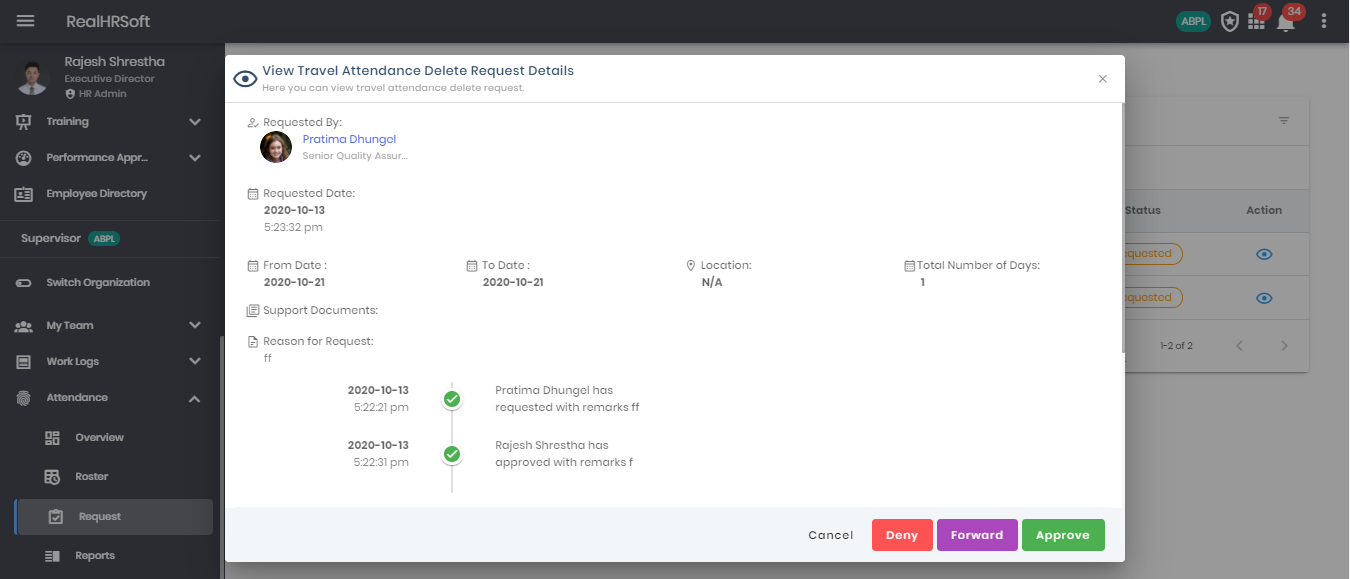
- Click on the action button to view in detail the travel attendance delete request along with taking appropriate actions.
# Credit Hour Delete Request
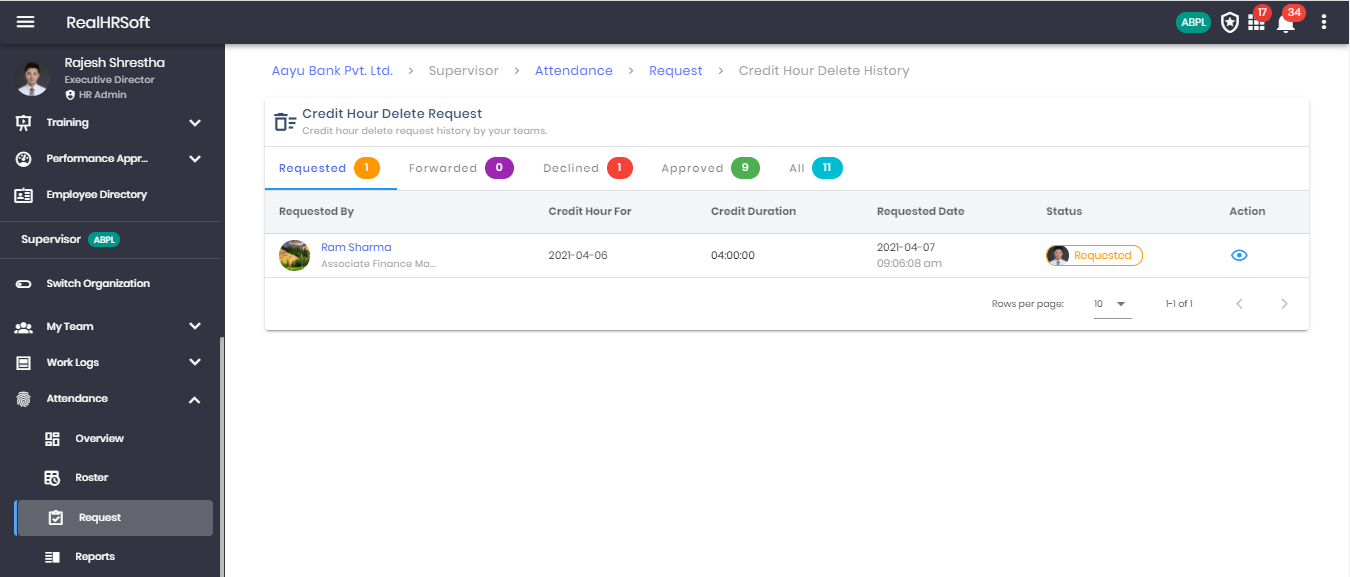

This feature is useful in cases when the credit hours are requested in advance and approved but the employee has not completed the requirement. The employee can request for the same and get this approved.
- Go to “Attendance” under Supervisor in the sidebar. Click on “Request” followed by “Credit Hour Delete Request” to view the table containing the list of employees that have deleted their request for Credit Hour. This list can be further filtered based on their current status.
- Click on the action button to view in detail the Credit Hour delete request along with taking appropriate actions.
# Reports
# Break In Break Out

- Supervisor’s can easily navigate and view their team’s Break In Break Out report by scrolling to the “Supervisor” section in the sidebar and clicking on “Attendance”. Within the Report section, they will find the “Break In Break Out”.
# Calendar
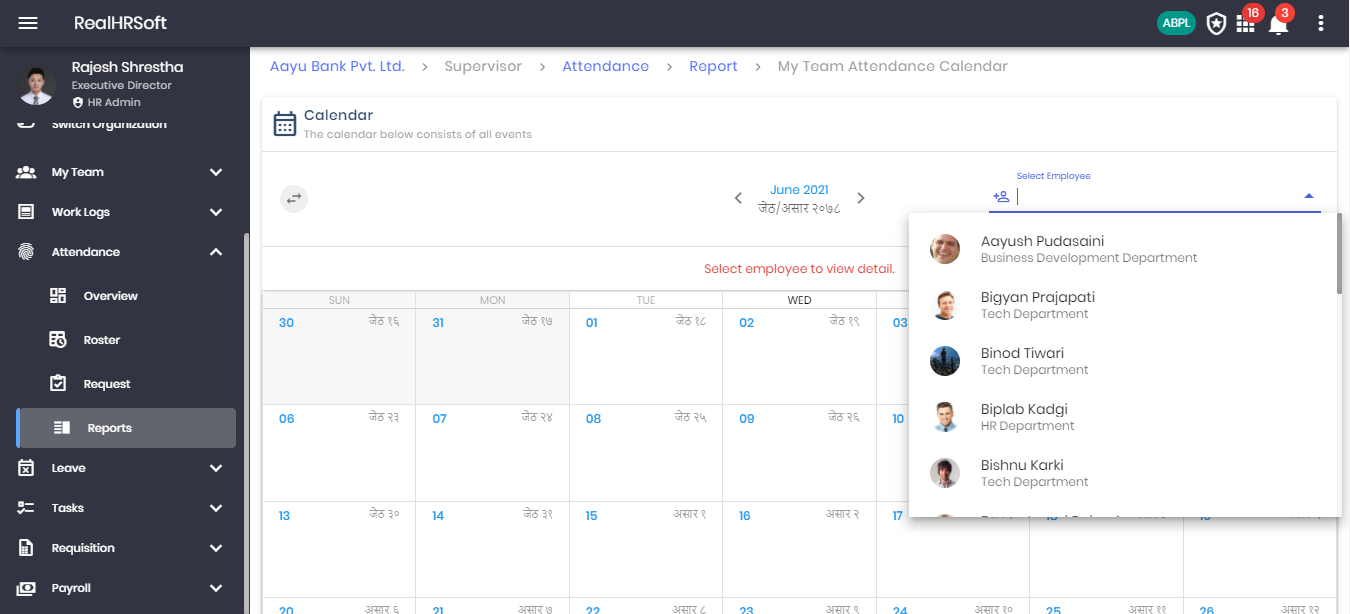
- Supervisor’s can easily navigate and view their team’s Calendar report by scrolling to the “Supervisor” section in the sidebar and clicking on “Attendance”. Within the Report section, they will find the “Calendar”.
# Daily Attendance
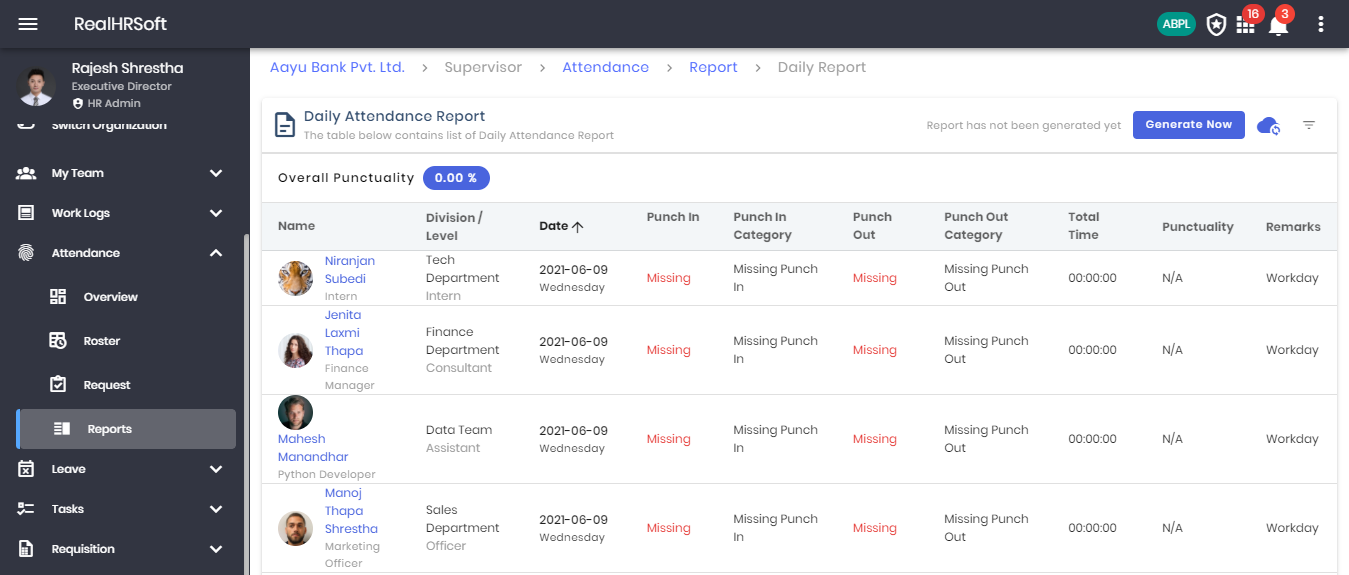
*Supervisor’s can easily navigate and view their team’s Daily Attendance report by scrolling to the “Supervisor” section in the sidebar and clicking on “Attendance”. Within the Report section, they will find the “Daily Attendance”.
# Irregularities
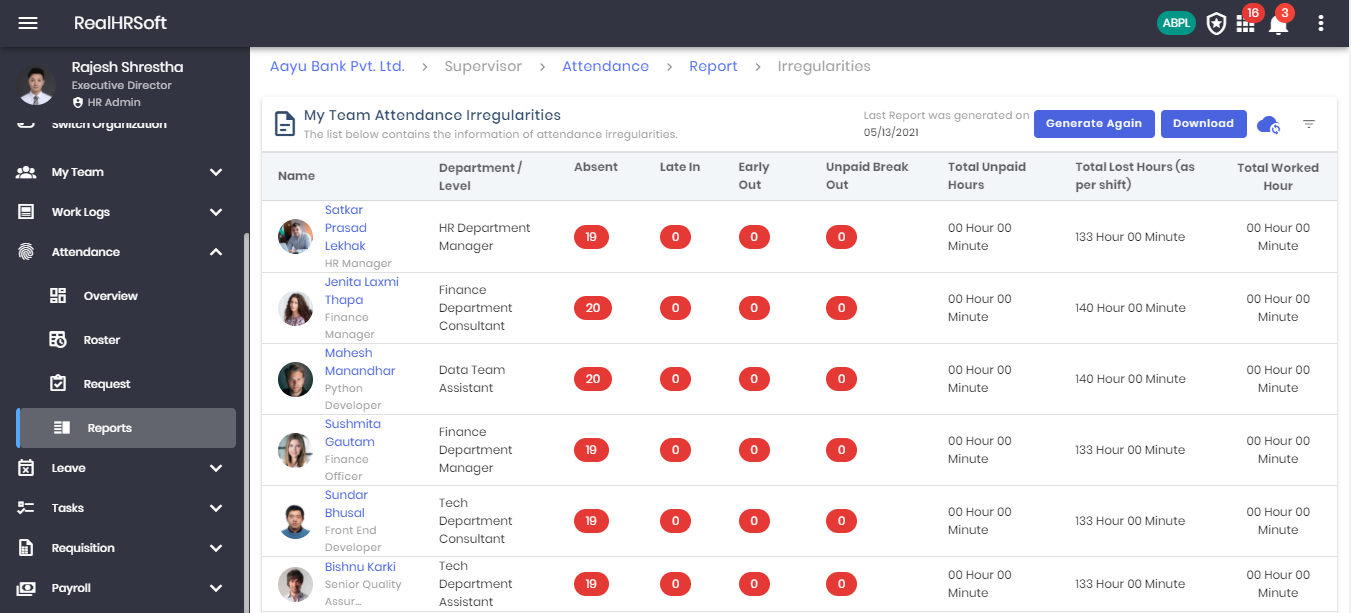
- Supervisor’s can easily navigate and view their team’s Irregularities report by scrolling to the “Supervisor” section in the sidebar and clicking on “Attendance”. Within the Report section, they will find the “Irregularities”.
# Individual Daily Attendance
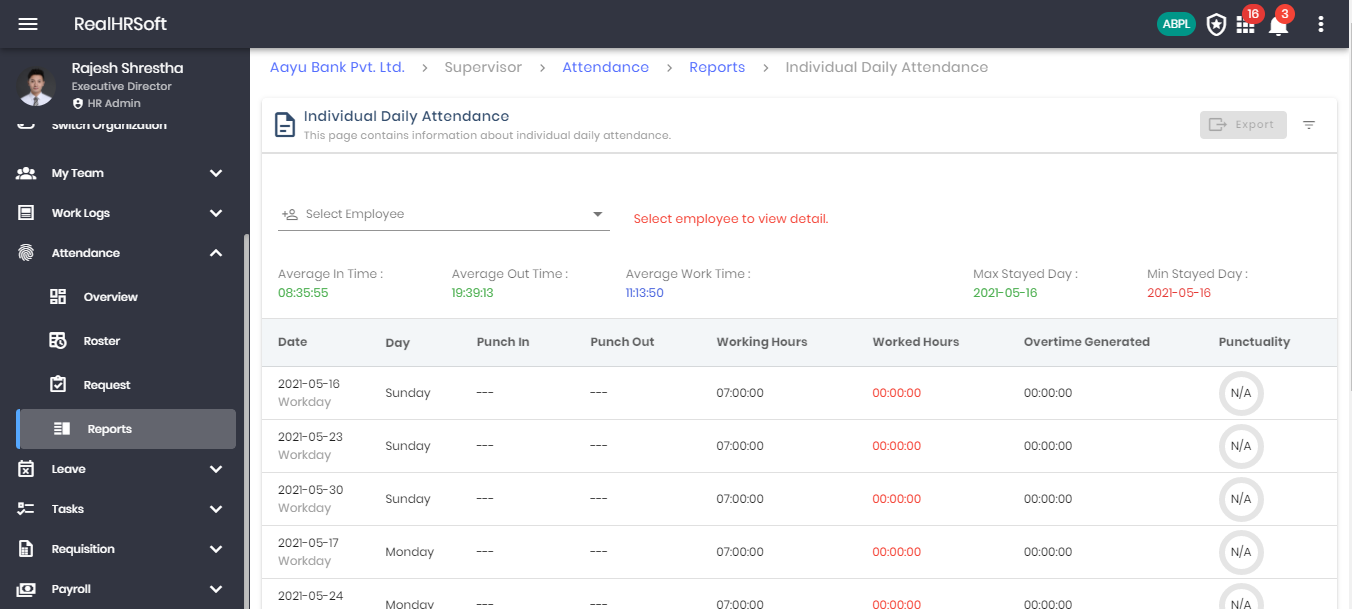
- Supervisor’s can easily navigate and view their team’s Individual Daily Attendance report by scrolling to the “Supervisor” section in the sidebar and clicking on “Attendance”. Within the Report section, they will find the “Individual Daily Attendance”.
# Monthly Attendance
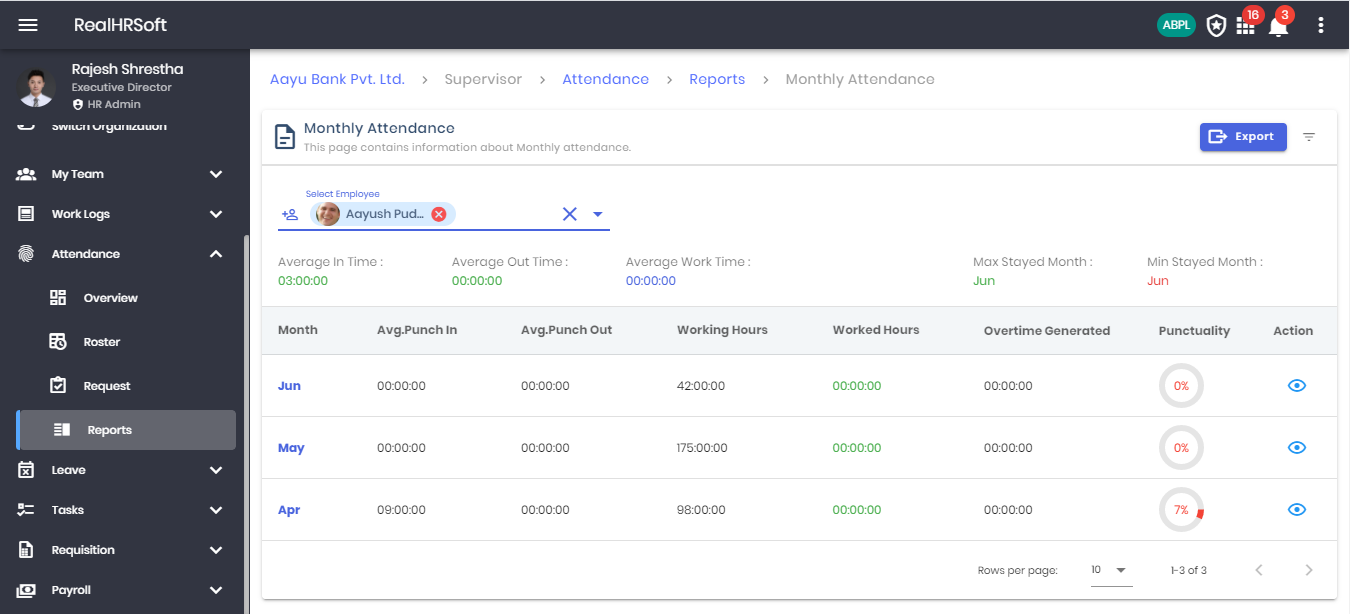
- Supervisor’s can easily navigate and view their team’s Monthly Attendance report by scrolling to the “Supervisor” section in the sidebar and clicking on “Attendance”. Within the Report section, they will find the “Monthly Attendance”.
# Punctuality
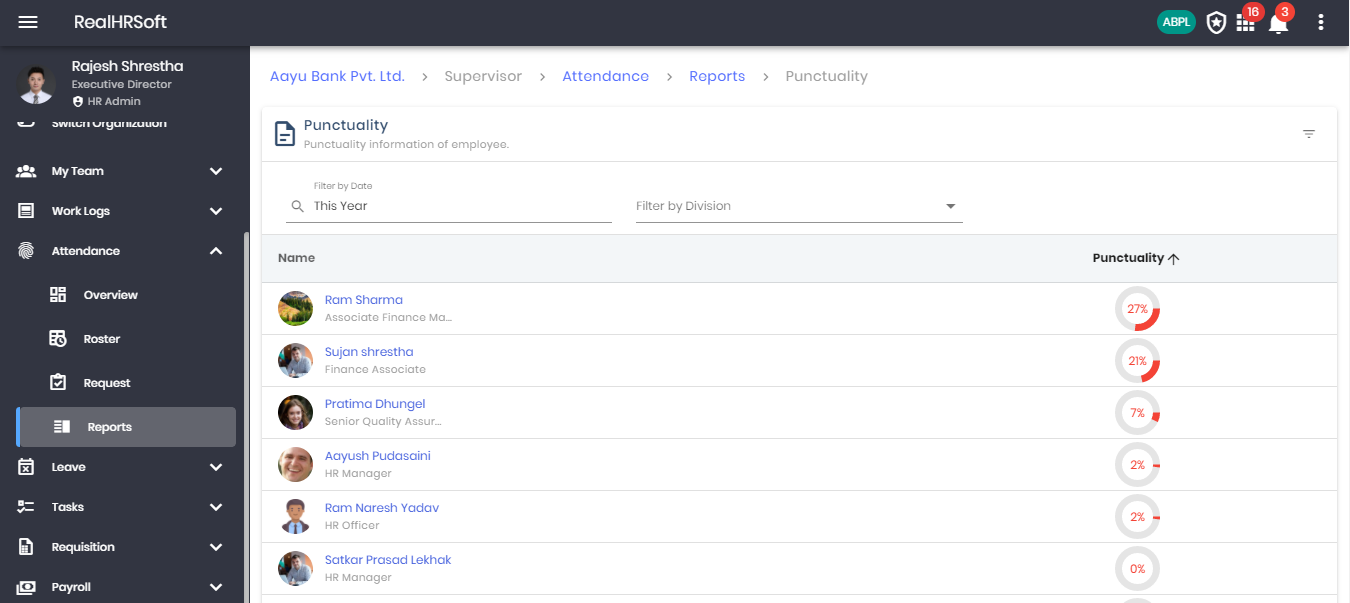
- Supervisor’s can easily navigate and view their team’s Punctuality report by scrolling to the “Supervisor” section in the sidebar and clicking on “Attendance”. Within the Report section, they will find the “Punctuality”.
# Geolocation

- Supervisor’s can easily navigate and view their team’s Geolocation report by scrolling to the “Supervisor” section in the sidebar and clicking on “Attendance”. Within the Report section, they will find the “Geolocation”.
# Attendance Penalty
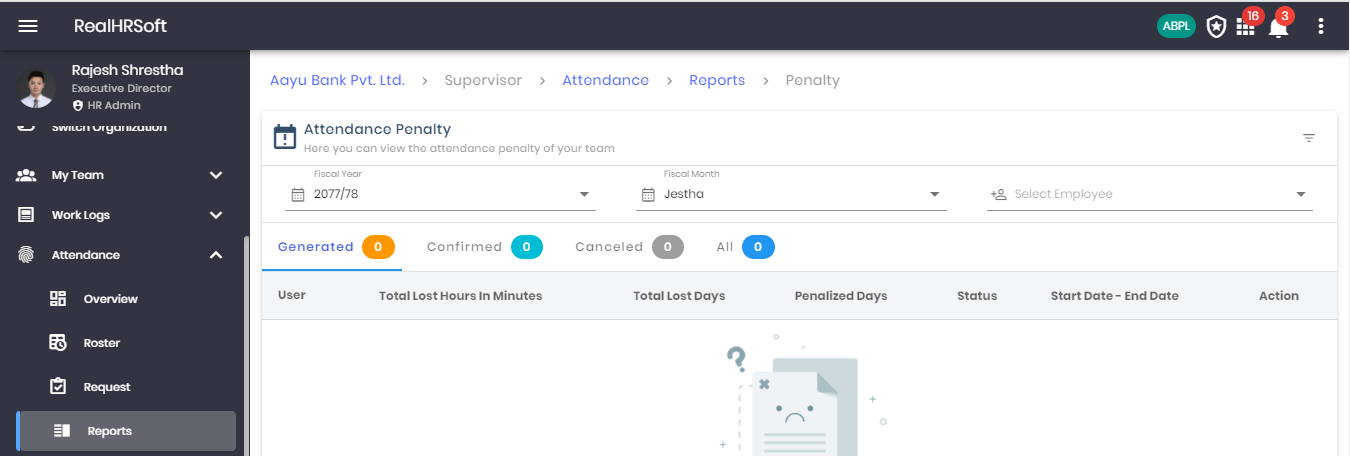
- Supervisor’s can easily navigate and view their team’s Attendance Penalty report by scrolling to the “Supervisor” section in the sidebar and clicking on “Attendance”. Within the Report section, they will find the “Attendance Penalty”.
# Leave
# Overview
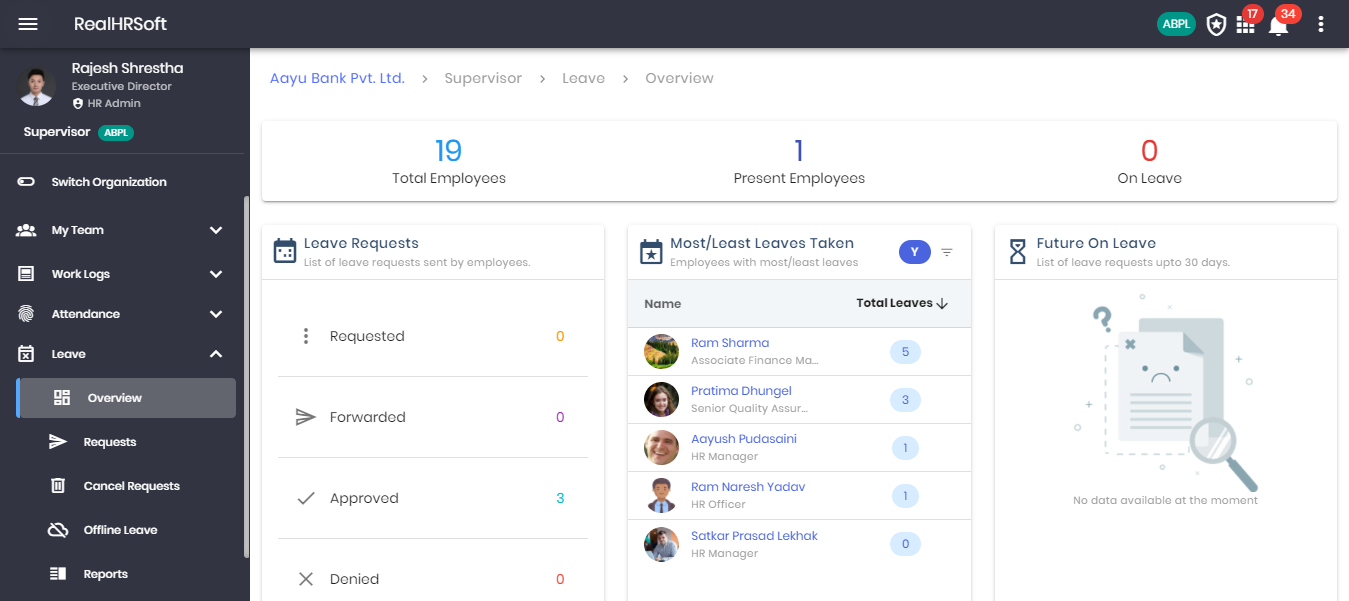
- Go to “Leave” under Supervisor in the sidebar. Click on “Overview” for a summary of the team’s leave information.
- Click on the number above “Total Employees” to display the list of employees within the team.
- Click on the number above “Present Employees” to display the list of employees that are present today in the team.
- Click on the number above “Absent Employees” to display the list of employees that are absent for the day within the team.
- Displays the list of team members that have applied for Leave and the requests that are pending & approved.
- Displays the list of “Most/Least Leave” applied by the team members, you may filter it for a specific date range.
- Displays the list of employees that have applied for future leave requests in the next 30 days.
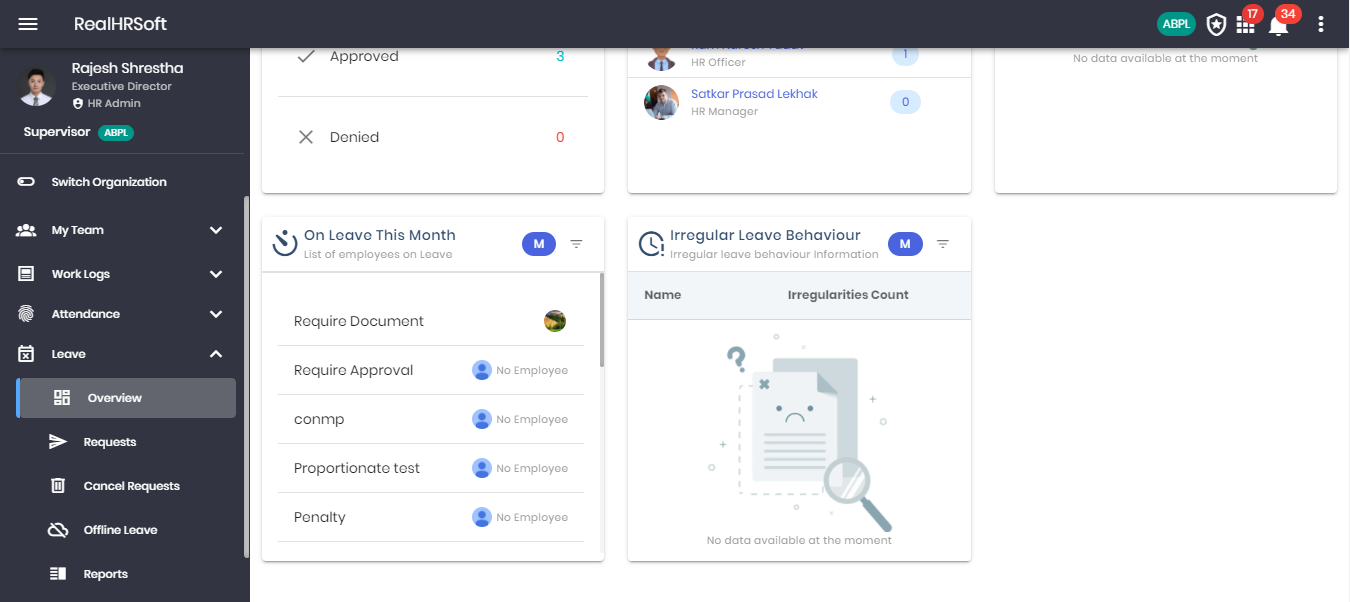
- Displays the list of employees that have applied for leave in the current month. The list can be filtered by date.
- Displays the list of employees that have irregular leave behaviours in the current month. The list can be filtered by date.
# Requests
To take action on the leave requests by the team members :
- Go to 'Leave' on the supervisor section of the sidebar, click on the 'Requests'
- Click on the 'View Details' icon on the Action column
- Provide the 'Remarks'
- Select the action to perform (Approve/Forward/Deny)
- Click on the 'Save' button.
- To take action in bulk, select the checkbox A for Approve, F for Forward and D for Deny
- Provide the 'Remarks'
- Click on the 'Save' button
# Cancel Requests
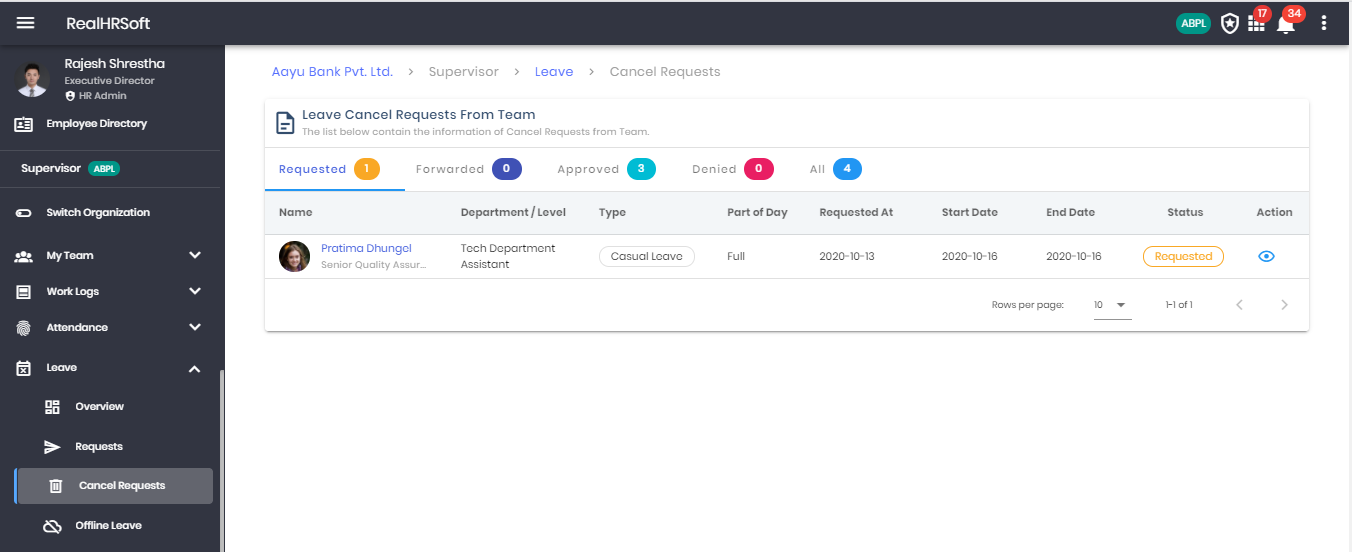
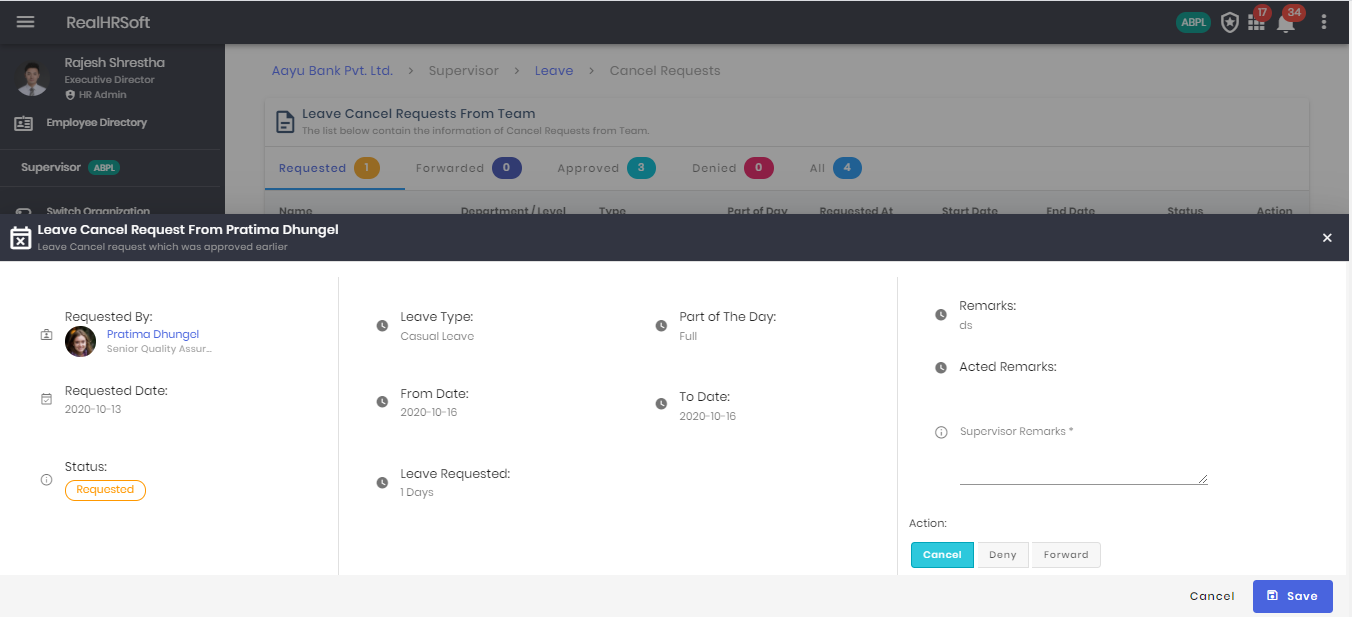
This feature is useful in cases when the leave is requested in advance and approved, however the employee ended up working on the day. The employee can apply for “Cancel Leave Request” and get this approved which will result in the leave day converted into a working day.
- Go to “Leave” under Supervisor in the sidebar. Click on “Cancel Request” to view the table containing the list of team members that have requested for Leave Cancel Requests.This list can be further filtered based on their current status.
- Click on the action button to view in detail the Credit Hour delete request along with taking appropriate actions. Supervisor remarks are mandatory for the same.
# Offline Leave
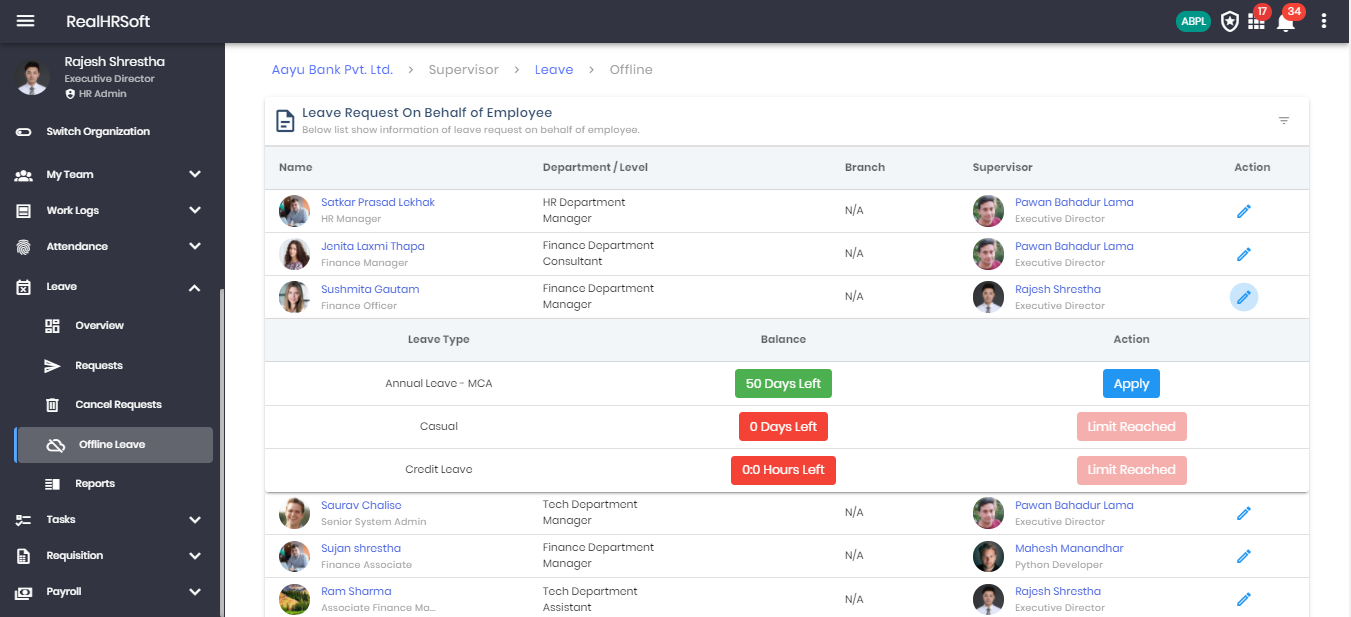
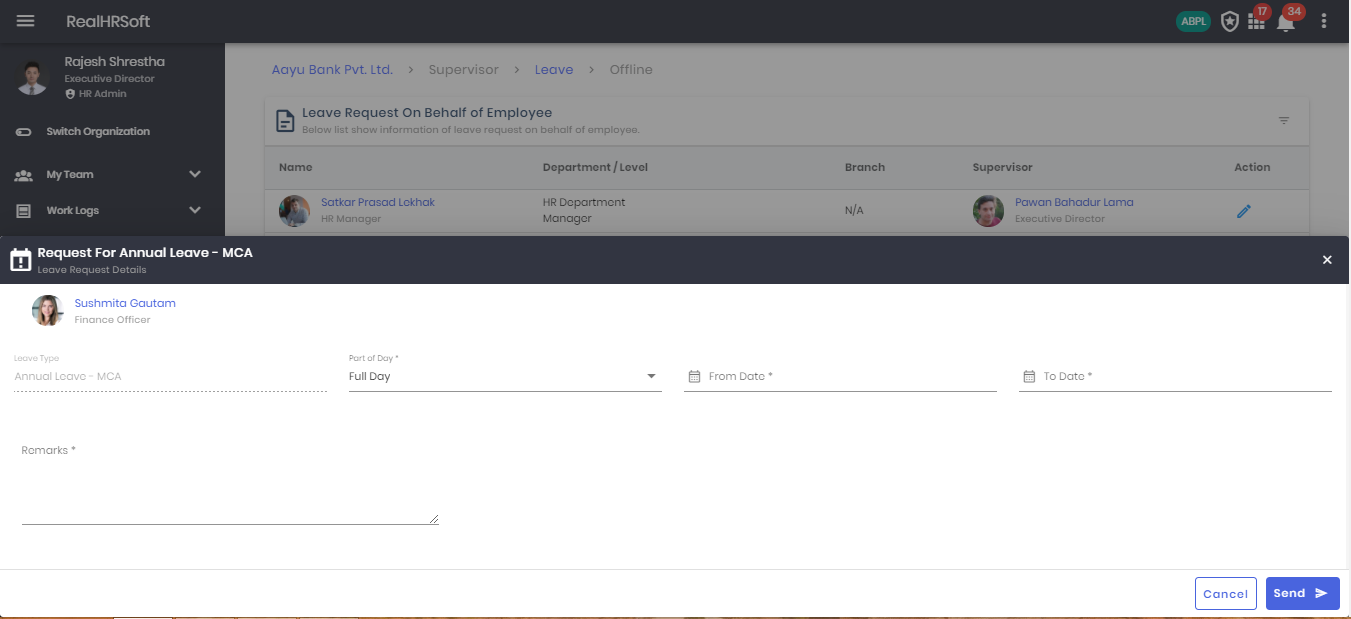
This feature is essential in an organization that allows the supervisor to apply leave on behalf of his team members. In cases where the team members are unable to apply for leave, the supervisor can apply for offline leave from this platform.
- Go to “Leave” under Supervisor in the sidebar. Click on “Offline Leave” to view the table containing the list of his team members that have requested for Leave Cancel Requests.This list can be further filtered based on their current status.
- Click on the “Request Leave” action button to view in detail the allotted and remaining leave for the employee.
- Supervisor can apply for a specific leave type by clicking on the apply button
- Click on Send button after filling out all leave details to apply for the leave.
# Reports
# Individual Leave
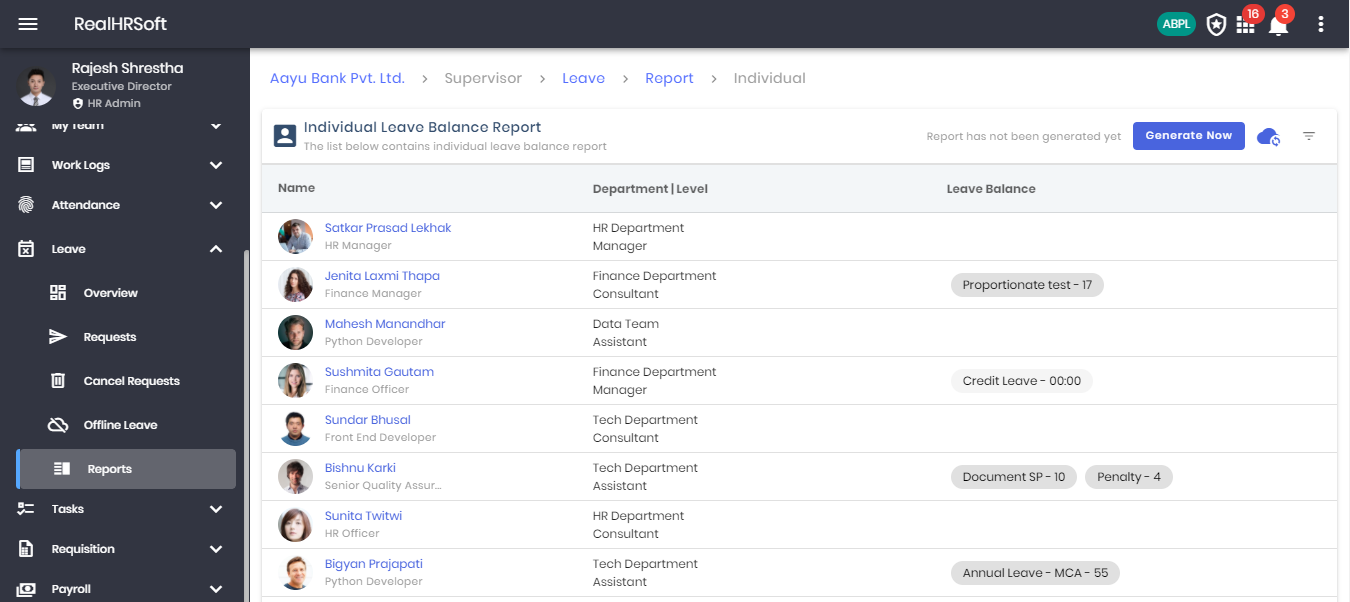
- Supervisor’s can easily navigate and view their team’s Individual Leave report by scrolling to the “Supervisor” section in the sidebar and clicking on “Leave”. Within the Report section, they will find the “Individual Leave”.
# Irregularities
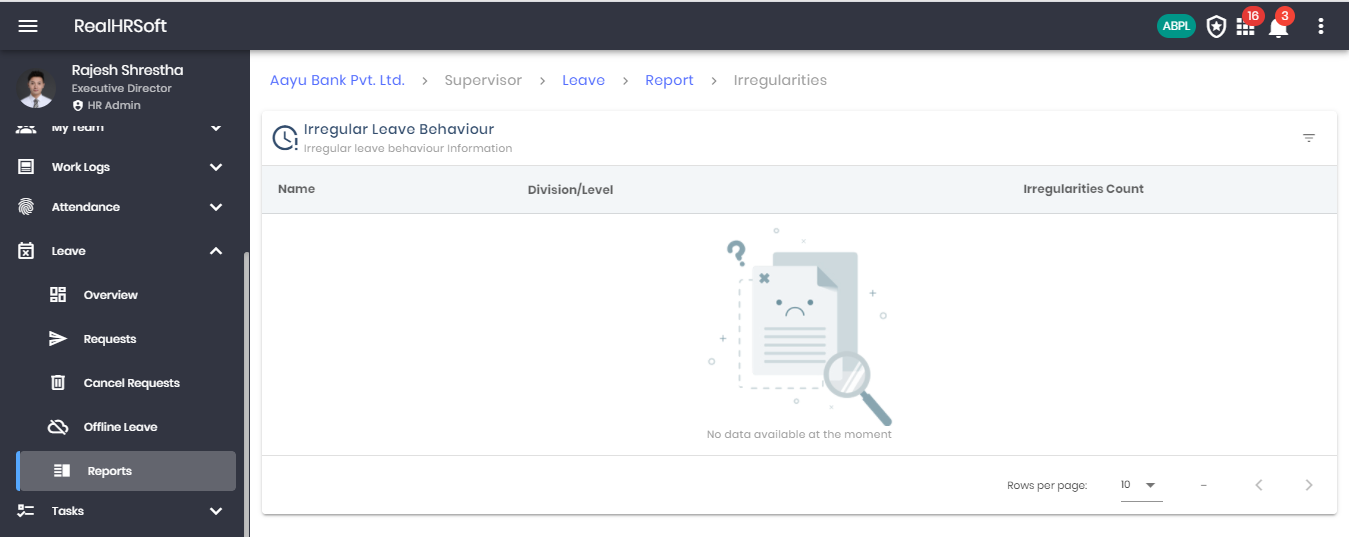
- Supervisor’s can easily navigate and view their team’s Irregularities report by scrolling to the “Supervisor” section in the sidebar and clicking on “Leave”. Within the Report section, they will find the “Irregularities”.
# Tasks
# Overview
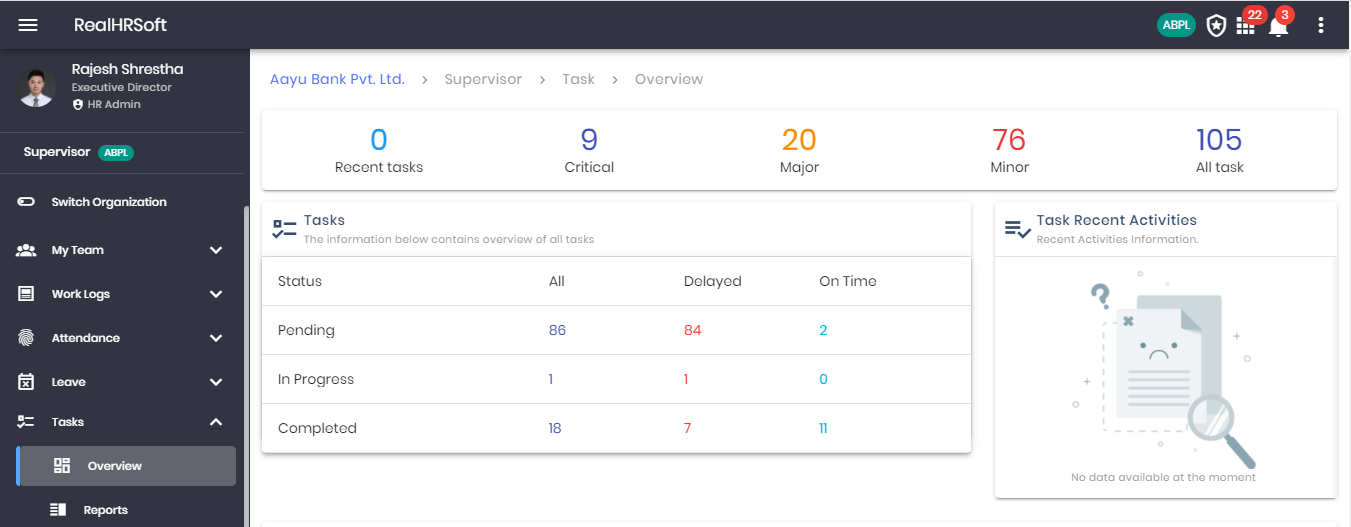

Task Overview
- Go to “Task” under Supervisor in the sidebar. Click on “Overview”
- Go to “Task” under Supervisor in the sidebar. Click on “Overview”
- Click on the number above “Recent Task” for the most recent task within your team
- Click on the number above “Critical” for the task marked as critical within your team
- Click on the number above “Major” for the task marked as major within your team
- Click on the number above “Minor” for the task marked as minor within your team
- Click on the number above “All Task” for the complete list of tasks within your team
- View and filter the tasks based on priority. Click on the respective number for a detailed list of the tasks
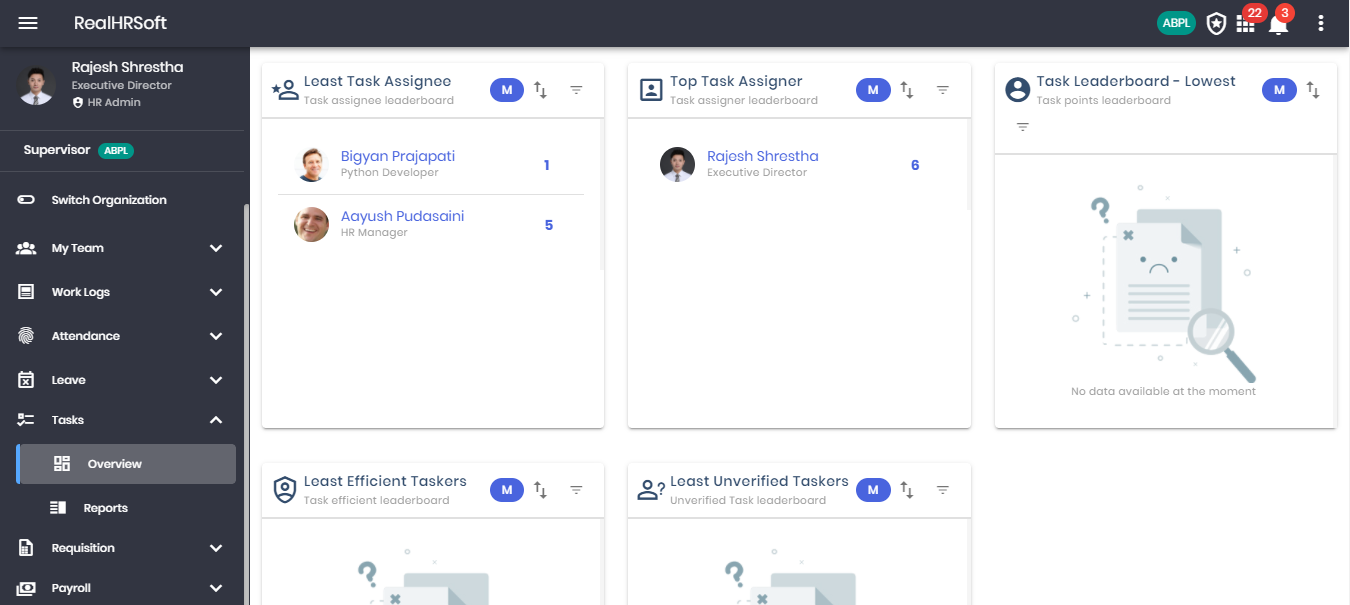
- View the task assignee leaderboard for the month. Click on the arrow button to sort on the basis of top task assignee or least task assignee.
- View the task assigner leaderboard for the month. Click on the arrow button to sort on the basis of top task assigner or least task assigner.
- View the task points for the month. Click on the arrow button to sort on the basis of highest or lowest points.
- View the task efficiency for the month. Click on the arrow button to sort on the basis of most efficient or least efficient employee.
- View the unverified task leaderboard for the month. Click on the arrow button to sort on the basis of most or least unverified taskers.
# Reports
# All Task
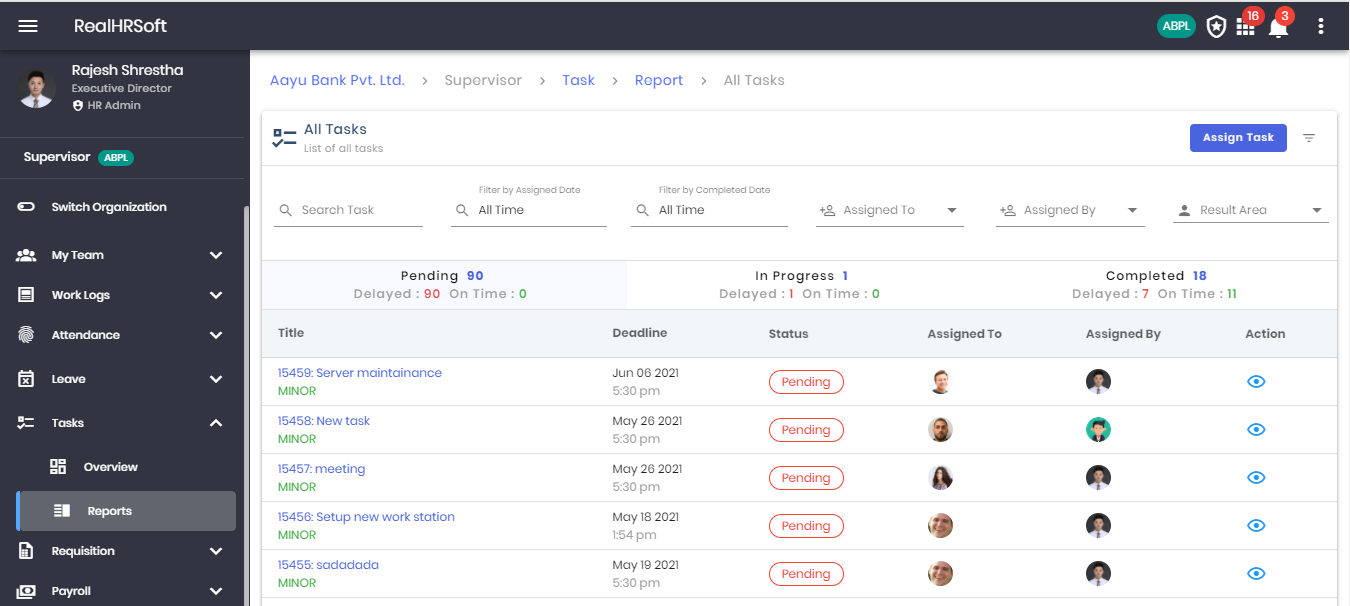
- Supervisor’s can easily navigate and view their team’s All Task report by scrolling to the “Supervisor” section in the sidebar and clicking on “Tasks”. Within the Report section, they will find the “All Task”.
# Closed and Hold Task
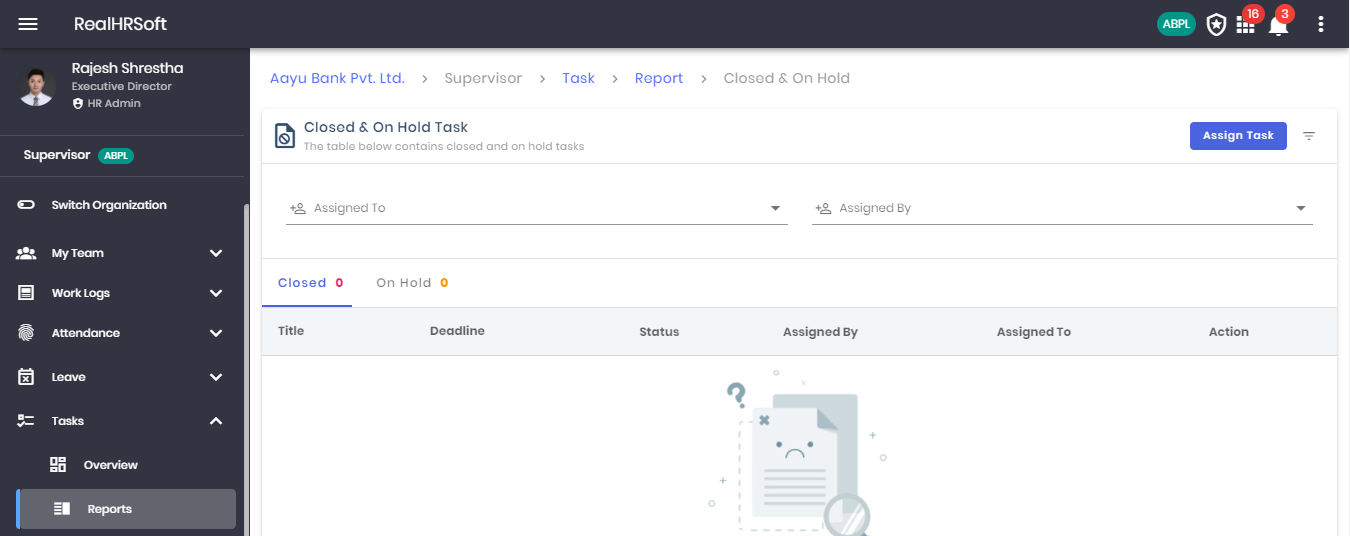
- Supervisor’s can easily navigate and view their team’s Closed & Hold Task report by scrolling to the “Supervisor” section in the sidebar and clicking on “Tasks”. Within the Report section, they will find the “Closed & Hold Task”.
# Requisition
# Vacancy Requisition
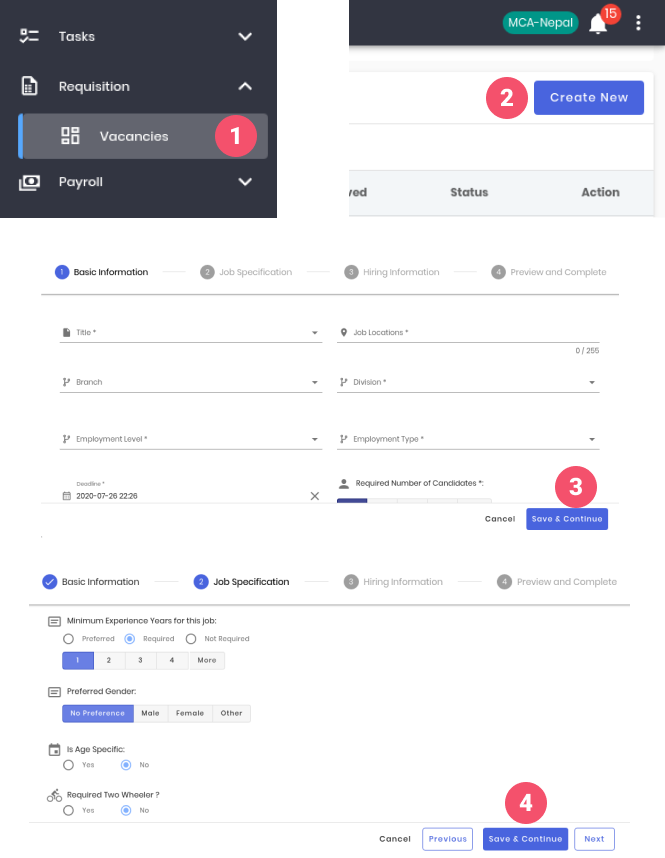
Here, vacancy requisition can be requested by the supervisor.
- Go to 'Requisition' on the sidebar, click on the 'Vacancies'
- Click on ‘Create New’ button to open the form
- Fill the basic information details in the form then click ‘Save & Continue’
- Fill the job specificaion details in the form then click ‘Save & Continue’
# Payroll

Payroll
- Go to “Payroll” under Supervisor in the sidebar. Click on “Advance Salary Request”
- Click on “Requested” for the list of team members that have requested for advanced salary.
- Click on “Approved” for the list of team members that have their advance salary request approved.
- Click on “Repayment” for the list of team members that are in their advanced salary repayment stage.
- Click on “Repayment” for the list of team members that are in their advanced salary repayment stage.
- Click on “Completed” for the list of team members that have completed their repayment for applied advanced salary.
- Click on “Canceled” for the list of team members that have their request for advance salary cancelled.
- Click on “Denied” for the list of team members that have their requested advance salary denied.
- Click on “All” for the list of team members that have requested, approved, repayment, completed, cancelled, denied for advanced salary.
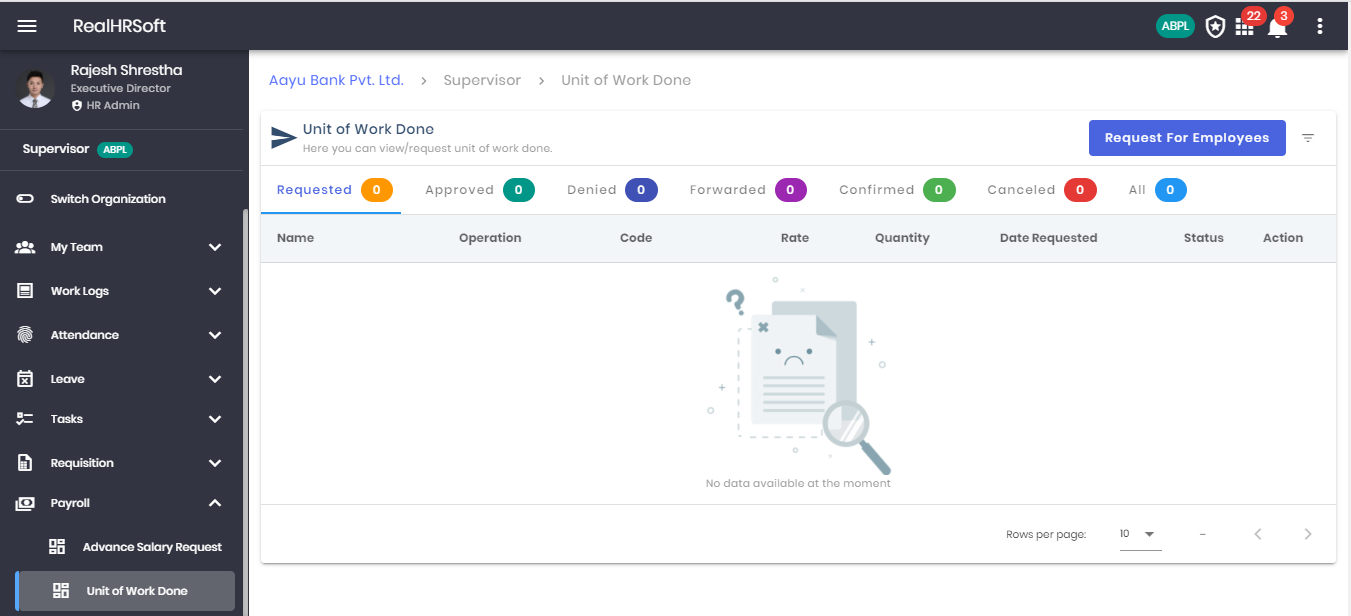
- Go to “Payroll” under Supervisor in the sidebar. Click on “Unit of Work Done”
- Click on “Requested” for the list of team members that have requested for Unit of Work Done.
- Click on “Approved” for the list of team members that have their Unit of Work Done request approved.
- Click on “Denied” for the list of team members that have their Unit of Work Done denied.
- Click on “Forwarded” for the list of team members that have forwarded their Unit of Work Done.
- Click on “Confirmed” for the list of team members that have their request for Unit of Work Done confirmed.
- Click on “Cancelled” for the list of team members that have their requested Unit of Work Done cancelled.
- Click on “All” for the list of team members that have requested, approved, repayment, completed, cancelled, denied for advanced salary.
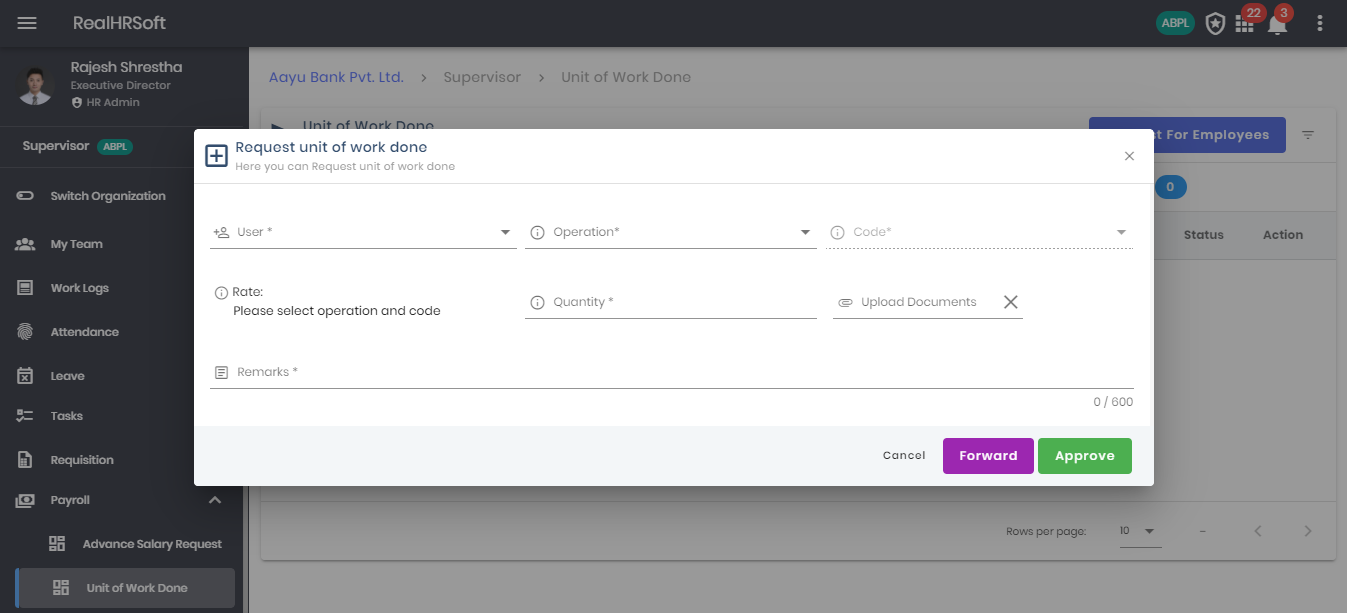
- Click on “Request for Employees” to request an employee of Unit of Work Done.
- Add a single user or multiple user by clicking on the users.
- Choose the operation for the Unit of Work Done
- Choose the code for Unit of Work Done. Rate will be populated on its own.
- Choose the quantity for Unit of Work Done
- Upload any document for Unit of Work Done
- Add any remark for Unit of Work Done
- Choose between Forward and Approve for the Unit of Work Done.
← Normal User HR Admin →