# HR Admin
# HR Login
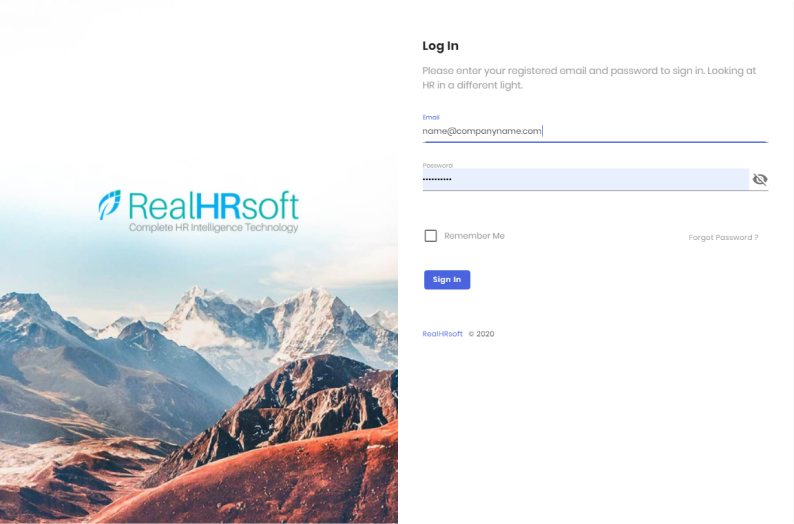
- Enter the 'Email'
- Enter the 'Password'
- Click on the 'Sign In' button.
# Forgot Password
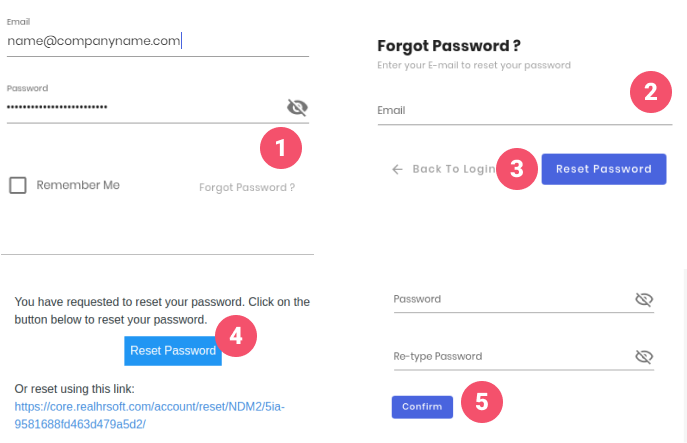
Forget password :
- Click on the 'Forgot Password?' button
- Enter the ‘email address’
- Click on the 'Reset Password' button
- Go to the inbox of your email, and open the email for 'Password Reset Link',there click on the 'Reset Password' button
- Fill ‘Password’ and ‘Re-Type Password’ then click on the 'Confirm' button
# Switch To HR Admin View
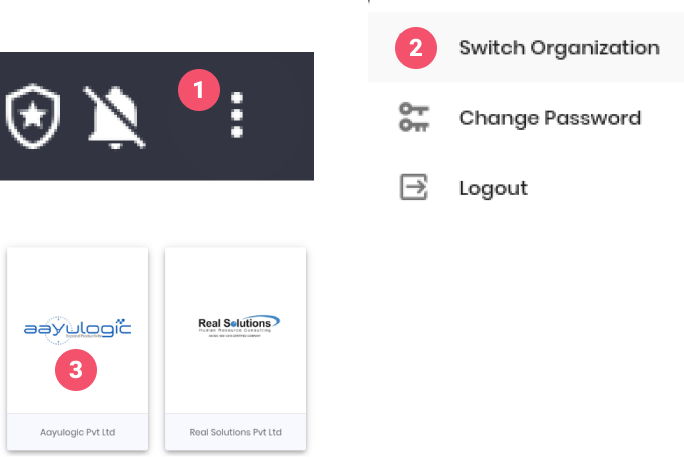
Switch to HR View :
- Click on the ‘3-dot’ icon on the top-right corner.
- Click on the ‘Switch Organization’ option.
- Click on the organization you want to switch to.
# Dashboard View
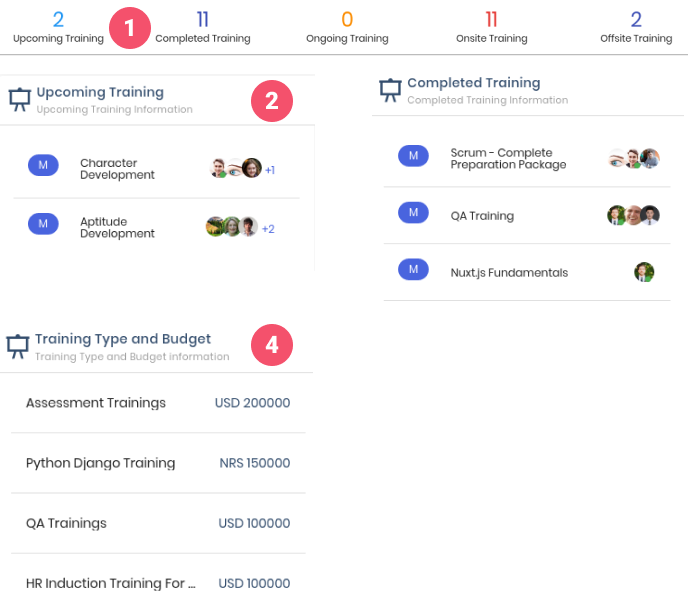
- Click on the numbers to go to the All Training page
- In this section all the upcoming trainings are displayed. Click on the profile image of the employees to see the list of the members.
- In this section all the completed trainings are displayed. Click on the profile image of the employees to see the list of the members.
- In this section training types and budget for those training types are displayed
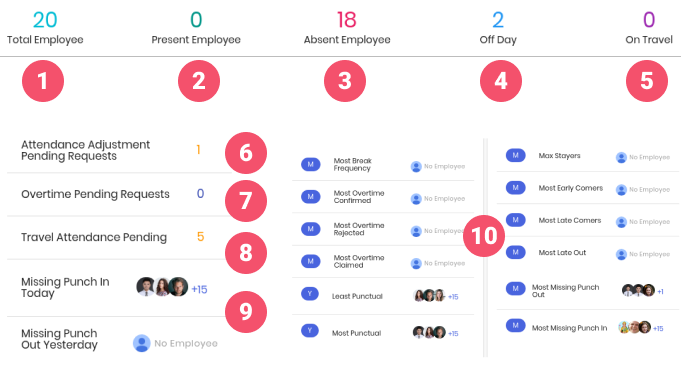
- Click on the number above 'Total Employee' to view the list of the total employees with name and division
- Click on the number above ‘Present Employee' to view the list of the present employees with name and division
- Click on the number above ‘Absent Employee' to view the list of the absent employees with name and division
- Click on the number above ‘Offday Employee' to view the list of the employees having offday with name and division
- Click on the number above 'On Travel’ to view the list of the employees who are on travel with name and division
- Click on the number on the row of ‘Attendance Adjustment Pending Requests’ to go to the attendance adjustment requests page
- Click on the number on the row of ‘Overtime Pending Requests’ to go to the overtime claim requests page
- Click on the number on the row of ‘Travel Attendance Pending’ to go to the travel attendance requests page
- Click on the number on the row of ‘Missing Punch in Today / Missing Punch Out Yesterday’ to go to the Missing Punch in Today / Missing Punch Out Yesterday page.
- Click on the employee profile picture to see the list of employees on the respective category
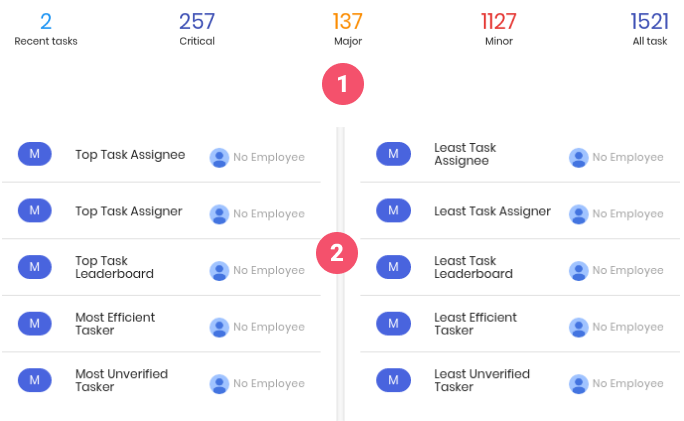
- Click on the numbers to go to the All Tasks Report page
- Click on the employee profile picture to see the list of employees and number of tasks on the respective category
# Organization
# Overview
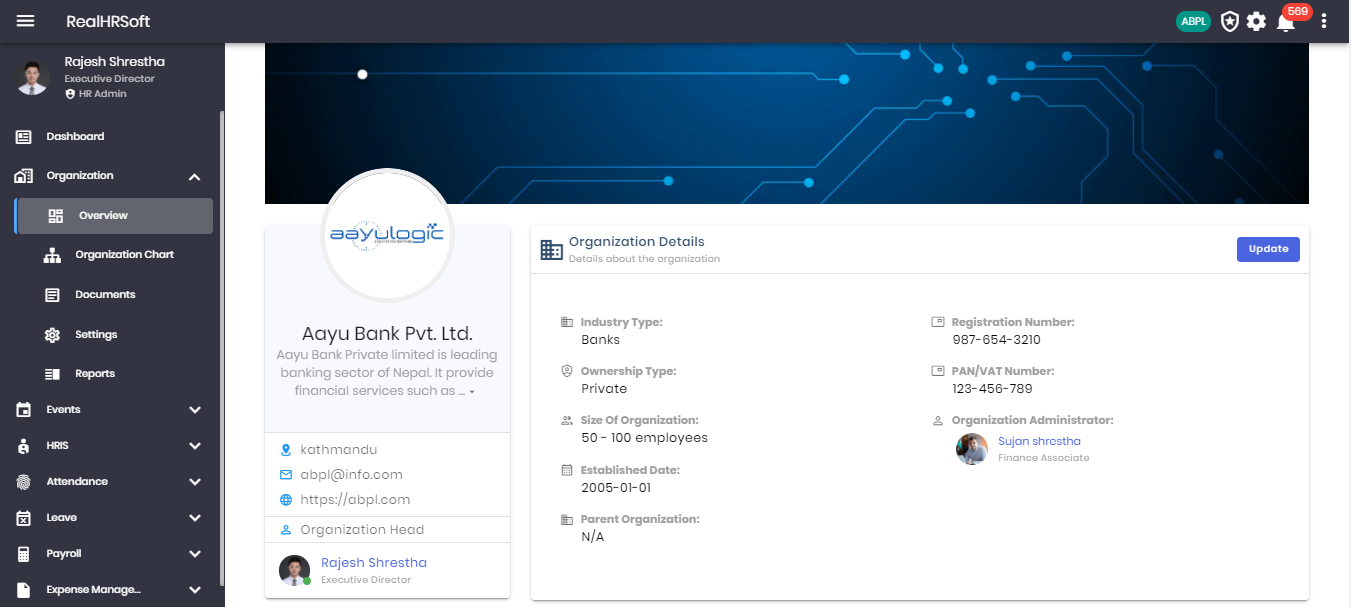
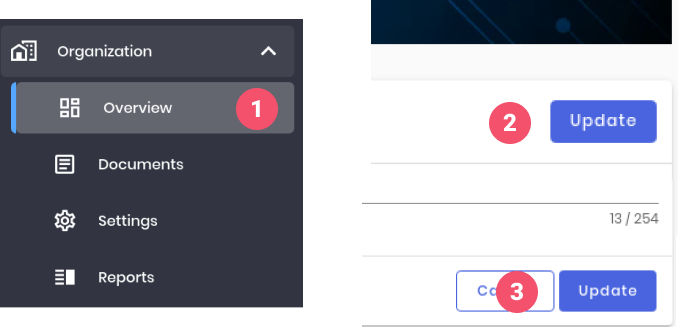
The HR of the organization has the option to share the basic details regarding the organization that can be viewed by their employees.
- Click on “Organization” in the side panel. Click on “Overview” to view and edit the information regarding the organization.
- Click on “Update” to make changes to the information.
# Organization Chart
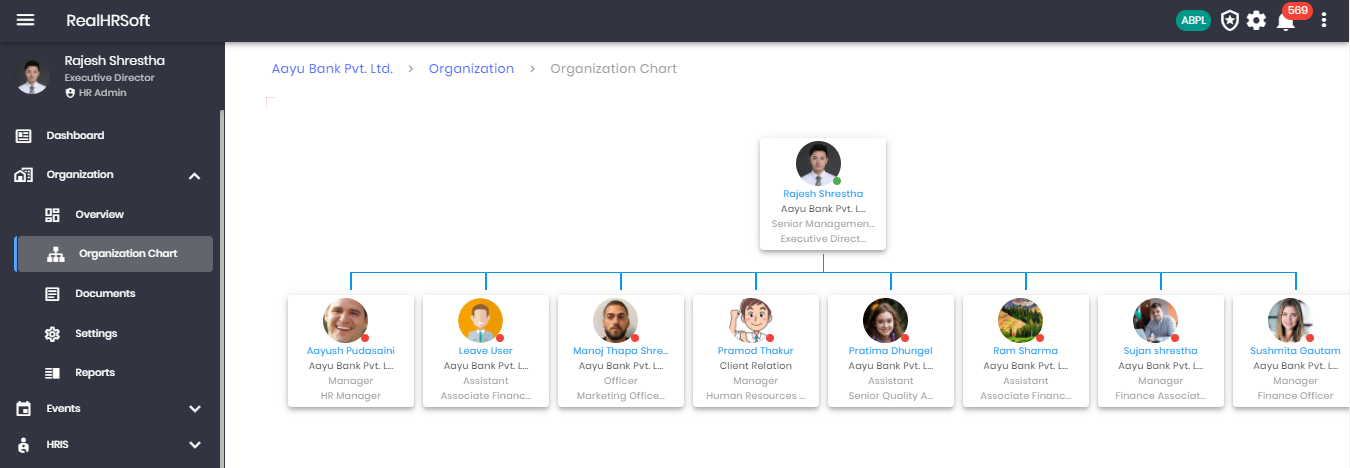
The organization chart represents the company hierarchy, team members and colleagues displayed all in a single page. This page gets populated automatically based on the employee’s job title and managers.
- Click on “Organization” in the sidebar. Click on “Organization Chart” to view the organization hierarchy.
- Click on the arrow button in either direction of the employee to view their team member, supervisor or colleague.
# Documents
- Go to ‘Organization’ on the sidebar, click on the ‘Overview’
- Click on the “Update” button, and change the details
- Click on the “Update” button to save the changes.
Organization Document
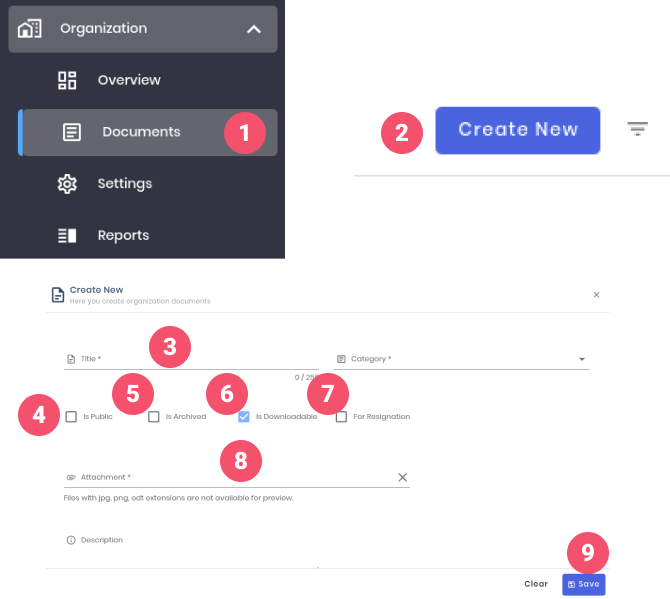
- Go to ‘Organization’ on the sidebar, click on the ‘Documents’
- Click on the “Create New” button to open the form
- Fill the ‘Title’ and category fields
- Check the ‘Is Public’ checkbox if the document is public
- Check the ‘Is Archived’ checkbox if the document is archive
- Check the ‘Is Downloadable’ checkbox if the document is downloadable
- Check the ‘For Resignation’ checkbox if the document will be used in resignation
- Upload the ‘Attachment’
- Click on the ‘Save’ button
# Settings
# Application Settings
Organization Application Settings
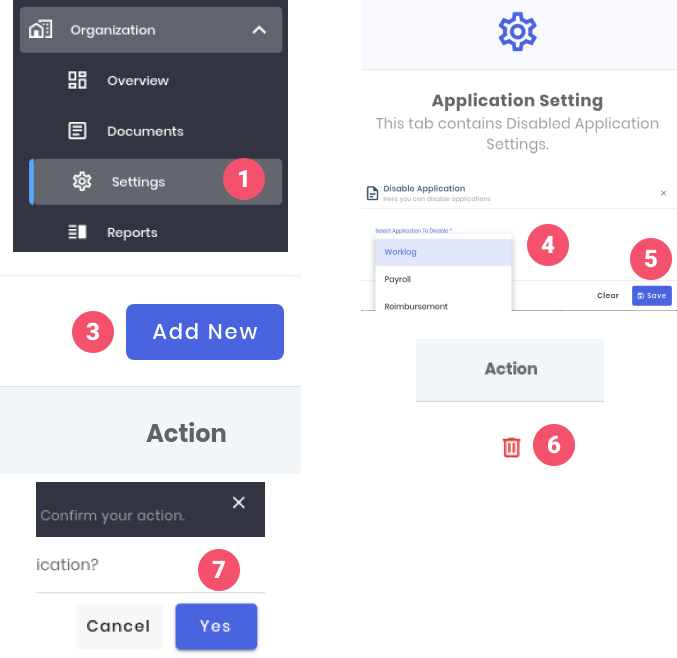
- Goto 'Organization', click on ‘Settings’
- Goto 'Application Settings'
- Click on the 'Add New' button
- Select the application to disable
- Click on the 'save' button
- Click on the 'Delete' icon on the Action column
- Click on the 'Yes' button
# Fiscal Year
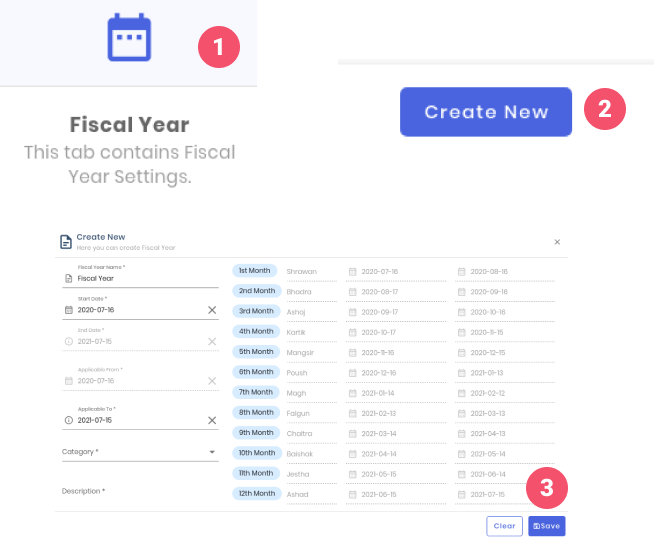
In this setting, HR can Define a Fiscal year of an organization. The system will use the fiscal year defined date for all purpose. To create new fiscal year setting :
- Click on the 'Fiscal Year'.
- Click on the 'Create New' button.
- Fill the fiscal year detail form and click on the 'Save' button.
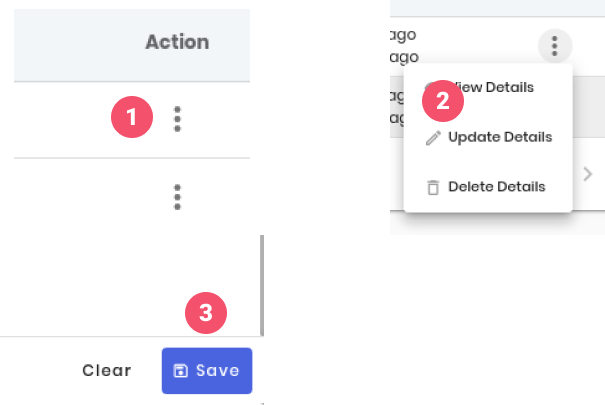
Click on the ‘3-dot’ menu on the action column
Click on the ‘Update Details’ option and update the changes
Click on the ‘Save’ button
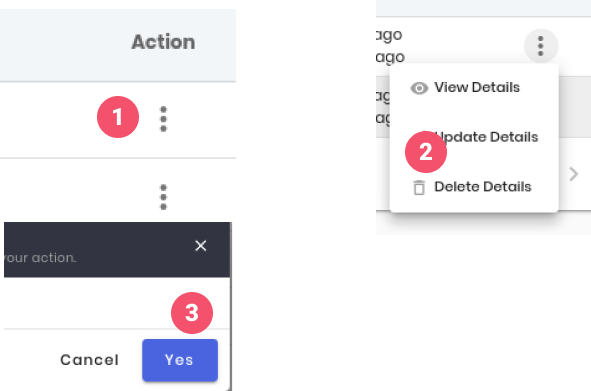
Click on the ‘3-dot’ menu on the action column
Click on the ‘Update Details’ option and update the changes
Click on the ‘Yes’ button
# Questionnaire
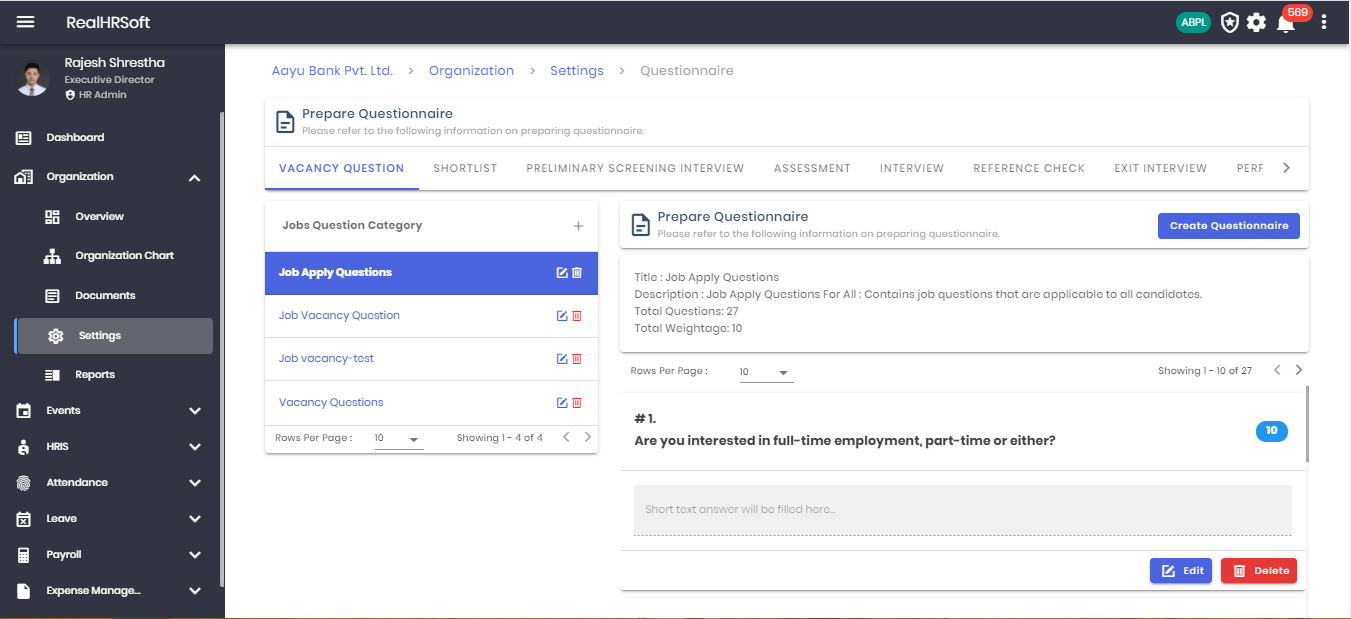
- Click on “Organization” from the sidebar. Click on “Settings” followed by Questionaire to view the information regarding the questionnaire created for the various rounds of Recruitment & Selection. The list can be filtered based on the Recruitment stage.
- Click on a “Jobs Question Category” to view the list of questions within the category. Click on the Update or Delete icon beside the name of job question category to edit the basic details regarding the category and delete it respectively.
- Click on “+” beside Jobs Question Category to add a new category of questions for the given Recruitment & Selection Stage.
- Click on “Prepare Questionnaire” (Only visible once the Job Question Category is selected) to add a new question to the category.
- Click on the “Edit” and “Delete” button below each question to update the previously created question or delete the question respectively.
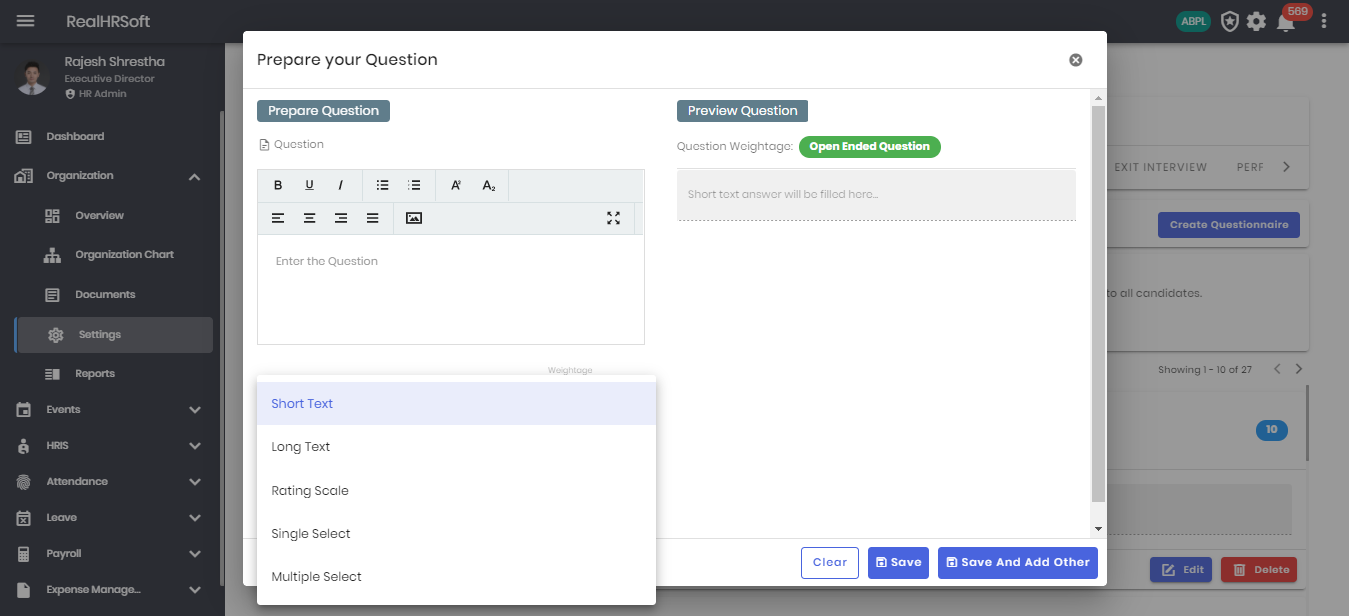
- Fill out the form with the question detail and click on the save button to create a new question. The questions can be open ended or close ended, The questions can be:
- Open Ended/Close Ended
- Short Text/Long Text/Rating Scale/Single Select/Multiple Select
# Holiday
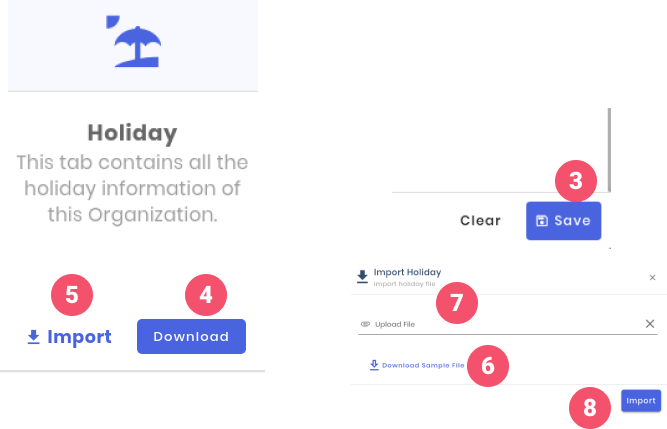
- Click on the 'Holiday'
- Click on the 'Create New' button
- Fill the holiday creation form and click on the 'Save' button
- To Download the list of the Holidays
- Click on the 'Download' button
To Import the holidays
- Click on the 'Import' button
- Download the sample file, edit the sample file and save it.
- Upload the edited sample file
- Click on the 'Import' button
- Click on the ‘3-dot’ menu on the action column
- Click on the ‘Update Details’ option and update the changes
- Click on the ‘Save’ button
- Click on the ‘3-dot’ menu on the action column
- Click on the ‘Delete Details’ option and update the changes
- Click on the ‘Yes’ button
# Vision and Mission
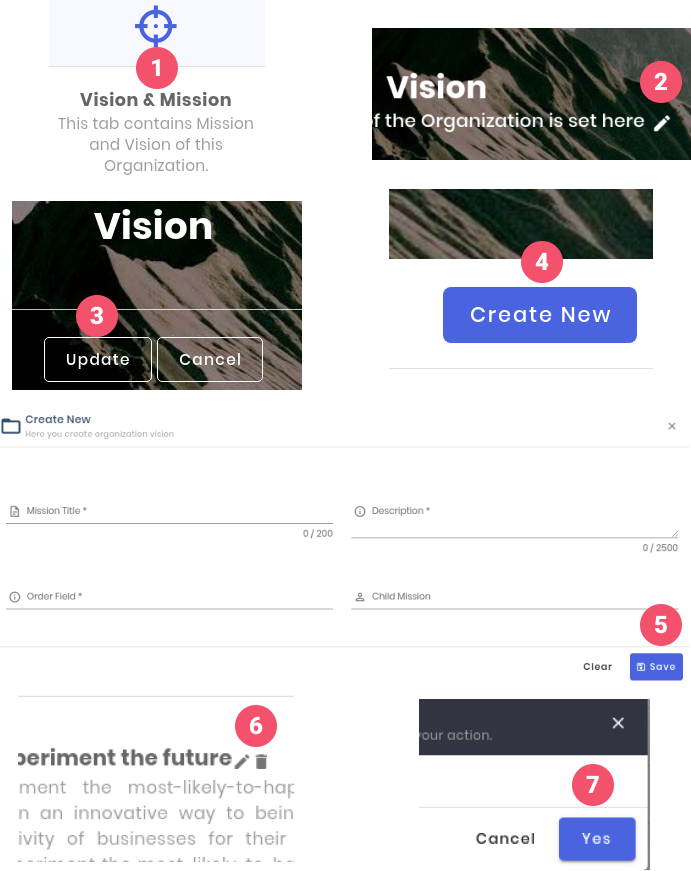
In this setting, HR can set the Vision statement of the organization, which can be seen by the organization employees. Also missions of the organization can be set from this setting.
- Click on the 'Vision & Mission'
- Click on the 'Edit' icon which will appear upon mouse hover, to change the vision statement
- Click on the 'Update' button to update the change
- To create a new mission, click on the 'Create New' button
- Fill the Form and click on the 'Save' button
- To update / delete the mission, click on therespective 'Update' and ‘Delete’ icon to update the changes
- Click on the ‘Save’ button
# Organization Ethics
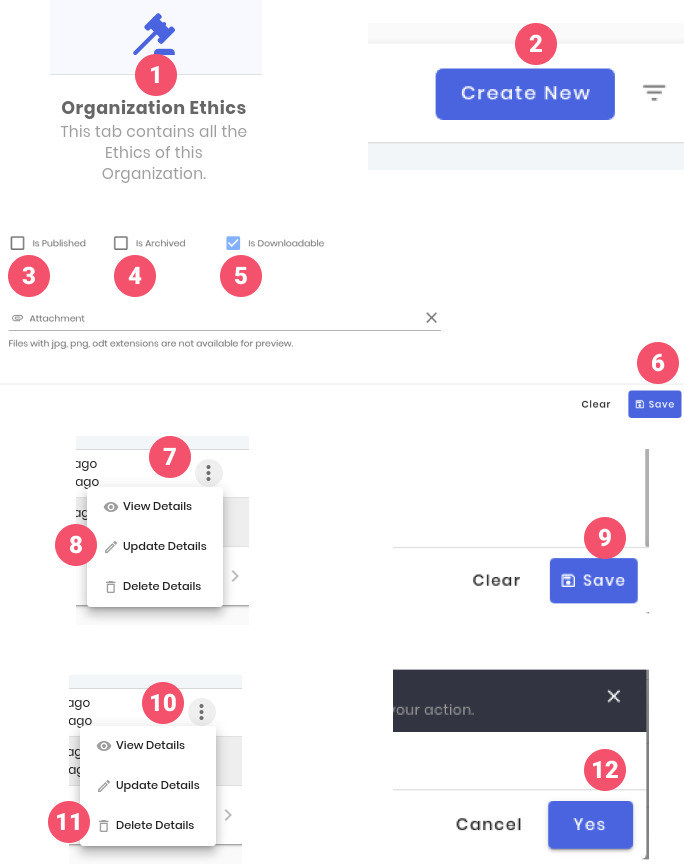
In this setting, HR can set the organization ethics which can be seen by the employees.
- To Create/update organization ethics, click on the 'Organization Ethics'
- Click on the 'Create New' button and fill the form
- Check the ‘Is Public’ checkbox if the document is public
- Check the ‘Is Archived’ checkbox if the document is archive
- Check the ‘Is Downloadable’ checkbox if the document is downloadable by the users
- Click on the 'Save' button
- To update, Click on the ‘3-dot’ menu on the action column
- Click on the ‘Update Details’ option and update the changes
- Click on the ‘Save’ button
- Delete Organization ethics, click on the ‘3-dot’ menu on the action column
- Click on the ‘Delete Details’ option
- Click on the ‘Yes' button
# Office Equipments
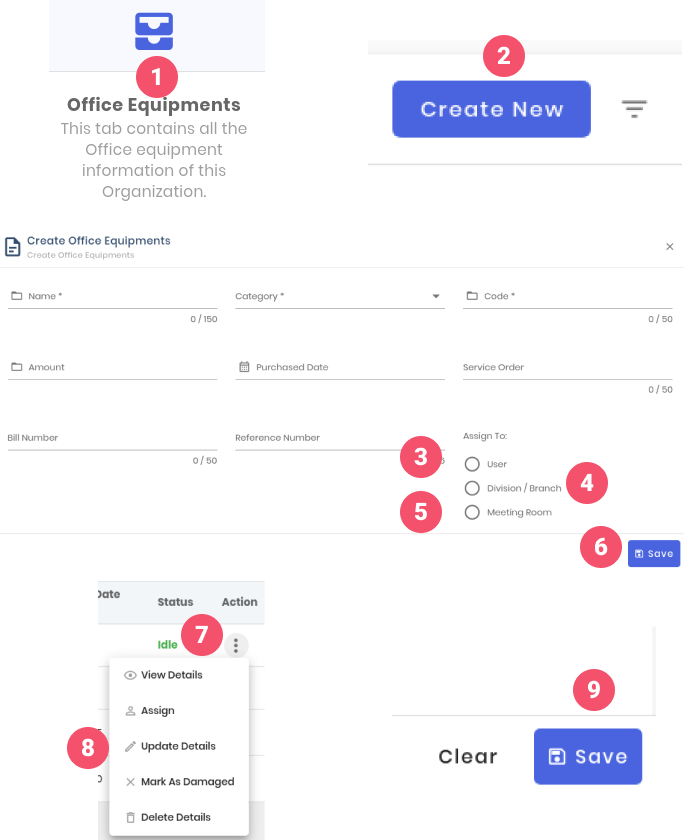
In this setting, HR can add the records of equipments of the organization. HR can assign the equipment to the Employees, Division or the Meeting Room. The damaged equipments records can be set from this setting.
- To add an office euipments, click on the 'Office Equipments'
- Click on the 'Create New' button and fill the form
- Select the 'User' on the Assign To section if the equipment is going to be assigned to user.
- Select the 'Division/Branch' on the Assign To section if the equipment is going to be assigned to division or branch
- Select the 'Meeting Room' on the Assign To section if the equipment is going to be assigned to meeting room
- Click on the 'Save' button
- To update and delete the details of the equipment, click on the ‘3-dot’ menu on the action column
- Click on the 'Update Details' option to update the changes, click on the 'Delete Details' option to update the changes
- Click on the 'Save' button
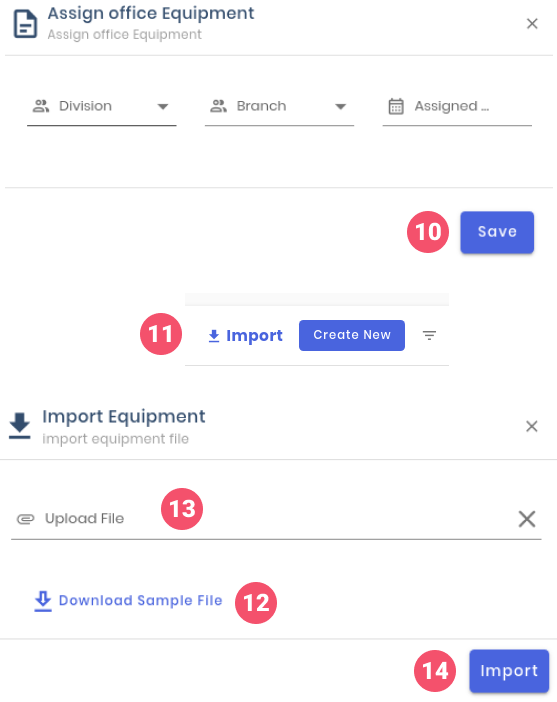
- To assign the equipment, click on the ‘3-dot’ menu on the action column, click on the 'Assign' option, fill the form and Click on the 'Save' button.
- To Import the equipment on bulk, click on the 'Import' button
- Download the sample file, edit the sample file and save it.
- Upload the edited sample file
- click on the 'Import' button
# Division

In this setting, HR can create the division of the Organization. Created division can be selected when updating employee profile.
- To create a divisions of the organization, click on the 'Division'
- Click on the 'Create New' button
- Fill the form and click on the 'Save' button
- To update the division details, click on the ‘3-dot’ icon on the action column
- Click on the 'Update Details' option
- Click on the 'Save' button
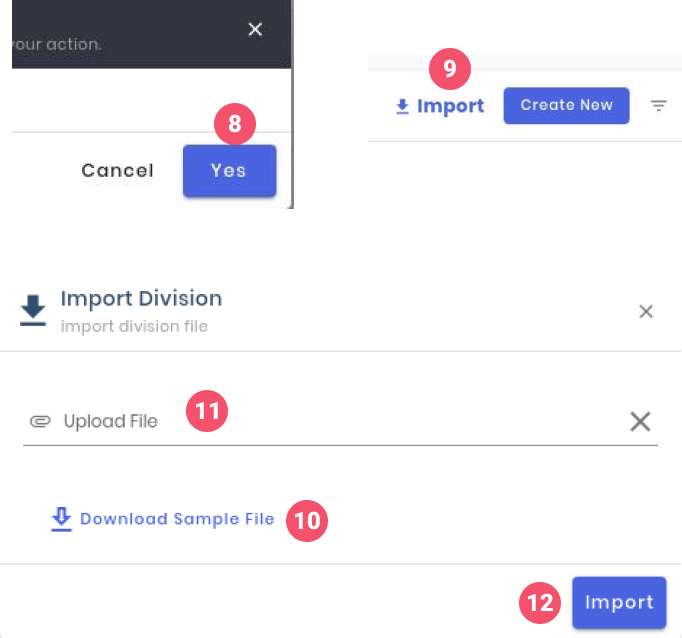
- To delete the division click on the ‘3-dot’ icon on the action column click on the 'Delete Details' option
- Click on the 'Yes' Button
- To import the division details on bulk click on the 'Import' button
- Download the sample file, edit the sample file and save it.
- Upload the edited sample file
- Click on the 'Import' button
# Employment Level
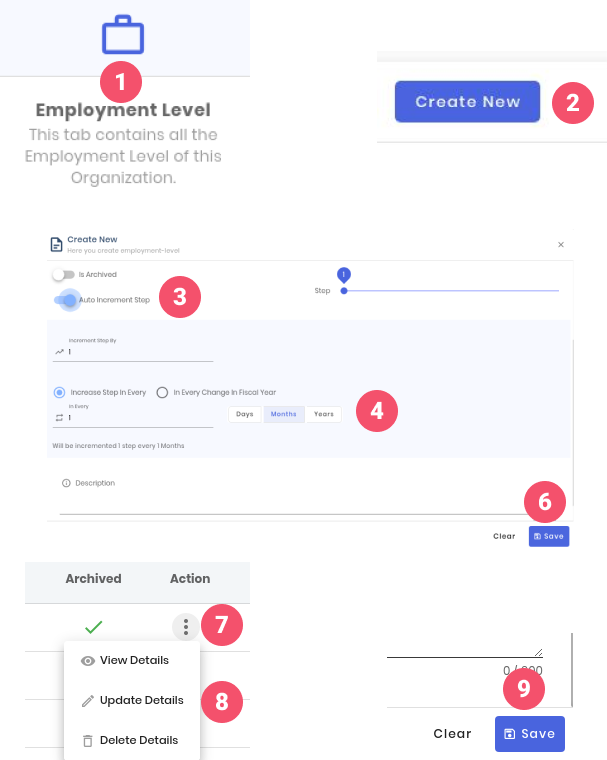
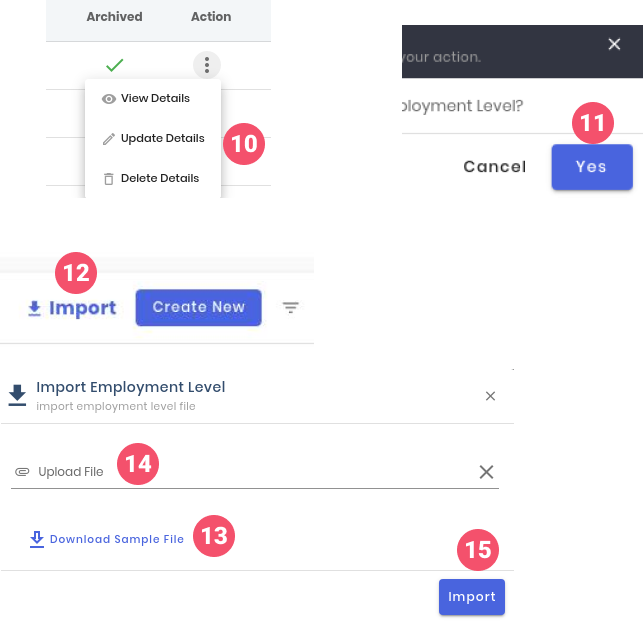
In this setting, HR can create the employment levels of the Organization. Created employment levels can be selected when updating employee profile.
- To Create New Employment Level, click on the 'Employment Level'
- Click on the 'Create New' button
- Click on the 'Auto Increment Step' switch to automatically increment the employment level
- Choose the step increment duration
- Set the maximum step level for the employment type
- Click on the 'Save' button
- To update the employment type, click on the ‘3-dot’ menu on the action column
- Click on the 'Update Details' and update the changes
- Click on the 'Save' button
- To delete the employment type, click on the ‘3-dot’ menu on the action column, click on the 'Delete Details'
- Click on the 'Yes' button
- To import the employment level details on bulk, click on the 'Import' button
- Download the sample file, edit the sample file and save it.
- Upload the edited sample file
- click on the 'Import' button
# Employment Type

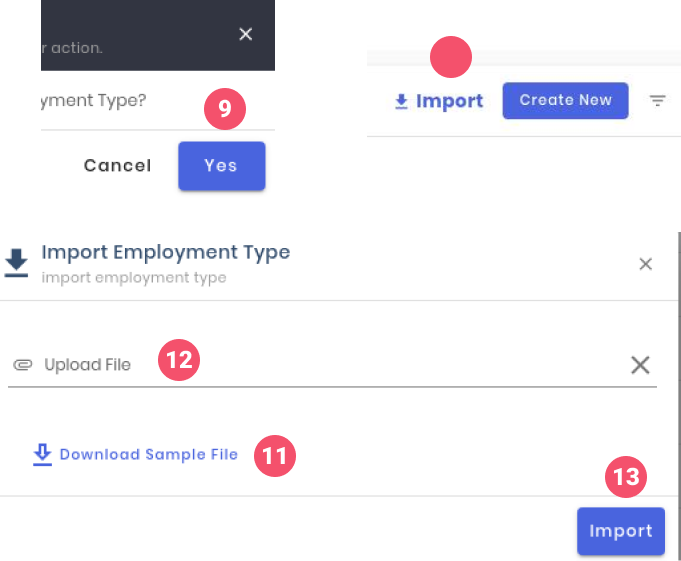
In this setting, HR can create the employment types of the Organization. Created employment types can be selected when updating employee profile.
- To Create New Employment Type, click on the 'Employment Type'
- Click on the 'Create New' button
- Click on the 'Is Contract' checkbox if the employment type is contract.
- Click on the 'Save' button
- To update the employment type details, click on the ‘3-dot’ menu on the action column
- Click on the 'Update Details' option and update the changes
- Click on the 'Save' button
- To delete tha employment type details, click on the 'Delete Details'
- Click on the 'Yes' button
- To import the employment type details on bulk, click on the 'Import' button
- Download the sample file, edit the sample file and save it.
- Upload the edited sample file
- Click on the 'Import' button
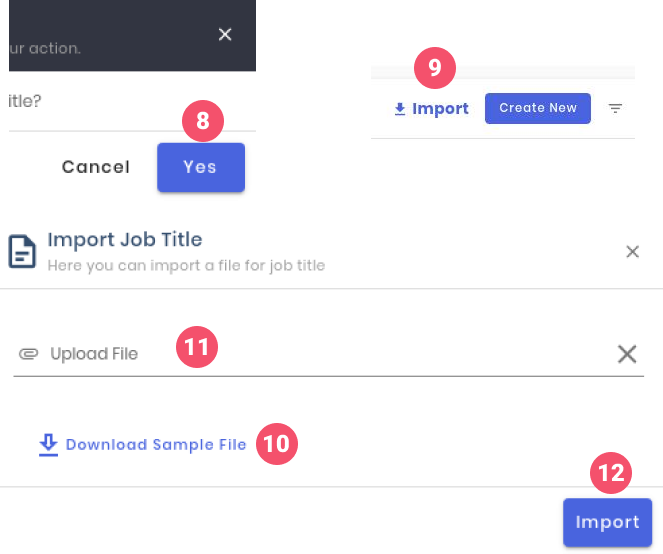
# Job Title
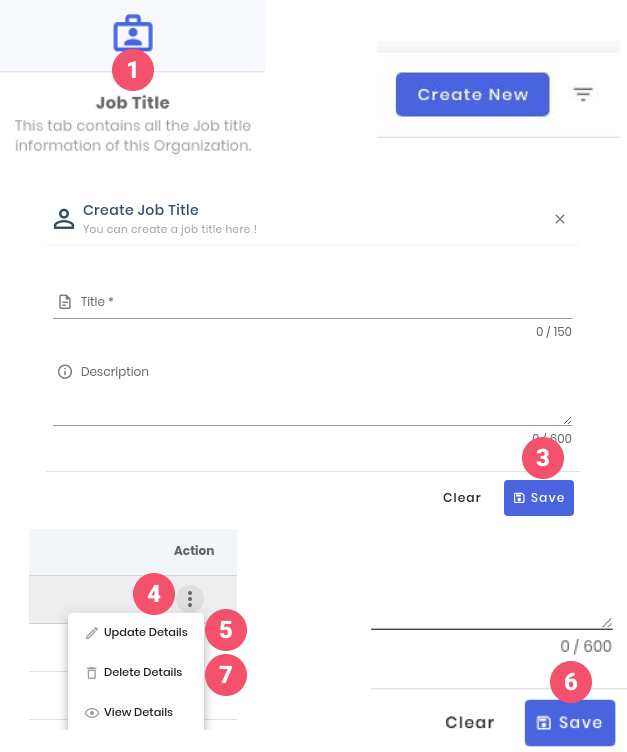
In this setting, HR can create the job titles of the Organization. Created job titles can be selected when updating employee profile as well as while creating vacancy.
- To create a job title, click on the 'Job Title'
- Click on the 'Create New' button
- Fill the form and click on the 'Save' button
- To update the job title details, click on the ‘3-dot’ menu on the action columns
- Click on the 'Update Details' option and update the change
- click on the 'Save' button
- To delete the job title, click on the 3-dot menu on the action column, click on the 'Delete Details' option
- Click on the 'Yes' button
- To import the job title on a bulk, click on the 'Import' button
- Download the sample file, edit the sample file and save it.
- Upload the edited sample file
- click on the 'Import' button
# Branch
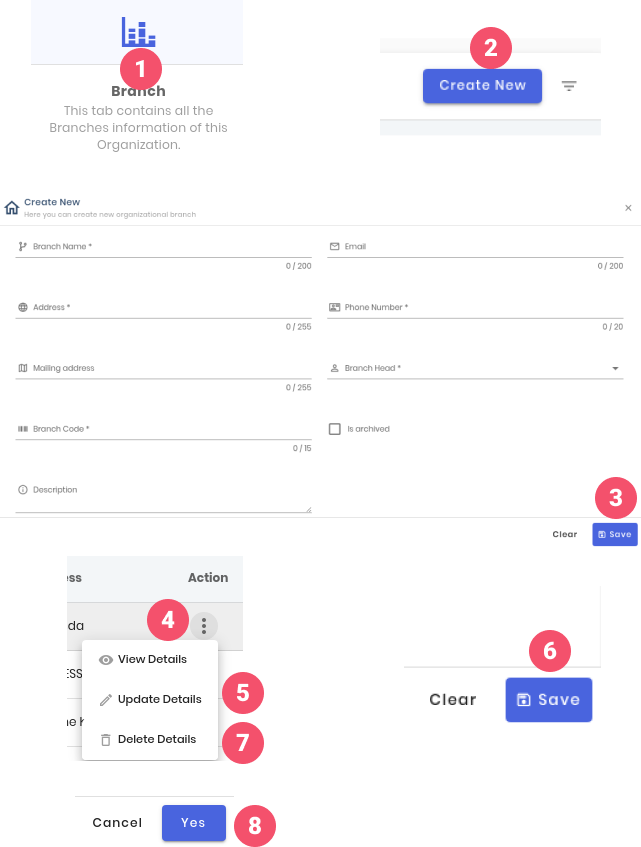
In this setting, HR can create the branch of the Organization. Created branch can be selected when updating employee profile.
- To create a new branch of an organization, click on the 'Branch'
- Click on the 'Create New' button
- Click on the ‘3-dot’ menu on the action column
- Click on the 'Update Details' option and update the changes
- Click on the 'Save' button to save the branch details
- Click on the ‘3-dot’ menu on the action column, click on the 'Delete Details' option and update the changes
- Click on the 'Yes' button
# Bank
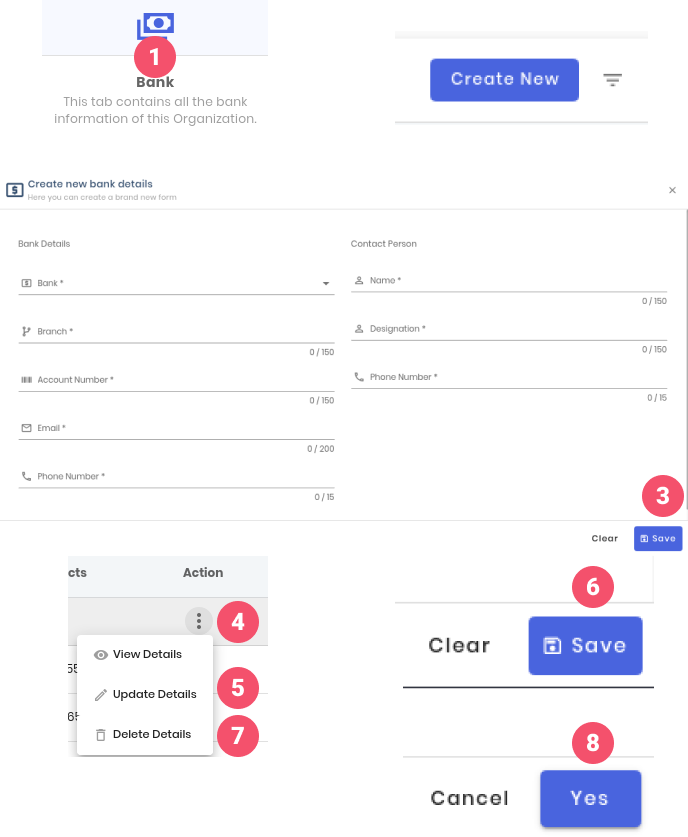
In this setting, HR can create the bank profile of the Organization. Created bank profile can be selected when updating employee profile.
- To create a new bank detail, click on the 'Bank'
- Click on the 'Create New' button
- Fill the form and click on the 'Save' button
- To update the Bank detail, click on the ‘3-dot’ menu on the action column
- Click on the 'Update Details' option and update the changes
- Click on the 'Save' button
- To delete the bank details, click on the ‘3-dot’ menu on the action column
- Click on the 'Delete Details' option and update the changes
# Template Mapping
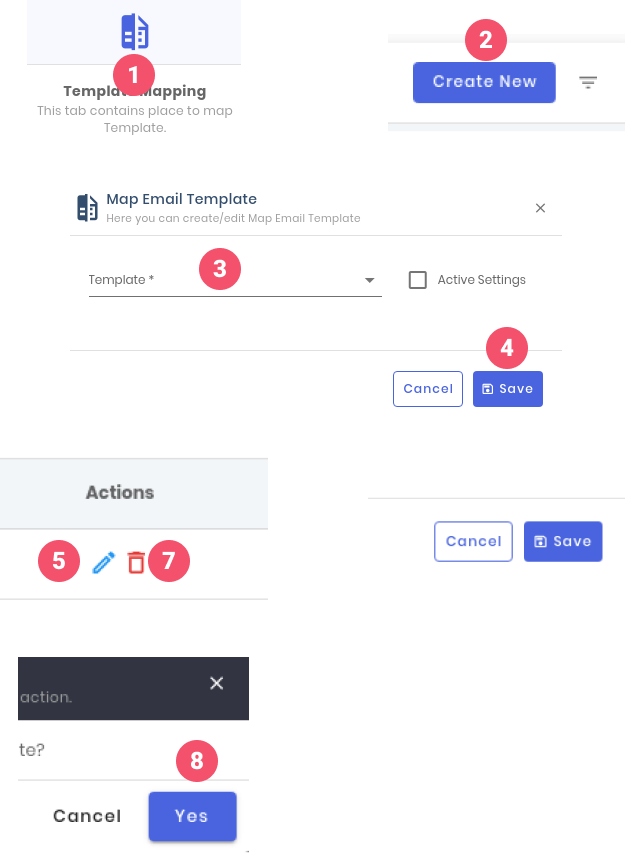
In this setting, HR can set the email template which will be used to send the email using the system.
- To create a template mapping setting, click on the 'Template Mapping'
- Click on the 'Create New' button
- Select the template and setting
- Click on the 'Save' button
- To update the email template setting, click on the 'Edit' icon on the action column and update the changes
- Click on the 'Save' button
- To delete the email template setting, click on the 'Delete' icon on the action column
- Click on the 'Yes' button
# Meeting Room
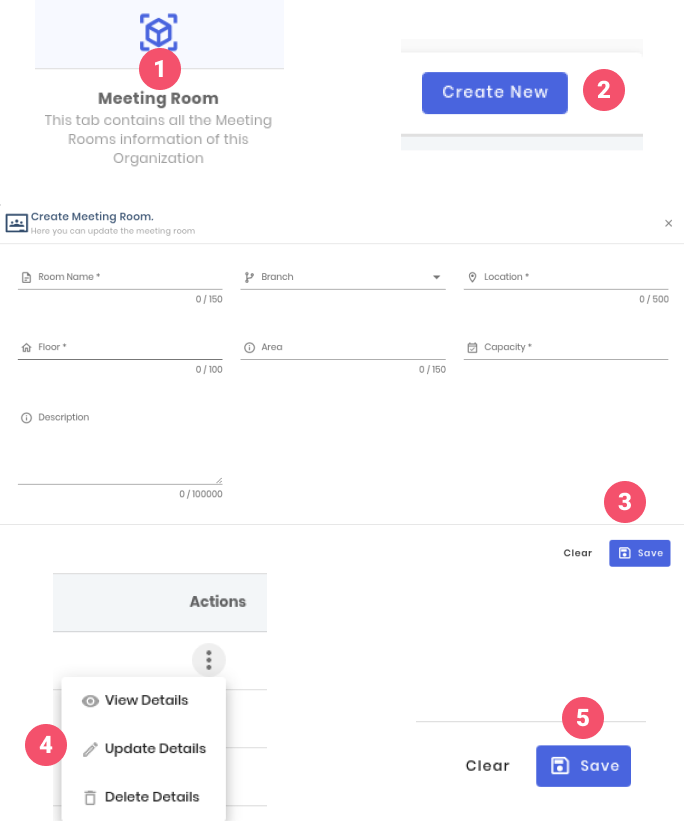
In this setting, HR can create a Meeting Room, Conference Room, Training Halls etc. These create meetings rooms can be selected and booked while creating meetings.
- To create a meeting room, click on the 'Meeting Room'
- Click on the 'Create New' button
- Fill the form and click on the 'Save' button
- To update the details of the meeting room, click on the ‘3-dot’ menu on the action column, click on the 'Update Details' option and update the changes
# Ability
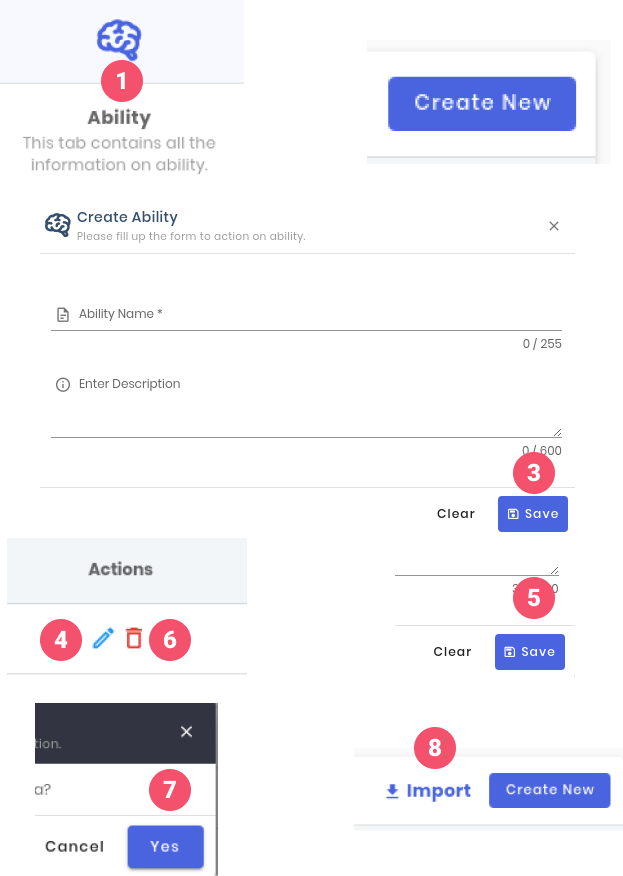
In this setting, HR can create the Ability associated with the organization. These abilities can be assigned to employees from HRIS and also can be selected when updating user profile of an employee.
- To create new ability, click on the 'Ability'
- Click on the 'Create New' button
- Fill the form and click on the 'Save' button
- To update the ability, click on the 'Update' icon on the action column and update the changes
- Click on the 'Save' button
- To delete the ability, click on the 'Delete' icon on the action column
- Click on the 'Yes' button
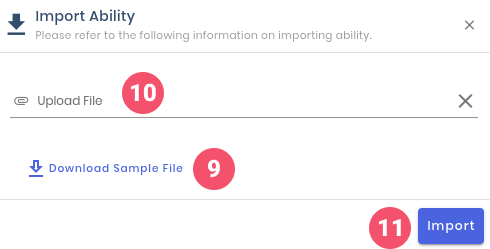
- To import the ability on the bulk, click on the 'Import' button
- Download the sample file, edit the sample file and save it.
- Upload the edited sample file.
- Click on the 'Import' button
# Knowledge

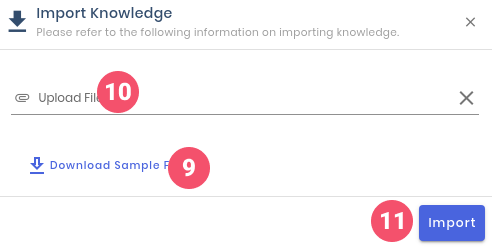
In this setting, HR can create the Knowledge associated with the organization. These knowledge can be assigned to employees from HRIS and also can be selected when updating user profile of an employee.
- To create new knowledge, click on the 'Knowledge'
- Click on the 'Create New' button
- Fill the form and click on the 'Save' button
- To update the knowledge, click on the 'Update' icon on the action column and update the changes
- Click on the 'Save' button
- To delete the knowledge, click on the 'Delete' icon on the action column
- Click on the 'Yes' button
- To import the knowledge on the bulk, click on the 'Import' button
- Download the sample file, edit the sample file and save it.
- Upload the edited sample file
- Click on the 'Import' button
# Skill
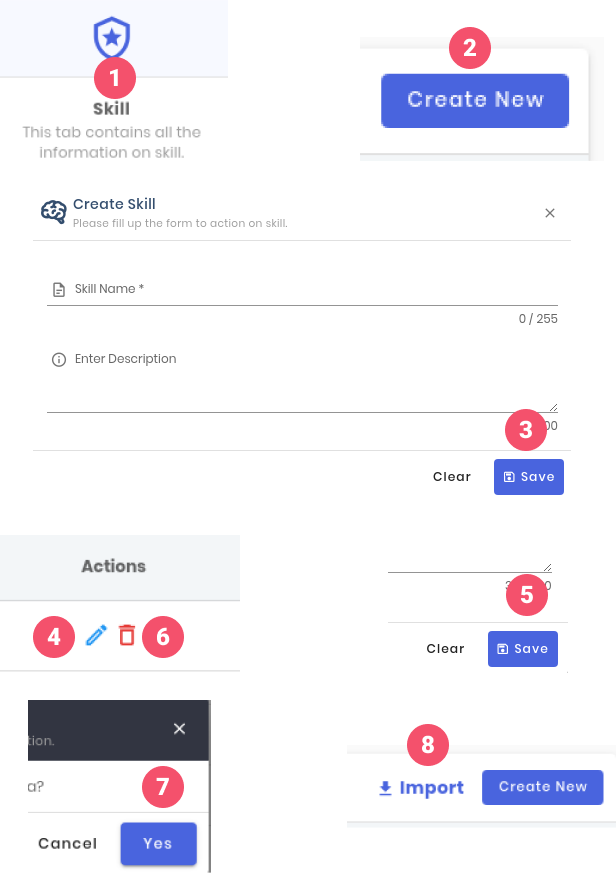
In this setting, HR can create the skill associated with the organization. These skill can be assigned to employees from HRIS and also can be selected when updating user profile of an employee.
- To create new skill, click on the 'Skill'
- Click on the 'Create New' button
- Fill the form and click on the 'Save' button
- To update the skill, click on the 'Update' icon on the action column and update the changes
- Click on the 'Save' button
- To delete the skill, click on the 'Delete' icon on the action column
- Click on the 'Yes' button
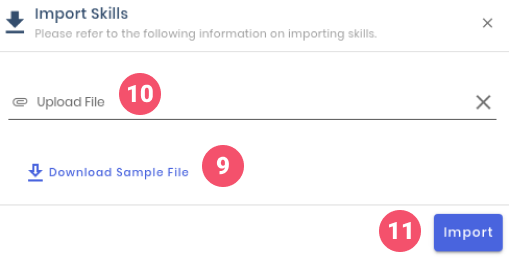
- To import the skill on the bulk, click on the 'Import' button
- Download the sample file, edit the sample file and save it.
- Upload the edited sample file
- Click on the 'Import' button
# Other Attribute
In this setting, HR can create the other attribute associated with the organization. These other attribute can be assigned to employees from HRIS and also can be selected when updating user profile of an employee.
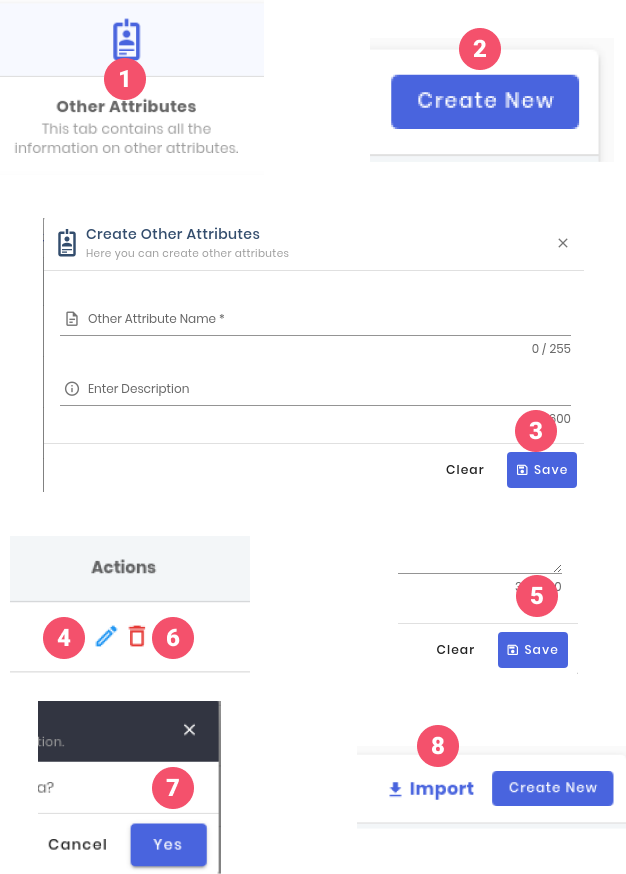
- To create new other attribute, click on the 'Other attribute'
- Click on the 'Create New' button
- Fill the form and click on the 'Save' button
- To update the other attribute, click on the 'Update' icon on the action column and update the changes
- Click on the 'Save' button
- To delete the other attribute, click on the 'Delete' icon on the action column
- Click on the 'Yes' button
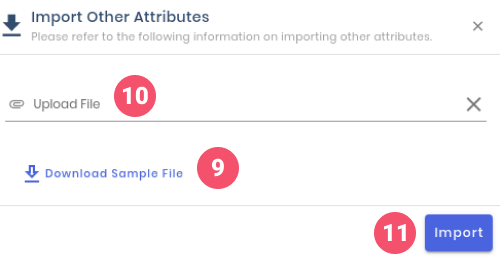
- To import the other attribute on the bulk, click on the 'Import' button
- Download the sample file, edit the sample file and save it.
- Upload the edited sample file
- Click on the 'Import' button
# Reports
# Email Logs
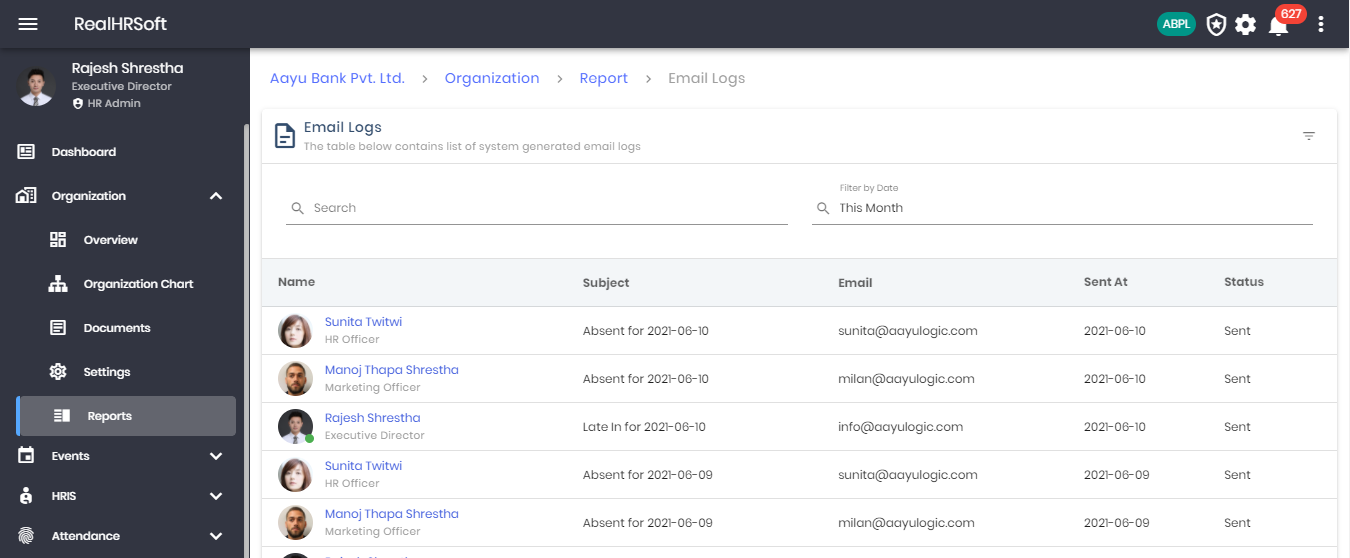
The HR can view a report on the system generated email logs using the platform. This shows the email recipient along with the email subject, sent email id, sent time and status. They can also filter the list by date or search for a particular employee.
The HR can easily navigate and view the company’s Email Log report by scrolling to the “Organization” section and clicking on “Reports”. Within the Report section, they will find the “Email Logs”.
# Export Logs
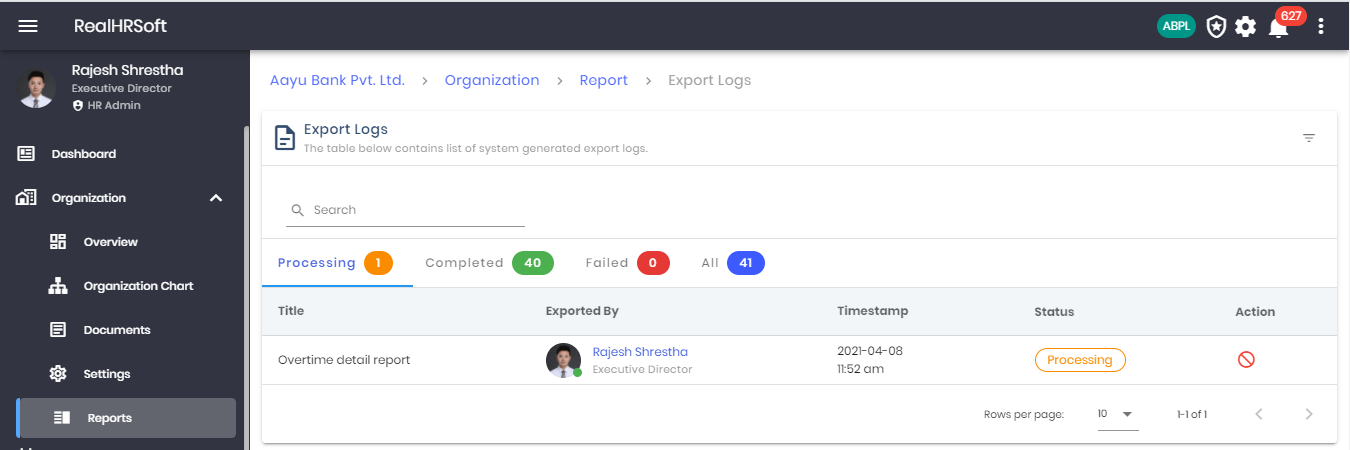
The HR can view a report on the system generated export logs using the platform. This shows the employee name and the exported data along with the timeline and export status. They also have the ability to stop the process by clicking on the Action button.
The HR can easily navigate and view the company’s Export Logs report by scrolling to the “Organization” section and clicking on “Reports”. Within the Report section, they will find the “Export Logs”
# Events
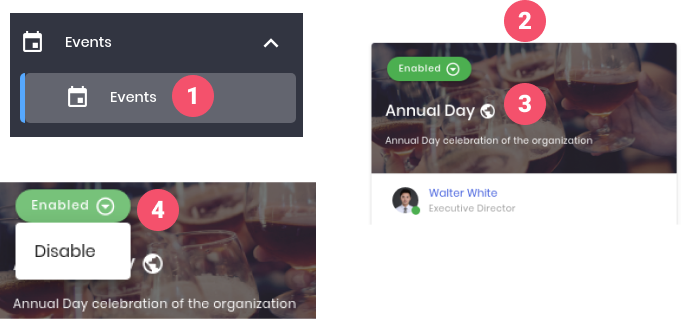
In Events section, HR can view the different events of the organization created by employees.
- To view the details of events, click on the 'Events' on the sidebar
- Select the tab to view the events in the respective category
- Click on the Name of the event to view the details of the events
- To disable the event click on the 'Enable' option and choose the option 'Disable'
# HRIS
# Overview
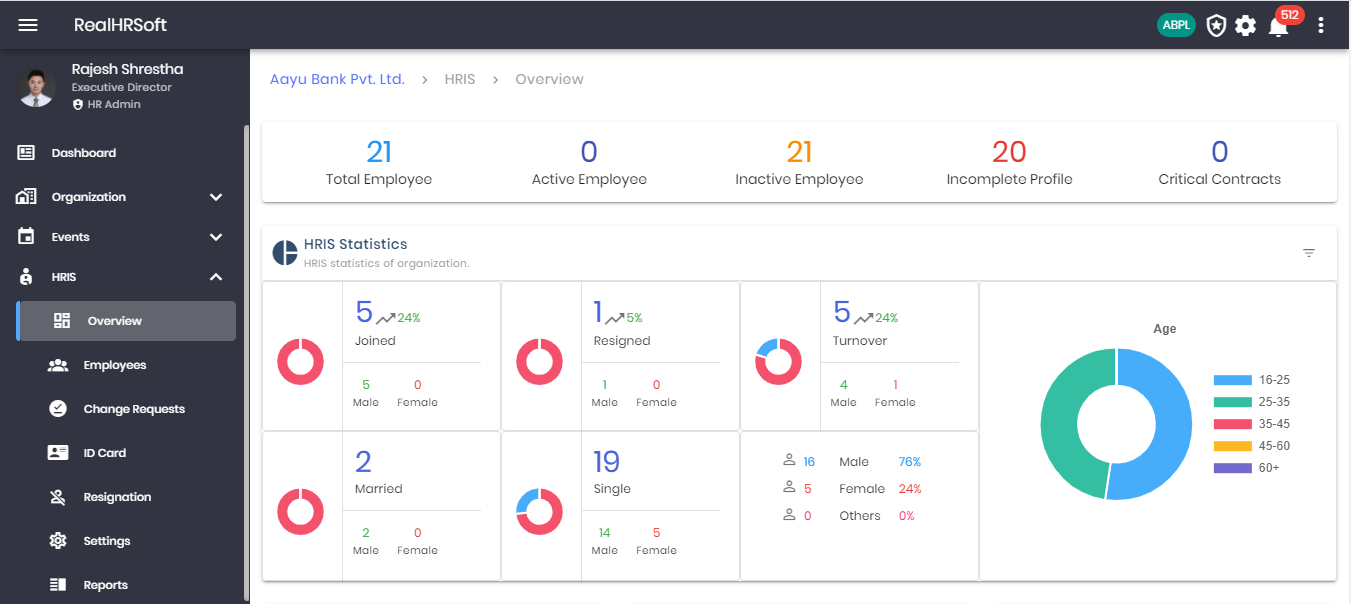
- Go to “HRIS” in the sidebar. Click on “Overview” for a summary of the employee statistics within the organization.
- Click on the number above “Total Employees” to display the list of employees within the organization.
- Click on the number above “Active Employees” to display the list of employees that have currently logged in to the RealHRsoft platform within the organization.
- Click on the number above “Inactive Employees” to display the list of employees that are currently logged out of the RealHRsoft platform within the organization.
- Click on the number above “Incomplete Profile” to display the list of employees with incomplete profiles.
- Click on the number above “Critical Contract” to display the list of employees with their contract expiring soon. The priority (criticality i.e. number of days remaining for contract renewal) can be changed as per organization rules.
- Displays the HRIS statistics within the organization based on number of employees joined, resigned, turnover, married, single and their division based on gender. Clicking on the numbers will display the list of employees within the specific criteria. E.g. Employees that have joined the organization.
- Displays the pie chart of the employees within the organization based on their age.
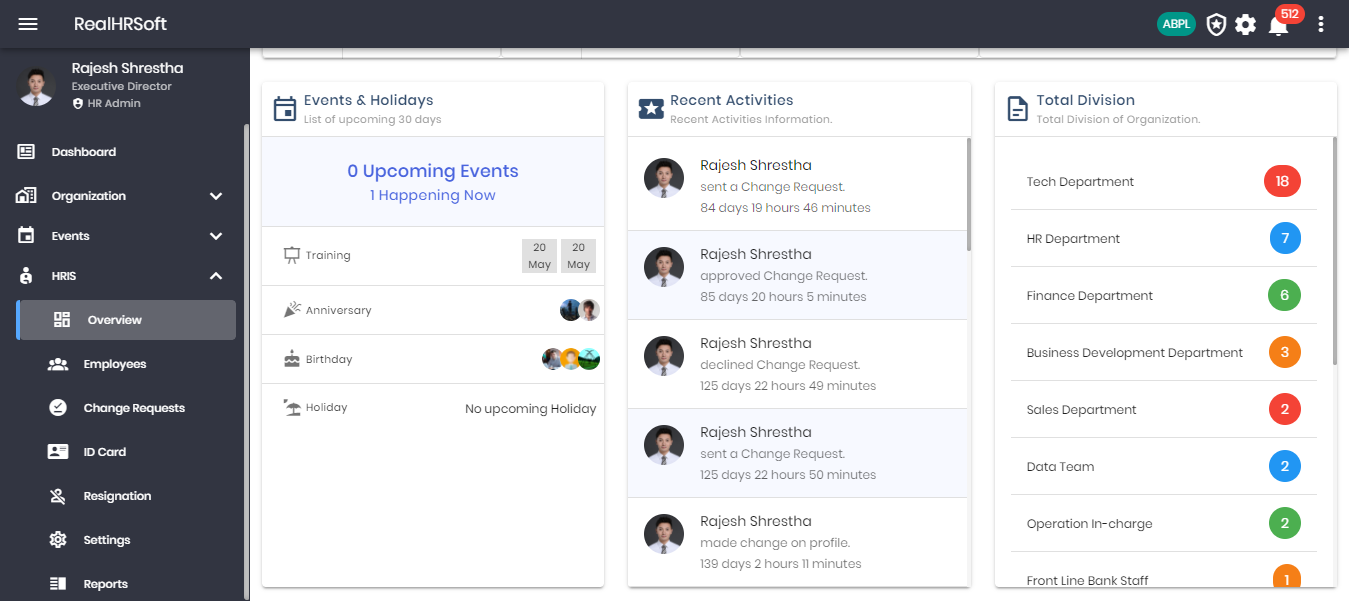
- Displays the list of upcoming holidays and events within the next 30 days.
- Displays the recent activities information raised or solved by the employees within the organization.
- Displays the division of employees within the organization based on their department. Click on the number followed by the department name shows the the list of employees within the specific organization.
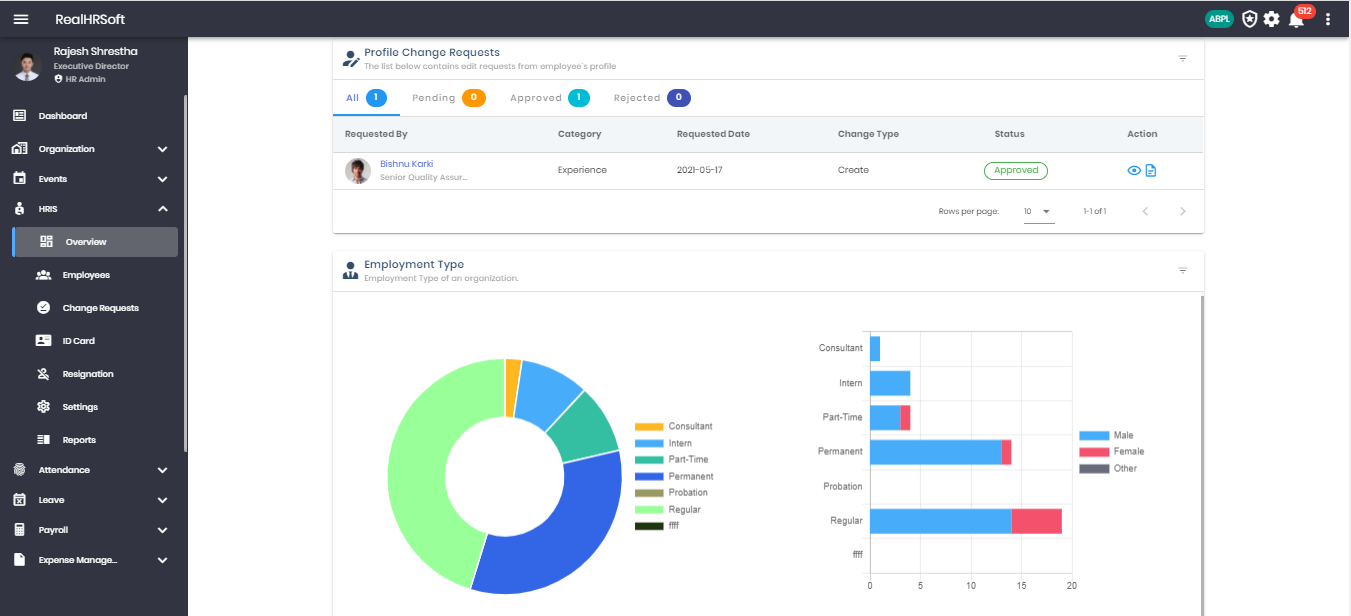
- Displays the list containing edit requests from the employee's profile. The informatio about the request can also be seen from here. The list can be further divided into “Pending”, “Approved”, “Rejected” or “All”. Click on each to view the list. The number indicates the number of such approval.
- Click on the “View History” action button to view the history of the specific request. Displays the pie chart and bar graph of employees division within the organization based on their employment type.
# Employee
# Current Employee List
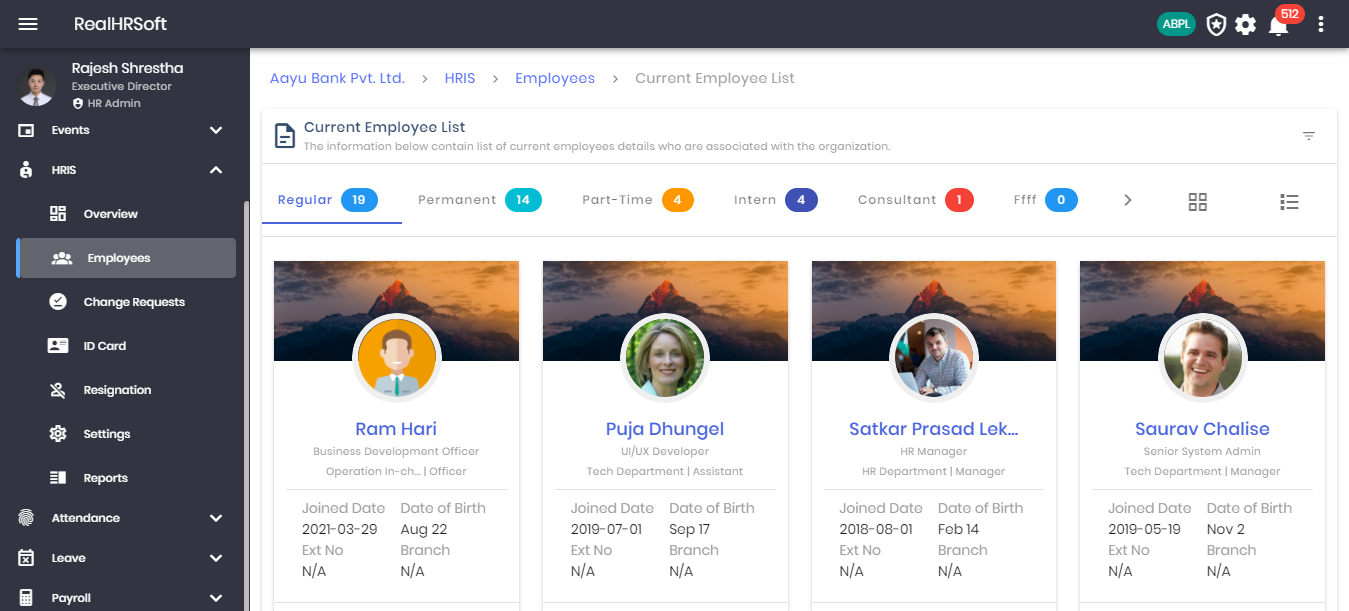
- Go to “HRIS” in the sidebar. Click on “Employees” followed by “Current Employee List” to view the list of current employees details who are associated with the organization.
- The list can be divided based on their employment type. The number displays the number of employees in each list. You may view the list in Grid View or List View
- Click on the filter button to search employees based on various parameters.
# Past Employee List
- Go to “HRIS” in the sidebar. Click on “Employees” followed by “Past Employee List” to view the list of past employees details who are no longer associated with the organization. The list is divided into employees with their contract expired and employees that have resigned or terminated.
- Click on “Update Contract” action button to Change the employment type of the employee. Please refer to Employee type for further information
- Click on “Offboard” action button to offboard the employees. This will take you to Employee Separation page to take the necessary next steps.
- Click on “Resigned/Terminated” tab to list the employees that have requested to leave the organization or have been terminated by the company. You may view the profile of the employee from the action button.
# Employee Separation
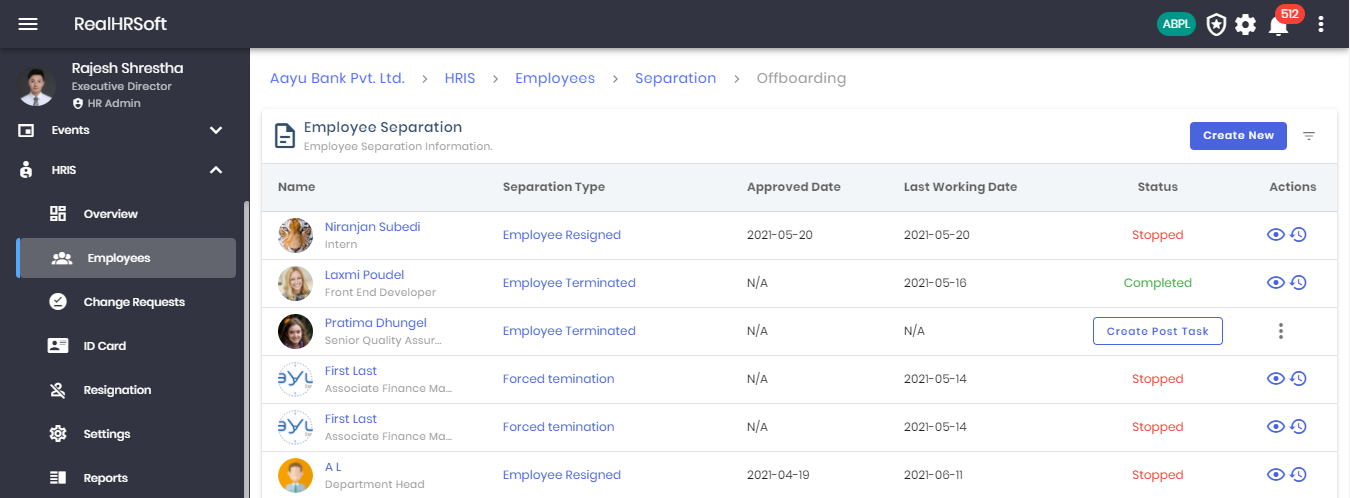

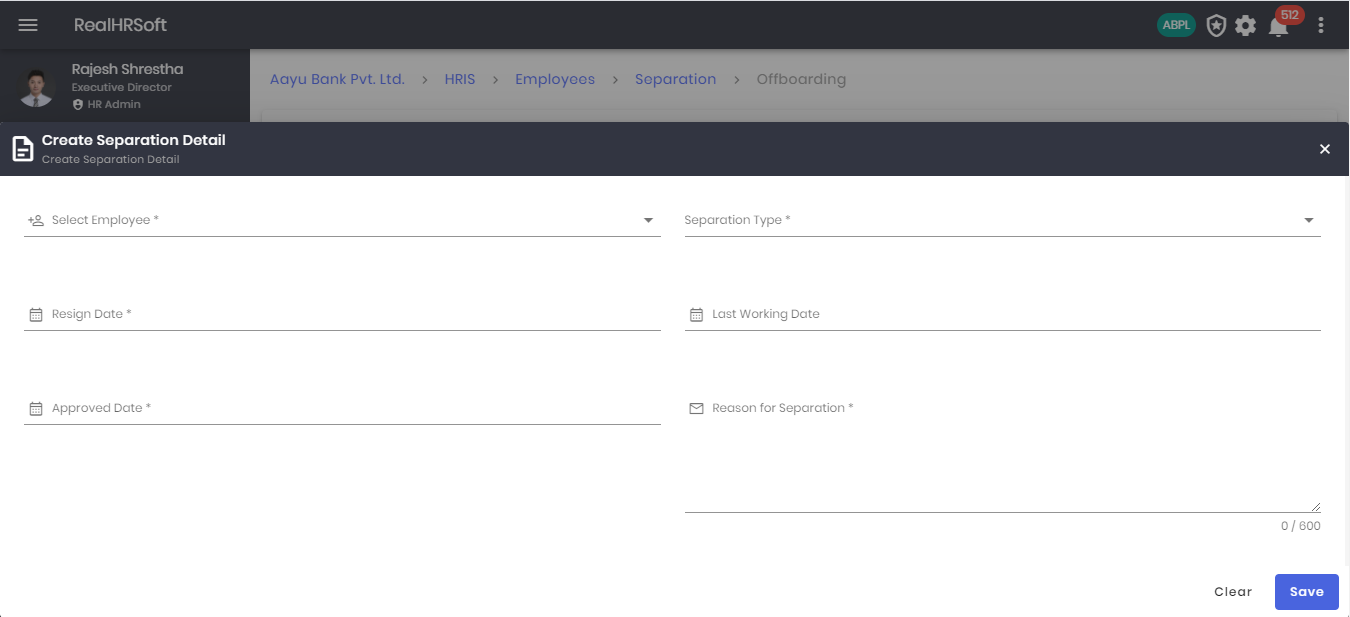
- Go to “HRIS '' in the sidebar. Click on “Employees'' followed by “Separation” and “Offboarding” to view the actions to be taken during the offboarding of employees. The list contains the employee separation information.
- Click on “Create New” to offboard an employee by providing the employee and separation details. You may search the list for a specific employee.
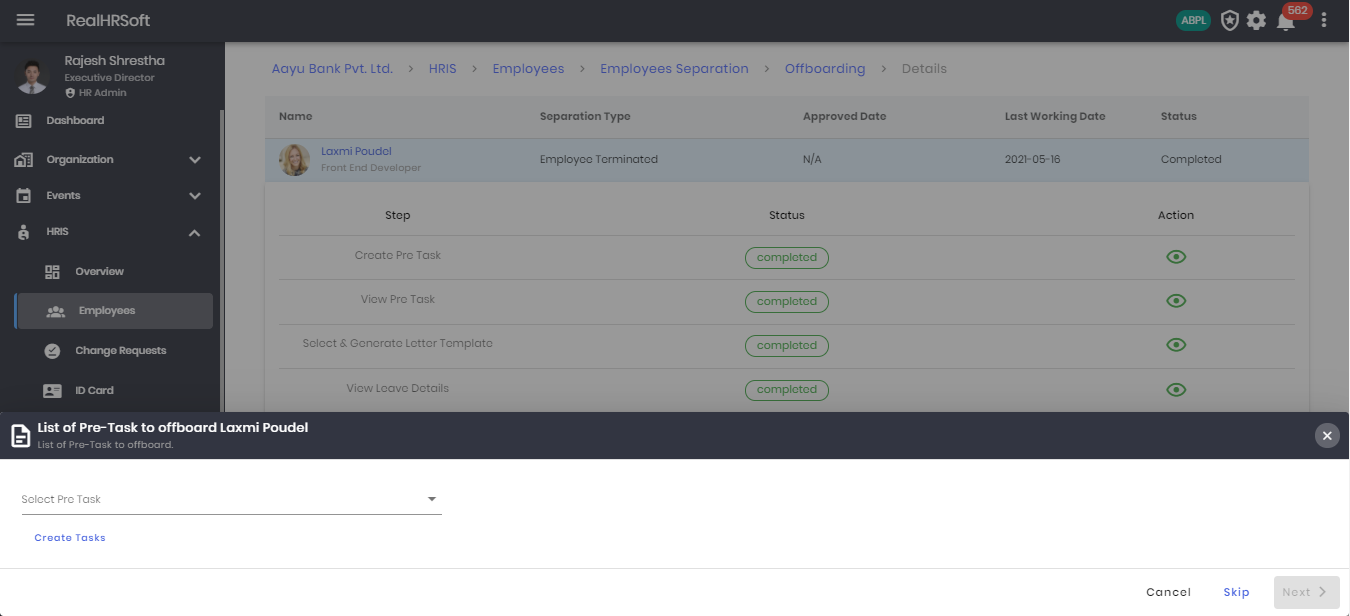
- Click on the “View Detail” action button to view all the next steps and current status of these steps. You may also create a new task or assign a new task for the offboarding process.
# Import
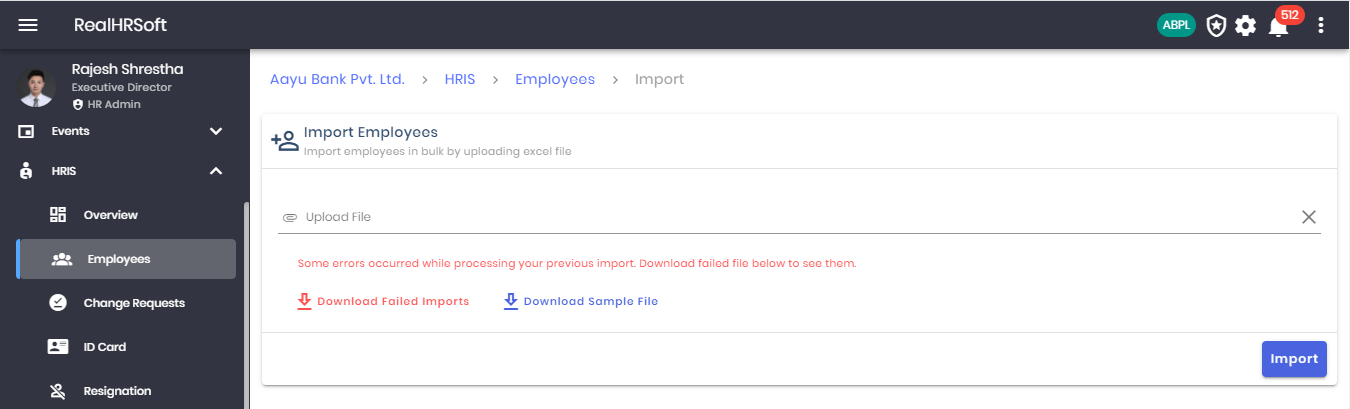
The platform allows the HR to import the basic details about the employees from an excel sheet. This feature is useful when migrating information from an existing database or bulk upload details about the employee. Please note: The information to be uploaded must match the Sample that can be downloaded from the platform. In case the uploaded data does not match the format, the platform will not be able to replicate the same information and also cause an error.
- Go to “HRIS” in the sidebar. Click on “Employees” followed by “Import” to import employees in bulk by uploading excel file
- Click on “Download Sample File” to download a sample format. The entered data should match format.
# Employee Document

Using the platform, the employees can upload required documents that can be viewed, verified & downloaded by the HR before they update the details about the employee. This also helps in documenting important files.
- Go to “HRIS” in the sidebar. Click on “Employees” followed by “Documents” to view the list of employee documents.
- Click on the action button to View, Download or Delete the document.
# Assign KSAO
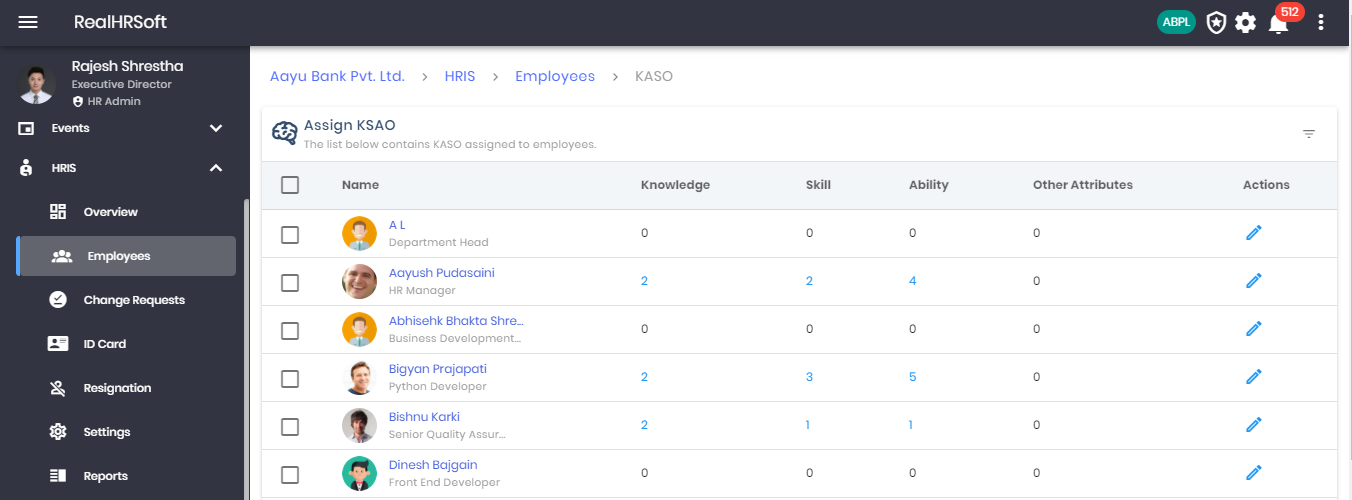
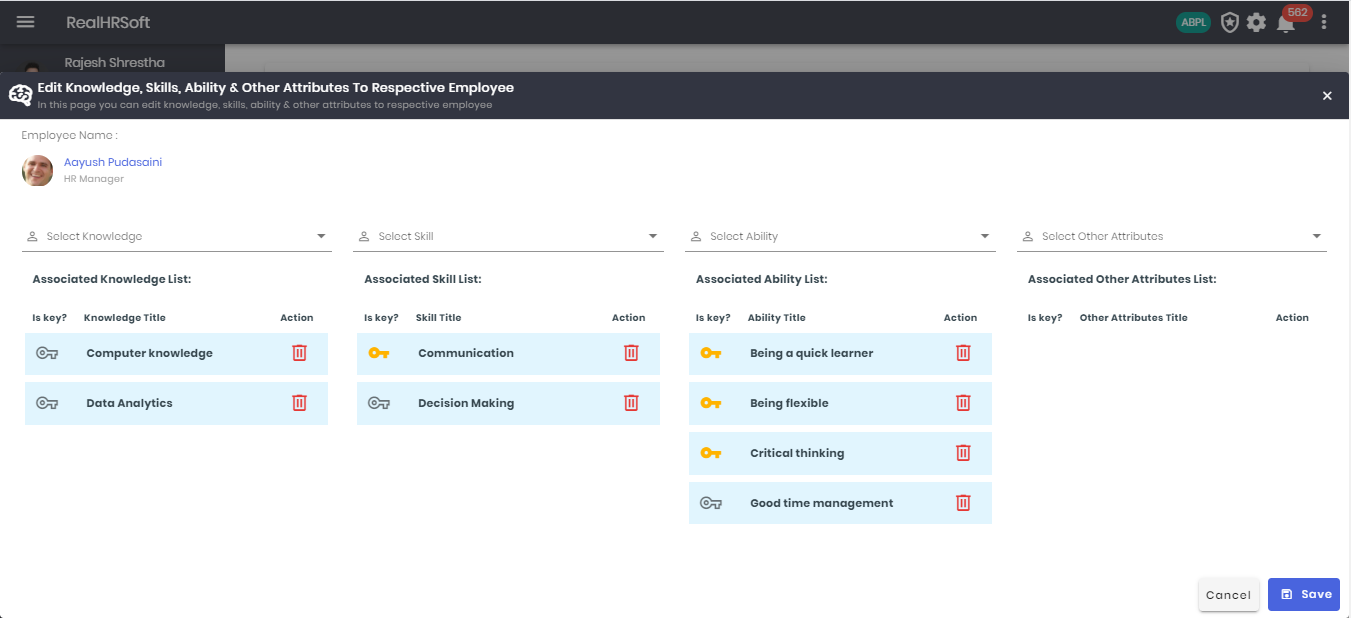
KSAO stands for Knowledge, Skill, Ability and Others. The platform allows you to create these attributes and can be assigned to each employee based on their individual qualities and roles.
- Go to “HRIS” in the sidebar. Click on “Employees” followed by “Assign KSAO” to view the list of employees and assign knowledge, skill, ability and other to employees within the organization
- Click on the action button to edit associated knowledge, skill, ability and other to the employee.
- Click on the number to view the respective detail. E.g. List of knowledge for a particular employee. Bulk assignments of KSAO can also be done by selecting all or multiple employees.
# Pre Employment
# Add
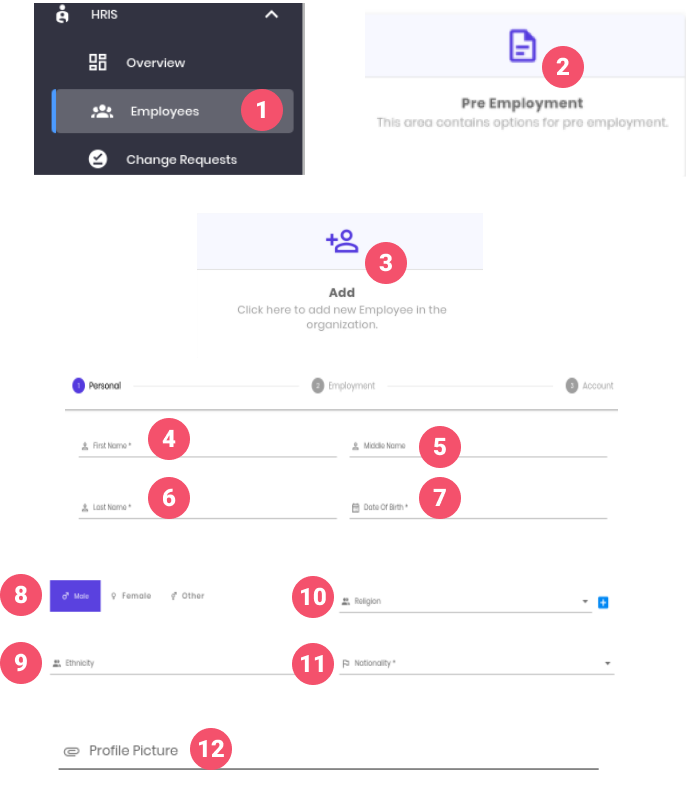
- Click on HRIS from Side bar and click on Employees.
- Click on Pre Employment.
- Click on Add.
- Enter First Name
- Enter Middle name(optional)
- Enter Last name
- Enter Date of birth.
- Select Gender
- Select Ethnicity(optional)
- Select Religion(optional)
- Select Nationality
- Choose Profile Picture(optional)
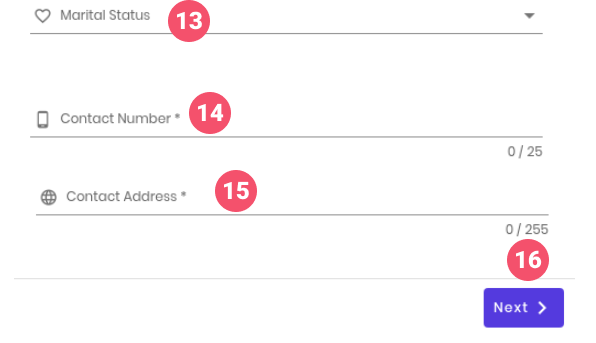
- Select Marital status.
- Enter Contact Number.
- Enter Address.
- Click on Next.
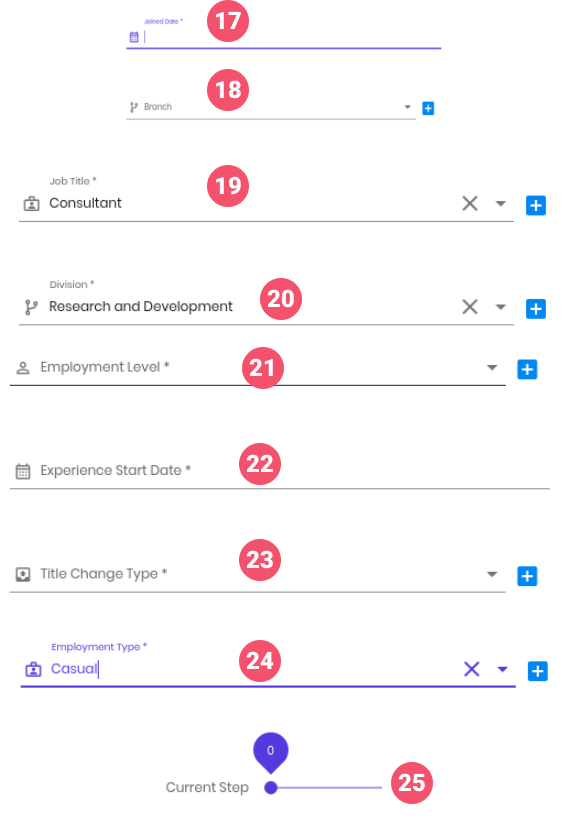
- Enter joined Date
- Select Branch(optional).
- Select Job title
- Select Division
- Select Employment Level
- Enter Experience Start Date.
- Select Title Change Type.
- Select Employment Type
- Select Current Step[optional]
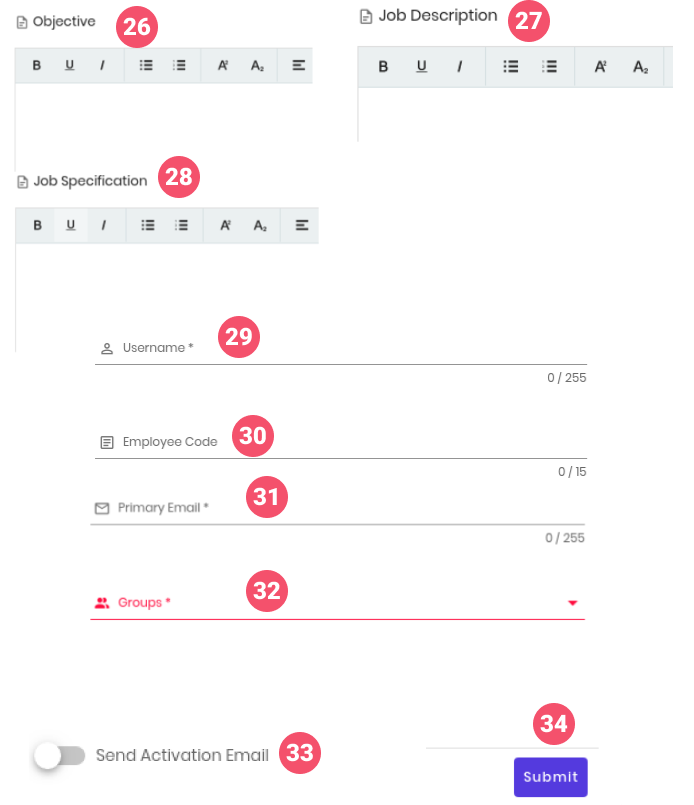
- Enter Objective
- Enter job description
- Enter Job Specification
- Enter Username
- Enter Employee code if any
- Enter Primary Email
- Select User Group
- To send email activation, toggle the email activation button
- Click on Submit
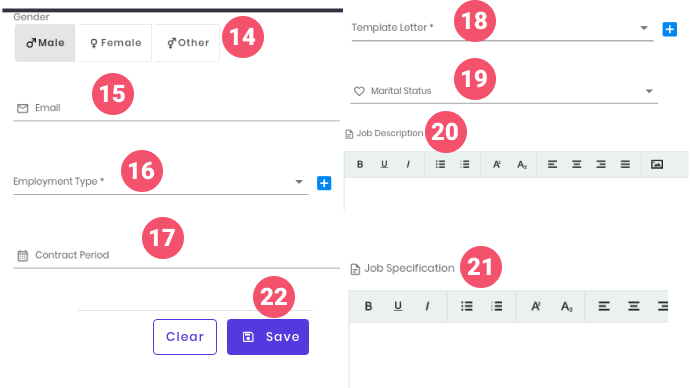
# Onboarding
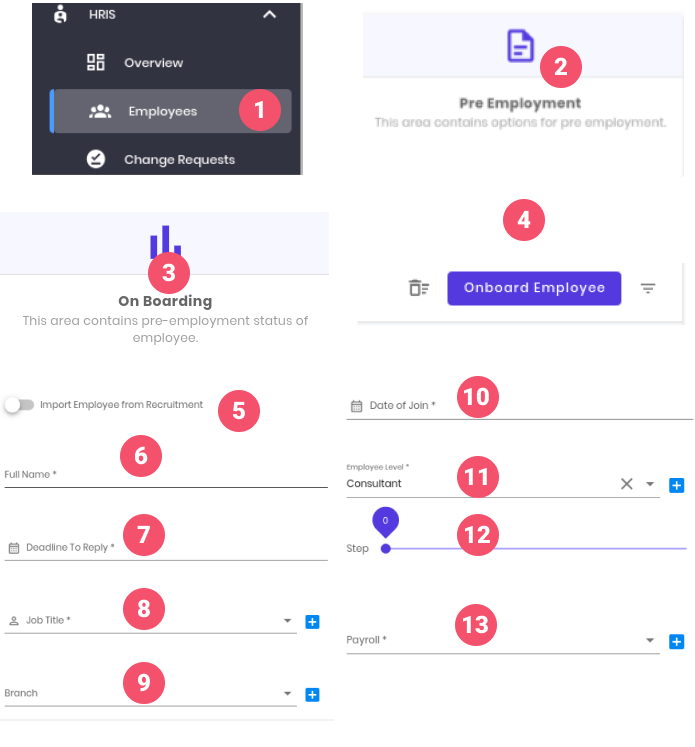
- Click on HRIS from Side bar and click on Employees.
- Click on Pre Employment
- Click on On Boarding
- Click on Onboard Employee
- Make sure Import employee from recruitment is not enabled.
- Enter Full Name.
- Enter Deadline to Apply.
- Enter job Title.
- Enter Branch(optional).
- Enter Date of join
- Enter Employment level.
- Select Employment step.
- Select Payroll
- Select Gender.
- Enter Email
- Select Employment Type
- Enter Contract Period (optional)
- Select Letter template.
- Select Marital Status(optional)
- Select Job Description.
- Select Job Specification
- Click on Save
# Assigning Supervisor
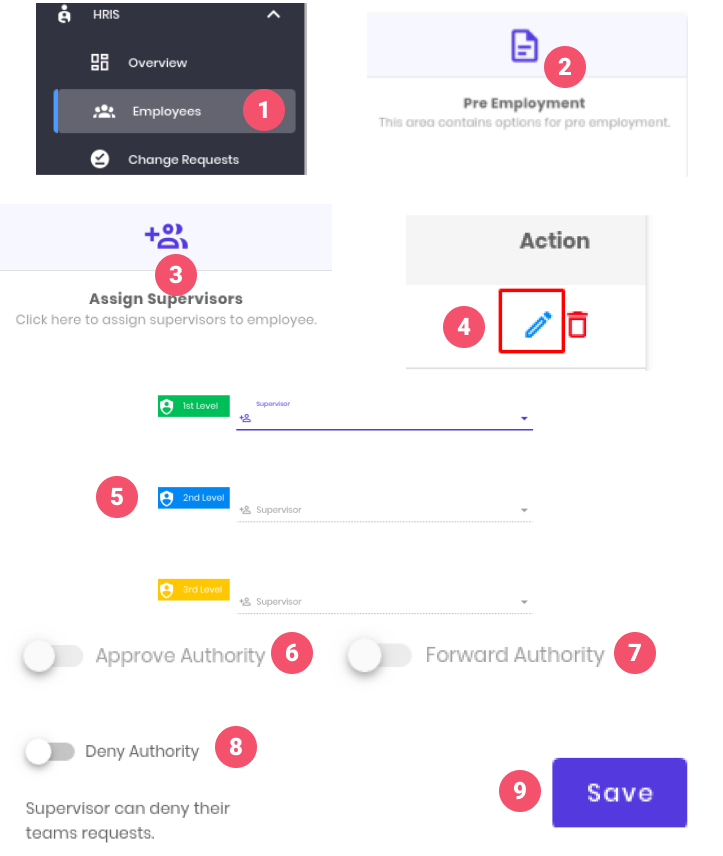
- Click on HRIS from Side bar and click on Employees.
- Click on Pre Employment
- Click on Assign Supervisors
- Click on Assign Icon from the Action of the employee you want to assign supervisor.
- Select the Levels of supervisor(1st,second and third level as per requirement)
- To make sure Supervisor can Approve their teams requests, select the approve authority toggle button(not applicable for third level supervisor)
- To make sure Supervisor can Forward their teams requests, select the Forward authority toggle button(not applicable for third level supervisor)
- To make sure Supervisor can Deny their teams requests, select the Deny authority toggle button.
- Click on Save.
# If Employee has no Supervisor
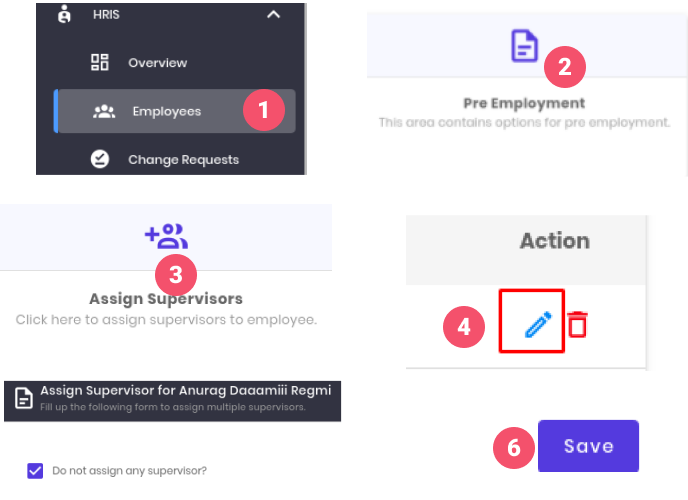
- Click on HRIS from Side bar and click on Employees.
- Click on Pre Employment
- Click on Assign Supervisors
- Click on Assign Icon from the Action of the employee you want to assign supervisor to.
- Select the check box do not assign any supervisor
- Click on Save.
# Employment Review
# Change Type & Process
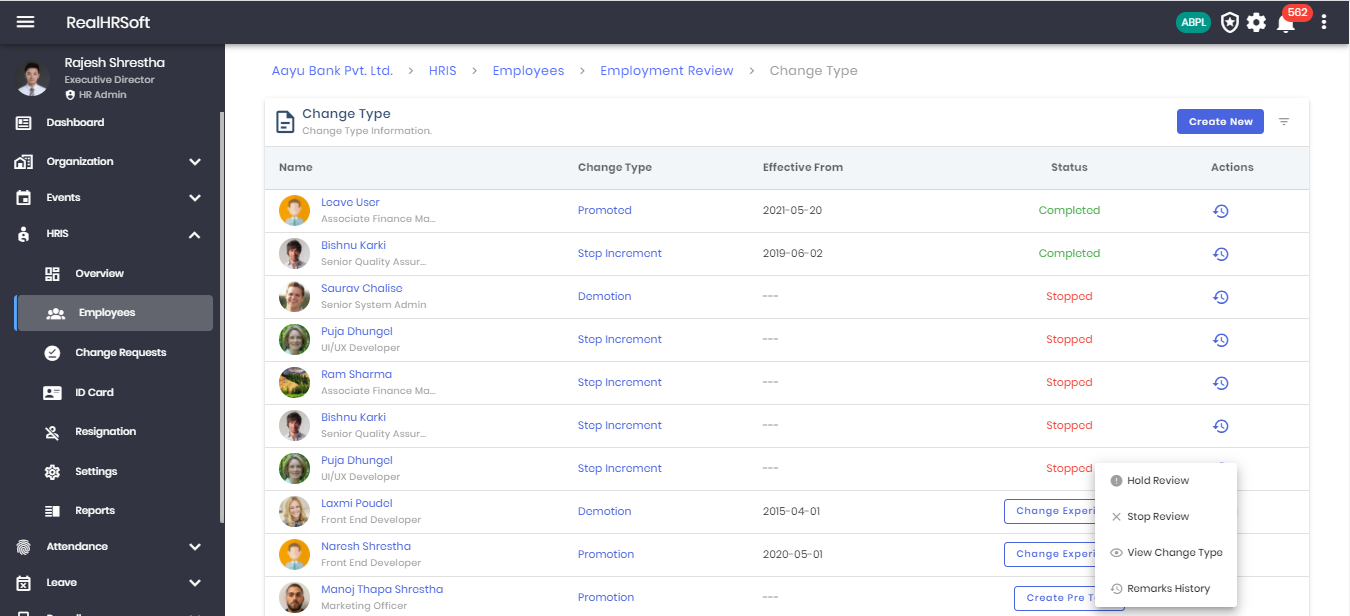
- Go to “HRIS” in the sidebar. Click on “Employees” followed by “Employment Review” to view all option for employee review. The change type and process is used to take action at the time of change type.
- The list displays the list of employees and their change type information. Action can be taken to View change type, history, Hold review or stop review.
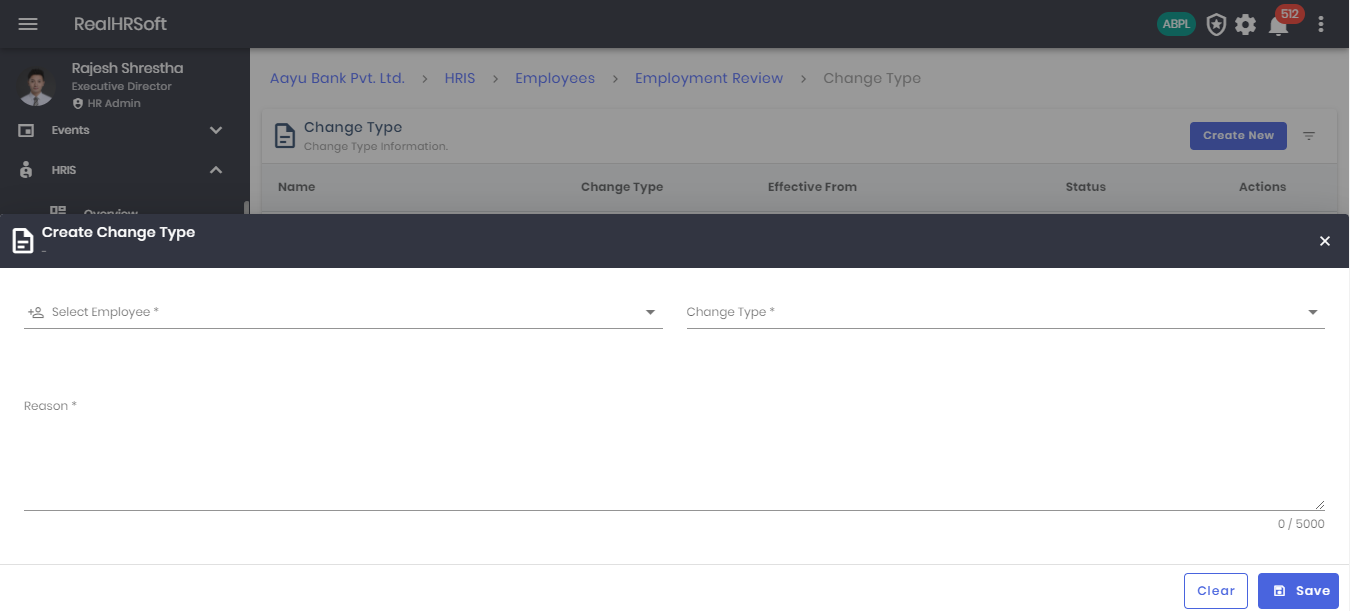
- Click on “Create New” to create a change type for the employee. E.g. Joined, Promoted, Demoted, Step Increment.
# Change Requests
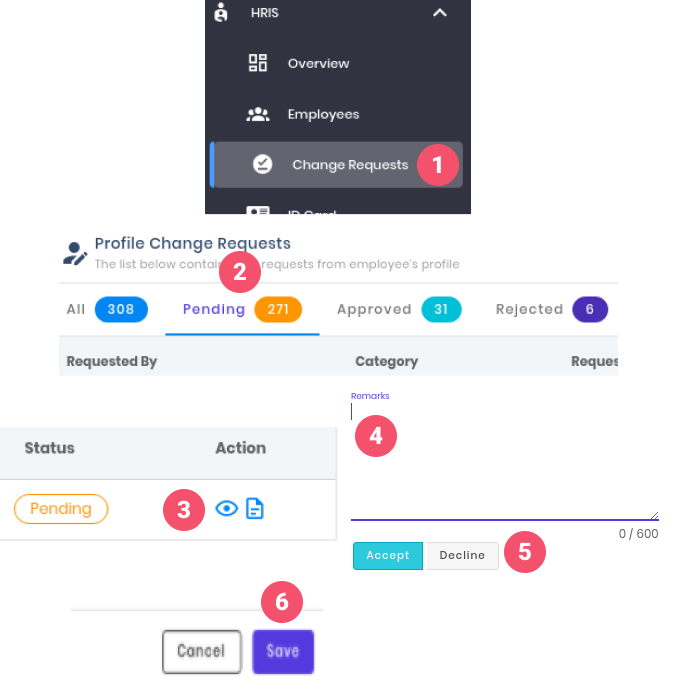
- Click on HRIS from Side bar and click on Change Requests.
- Click on Pending Tab
- Click the eye icon(view change request) under action of the pending request you want to change.
- Write remarks for the request
- Select Accept to approve or Decline to reject change request.
- Click on Save.
# ID Card
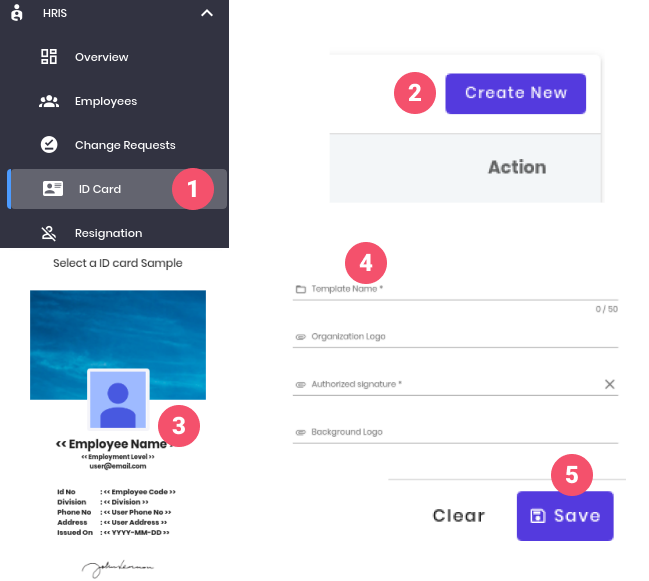
- Click on HRIS and then Click on ID Card
- Click on the Create New button in the top right.
- Click The ID card sample you want to generate template for.(you can select any you want).
- Fill in the required details as per the sample.
- Click on Save.
# Generating an ID Card
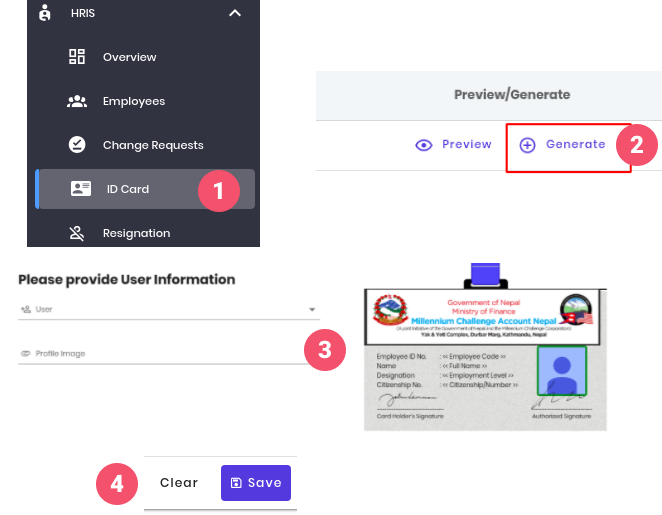
- Click on HRIS and then Click on ID Card
- Click on Generate button from available ID card sample list.
- Fill in the necessary fields.
- Click on Save
# Deleting the template
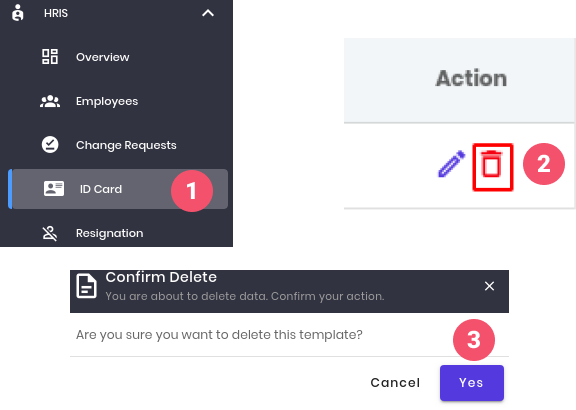
- Click on HRIS and then Click on ID Card
- Click on the Delete icon in the Action section in the right.
- Select Yes in the confirmation dialouge.
# To preview any ID card Template

- Click on HRIS and then Click on ID Card
- Click on the preview text of the sample you want to preview.
# Resignation
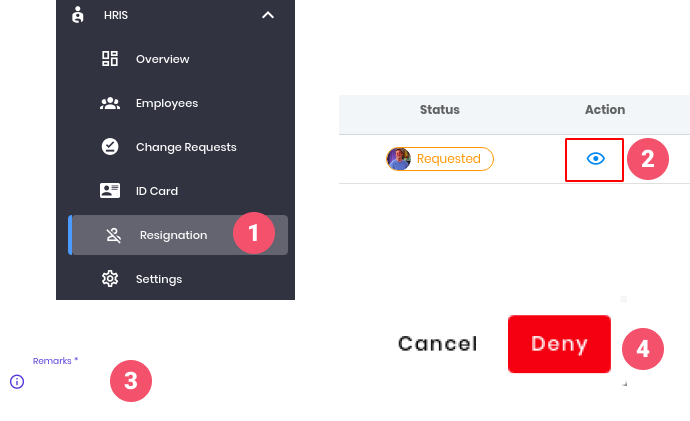
- Click on HRIS and Click on Resignation
- Click on eye icon in the action to view request detail.
- **Add remarks **.
- Click on Deny.
# Settings
# Contract Settings
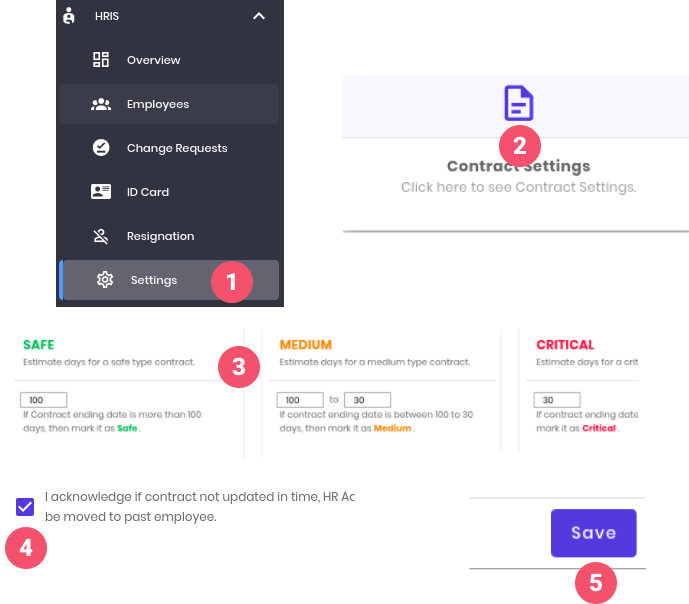
- Click on HRIS and Click on Settings
- Click on Contract Settings
- Enter the estimated day for Safe,medium and Critical days for the contract.
- Check the Acknowledgement box.
- Click on Save
# Letter Template

- Click on HRIS and Click on Settings
- Click on Letter Template
- Click on Create New.
- Enter Name of the Letter
- Select Letter Category.
- Enter Letter Message.
- Click on Save.
# Seperation Type
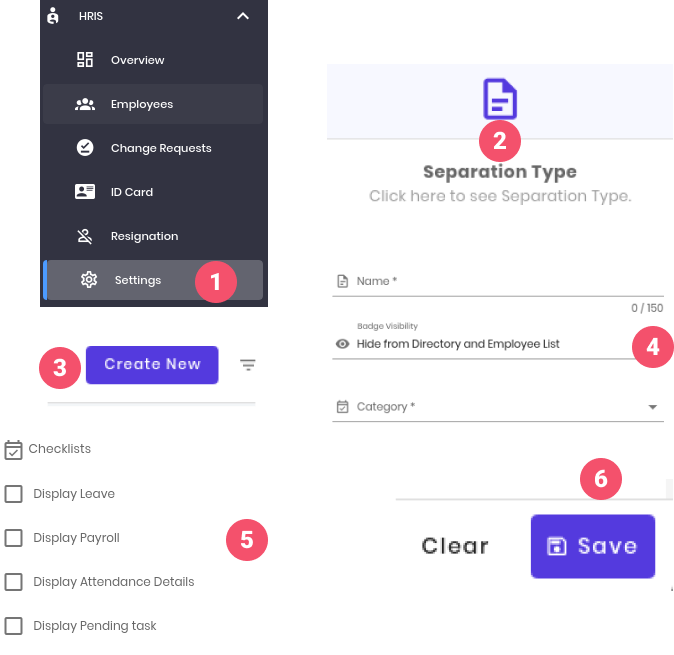
- Click on HRIS and Click on Settings
- Click on Seperation Type
- Click on Create New.
- Enter the separation type name,badge visibility,category.
- Select the checklist as per the need.
- Click on Save.
# Task Template
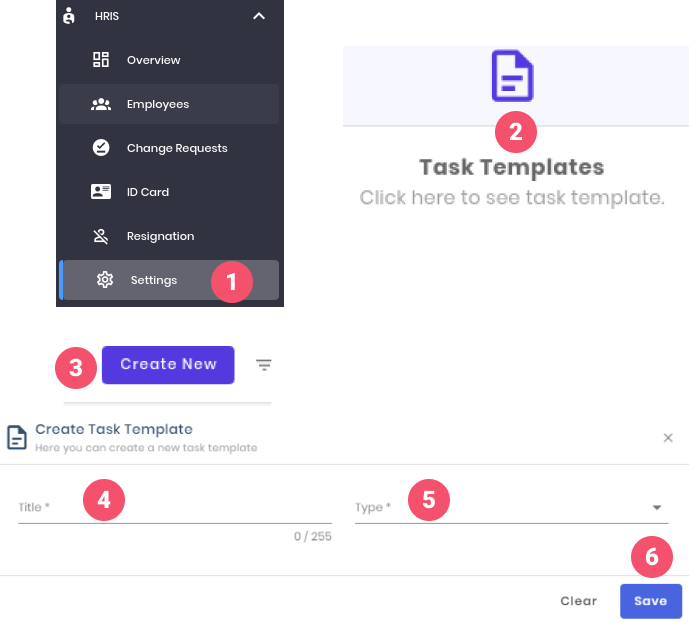
- Click on HRIS and Click on Settings
- Click on Task Template
- Click on Create New.
- Enter title
- Select type
- Click on Save
# Employment Review Type
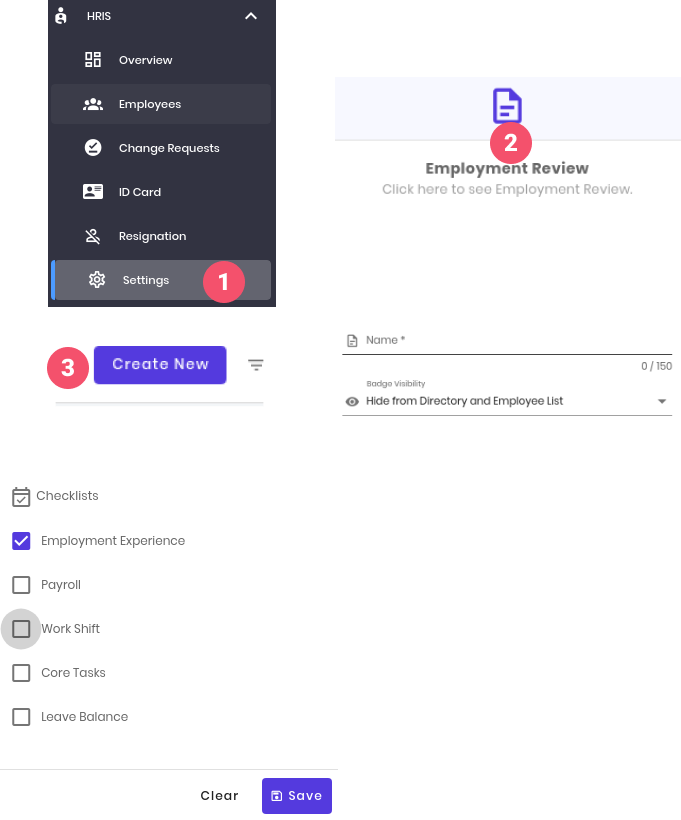
- Click on HRIS and Click on Settings
- Click on Employment Review
- Click on Create New.
- Enter the Name
- Enter badge visibility
- Select the checklist as per the need
- Click on Save
# Creating Exit Interview Questions
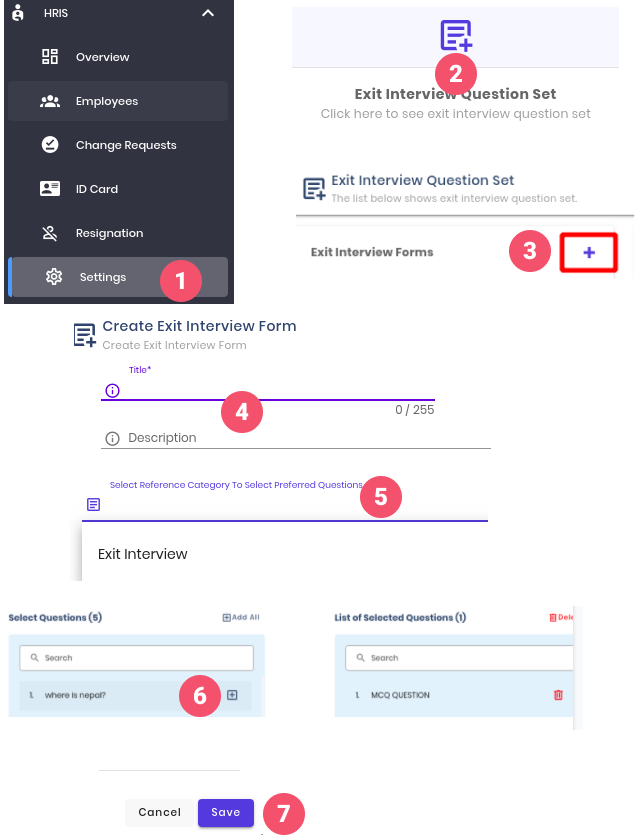
- Click on HRIS and Click on Settings
- Click on Exit Interview Question Set
- Click on the plus(+) icon
- Enter Title,Description and select Reference Category to Select Preferred questions.
- Select the available reference category.
- Select the question from the category by clicking plus(+) sign . Select question is preview in the right side.
- Click on Save.
# Email Setting
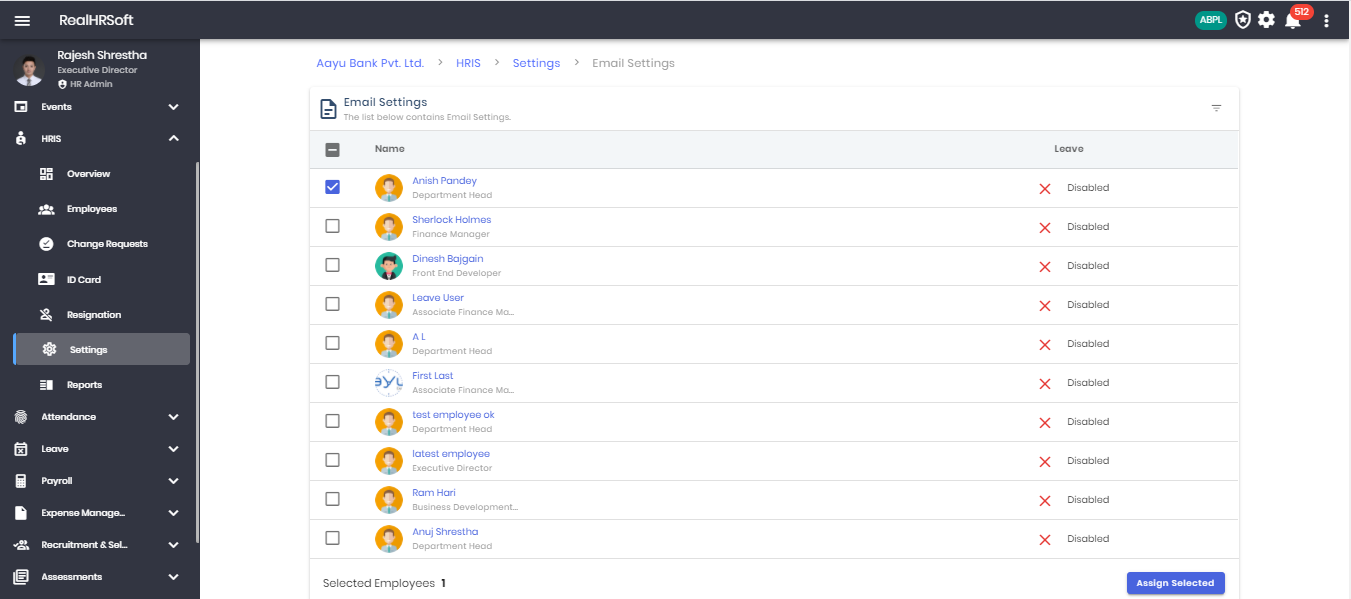
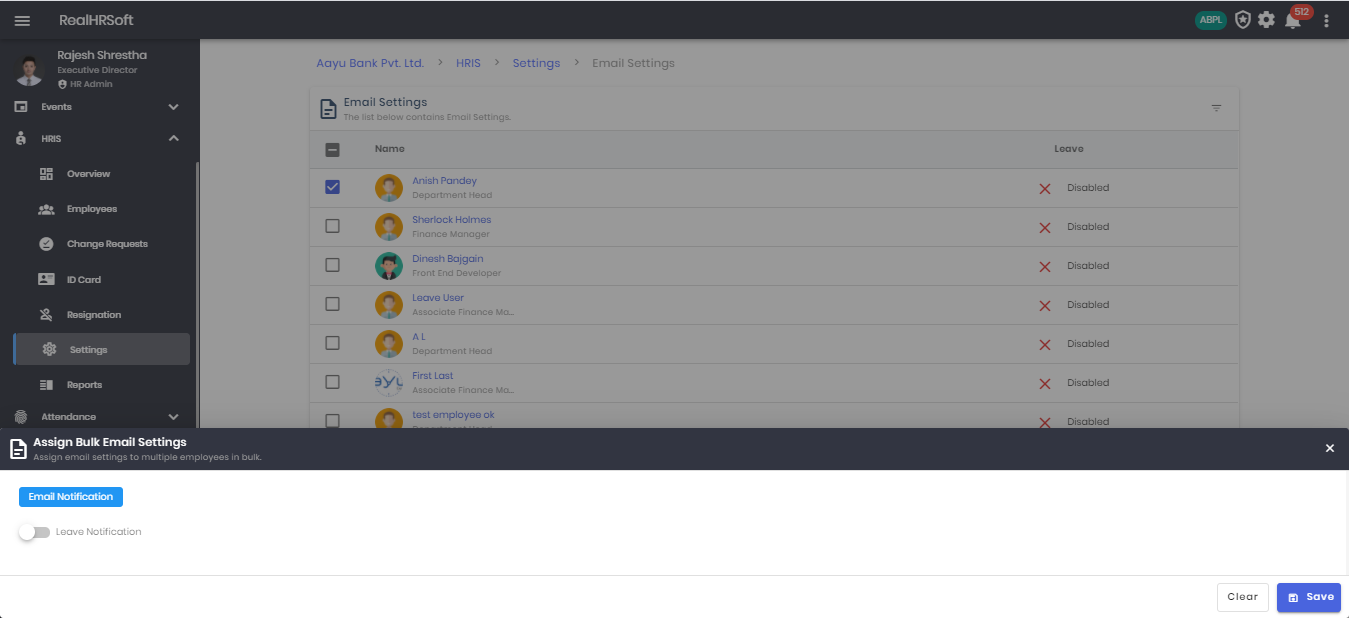
The platform allows sending of automated email based to their employees. This can be enabled/disabled for individual employee based on the company rules.
- Go to “HRIS” in the sidebar. Click on “Setting” followed by “Email Setting” to view the list of employees and their email settings for leave.
- You may bulk assign email settings for leave by selecting multiple employees at once.
# Resignation Approval
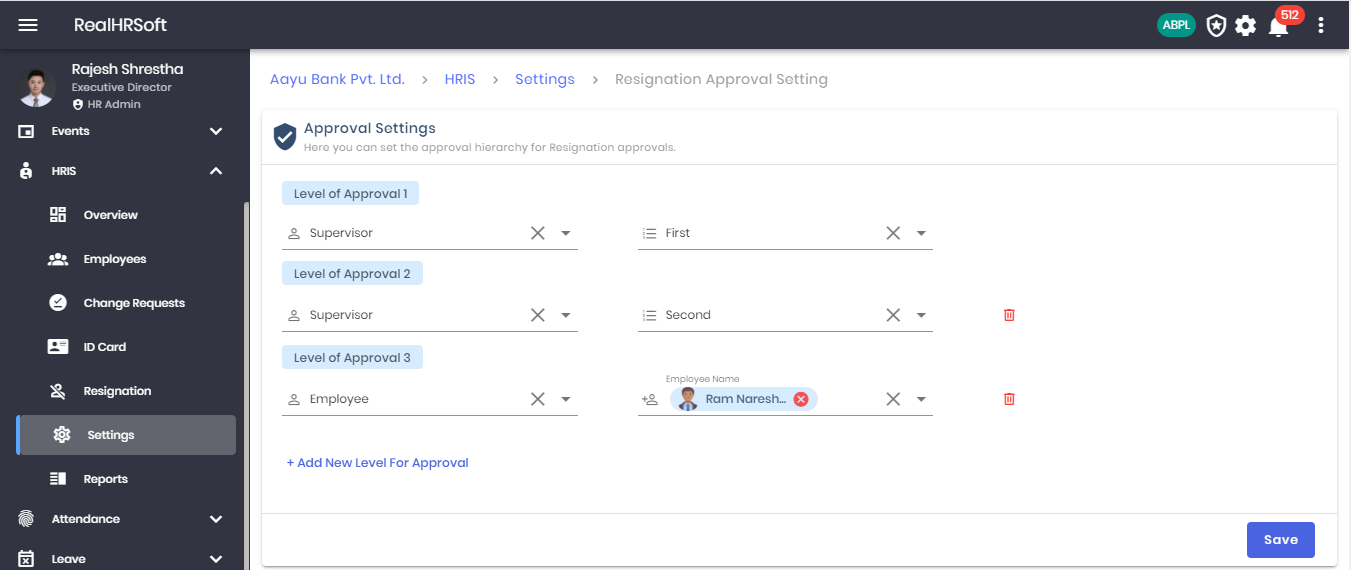
Organizations often require multiple level of approval before accepting resignation from an employee. The platform allows the HR to set up a hierarchy to be followed based on their position in the organization before the approval is confirmed.
- Go to “HRIS” in the sidebar. Click on “Setting” followed by “Resignation Approval” to set the approval hierarchy for resignation approval.
- Multiple levels of hierarchy can be set and new level can be added by clicking on “Add New Level of Hierarchy”
# Duty Station
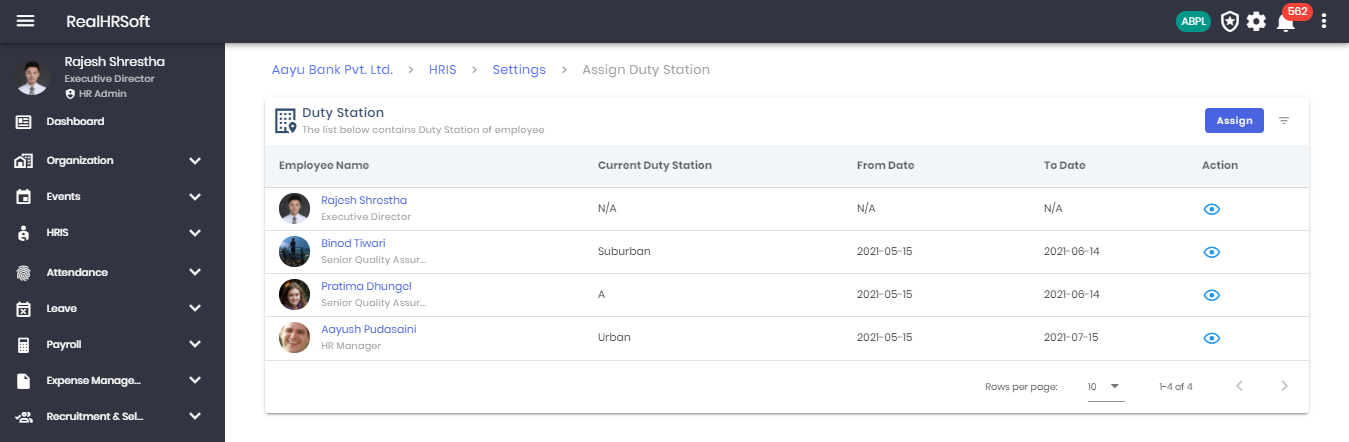
- Go to “HRIS” in the sidebar. Click on “Setting” followed by “Duty Station” to view the list of employees and their duty station details.
- Click on “Assign” to assign a duty station for the employee by providing the details for the same.
# Reports
# Basic Reports
# Branch
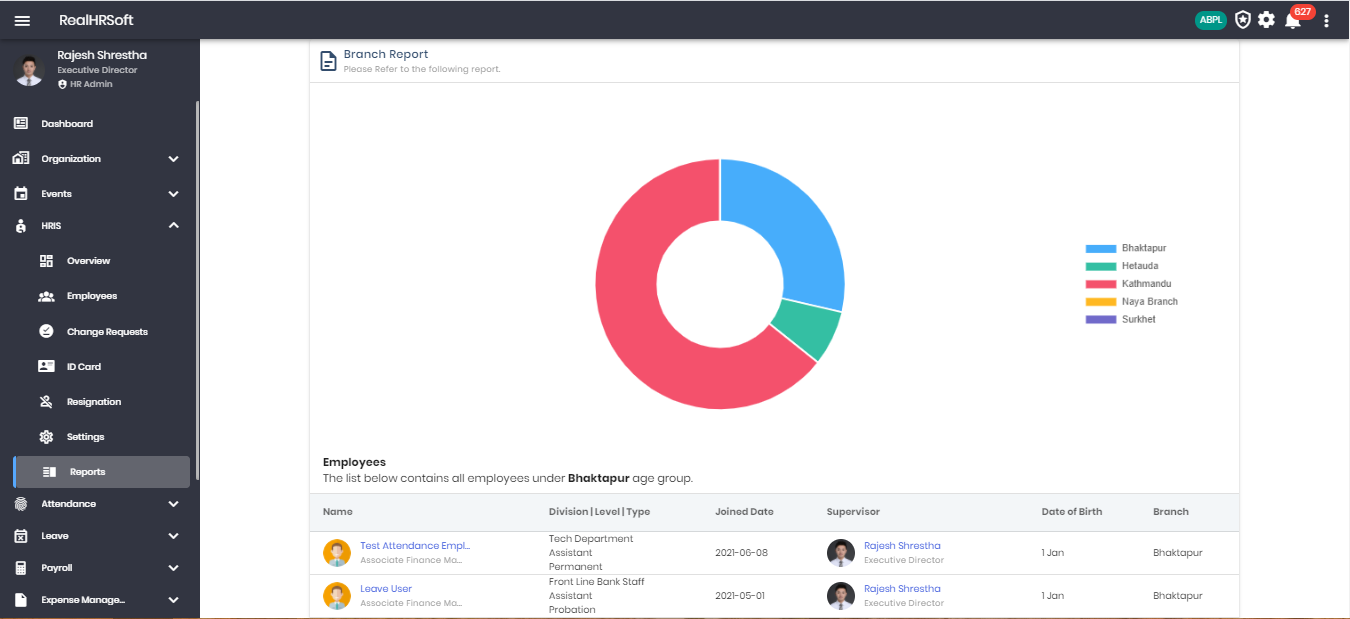
The HR can view a report on each branch which includes the list of employees within the given branch. By clicking on the given branch gives the detail about the particular employees of the branch.
The HR can easily navigate and view the company’s Employees Basic Reports by scrolling to the “HRIS” section and clicking on “Reports”. Within the Report section, they will find the “Basic Reports”. Here lies the option to view the basic report on “Branch”
# Contract Status
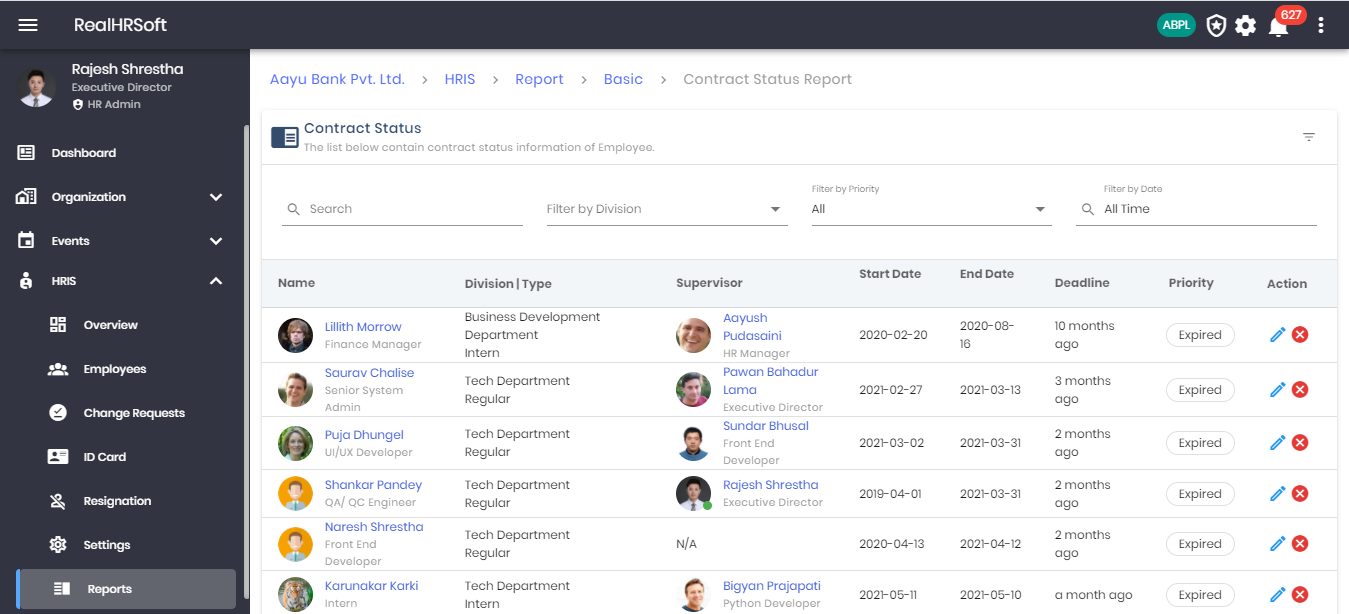
The HR can view a report on the contract status of all the employees within the organization using the platform. The report includes the employee’s contract details, contract priority status along with the option to renew or terminate the contract.
The HR can easily navigate and view the company’s Employees Basic Reports by scrolling to the “HRIS” section and clicking on “Reports”. Within the Report section, they will find the “Basic Reports”. Here lies the option to view the basic report on “Contract Status”
# Employment Type
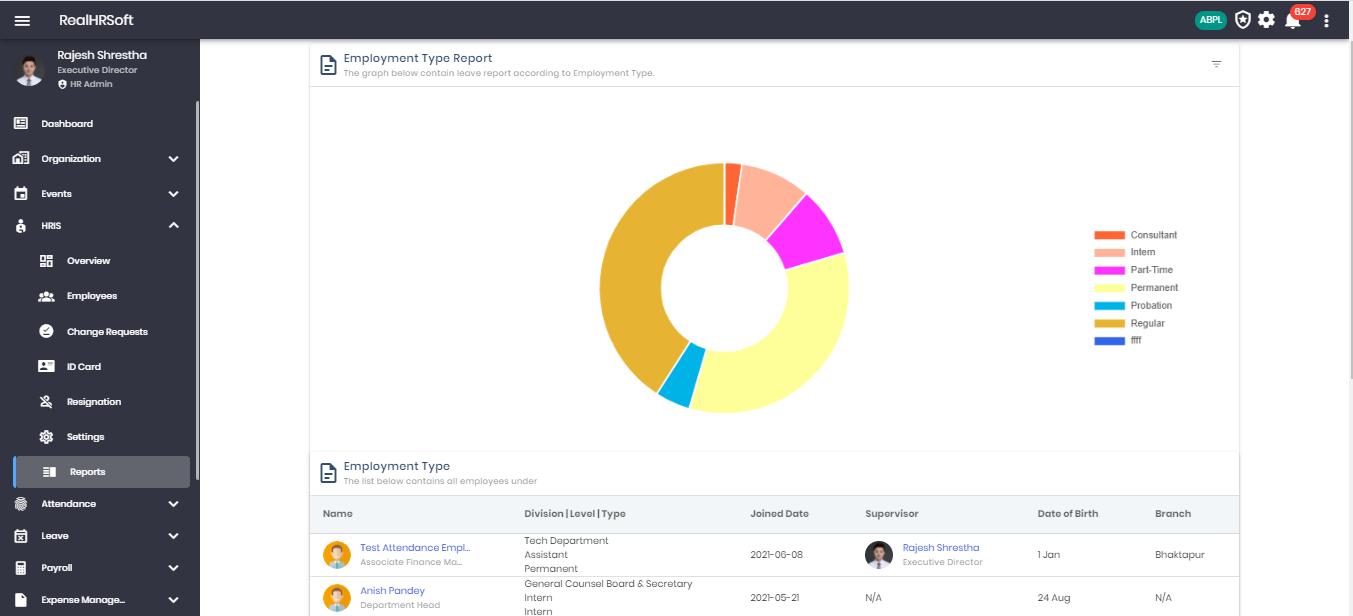 - The HR can view a report on the employment type within the given branch. By clicking on the given employment type gives the detail about the employees with the particular employment type.
- The HR can easily navigate and view the company’s Employees Basic Reports by scrolling to the “HRIS” section and clicking on “Reports”. Within the Report section, they will find the “Basic Reports”. Here lies the option to view the basic report on “Employment Type”
# Multicomparative report view
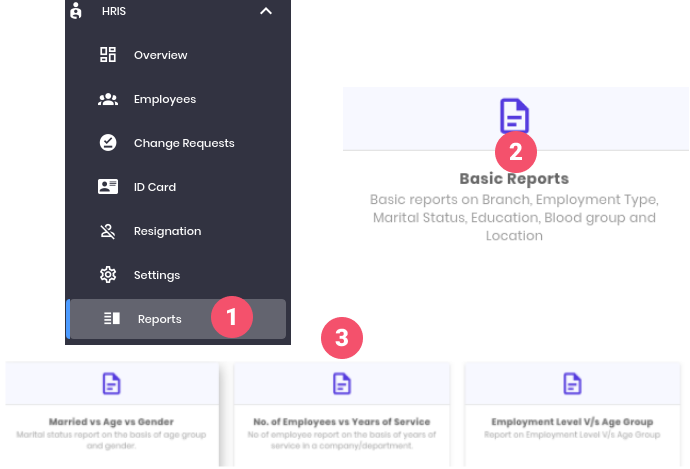
- Click on HRIS and click on Reports.
- Select Basic Reports.
- Click on any report to view.
# Married vs Age vs Gender
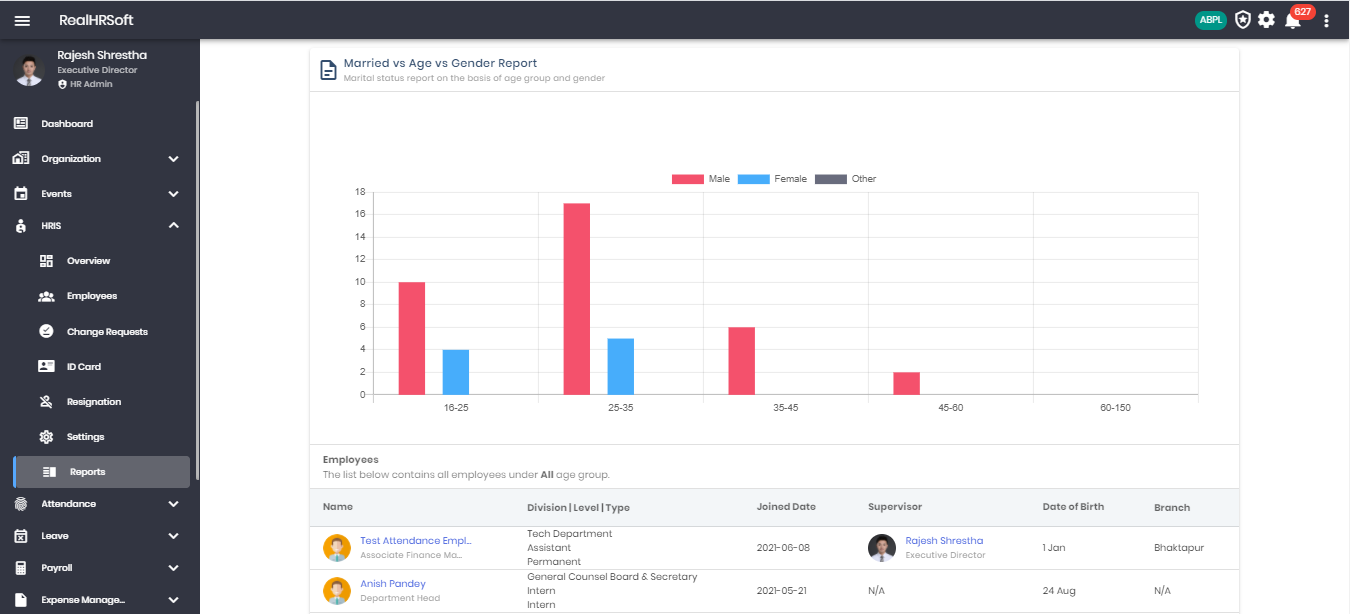
The HR can view a report on the marital status of the employee based on age and gender. By clicking on the given gender gives the detail about the employees with the particular gender in the age range.
The HR can easily navigate and view the company’s Employees Multiple Comparative Reports by scrolling to the “HRIS” section and clicking on “Reports”. Within the Report section, they will find the “Multiple Comparative Reports”. Here lies the option to view the Multiple Comparative Reports on “Married vs Age vs Gender”
# No of Employees vs Years of Service
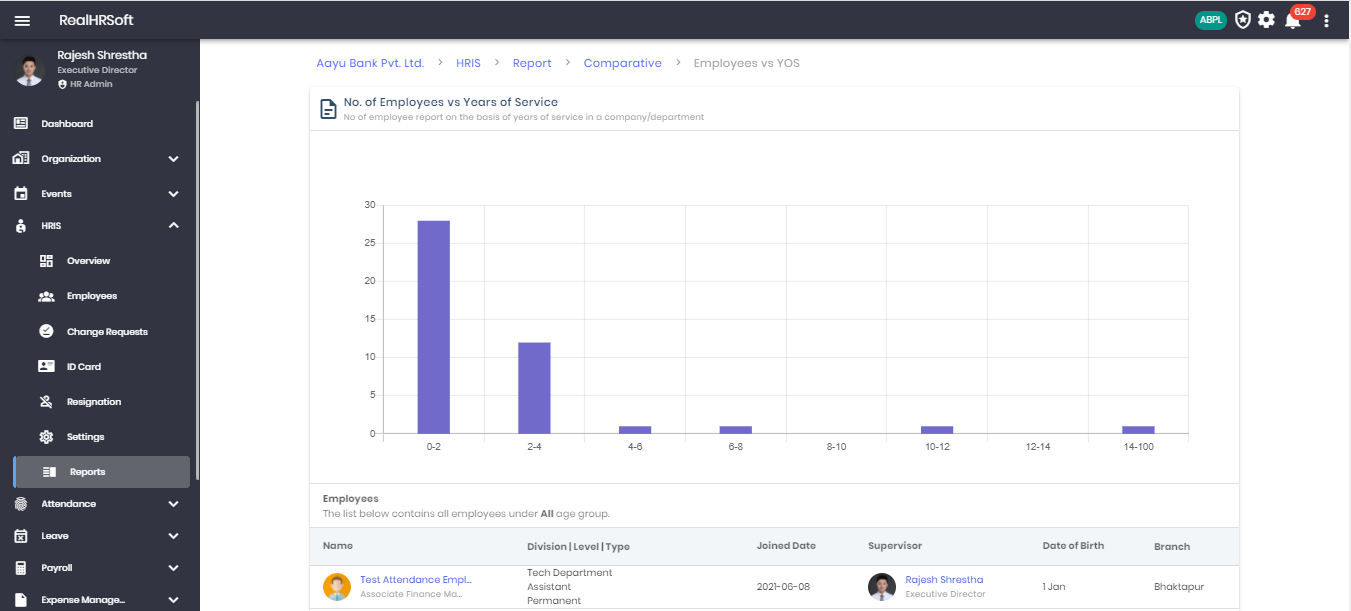
The HR can view a report on the number of employees on the basis of years of service in a company/department. By clicking on the given year of service gives the detail about the employees with the particular employment year of service.
The HR can easily navigate and view the company’s Employees Multiple Comparative Reports by scrolling to the “HRIS” section and clicking on “Reports”. Within the Report section, they will find the “Multiple Comparative Reports”. Here lies the option to view the Multiple Comparative Reports on “No of Employees vs Years of Service”
# Employment Level vs Age Group
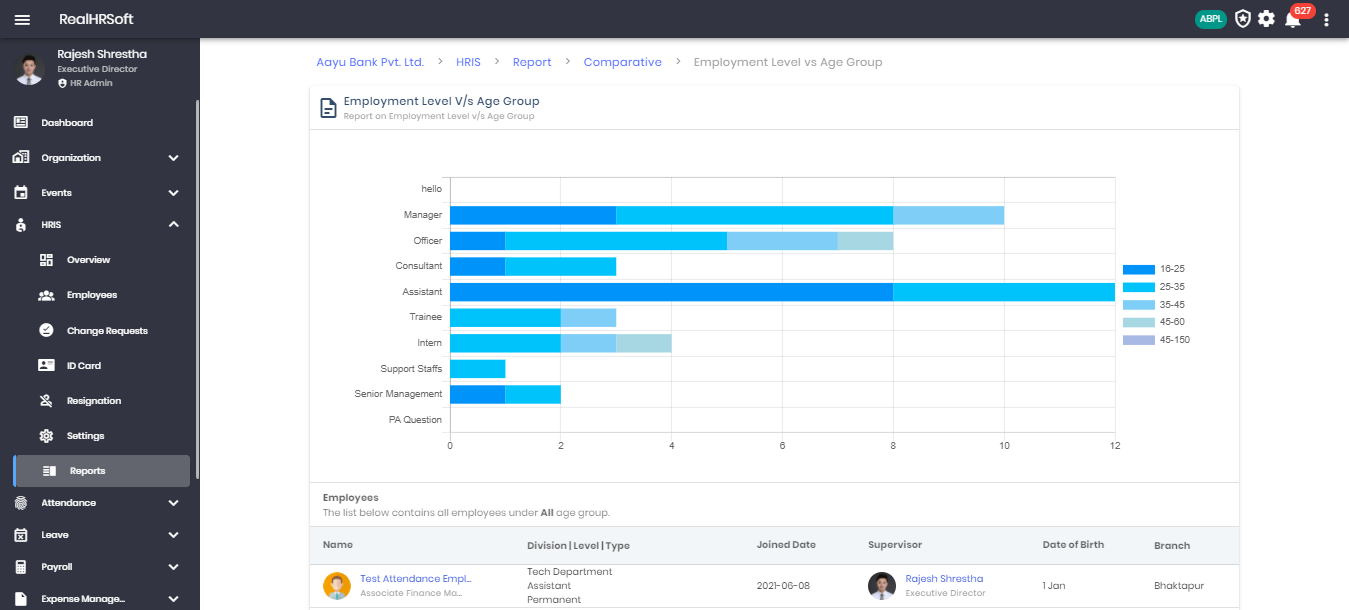
The HR can view a report on the employment level and in the particular age group. By clicking on the given employment level gives the detail about the employees with the particular employment level in the age range.
The HR can easily navigate and view the company’s Employees Multiple Comparative Reports by scrolling to the “HRIS” section and clicking on “Reports”. Within the Report section, they will find the “Multiple Comparative Reports”. Here lies the option to view the Multiple Comparative Reports on “Employment Level vs Age Group”
# Employment Review
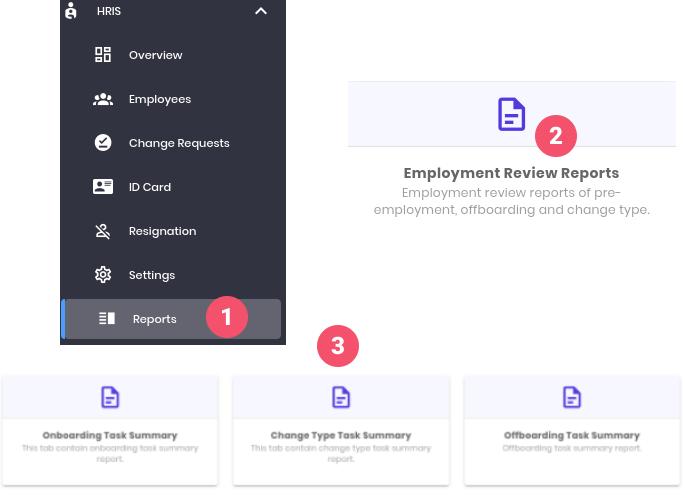
- Click on HRIS and click on Reports.
- Select Employment Review Reports.
- Click on the Employment review report you want to view(Onboarding task summary, change type task summary ,offboarding task summary report.).
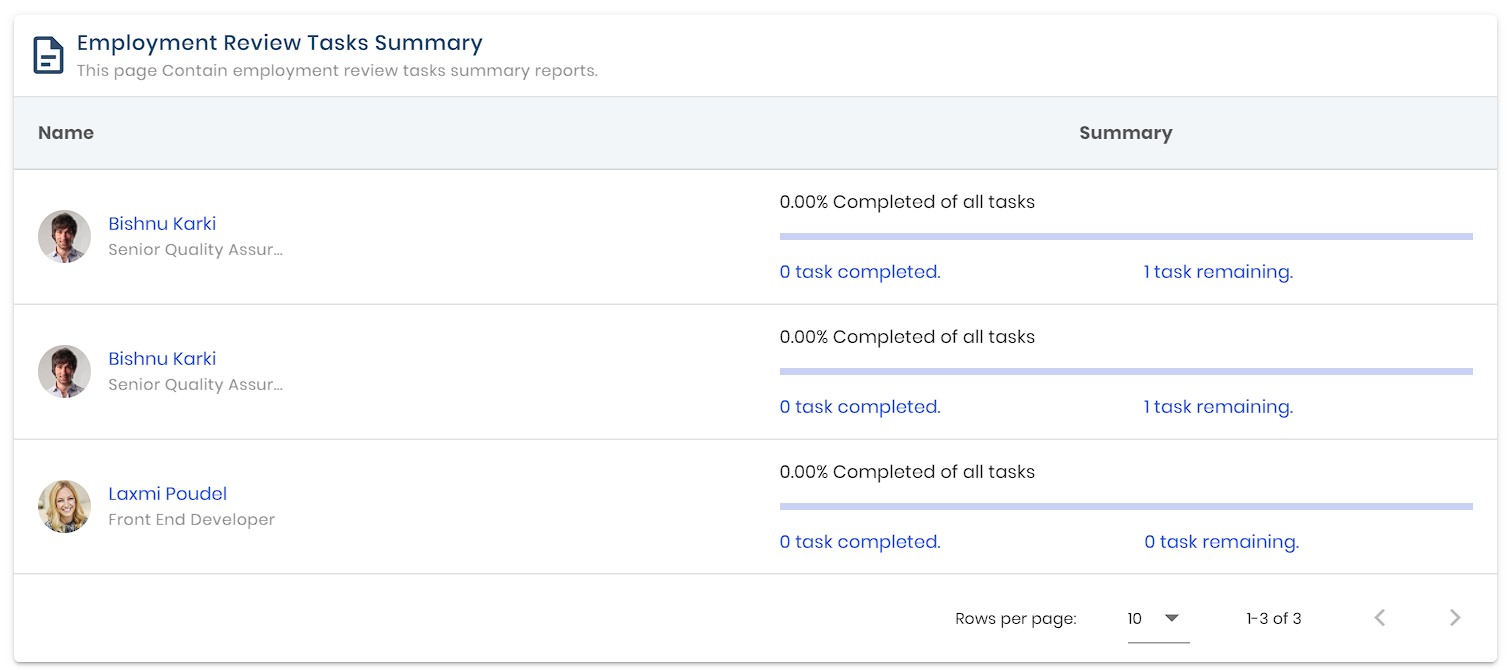
# Onboarding Task Summary
- The HR can easily navigate and view the company’s Employment Review Reports by scrolling to the “HRIS” section and clicking on “Reports”. Within the Report section, they will find the “Employment Review Reports”
# Change Type Task Summary
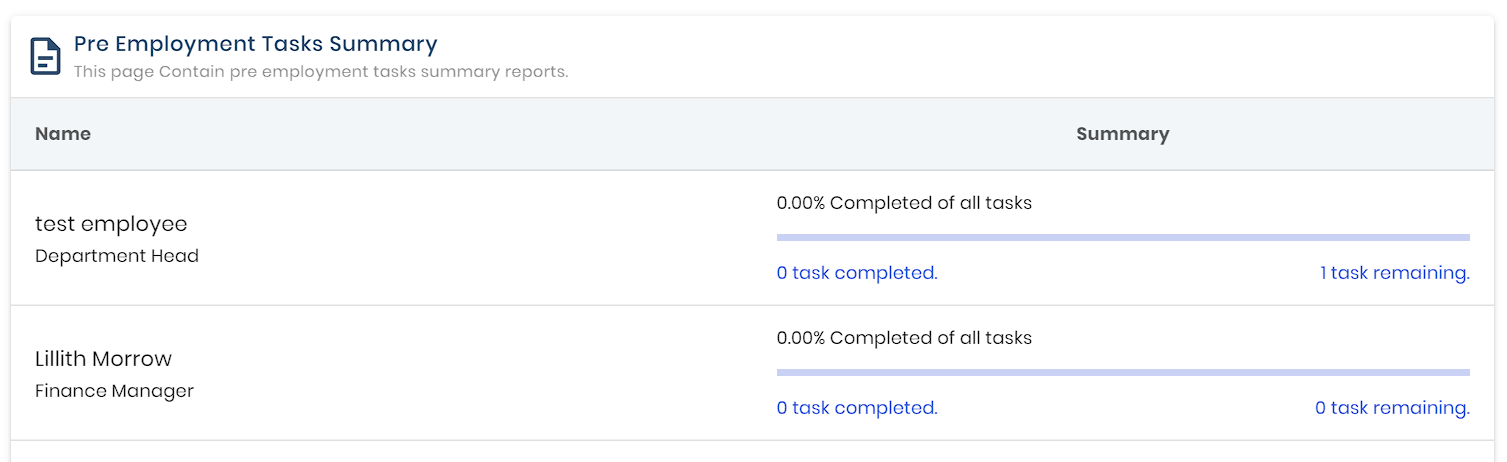
- This page Contain employment review tasks summary reports.
# Offboarding Task Summary
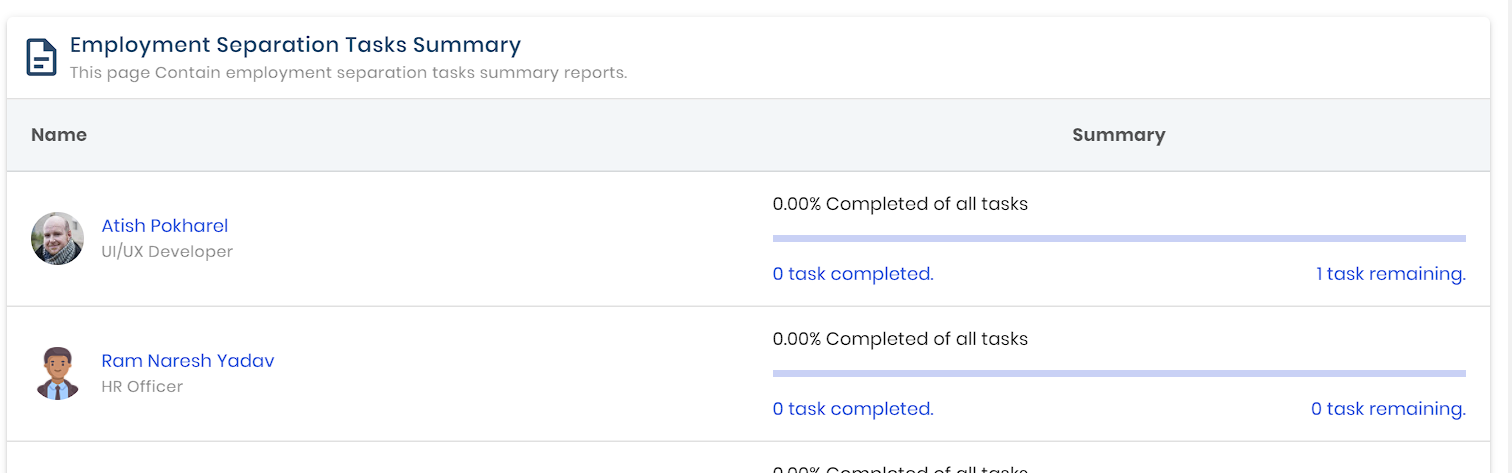
- This page Contain employment separation tasks summary reports.
# Generate Reports
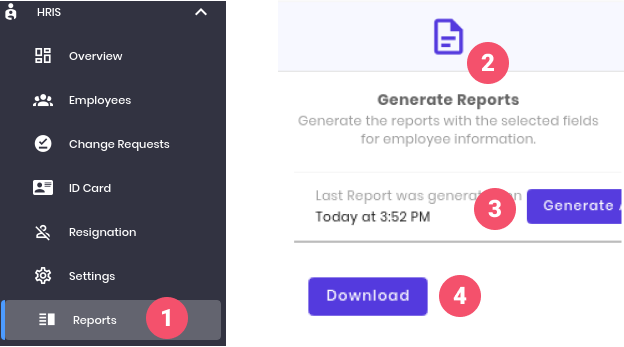
- Click on HRIS and click on Reports.
- Click on Generate Reports
- Click on Generate button (Make sure generated time is correct)
- Click on Download to download Report.
# Exit interview
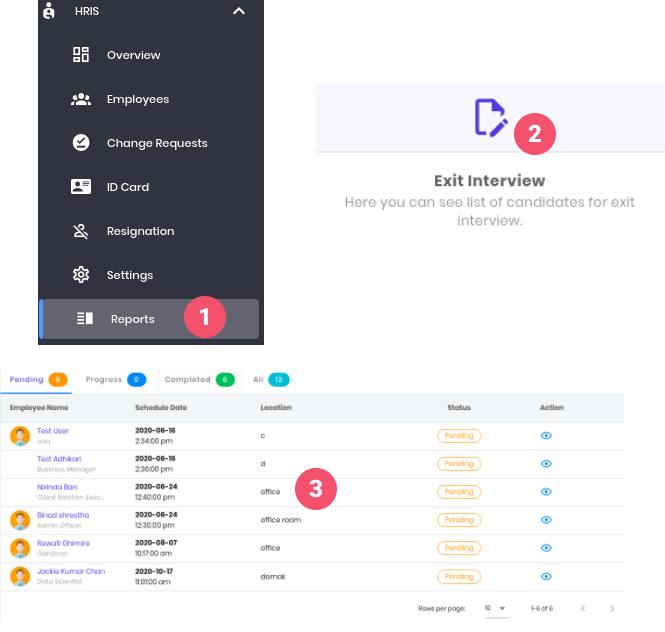
- Click on HRIS and click on Reports.
- Click on Exit Interview
- Now you call see the list of all (pending, progress,completed) exit interview candidates.
# Attendance
# Attendance Overview
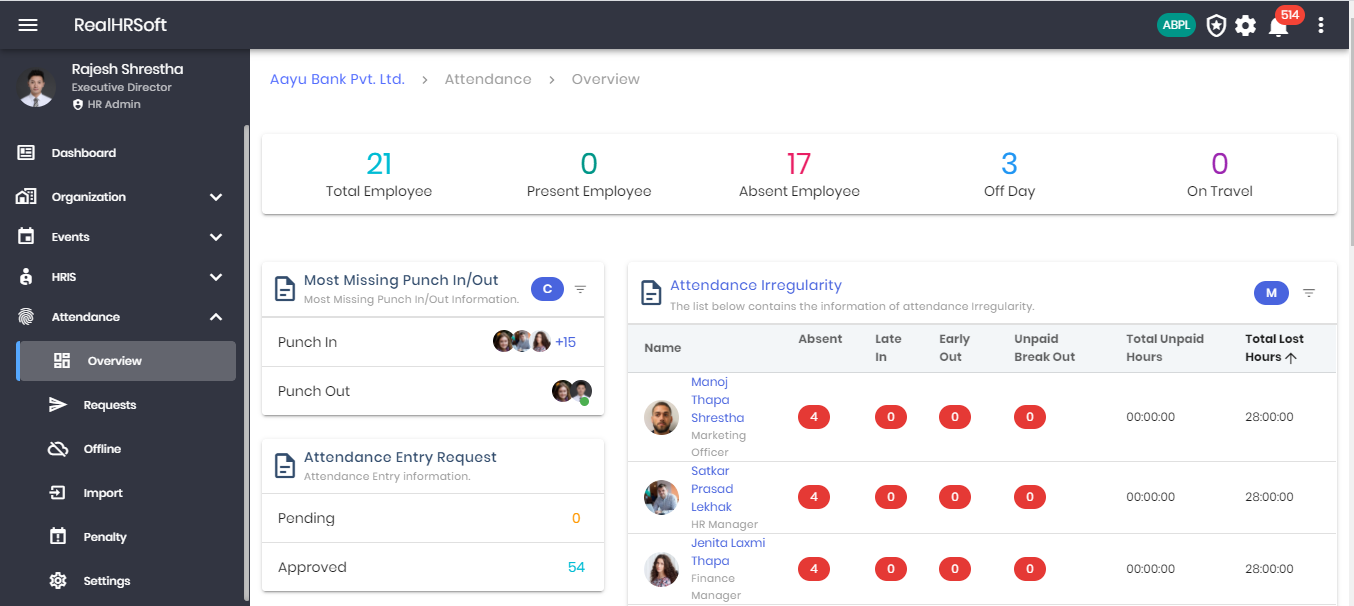

- Go to “Attendance” in the sidebar. Click on “Overview” for a summary of the employee attendance within the organization.
- Click on the number above “Total Employees” to display the list of employees within the organization.
- Click on the number above “Present Employees” to display the list of employees that are present today in the organization.
- Click on the number above “Absent Employees” to display the list of employees that are absent for the day within the organization.
- Click on the number above “Off Day” to display the list of employees with an off day assigned to their shift.
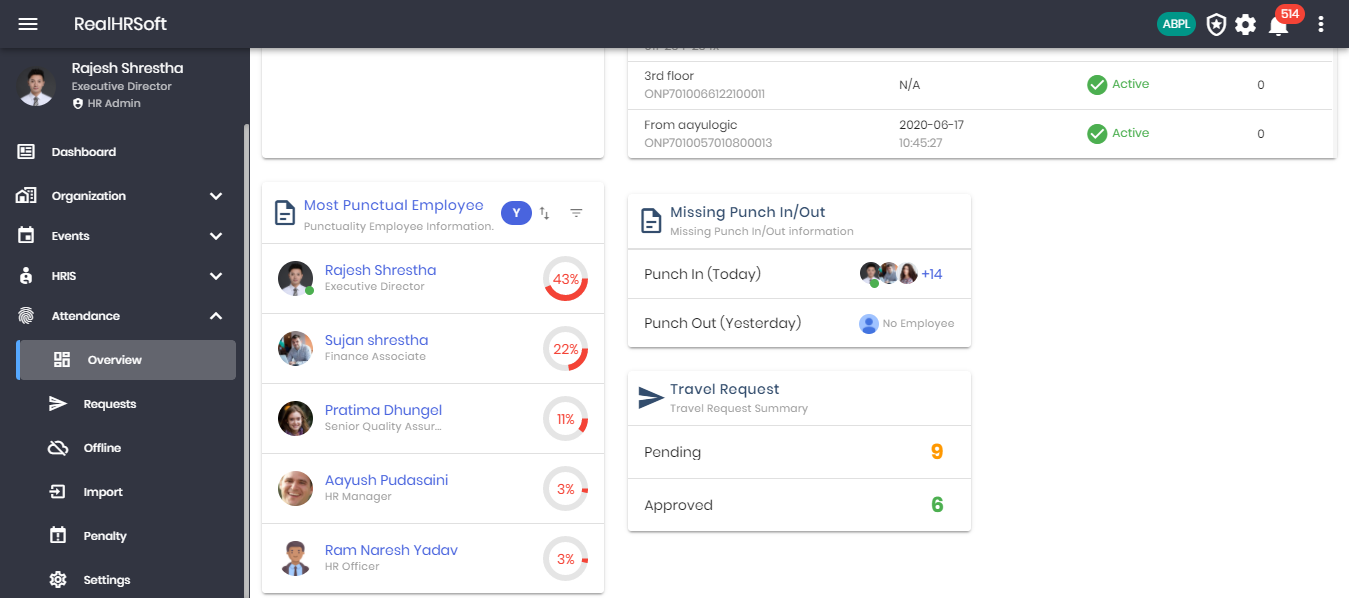
- Displays the list of “Most Punch In/Punch Out Missing” employees, you may filter it for a specific date ranges.
- Displays the “Top Task Assignee” for the month, you may also sort it based on “Least Task Assignee” or filter it for different date ranges.
- Displays the list of employees with attendance irregularities for the month. You may also filter it for different date ranges, shift, division or branch.
- Displays the list of attendance entry information.
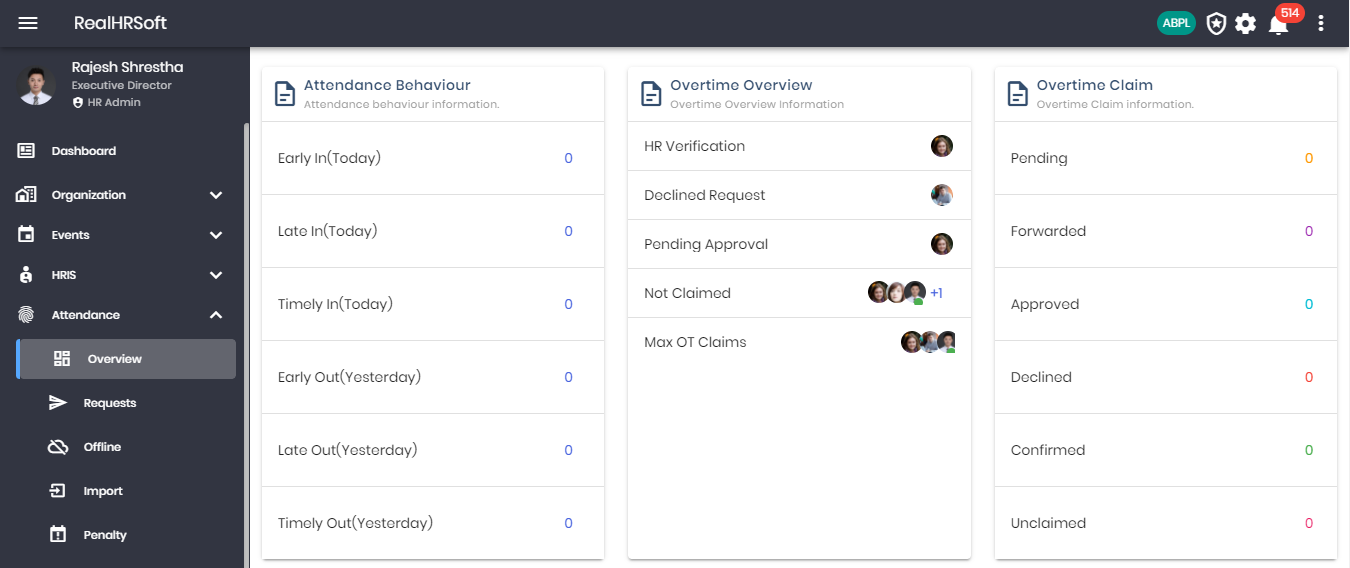
- Displays the list of employees with attendance behaviour information. Click on the number followed by attendance behaviour to list the employees in that fall in the respective criteria.
- Displays the list of overtime overview information. Employee icons will follow each information.
- Displays the overtime claim information. Click on the number followed by the information to get a list of such requests.
- Displays the list of employees to watch based on their attendance behaviour such as max stayer, most early comers etc.
- Displays the list of today’s total break in/out for each category.Click on the number followed by each category to view the list of employees and their break in/out information.
- Displays the list of employees with most break duration information for the month. You may also filter by date.
- Displays the list of employees with most break frequency information for the month. You may also filter by date.
- Displays the list of attendance devices and their status.
# Requests
# Attendance Adjustments
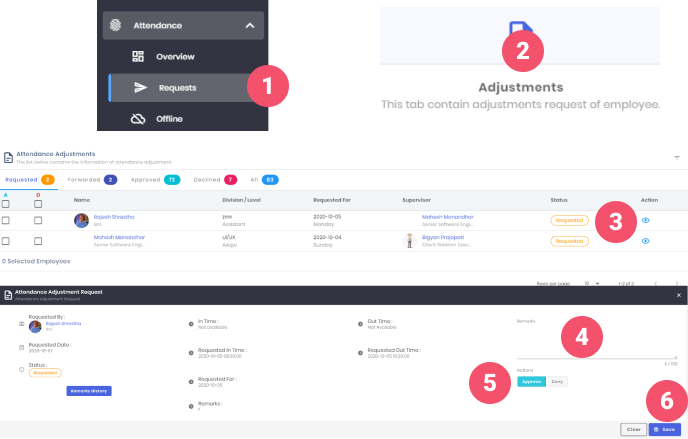
In this section, HR can view the different attendance adjustments of the organization requested by employees.
- Goto the “Attendance” on sidebar, click on “Requests”
- Click on the 'Adjustments' on the sidebar
- In this table you can view the list of attendance adjustment requests, click on “View” icon
- Enter remarks
- Choose your action to Approve or Deny
- Click on “Save” button
# Bulk Attendance Adjustments
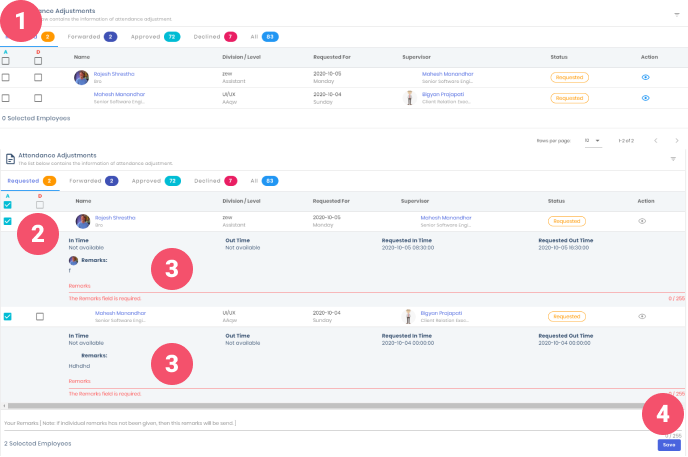
In this section, HR can take bulk action of attendance adjustments of the organization requested by employees.
- In the attendance adjustment table, in the left hand side “A” stands for Approve and “D” stands for Deny
- Select the actions “A” or “D”.
- Enter remarks
- Click on “Save” button
# Overtime Claims
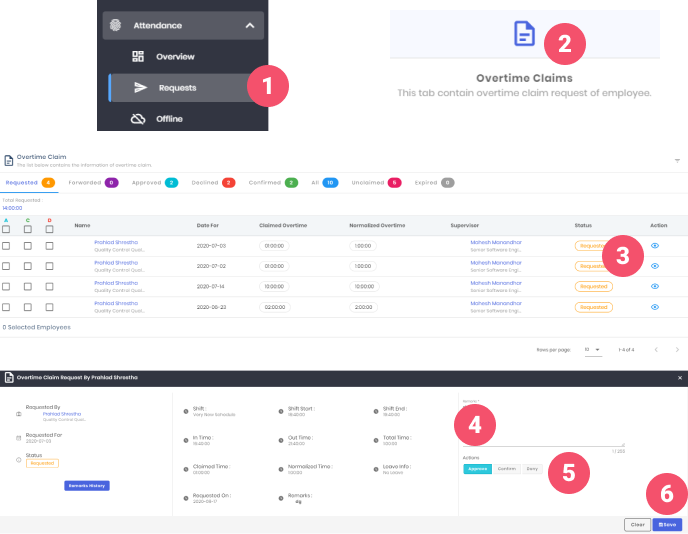
In this section, HR can view the different overtime claims of the organization requested by employees.
- Goto the “Attendance” on sidebar, click on “Requests”
- Click on the 'Overtime Claims' on the sidebar
- In this table you can view the list of overtime claim requests, click on “View” icon
- Enter remarks
- Choose your action to Approve or Deny
- Click on “Save” button
# Bulk Overtime Claims
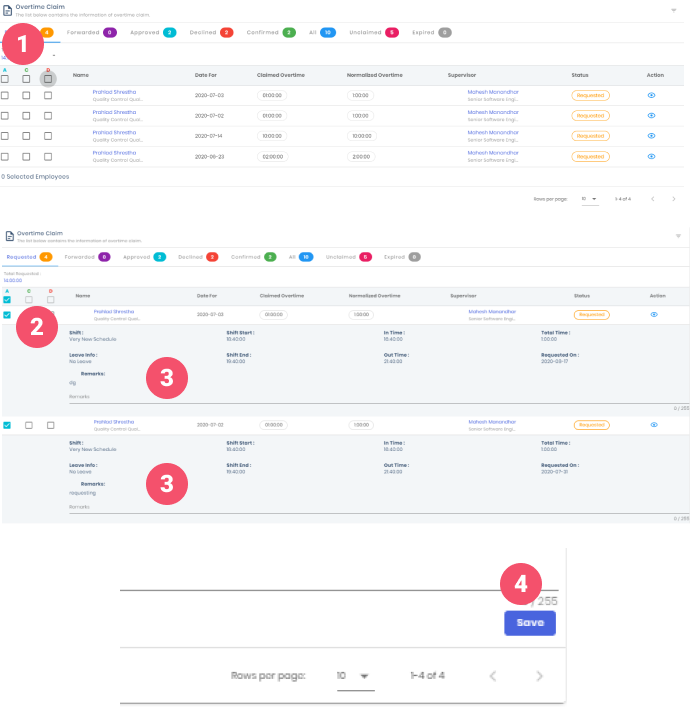
In this section, HR can take bulk action of overtime claims of the organization requested by employees.
- In the attendance adjustment table, in the left hand side “A” stands for Approve, “C” stands for Confirm and “D” stands for Deny
- Select the actions “A” “C” or “D”.
- Enter remarks
- Click on “Save” button
# Travel Attendance
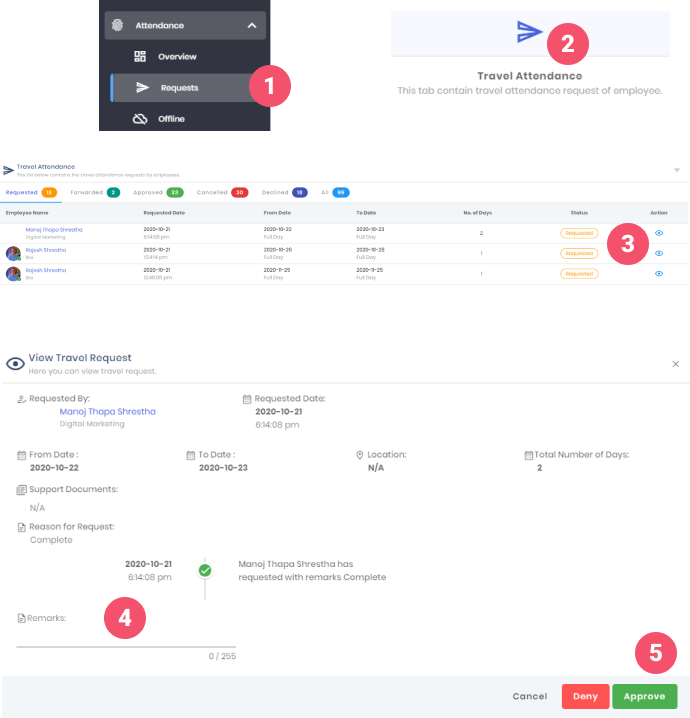
In this section, HR can view the different travel attendance of the organization requested by employees.
- Goto the “Attendance” on sidebar, click on “Requests”
- Click on the 'Travel Attendance' on the sidebar
- In this table you can view the list of travel attendance requests, click on “View” icon
- Enter remarks
- Choose your action to Approve or Deny
- Click on “Save” button
# Travel Attendance Delete Requests
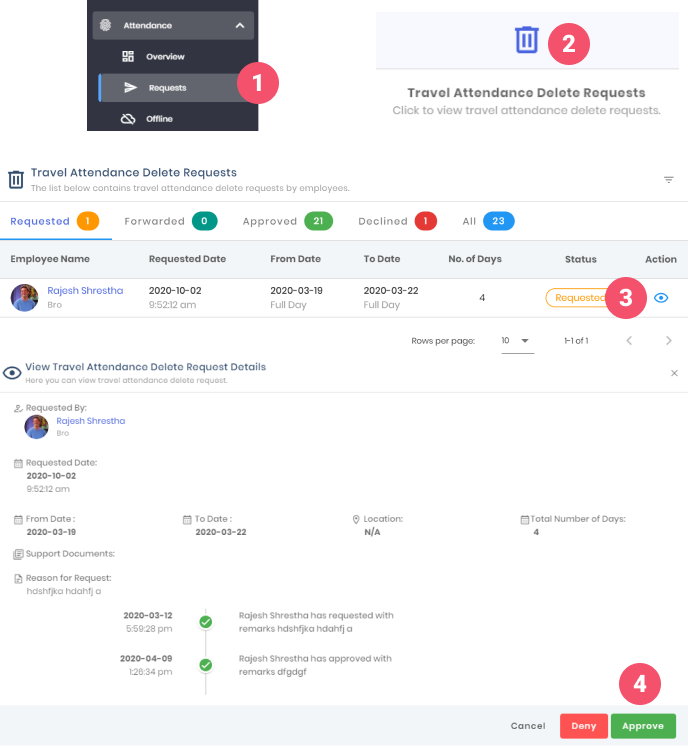
In this section, HR can view the different travel attendance delete requests of the organization requested by employees.
- Goto the “Attendance” on sidebar, click on “Requests”
- Click on the 'Travel Attendance Delete Requests' on the sidebar
- In this table you can view the list of travel attendance delete requests, click on “View” icon
- Click “Approve” or “Deny”
# Pre Overtime Requests
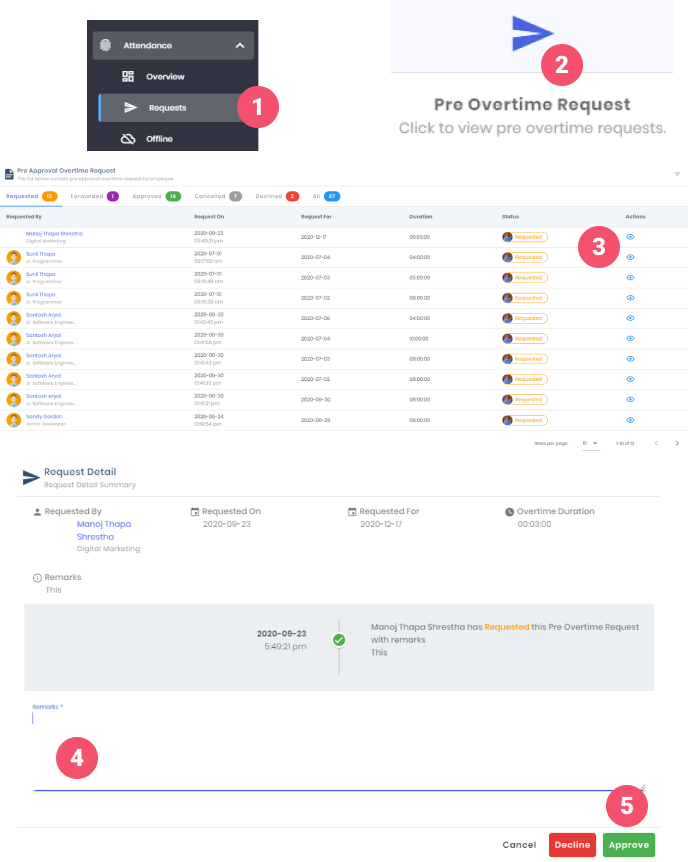
In this section, HR can view the pre overtime requests of the organization requested by employees.
- Goto the “Attendance” on sidebar, click on “Requests”
- Click on the 'Pre Overtime Request' on the sidebar
- In this table you can view the list of travel attendance delete requests, click on “View” icon
- Enter remarks
- Click “Approve” or “Deny”
# Credit Hour Requests
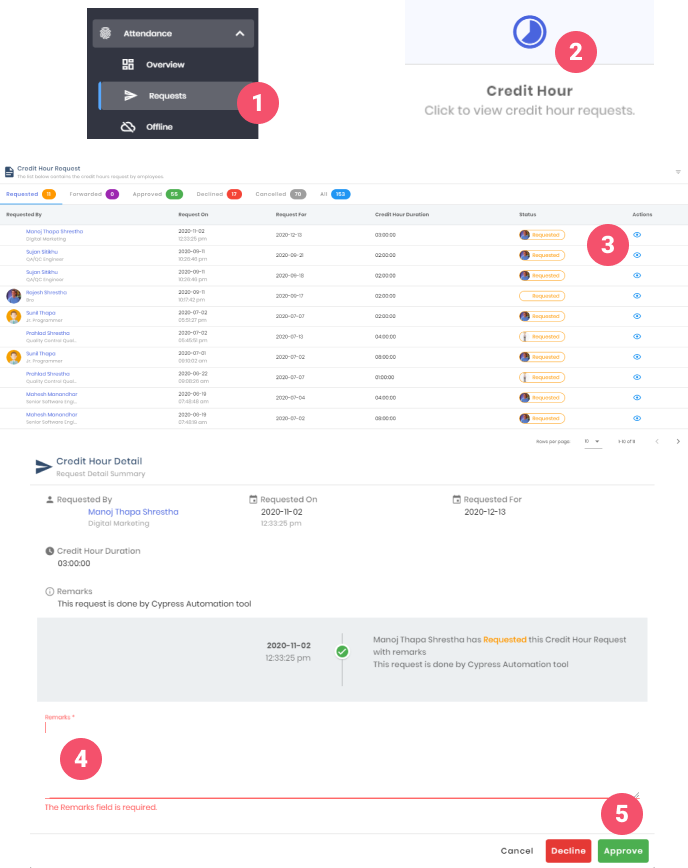
In this section, HR can view the credit hour requests of the organization requested by employees.
- Goto the “Attendance” on sidebar, click on “Requests”
- Click on the 'Credit Hour Request' on the sidebar
- In this table you can view the list of credit hour requests, click on “View” icon
- Enter remarks
- Click “Approve” or “Deny”
# Credit Hour Delete Requests
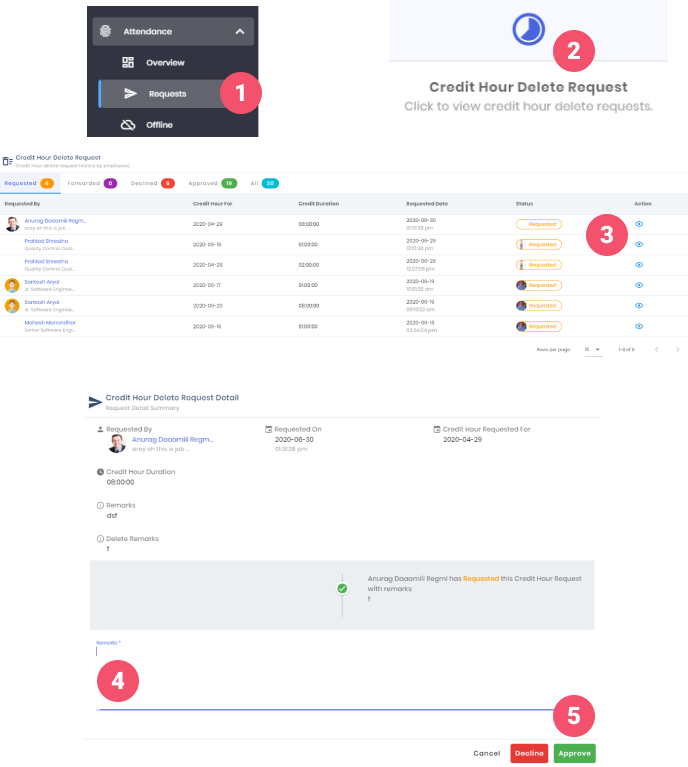
In this section, HR can view the credit hour delete requests of the organization requested by employees.
- Goto the “Attendance” on sidebar, click on “Requests”
- Click on the 'Credit Hour Delete Request' on the sidebar
- In this table you can view the list of credit hour delete requests, click on “View” icon
- Enter remarks
- Click “Approve” or “Deny”
# Time Sheet Request
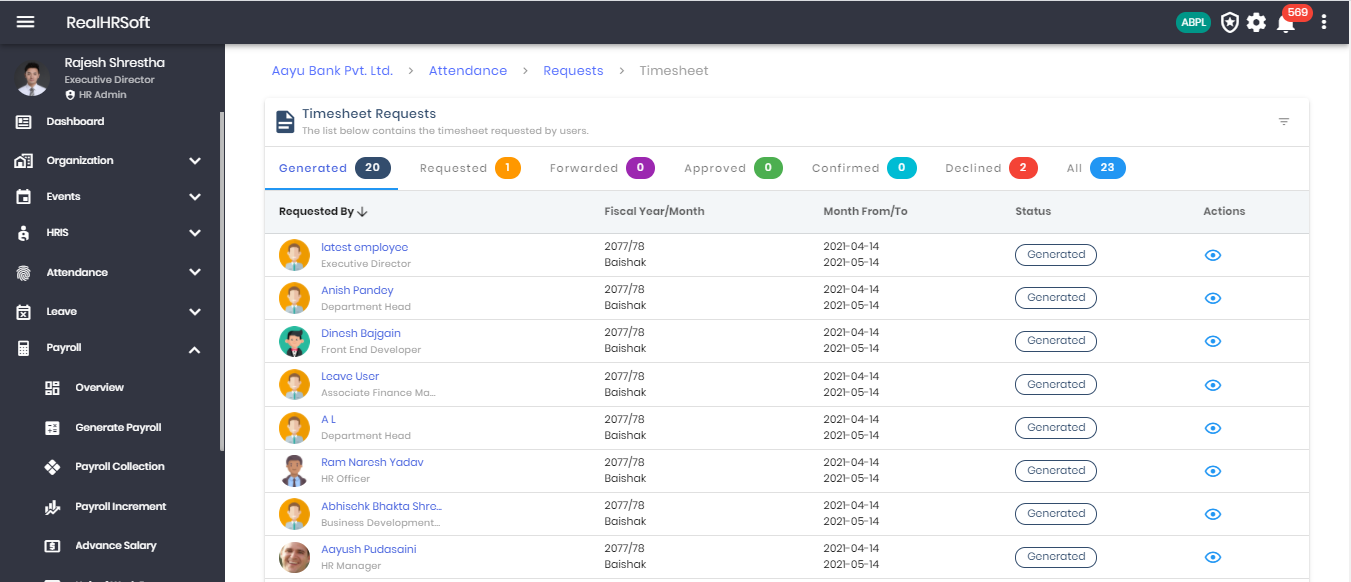
Organizations that require approval of a timesheet to document the working hour of the employee can avail the timesheet feature of the platform. The platform can generate a timesheet based on the employees attendance in the month. This can be shared with the employees, and the employees can request for the approval of the same.
- Go to “Attendance” in the sidebar. Click on “Request” followed by “Time Sheet Request” to view the list of timesheet request by the employees.
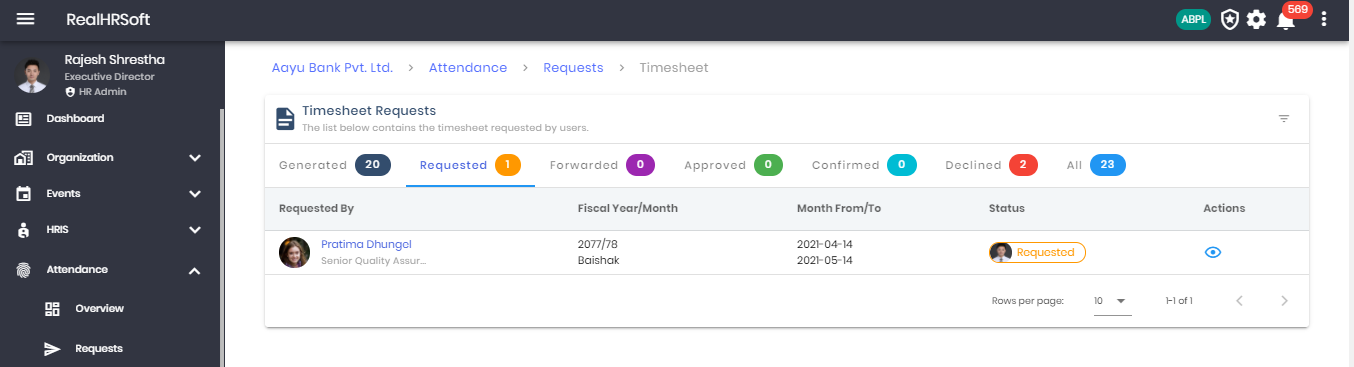
- Click to view the list of employees with their timesheet generated. You may also filter the list based on their current status. I.e. Requested, Approved,
- Click on the action button to view the timesheet generated for the employee.
- Click on “Regenerate” to generate the timesheet again if the changes are not seen in the previous generated timesheet
- Click on Remark for Attendance entry request history
- Click on “Download” to save a copy of timesheet for future reference
- Click to view the list of employees that have requested an Attendance Time sheet.
- The HR can take necessary steps such as Allow,Deny, Forward by clicking on the Action button.
# Web Attendance
**The platform allows to capture attendance via device or web attendance. The HR can enable/disable web attendance for the employees additionally the HR can also enable web attendance that requires approval too.**
- Go to “Attendance” in the side panel. Click on “Request” followed by “Web Attendance” to view the list of employees that have requested for web attendance.
- Click on “Approve” or “Deny” action button to approve or reject the attendance request.
# Offline
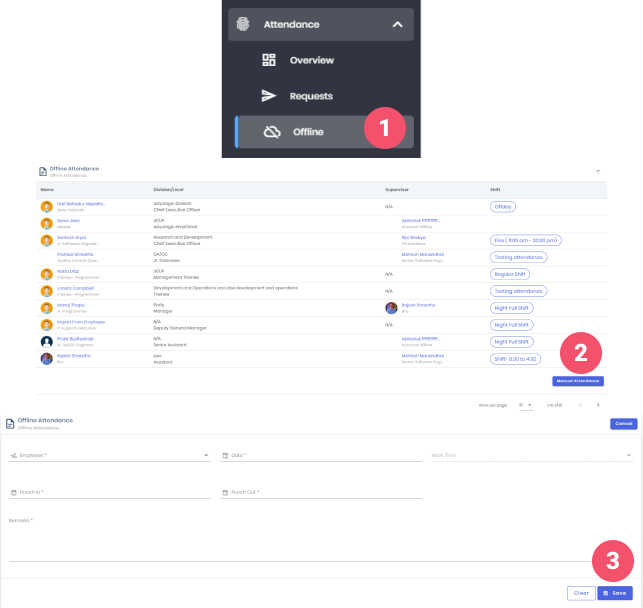
In this section, HR can set manual attendance on behalf of employees.
- Goto the “Attendance” on sidebar, click on “Offline”
- Click on the 'Manual Attendance' on the sidebar
- In this form select employees, date, punch in - punchout time and give remarks, click “Save” button
# Import
# Attendance Import
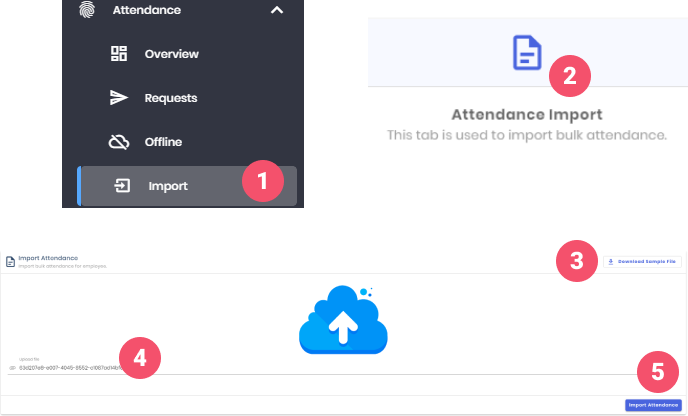
In this section, HR can import attendance records from supported formats.
- Goto the “Attendance” on sidebar, click on “Import”
- Goto “Attendance Report”
- Click “Download Sample File” to download sample file containing format
- Upload file
- Click “Import Attendance” button
# Import Overtime Claim History
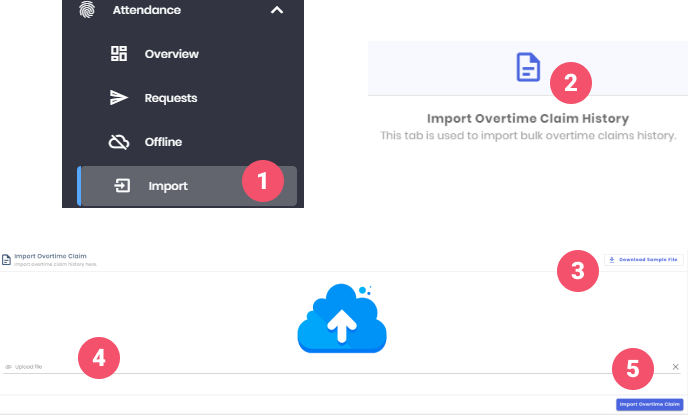
In this section, HR can import overtime claim history records from supported formats.
- Goto the “Attendance” on sidebar, click on “Import”
- Goto “Import Overtime Claim History”
- Click “Download Sample File” to download sample file containing format
- Upload file
- Click “Import Attendance” button
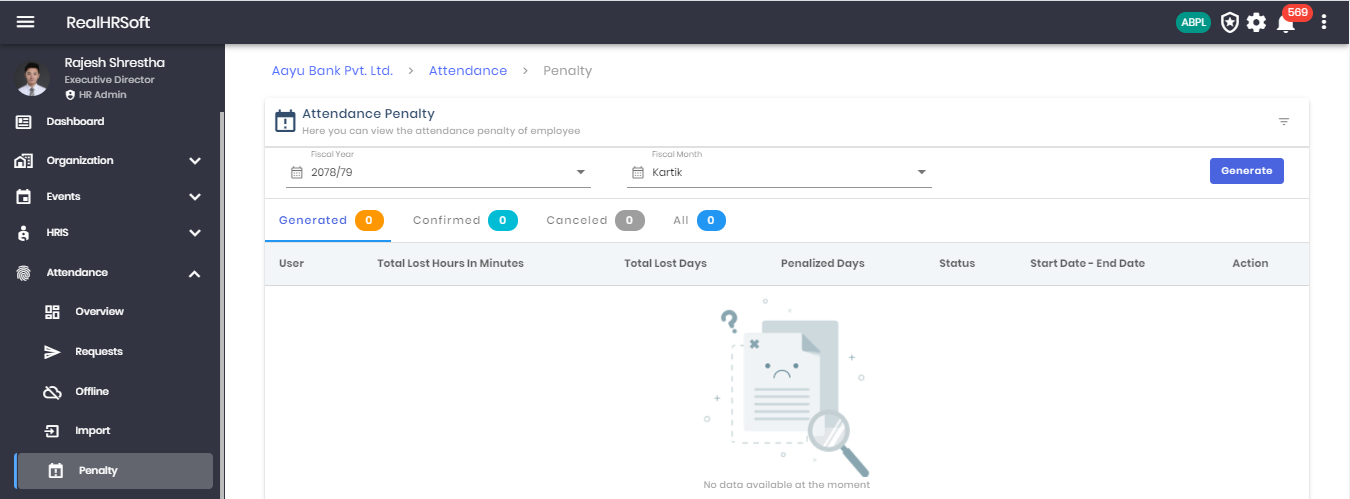
# Penalty
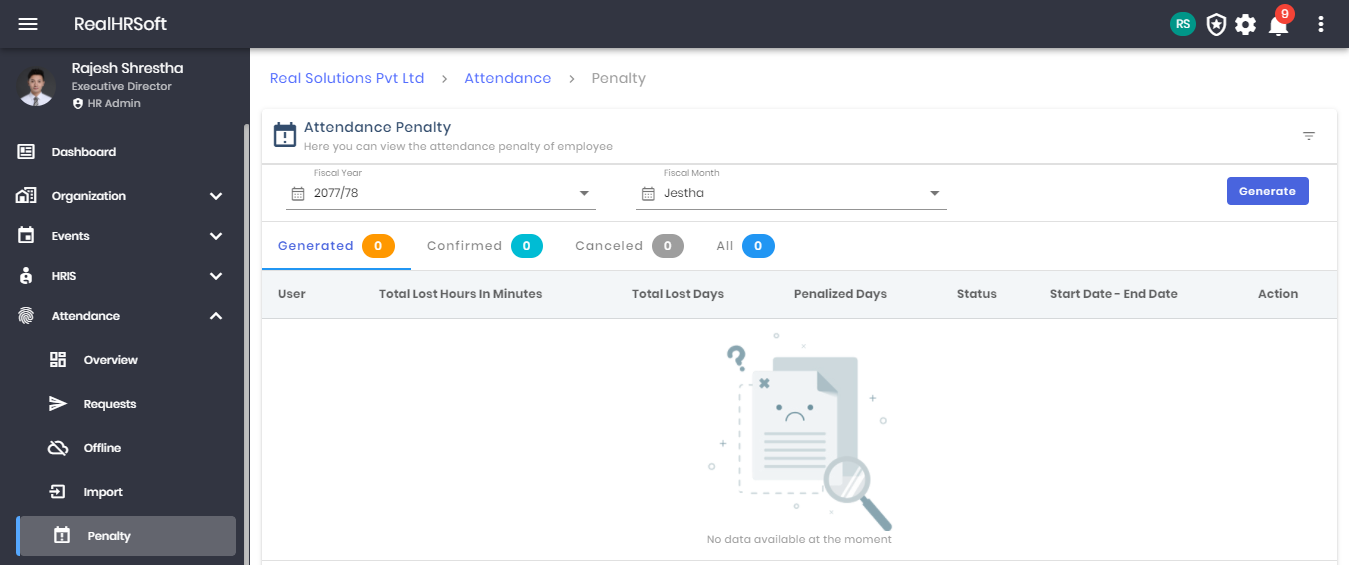
- Go to “Attendance” in the sidebar. Click on “Penalty” for a list of employees with attendance penalty.
- Click on the “Generate” button to generate the attendance penalty for employees for a given time period.
- View a different list of employees for which attendance penalty is generated, confirmed, cancelled and a combined list of all.
# Settings
# Device Setting
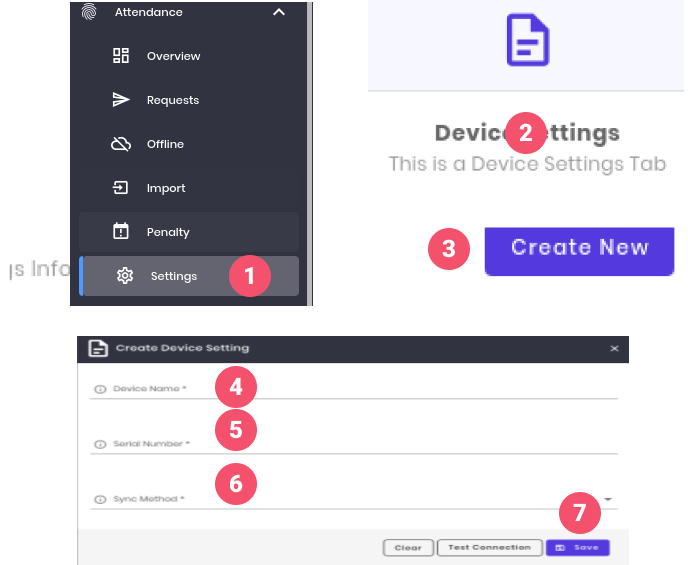
- To Create a New Device , go to Attendance on the side bar and click on “Settings”.
- Select “Device Settings”
- Click on “Create New”
- Enter the “Device Name”.
- Enter the “Serial Number”
- Select “Sync Method”
- Click on “Save”
# Update Device Setting
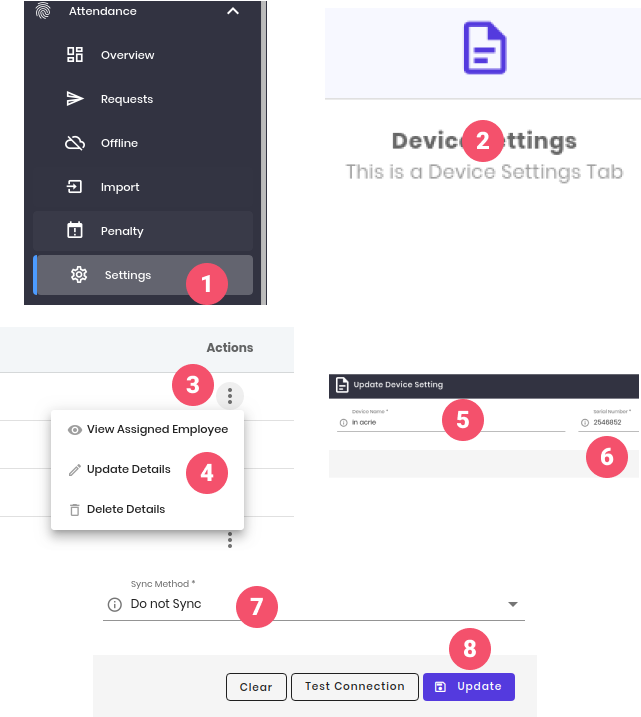
- To update a device , go to Attendance on the side bar and click on “Settings”.
- Select “Device Settings”
- Click on the “3 dot” icon of the device name you want to update.
- Click on “Update details”
- Enter the “Device Name”.
- Enter the “Serial Number”
- Select “Sync Method”
- Click on “Update”
# Delete Device Settings
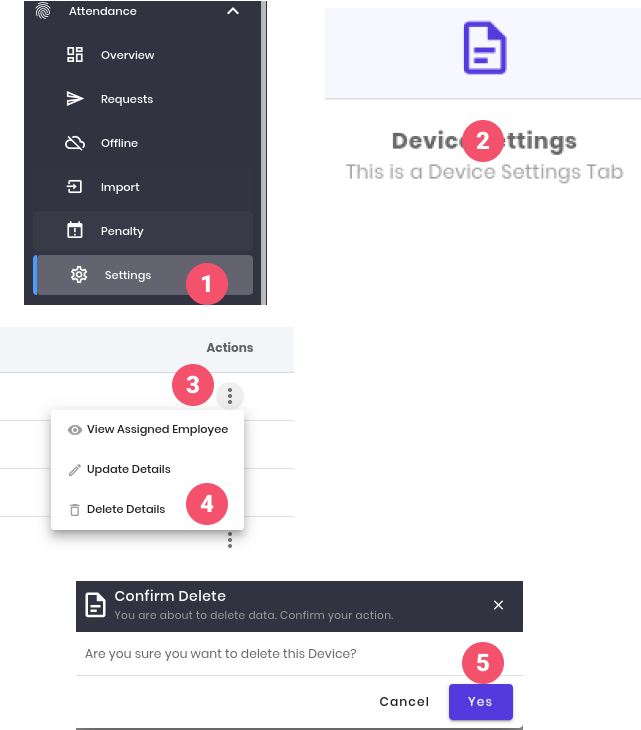
- To delete a device , go to Attendance on the side bar and click on “Settings”.
- Select “Device Settings”
- Click on the “3 dot” icon of the device name you want to update.
- Click on “Delete details”.
- Enter the “Device Name”
- Click “Yes”
# Work Shift Setting
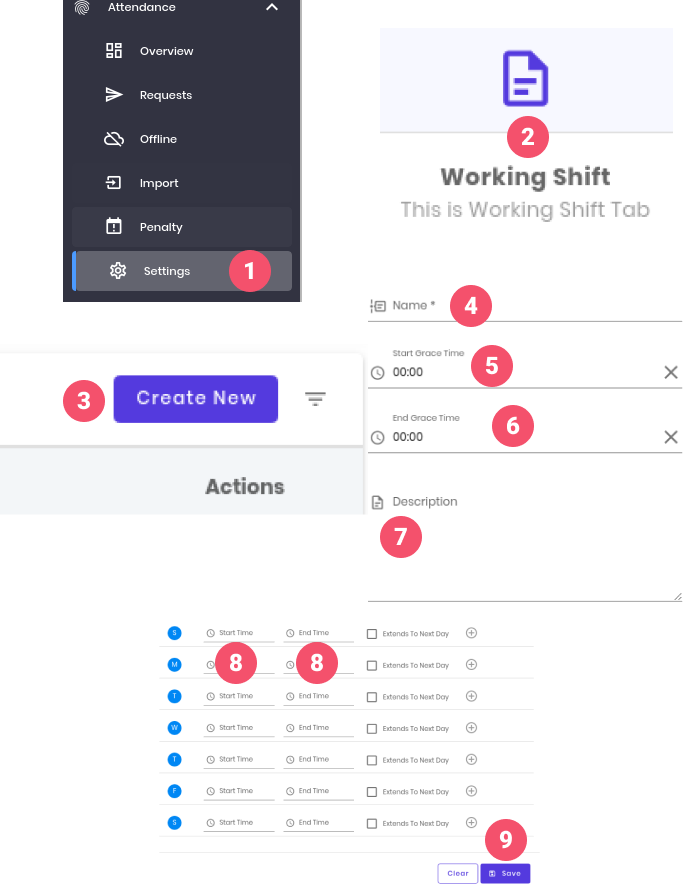
- To create a new workshift, go to Attendance on the side bar and click on “Settings”.
- Select “Workshift Settings”.
- Click on “Create New”.
- Enter “Name”
- Enter “Start Grace Time”(optional).
- Enter “End Grace time”(optional).
- Enter “Workshift Description”(optional).
- Enter “Start Time” and “End Time” of each week days( [optional] Click on extend to next day checkbox, if workshift extends to next days.)
- Click on “Save” button.
# Overtime Setting
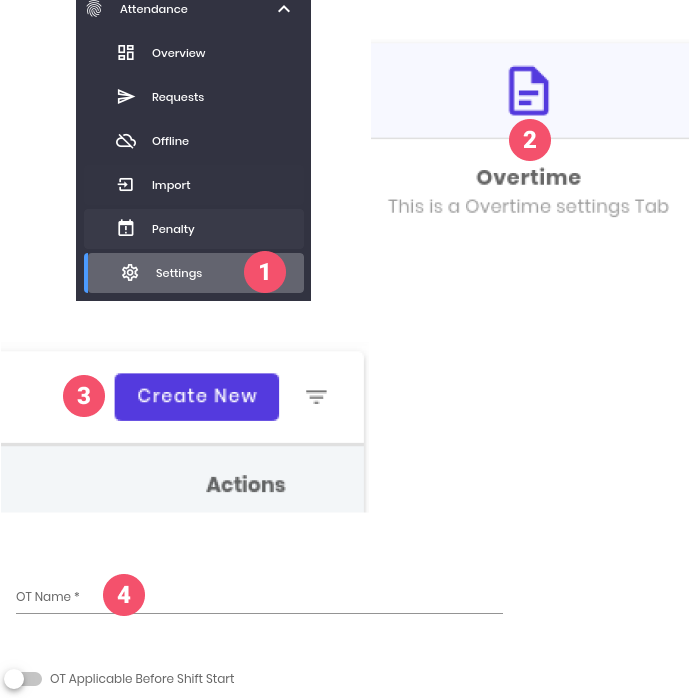
- To Create a New Overtime Setting with no prior approval required. Go to Attendance on the side bar and click on “Settings”.
- Select “Overtime Settings”.
- Click on “Create New”.
- Enter Overtime(OT) setting Name.
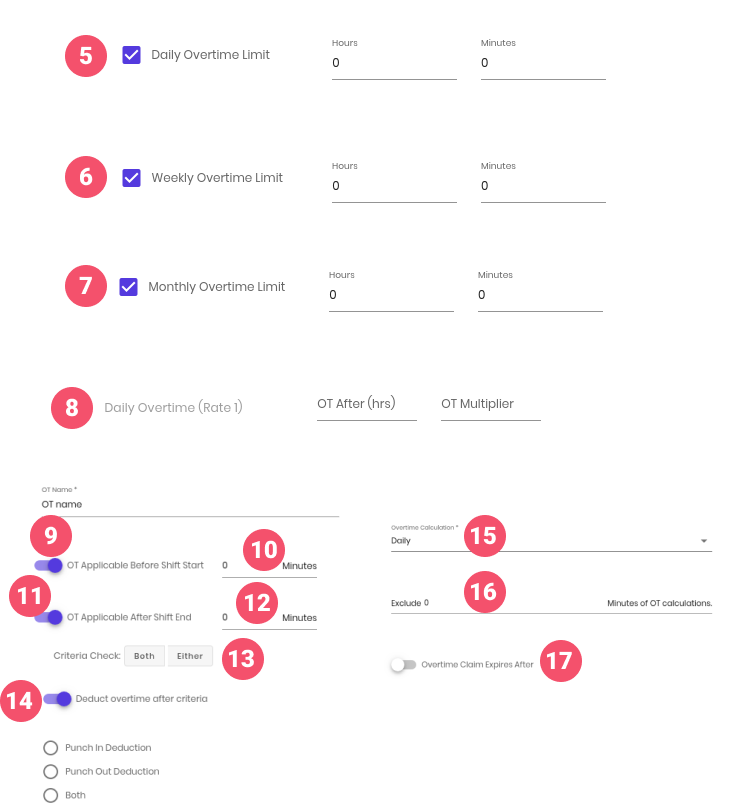
- To set a daily OT limit , select the Daily Overtime Limit Check box and Enter Hours and Minutes.
- To set a Weekly OT limit , select the Weekly Overtime Limit Check box and Enter Hours and Minutes.
- To set a monthly OT limit , select the monthly Overtime Limit Check box and Enter Hours and Minutes.
- Enter Daily Overtime Rate by entering OT After(hrs) and OT Multiplier.
- If overtime is applicable prior to shift starting , select OT applicable before shift start toggle button.
- Enter minutes for OT applicable before shift starts.
- If overtime is applicable after the shift ends , select OT applicable after shift end toggle button.
- Enter minutes for OT applicable before shift End.
- If both OT applicable before shift start and after shift end is selected Select Criteria Check : Both or Either.
- For punch-in , Punch-out or both deduction in OT, select Deduct overtime after criteria
- Select overtime Calculation(daily or weekly).
- To exclude minutes from OT calculation, Enter Exclude min of OT Calculation.
- If overtime claim Expires , select Overtime claims Expires after
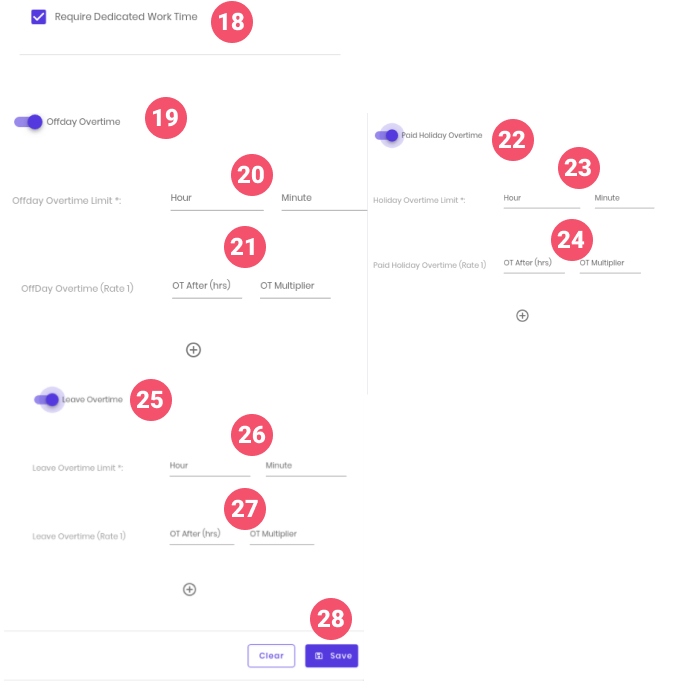
- If required dedicated work time, select the require dedicated work time checkbox.
- To set offday overtime limit, select offday Overtime.
- Enter overtime Limit(hour, minutes).
- Enter Overtime rate(Ot after hrs and OT multiplier).
- To set paid holiday overtime limit, select paid holiday overtime
- Enter overtime Limit(hour, minutes).
- Overtime rate(Ot after hrs and OT multiplier).
- To set Leave overtime limit, select Leave overtime
- Enter overtime Limit(hour, minutes).
- Overtime rate(Ot after hrs and OT multiplier).
- Click on Save Button.
# Individual Attendance Settings

- To assign User to Device, goto Attendance on the side bar and click on “Settings”.
- Select “Individual Attendance Settings”.
- Click on “Assign” to device from actions
- Click on “Add to Device”
- Enter **Bio user Id **
- Enter Device.
- Click “Save”
# Update Web Attendance Settings
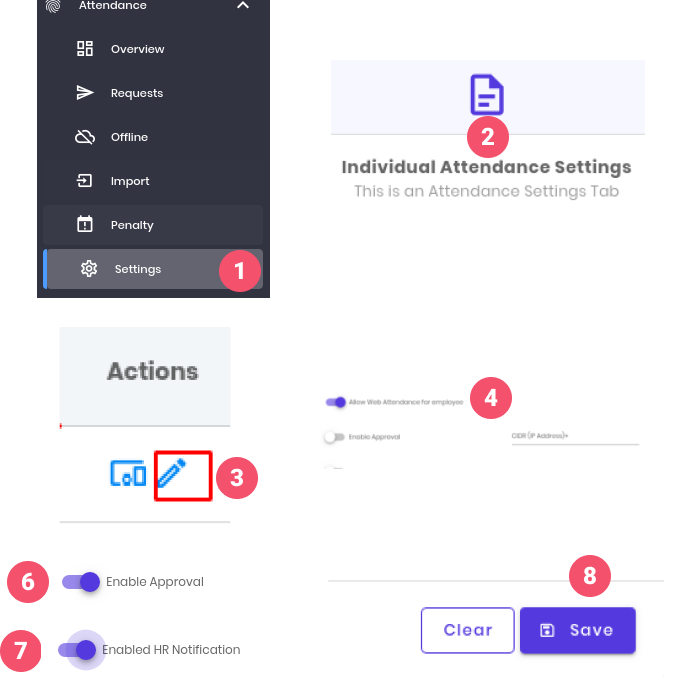
- To assign User to Device, goto Attendance on the side bar and click on “Settings”.
- Select “Individual Attendance Settings”.
- Click on “update web attendance” setting From Actions
- To allow web attendance , select Allow web attendance for employee 5. Enter CIDR(Ip address).
- To enable Supervisor approval , select approval
- To enable HR notification, select HR notification.
- Click “Save”
# Attendance Penalty

The platform allows the organization to penalise the employees based on the lost hours in attendance. The penalty may be a deduction in leave balance or salary payable at the end of the month. The HR may choose the penalty based on Frequency (Applicable on lost minutes considering certain days) or total lost hours during the days of the month. E.g. The employee is late for a certain number of days in a month or takes a number of personal breaks.
- Go to “Attendance” in the sidebar. Click on “Settings” followed by “Penalty Setting” to view the list of preset Penalty Settings.
- Click on “Create New” to set up a new setting for the penalty by filling out basic information about the penalty.
# Timesheet Approval Settings

- Go to ‘Attendance’ on the sidebar and click on ‘Settings’.
- Click on the ‘Timesheet Approval Settings’.
- Select ‘Enable Approval process’ to configure approval.
- Select ‘Fiscal Year’ to configure fiscal year.
- Enter ‘Round Off Total Working Hour’.
- Select ‘Leave Types For Display’.
- Enter ‘Branch’,’Division’,Full Name’,’Job Title’,Bio User Id’,’Contract End’,’Report Title’,’Employee Code’,’Contract Start’,’Employment Type’,’proportionate Rate’ to configure headers.
- Enter ‘Display Text’,’Legend Color’,’Legend Letter’ to configure leave types legends.
- Enter ‘Display Text’,’Legend Color’,’Legend Letter’ to configure primary legends.
- Click on the ‘Save’ button.
# Credit Hour Settings
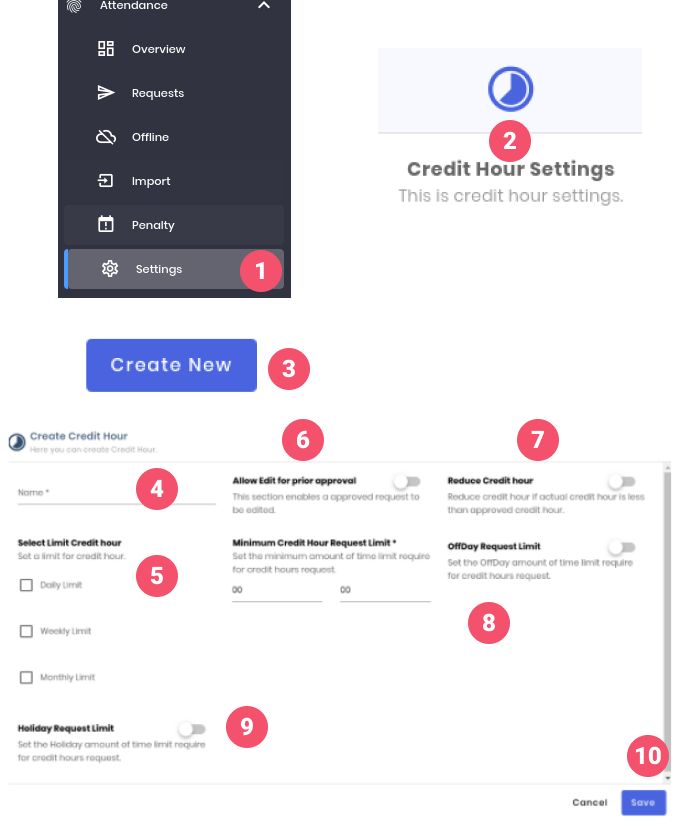
- Go to ‘Attendance’ on the sidebar and click on ‘Settings’.
- Click on the ‘Credit Hour Settings’.
- Click on the ‘Create New’ button.
- Enter ‘Name’,”Minimum Credit Hour Request Limit’.
- Select ‘Daily Limit’,’Weekly Limit’,’Monthly Limit’ to select limit credit hour.
- Select 'Allow edit for prior approval' to enable a approval request to be edited.
- Select 'Reduce Credit Hour’ to reduce credit hour if actual credit hour is less than approved credit hour.
- Select **‘Offday Request Limit’ **to set the offday amount of time limit.
- Select “Holiday Request Limit’ to set the holiday amount of time limit.
- Click on the ‘Save’ button.
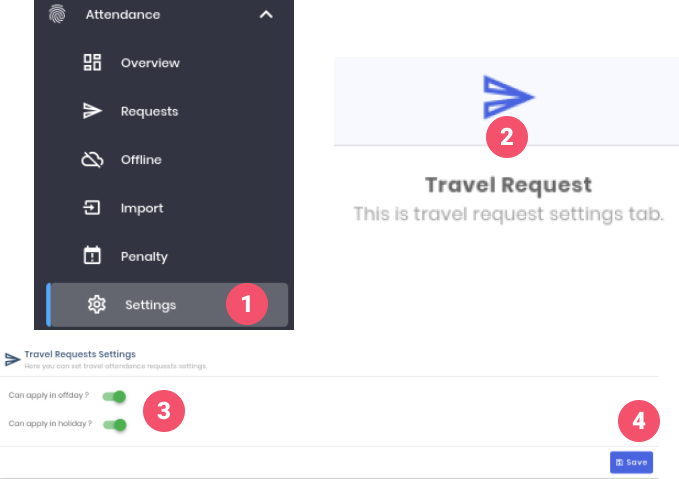
- Go to ‘Attendance’ on the sidebar and click on ‘Settings’.
- Click on the ‘Travel Request’
- Select **‘Can apply in offday?’,’Can apply in holiday?’**to enable travel requests to be applied on offday and holiday respectively.
- Click on ‘Save’ button.
# Reports
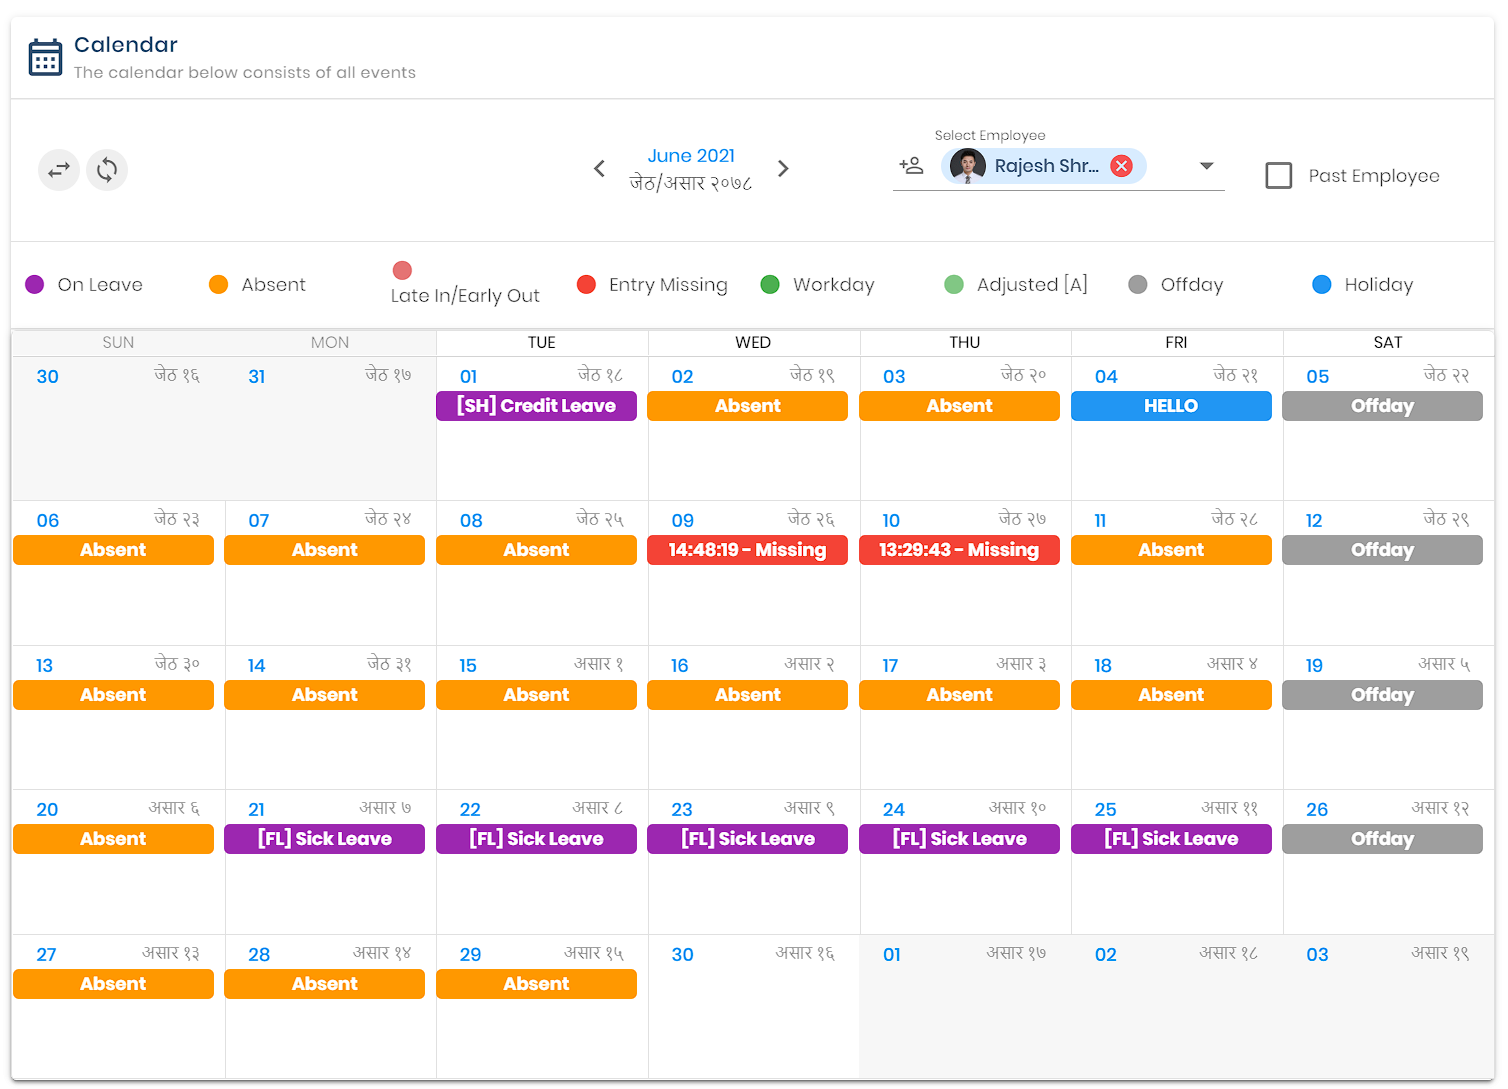
# Add Attendance Entries on behalf of users [By HR]
![Add Attendance Entries on behalf of users [By HR]](/hr/add_attendance_entries_on_behalf_of_user.png)
To add the attendance entries on behalf of user:
- Go to ‘Attendance’ on the sidebar and click on ‘Reports’.
- Click on ‘Calendar’.
- Search for the user whose attendance entry needs to be added.
- Click on the day on which you want to add the attendance entry for.
- Click on the ‘New Entries’ button.
- Select the time, select the category and enter the remarks and click on the ‘Save’ button to add the entry.
# Delete the attendance entries on behalf of user [By HR]
![Delete the attendance entries on behalf of user [By HR]](/hr/delete_attendance_entries_on_behalf_of_user.png)
To delete the attendance entries on behalf of user:
- Go to ‘Attendance’ on the sidebar and click on ‘Reports’.
- Select the ‘Calendar’
- Search for the user whose attendance entry needs to be deleted.
- Click on the day on which you want to delete the attendance entry for.
- Click on the ‘Delete’ icon of the entry you wish to delete form the attendance entries.
- Click on the ‘Yes’ button of the confirmation box to delete the entry.
# Break In/Break Out
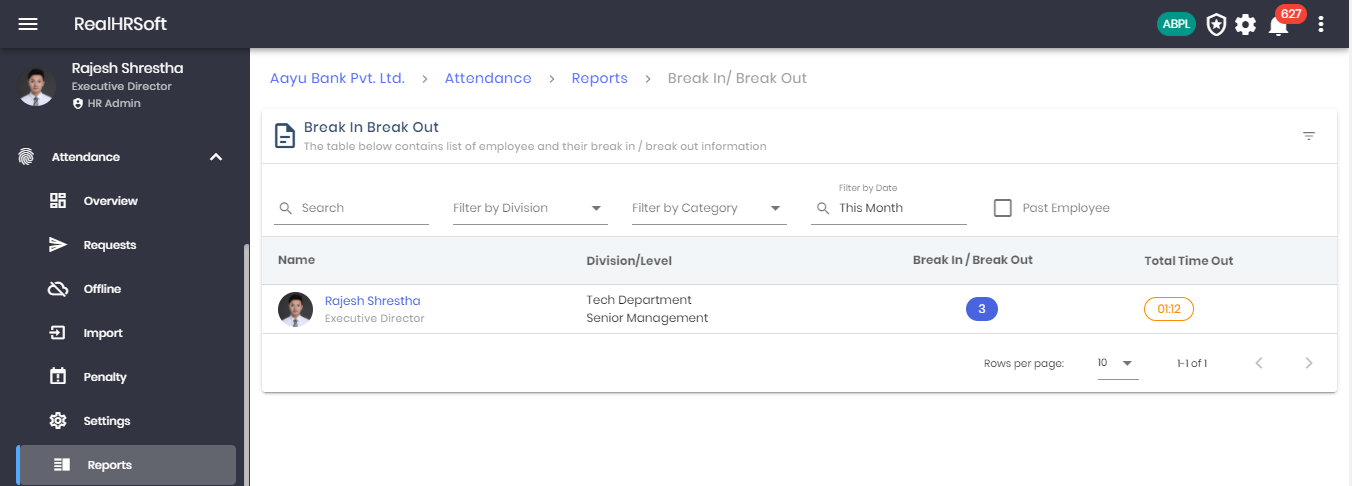
The HR can view the company’s overall employees Break In/Break Out information and also view the total time out for the day too. The HR can also filter the list based on the name of the employee, division, category or by date.
The HR can easily navigate and view the company’s Email Log report by scrolling to the “Organization” section and clicking on “Reports”. Within the Report section, they will find the “Email Logs”
# Calendar
- HR can view User Attendance Calendar.
# Daily Attendance
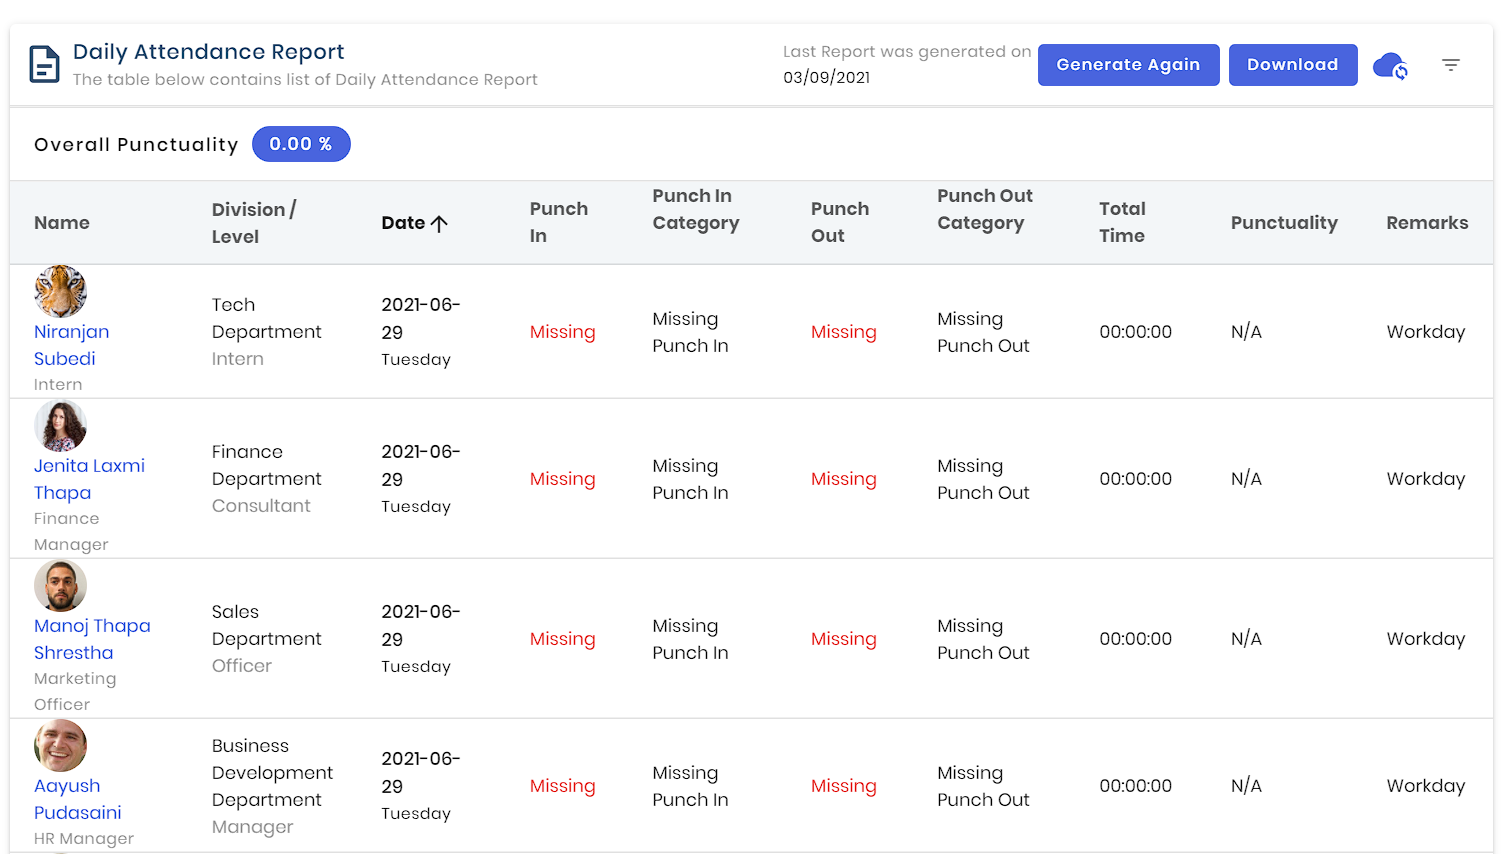
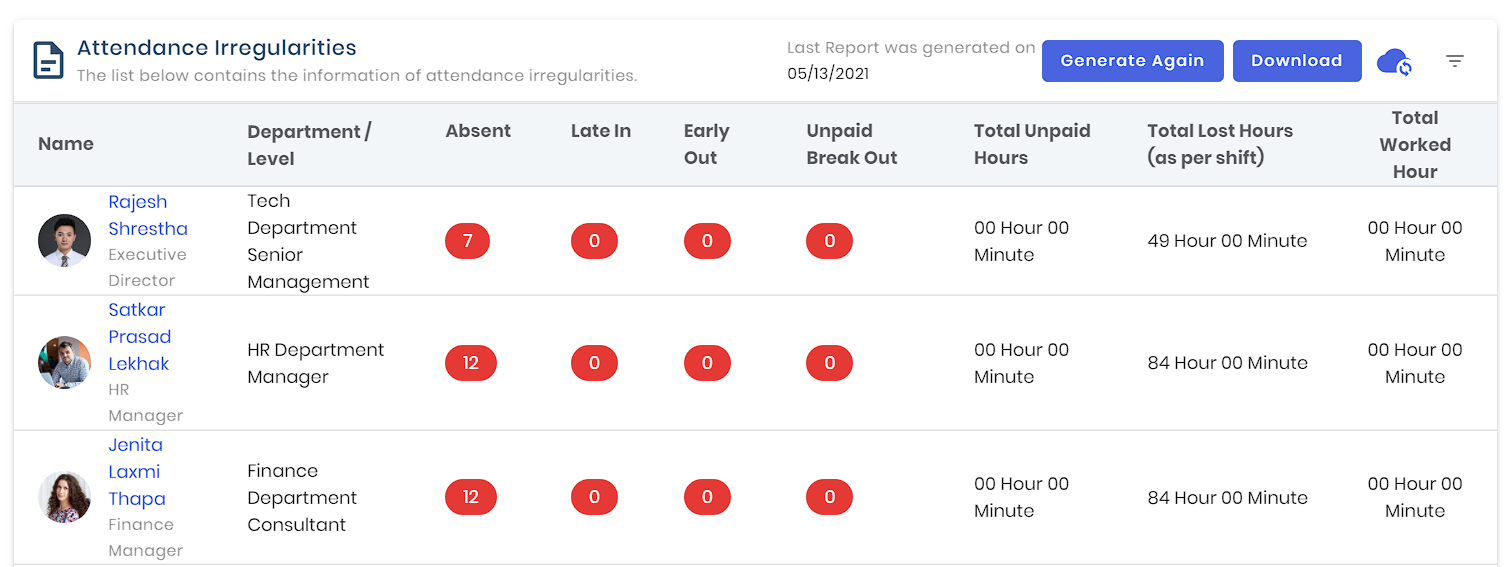
# Irregularities
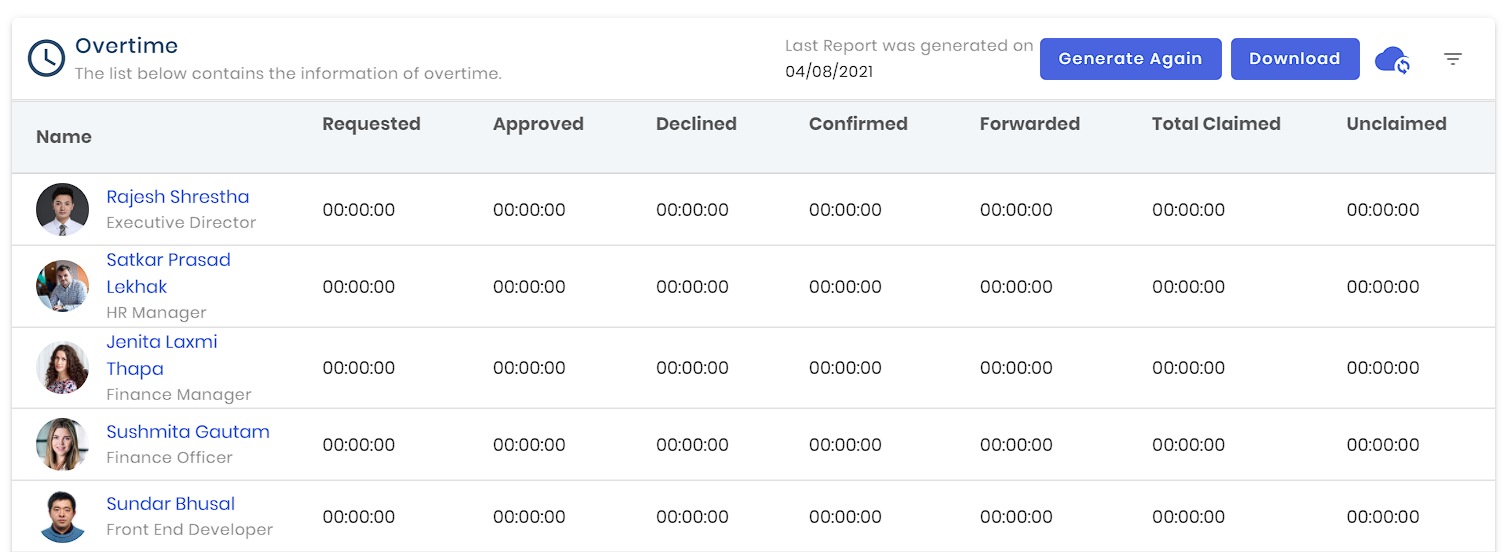
# Overtime
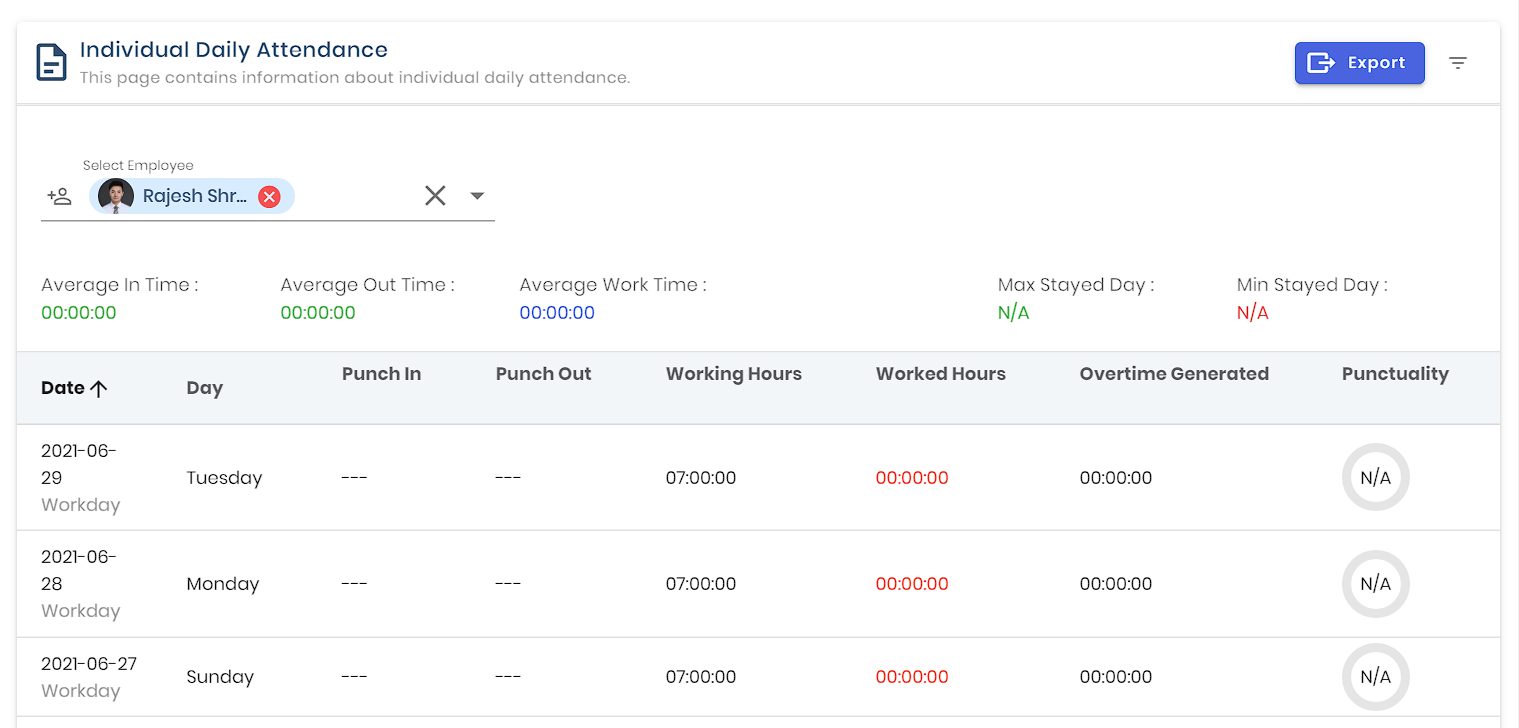
# Individual Daily Attendance
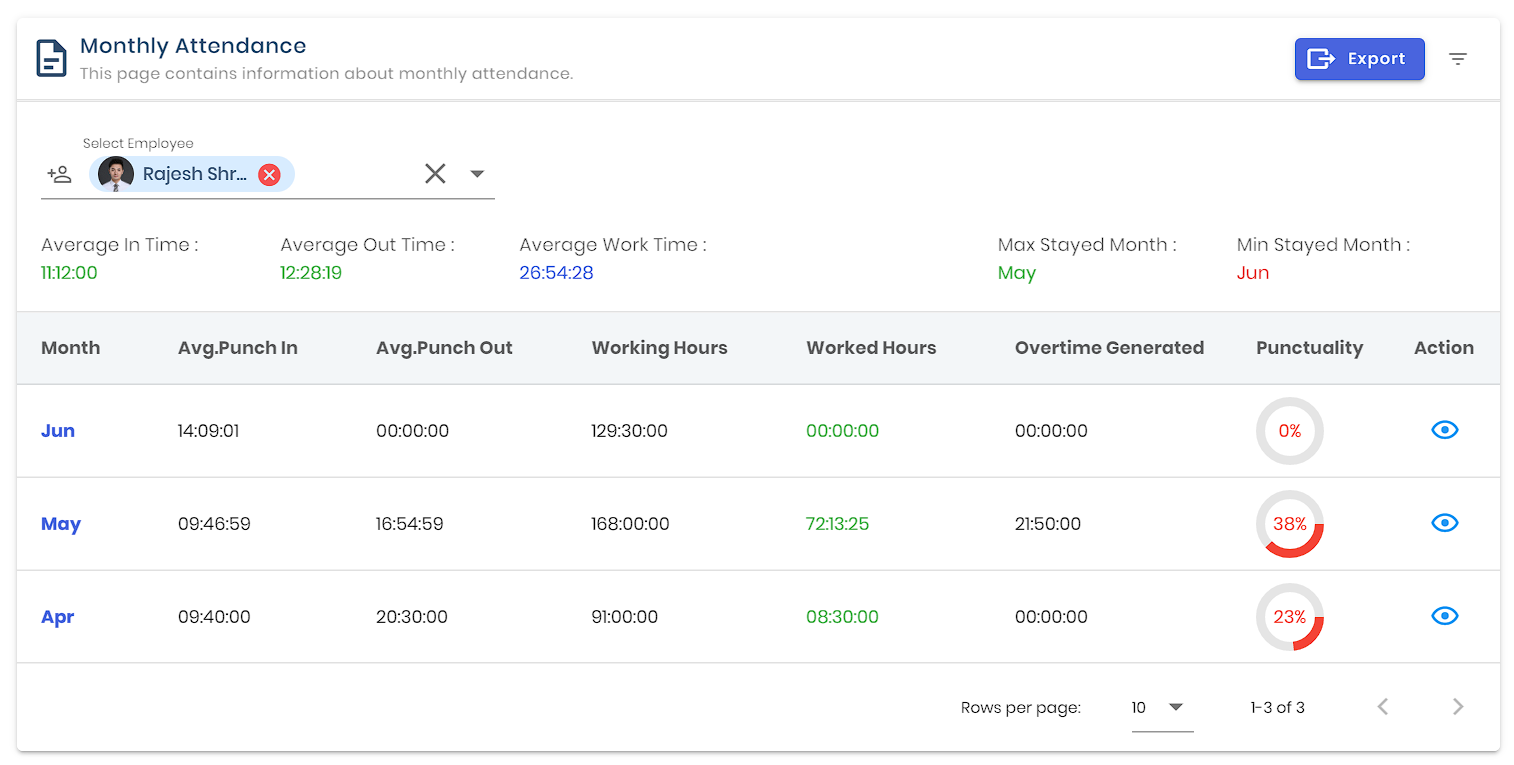
# Individual Monthly Attendance
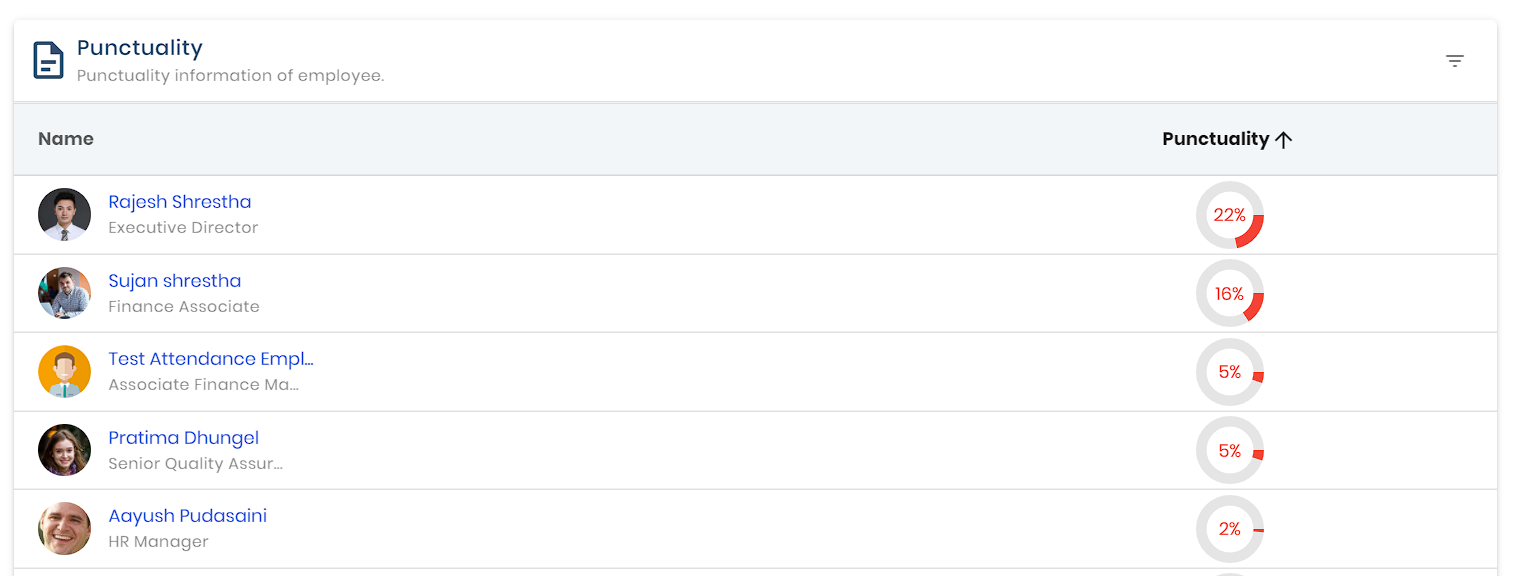
# Punctuality
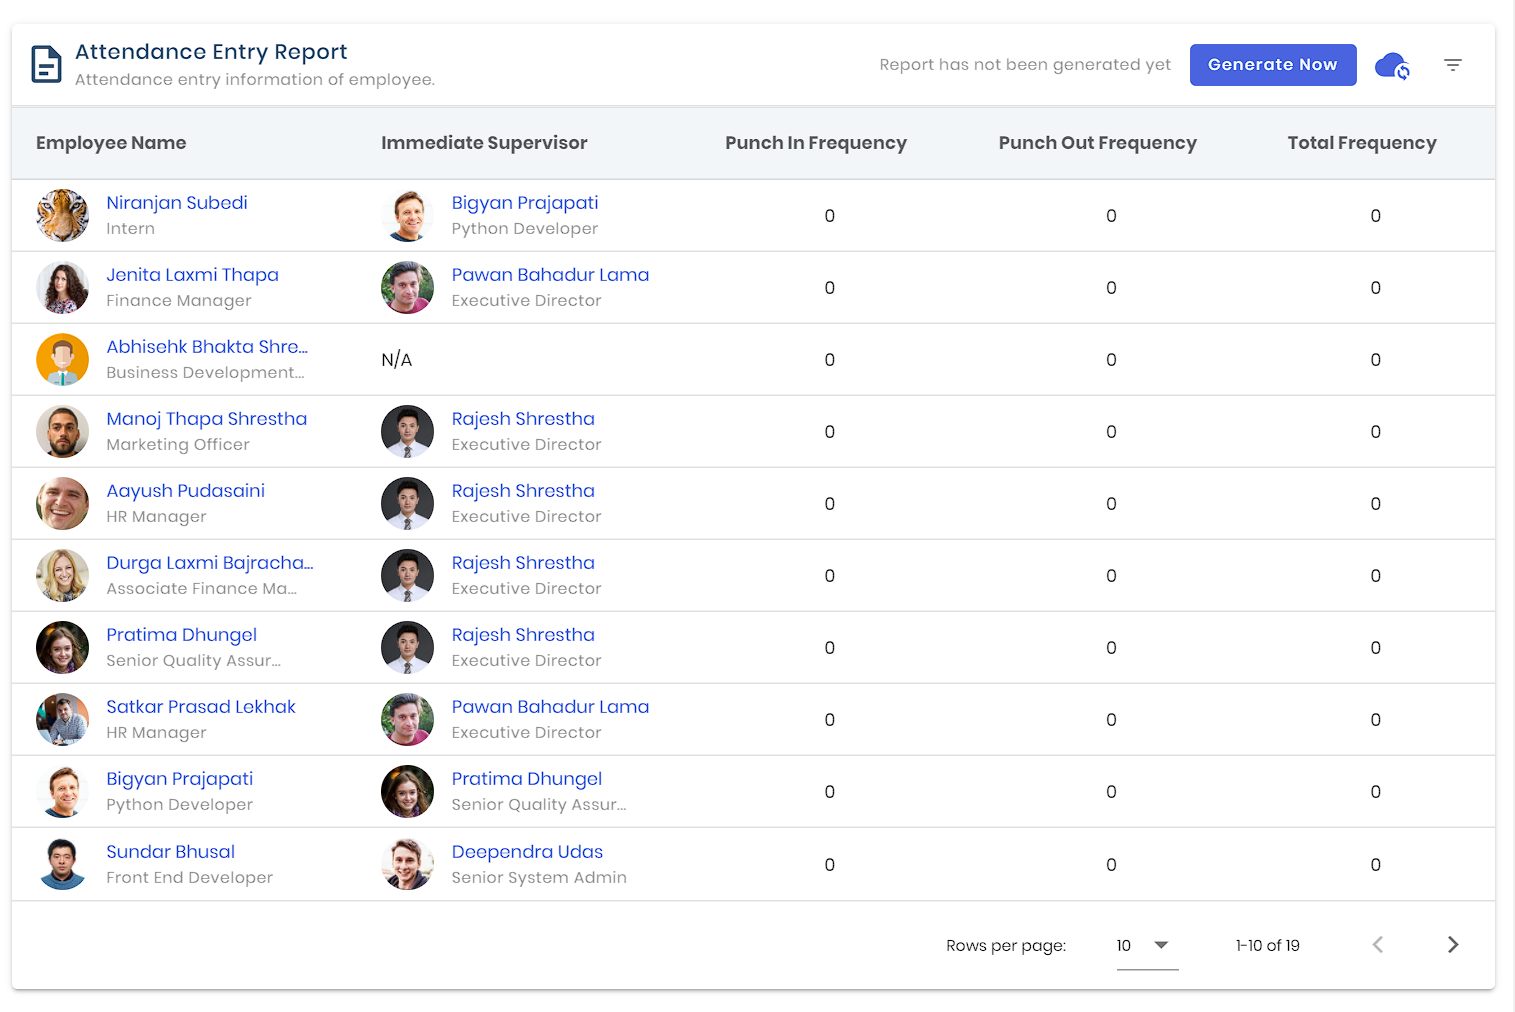
# Attendance Entries
-
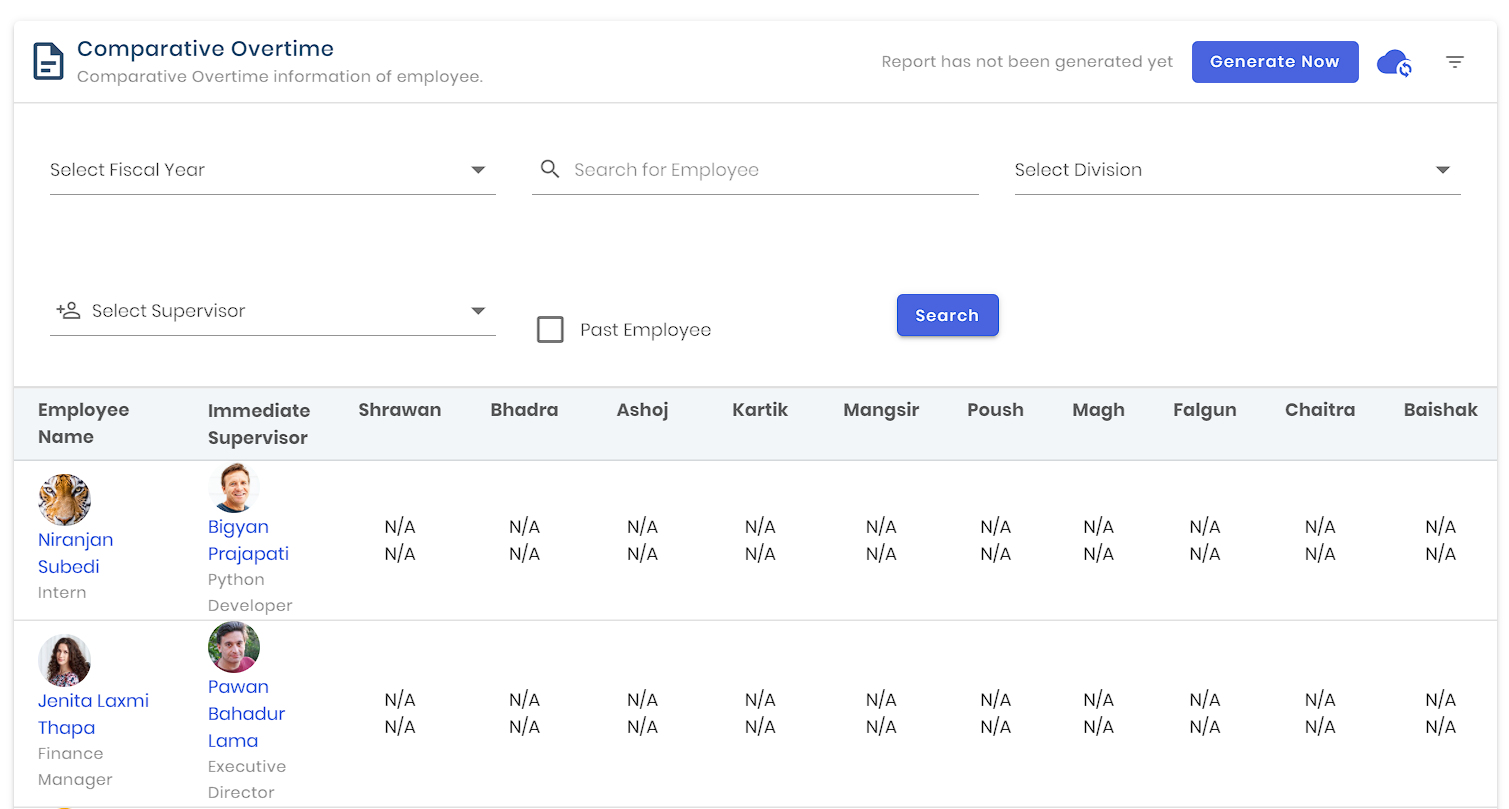
# Comparative Overtime
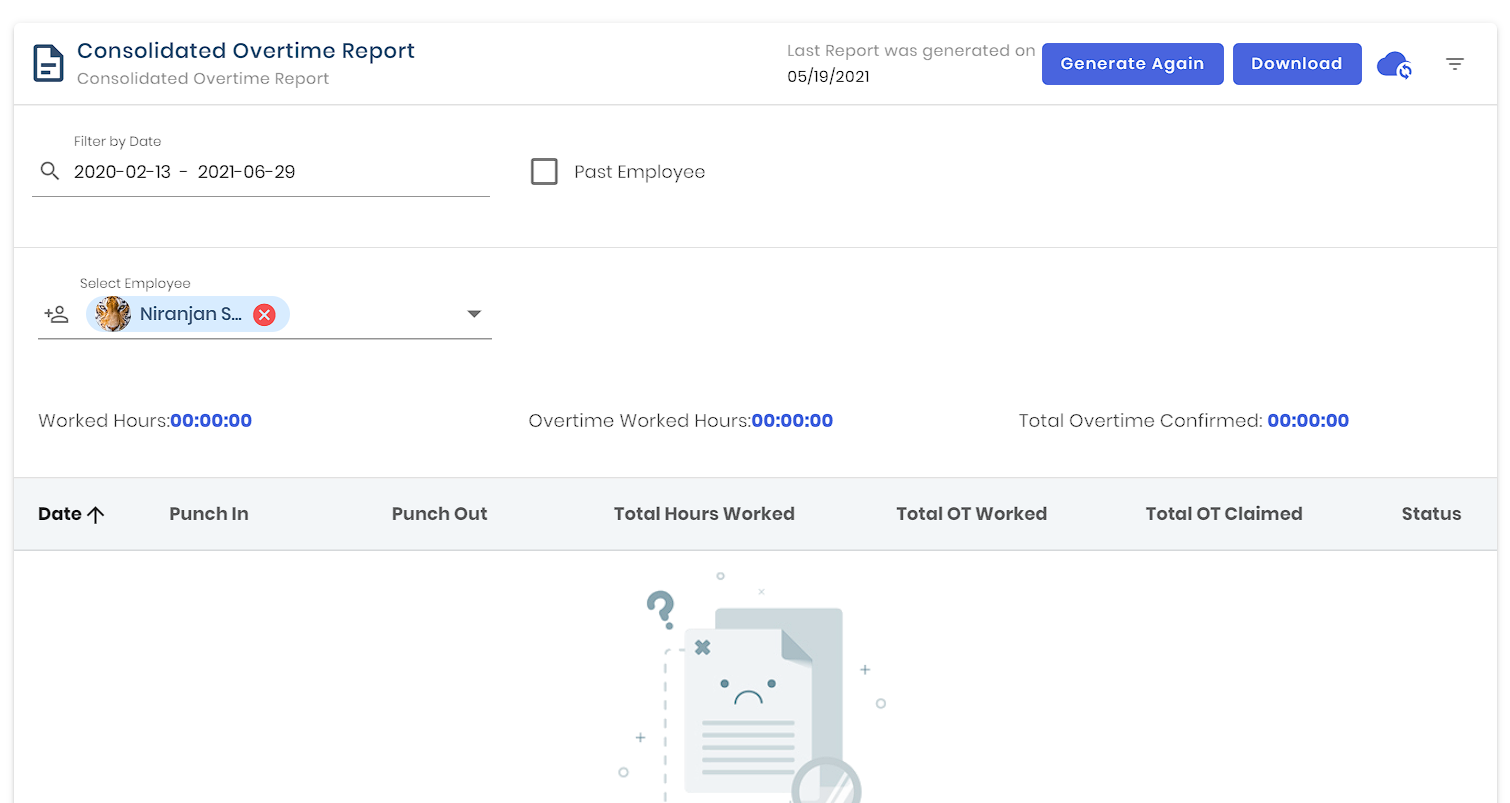
# Consolidated Overtime
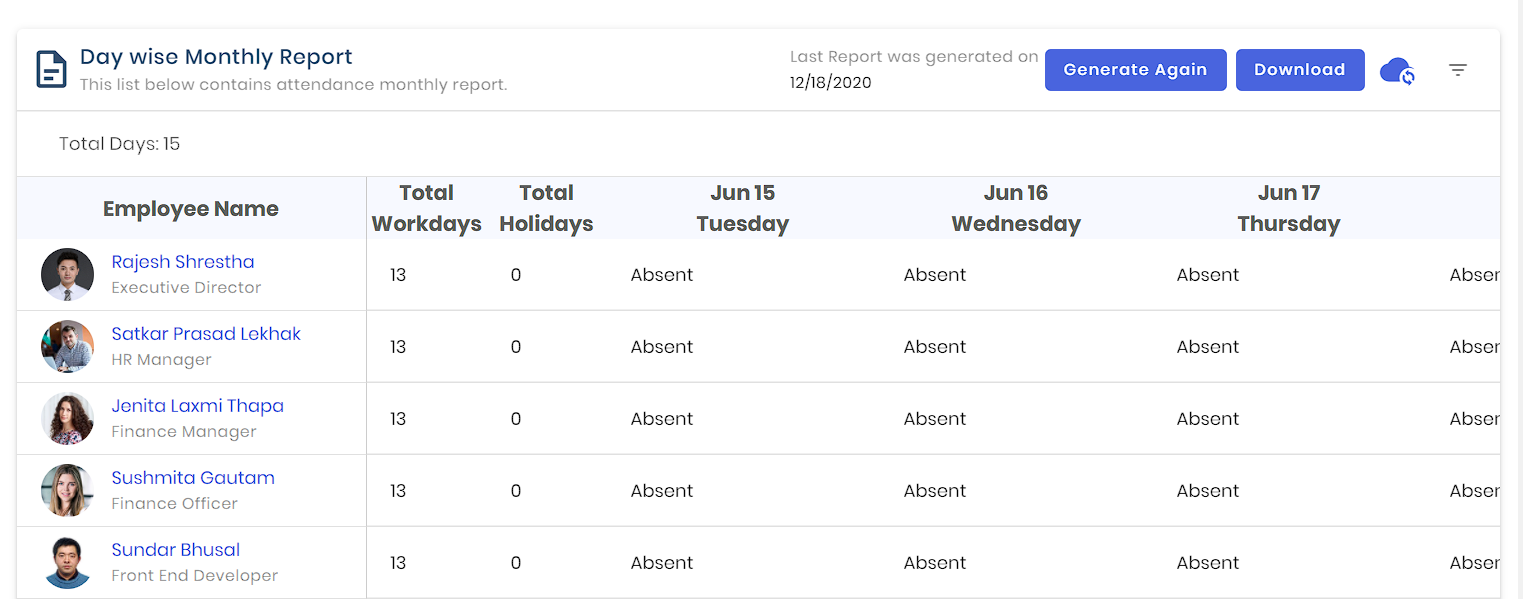
# Day wise Monthly Report
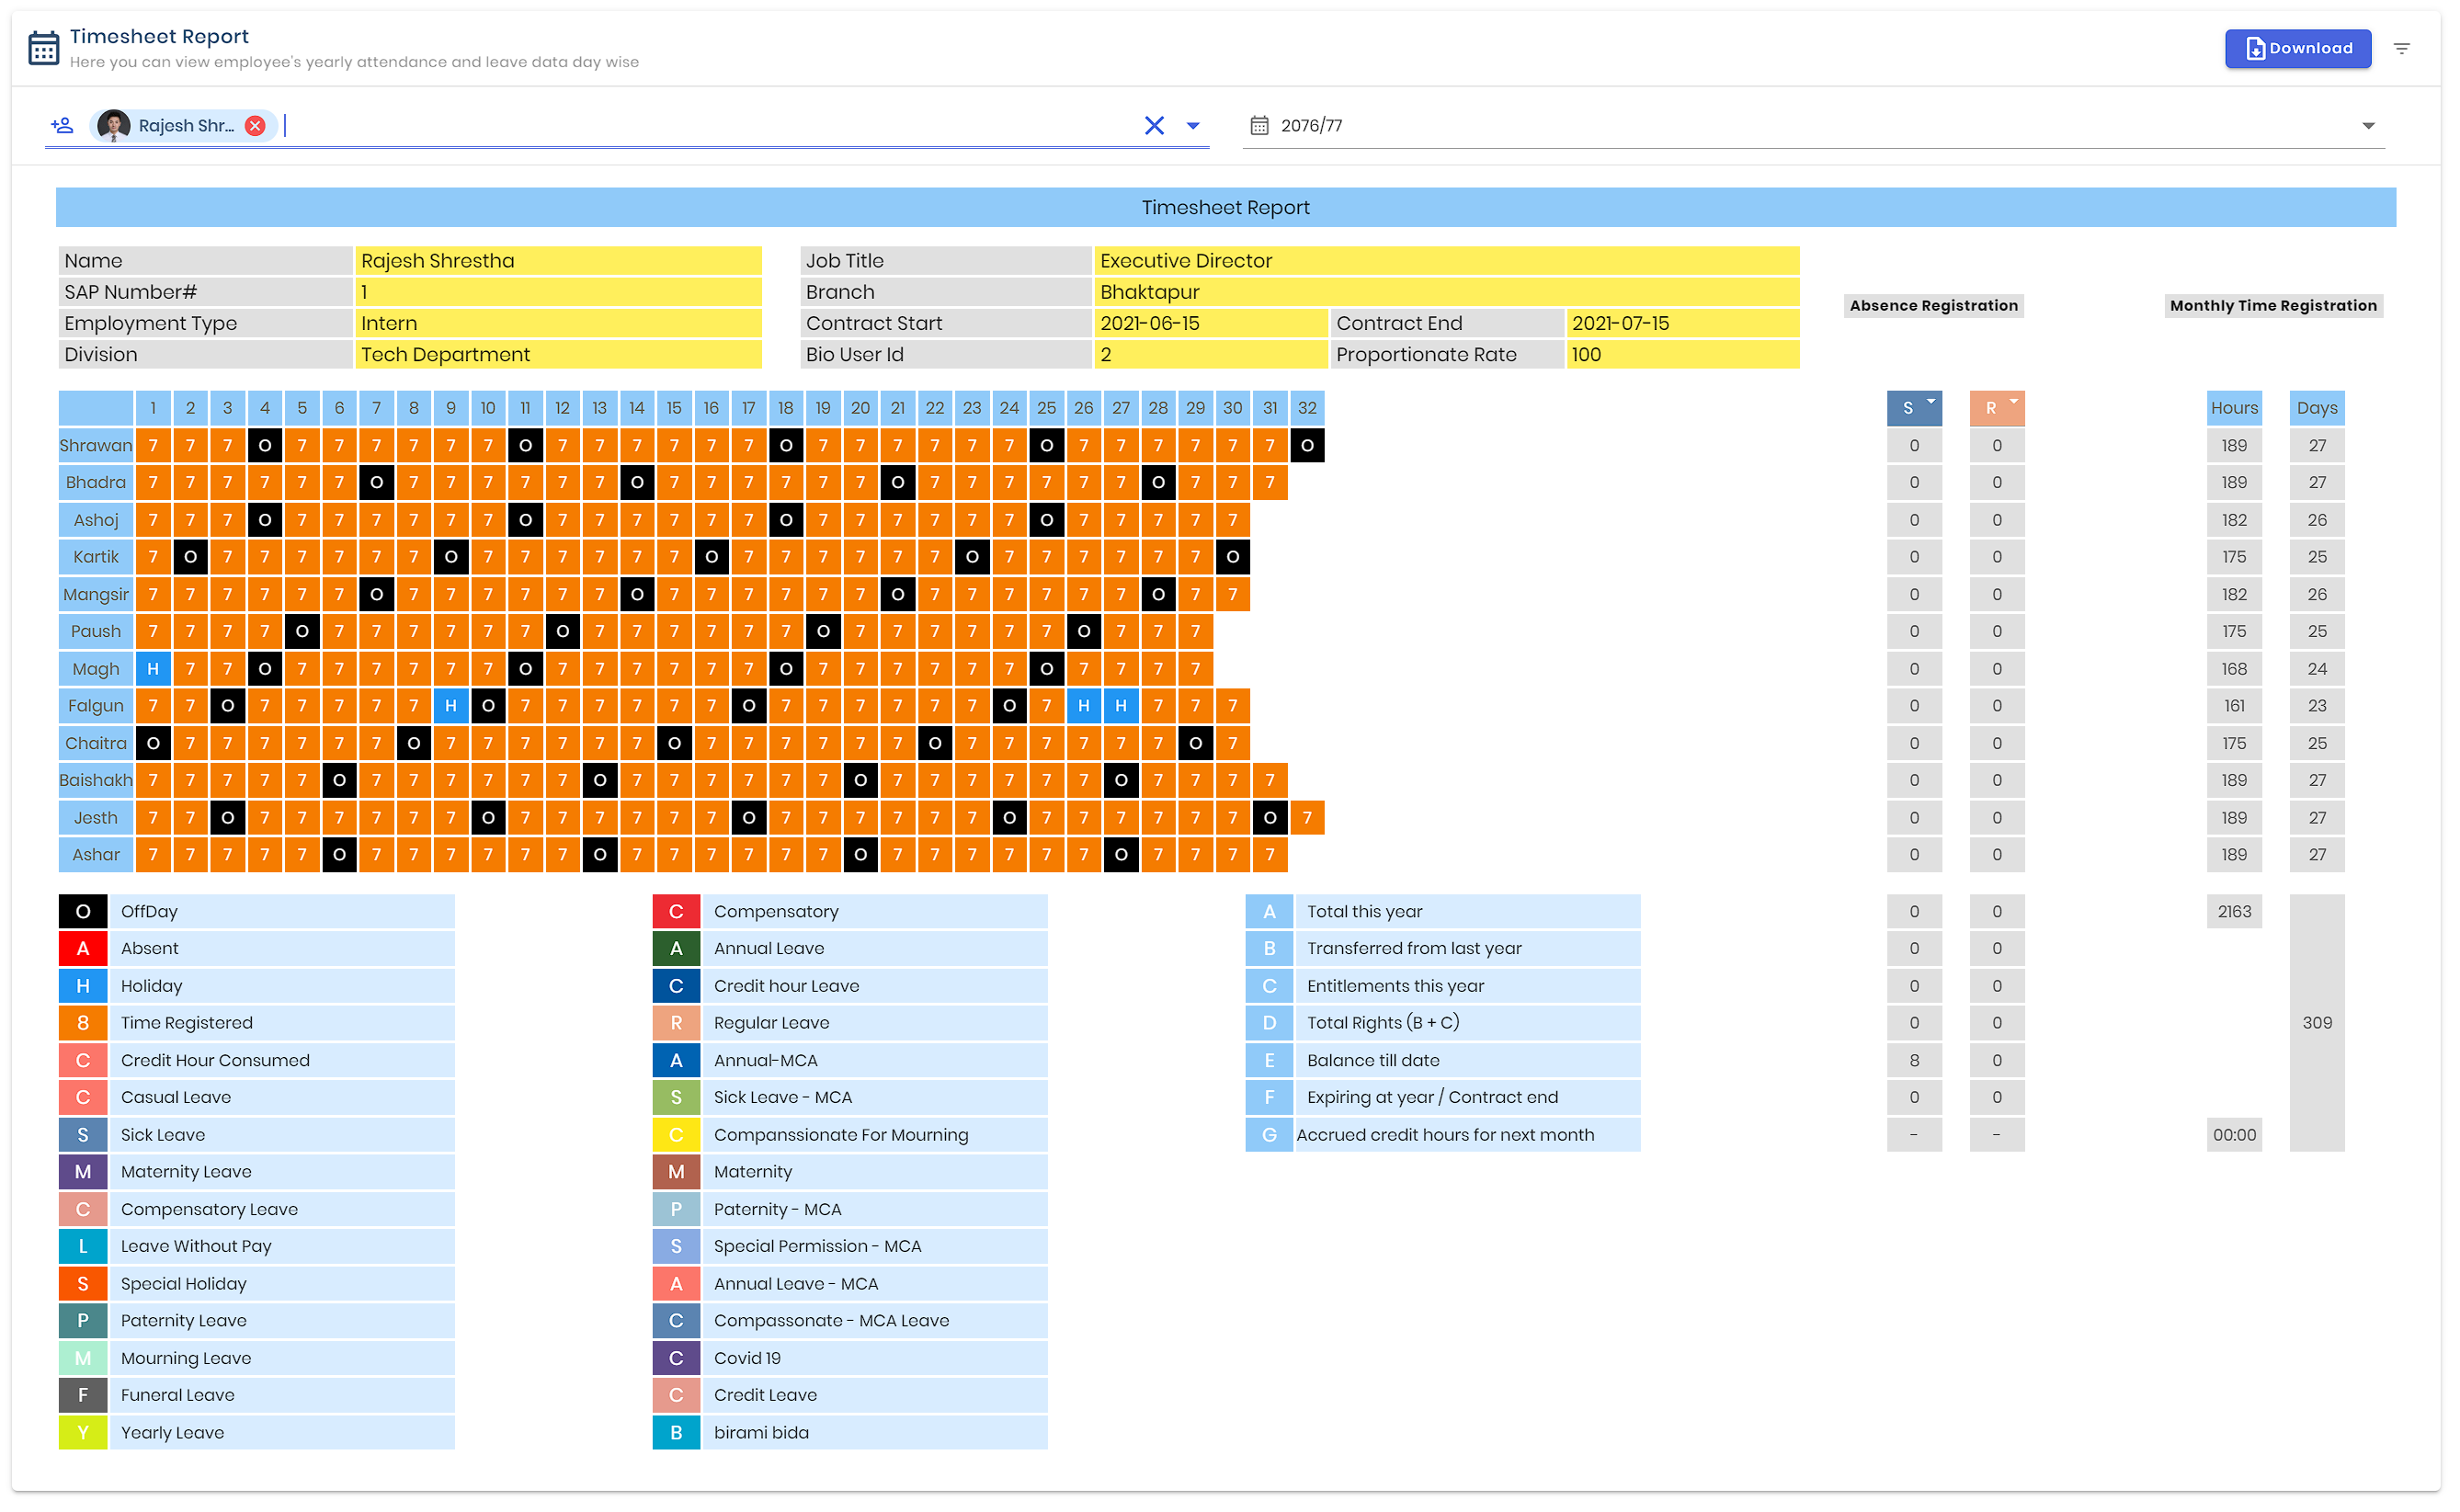
# Timesheet Report
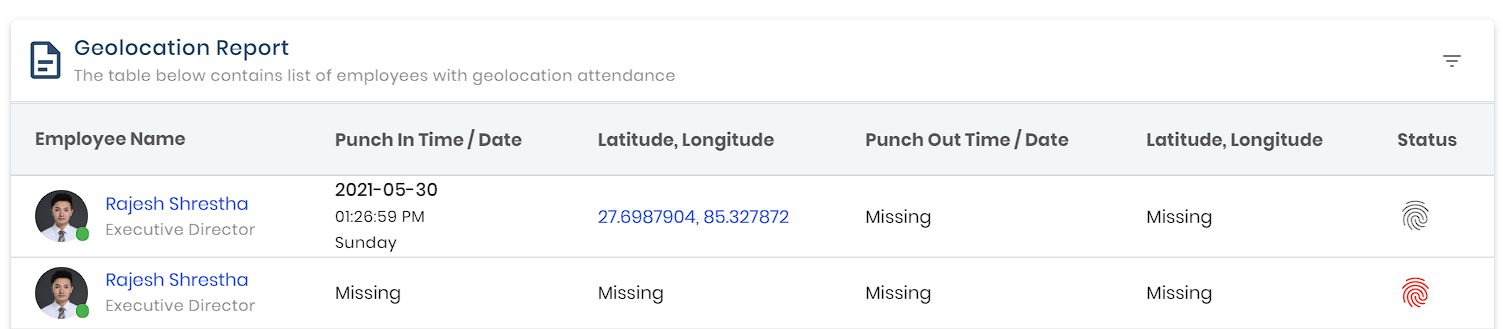
# Geolocation Report
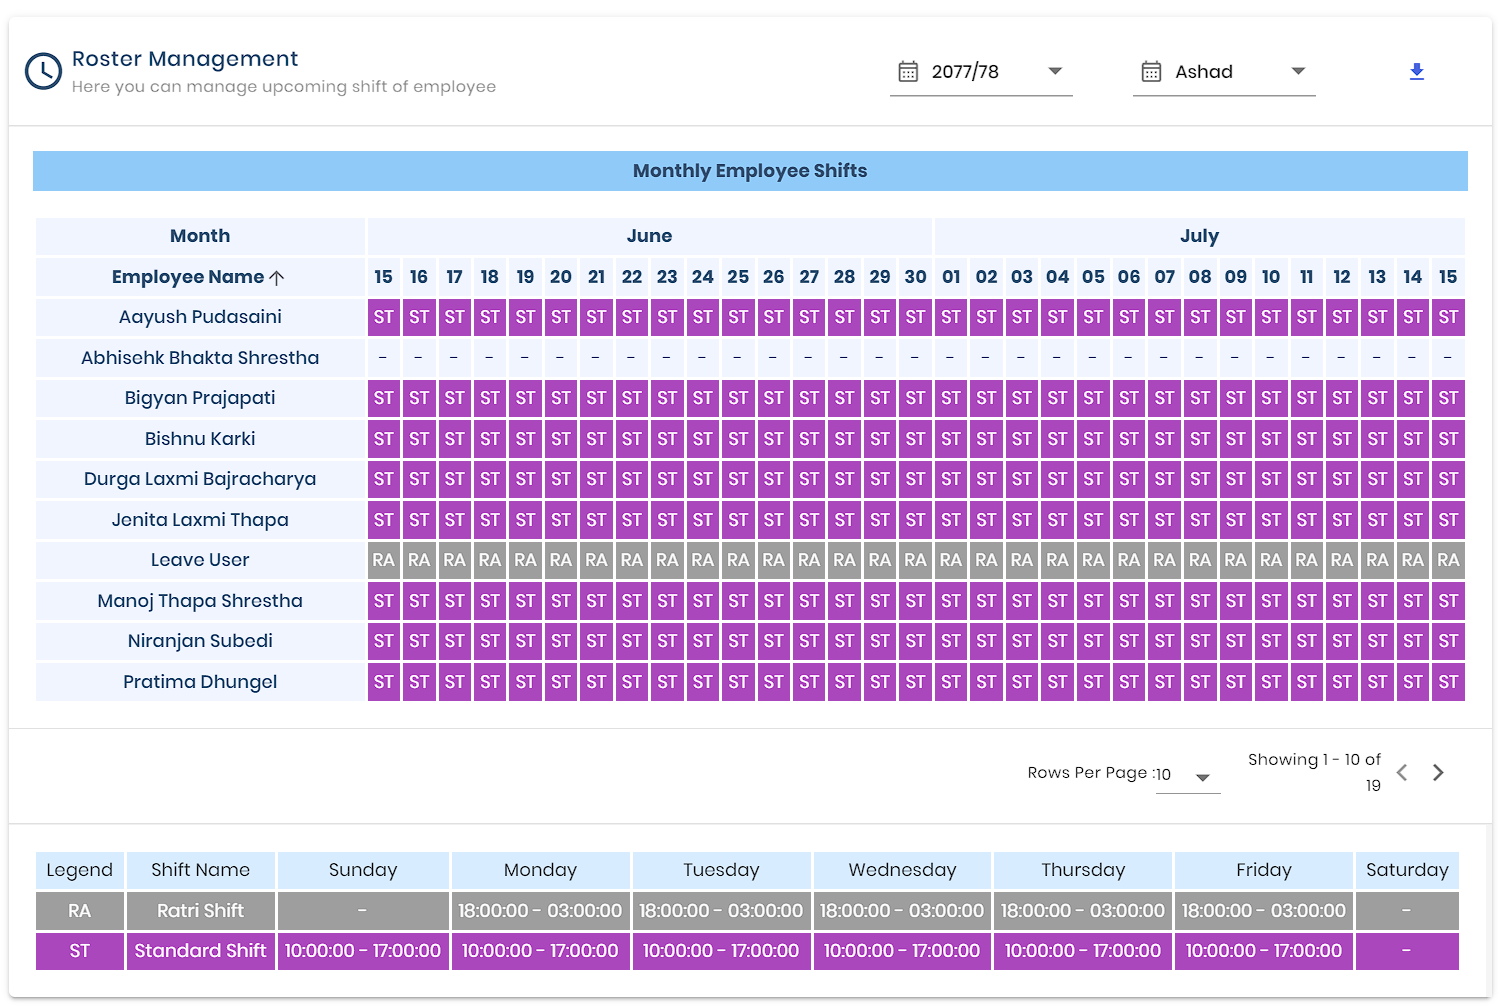
# Roster Report
# Leave
# Overview
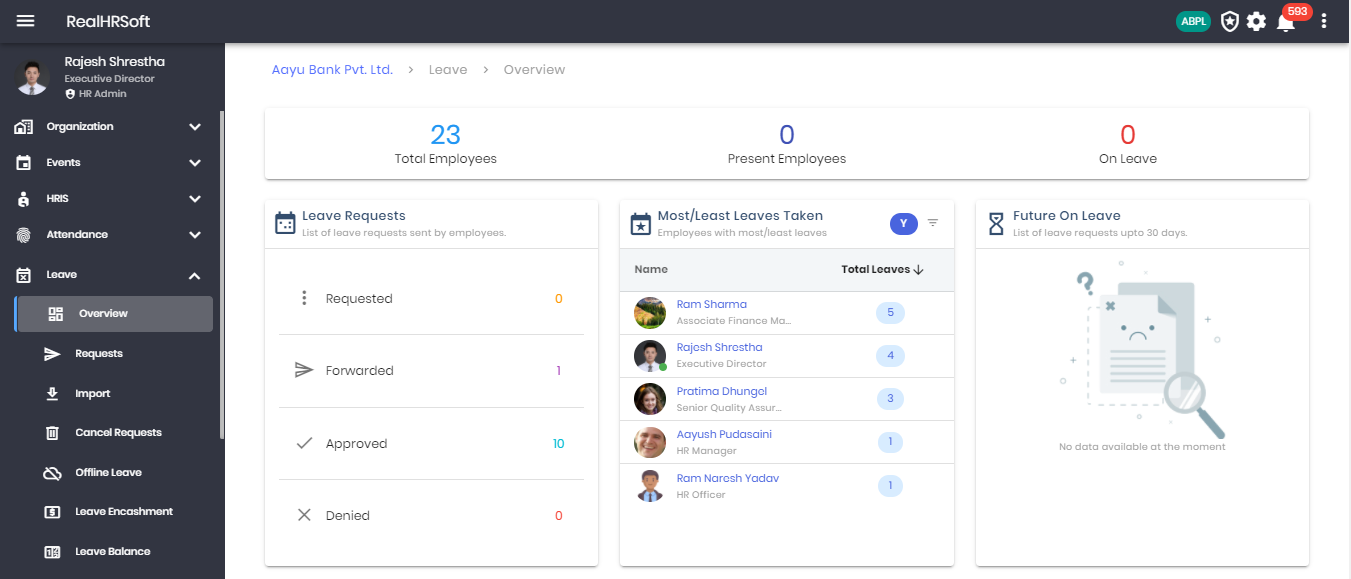
- Go to “Leave” in the sidebar. Click on “Overview” for a summary of the company’s leave information.
- Click on the number above “Total Employees” to display the list of employees within the team.
- Click on the number above “Present Employees” to display the list of employees that are present today in the team.
- Click on the number above “On Leave” to display the list of employees that are absent for the day within the team.
- Displays the list of team members that have applied for Leave and the requests that are pending & approved.
- Displays the list of “Most/Least Leave” applied by the team members, you may filter it for a specific date range.
- Displays the list of employees that have applied for future leave requests in the next 30 days.
- Displays the list of employees that have applied for leave in the current month based on the different leave types. The list can be filtered by date.
- Displays the Supervisors with the number of leaves pending for approval.
- Displays the Supervisors with the most number of leaves declined.
- Displays the list of employees that have irregular leave behaviours in the current month. The list can be filtered by date
- Displays the division of leave based on their department within the organization. The list shows the current month however it can be filtered by date
# Requests
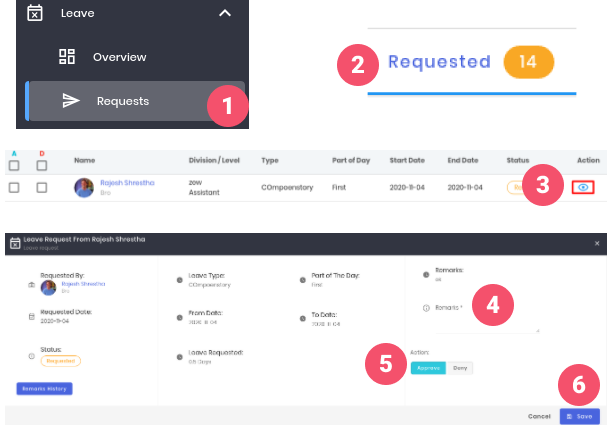
- Go to ‘Leave’ on the sidebar and click on ‘Requests’.
- Go to ‘Requested’ tab
- Go to the ‘View Details’ eye icon and click on it.
- Enter ‘Remarks’.
- Select ‘Approve’ or ‘Deny’ option.
- Click on the ‘Save’ button.
# Import
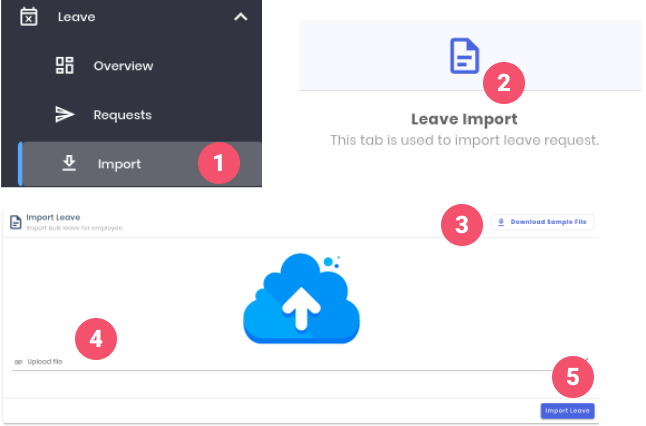
- Go to ‘Leave’ on the sidebar and click on ‘Import’.
- Go to ‘Leave Import’
- Download sample file
- Select file to upload.
- Click on the ‘Import Leave’ button.
# Cancel Requests

- Go to ‘Leave’ on the sidebar and click on ‘Cancel Requests’.
- Go to ‘Requested’ tab
- Go to the ‘View Details’ eye icon and click on it.
- Enter ‘Remarks’.
- Select ‘Approve’ or ‘Deny’ option.
- Click on the ‘Save’ button.
# Forwarded cancel leave requests
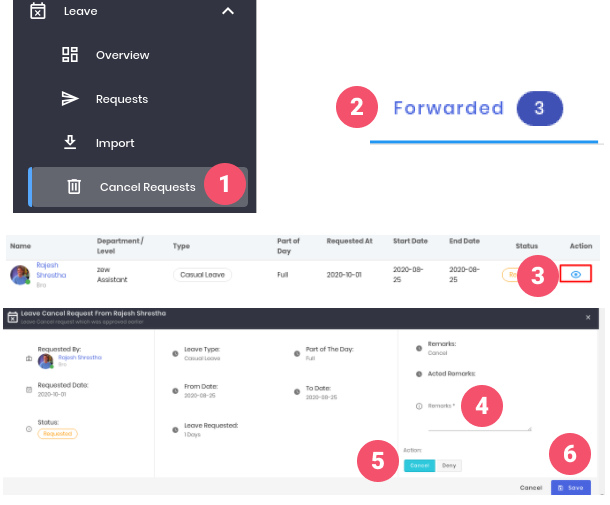
- Go to ‘Leave’ on the sidebar and click on ‘Cancel Requests’.
- Go to ‘Forwarded’ tab
- Go to the ‘View Details’ eye icon and click on it.
- Enter ‘Remarks’.
- Select ‘Approve’ or ‘Deny’ option.
- Click on the ‘Save’ button.
# Offline Leave
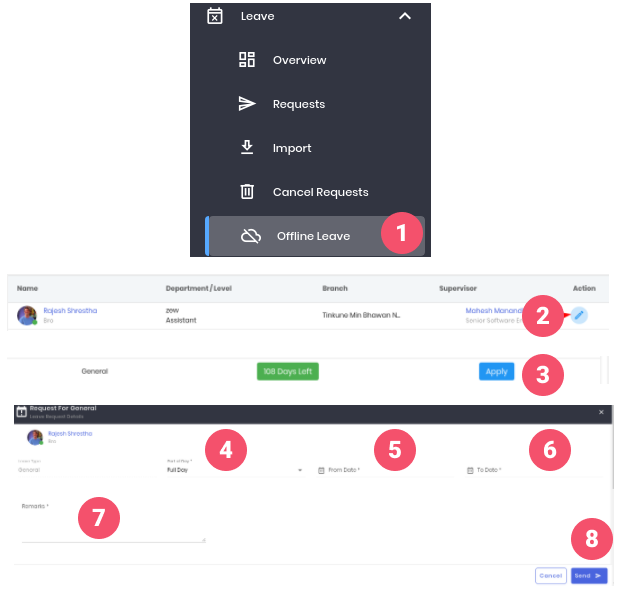
- Go to ‘Leave’ on the sidebar and click on ‘Offline Leave’.
- Verify the employee and Click on the ‘Leave request’ icon on the action column.
- Verify ‘Leave Type’,’Leave Balance’ and click on the ‘Apply’ button.
- Select either ‘Full Day’ or ‘First Half’ or ‘Second Half’ as ‘Part of Day.
- Select ‘From Date’.
- Select ‘End Date’.
- Enter the ‘Remarks’.
- Click on the ‘Save’ button.
# Leave Encashment
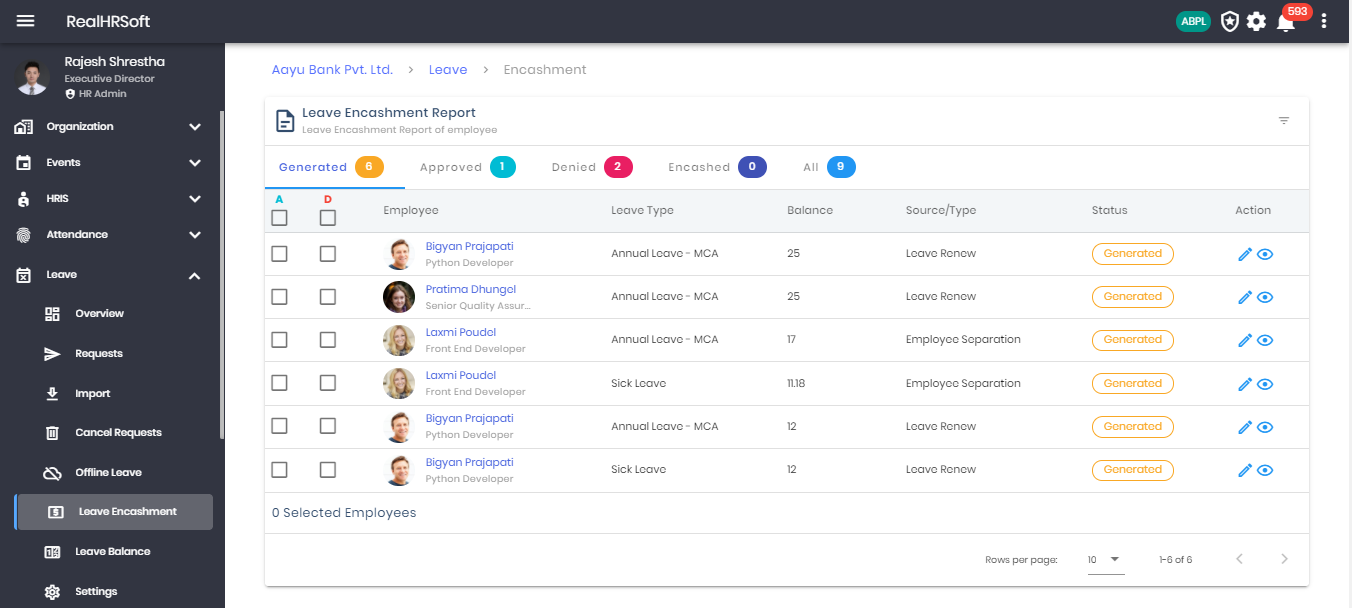
Few organizations have the policy to encash few of their leaves i.e. compensate a number of leave into monetary benefit based on their leave policy. The platform currently allows the HR’s to view if such company policies are met by the employees.
- Go to “Leave” in the sidebar. Click on “Leave Encashment” to view the list of the employees with their leave encashment details. The list can be further filter based on their current status i.e. Generated, Approved, Denied, Encashed or All.
- Click on the “Edit” action button to change the number of leave encashment days.
- Click on the “View” action button to view the details about the leave encashment generated for the employee.
# Leave Balance
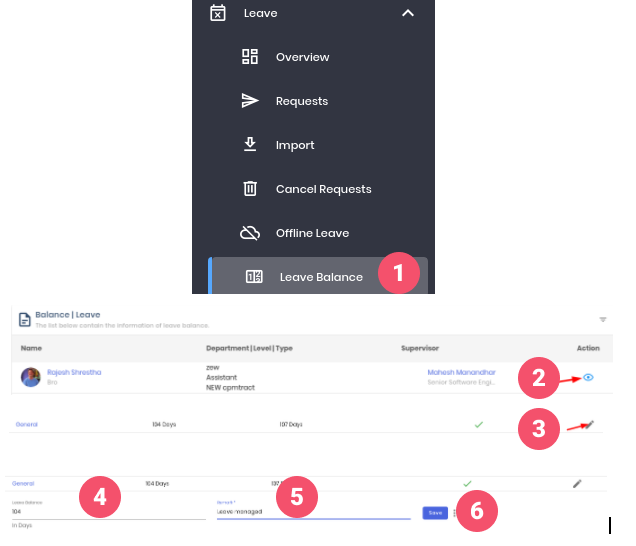
- Go to the ‘Leave’ on the sidebar and click on the ‘Leave Balance’.
- Verify the employee and click on the ‘manage’ eye button on Action column.
- Verify the leave type and click on the ‘edit’ icon on the action column.
- Enter ‘Leave Balance’.
- Enter ‘Remarks’.
- Click on the ‘Save’ button.
# Settings
# Leave Master Settings
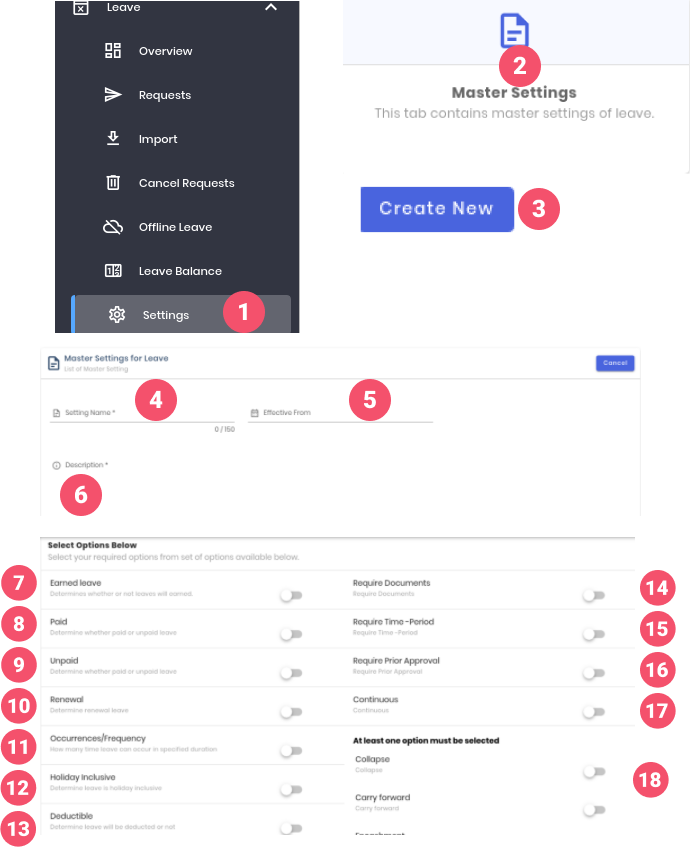
- Go to the ‘Leave’ on the sidebar and click on the ‘Settings’.
- Click on the ‘Master Settings’.
- Click on the ‘Create New’ button.
- Enter ‘Setting Name’.
- Select ‘Effective From’ date.
- Enter ‘Description’.
- Select ‘Earned leave’ to determine whether or not leave will be earned.
- Select ‘Paid’ to determine whether paid or unpaid leave.
- Select ‘Unpaid’ to determine whether paid or unpaid leave.
- Select ‘Renewal’ to determine renewal leave.
- Select 'Occurrences/Frequency’ to determine how many time leave can occur in specific time.
- Select ‘Holiday Inclusive’ to determine leave is holiday inclusive.
- Select 'Deductible’ to determine leave will be deducted or not.
- Select ‘Require Documents’ to determine whether documents will be required or not.
- Select ‘Require Time-Period’ to determine time period is required or not.
- Select ‘Require Prior Approval’ to determine prior approval is required or not.
- Select ‘Continuous’ to determine continuity of leave.
- Select at least one option ‘Collapse’,’Carry Forward’,’Encashment’ for respective feature.
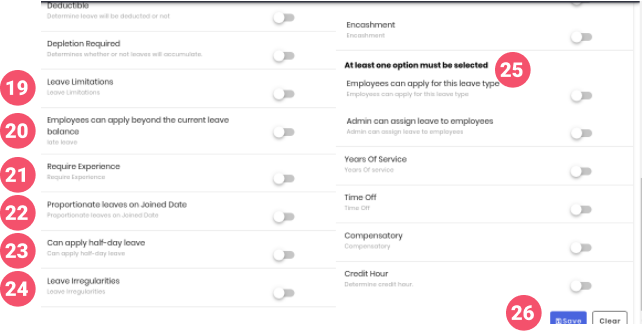
- Select ‘Leave Limitations’ to determine limitations of leave.
- Select ‘Employee can apply beyond the current leave balance’ to determine late leave.
- Select ‘Require Experience’ to determine whether experience is required or not.
- Select ‘Proportional leaves on joined date’ to determine it.
- Select ‘Can apply half-day leave’ to determine whether half day leave can be applied or not.
- Select ‘Leave irregularities’ to determine it.
- Select at least one option ‘Employee can apply for this leave type’,’Admin can assign leave to employees’,’Years of Service’,’Time Off’,’Compensatory’,’Credit Hour’ for respective feature.
- Click on the ‘Save’ button.
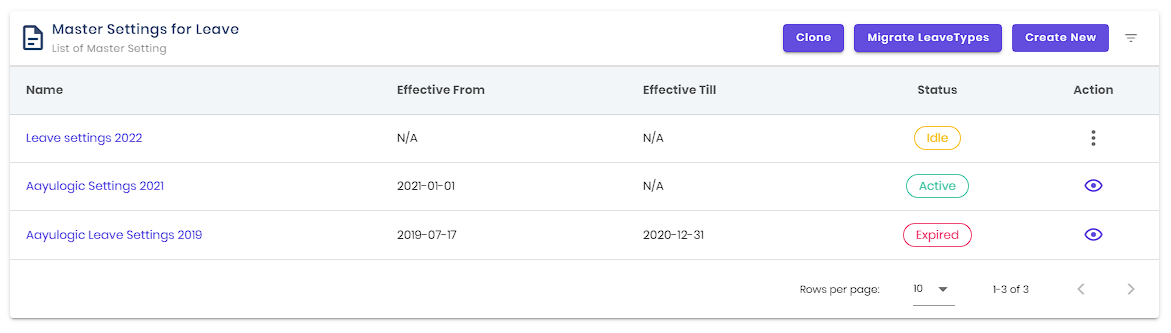
# Migrate leave type balance

- Go to the ‘Leave’ on the sidebar and click on the ‘Settings’.
- Click on the ‘Master Settings’.
- Click on the ‘Migrate Leave Types’.
- Select ‘Old Leave Type’.
- Select ‘New Leave Type’.
- Click on the ‘Save’ button.
# Leave Types
- Go to Leave Master Settings. Click on Leave Master setting heading created earlier.
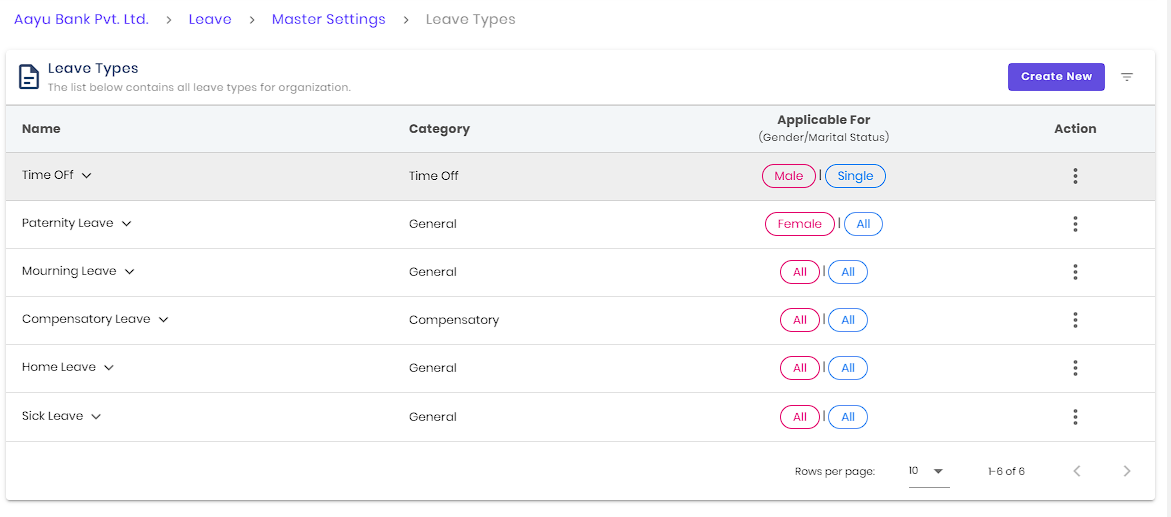
- Click "Create New"
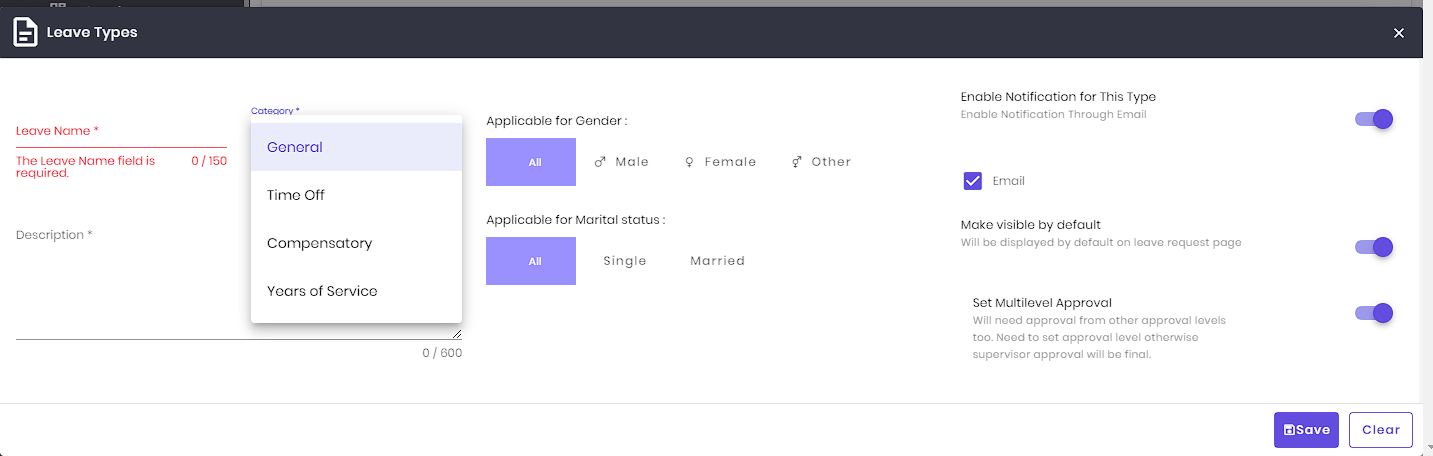
- Enter The Details as required
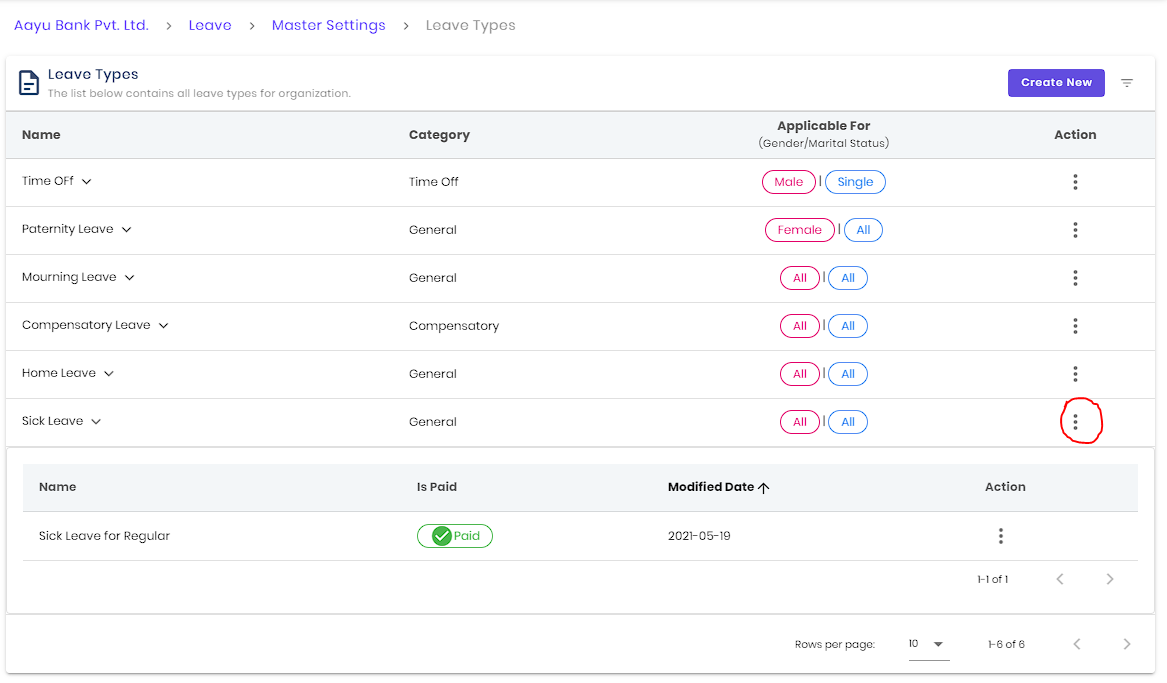
- Click "3 dot" to create leave policy for the created leave type

- Fill the details as required
# Assign Leave
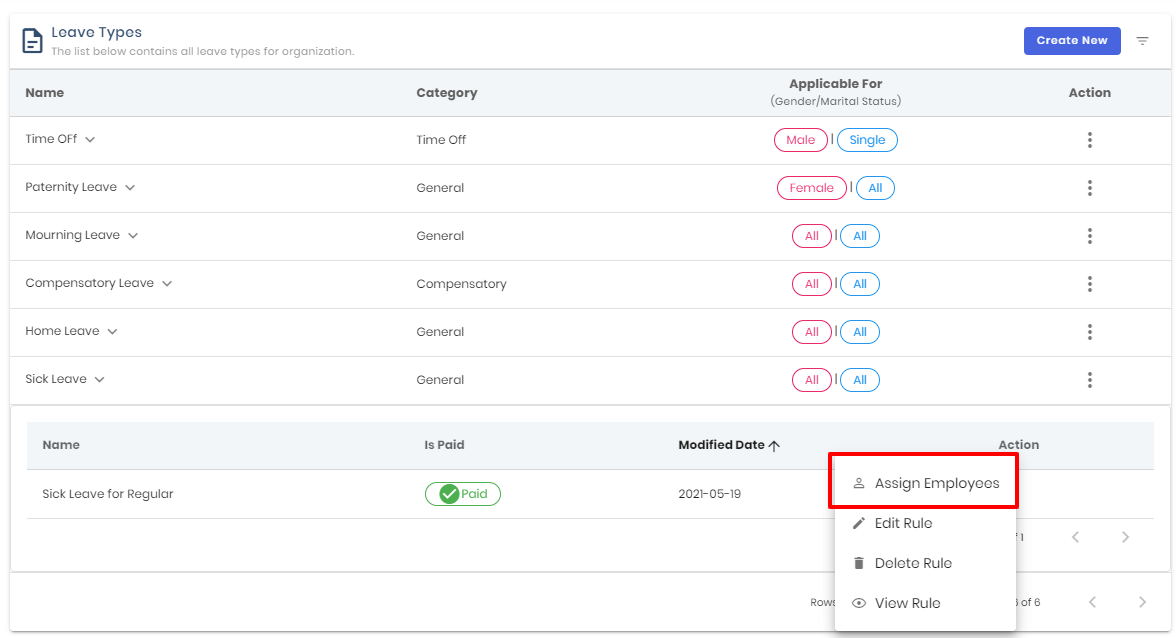
- Click "3 dot" of created new policy created.
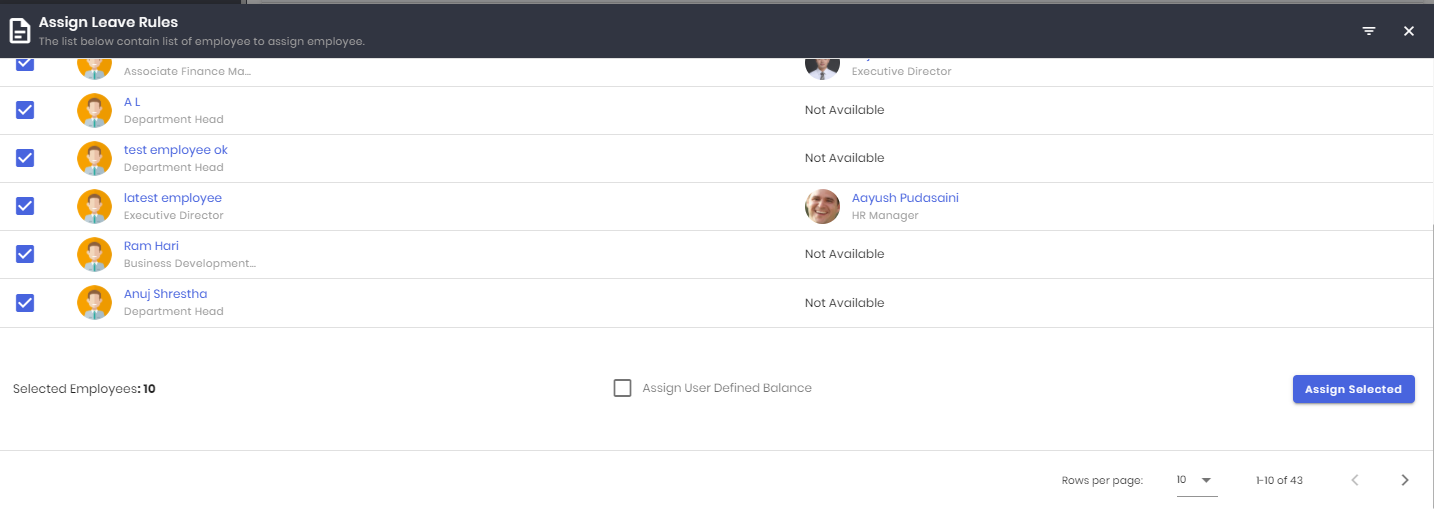
- Select the employee to Assign Leave. Click Assign selected to Assign Leave
# Leave Approval
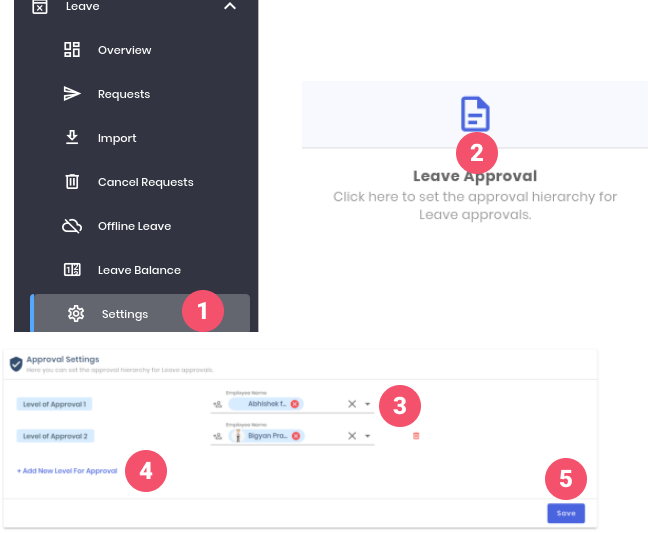
- Go to the ‘Leave’ on the sidebar and click on the ‘Settings’.
- Click on the ‘Leave Approval’.
- Select ‘Employee’ for first level approval.
- Click on ‘Add New Level For Approval’ to set a new level and select ‘Employee’ for the level.
- Click on the ‘Save’ button.
# Reports
# Multiple Comparative Reports
# Leave Comparison between division
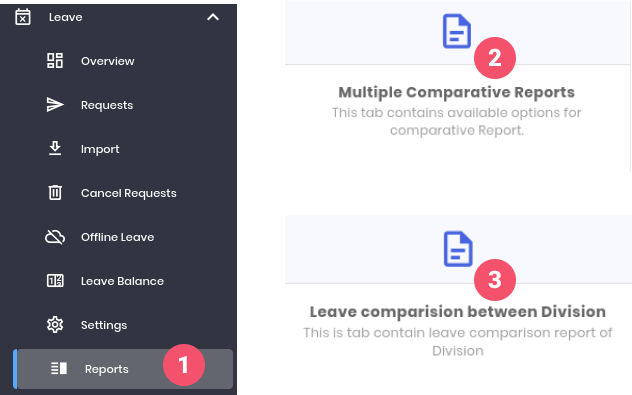
- Go to the ‘Leave’ on the sidebar and click on the ‘Reports’.
- Click on the ‘Multiple Comparative Reports’.
- Click on the ‘Leave comparison between division’.
# Leave Taken Monthly
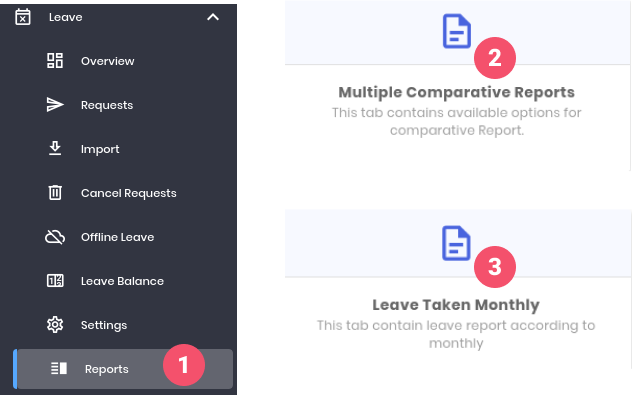
- Go to the ‘Leave’ on the sidebar and click on the ‘Reports’.
- Click on the ‘Multiple Comparative Reports’.
- Click on the ‘Leave Taken Monthly’’.
# Basic Report
# Monthly Leave Report
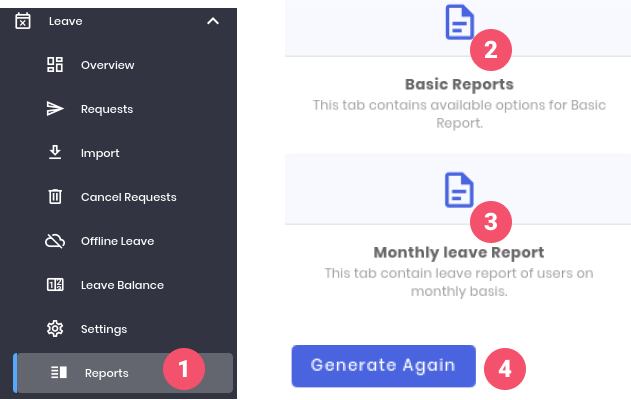
- Go to the ‘Leave’ on the sidebar and click on the ‘Reports’.
- Click on the ‘Basic Reports’.
- Click on the ‘Monthly Leave Report’.
- To generate a report again click on the ‘Generate Again’ button.
# Individual Monthly Leave Report
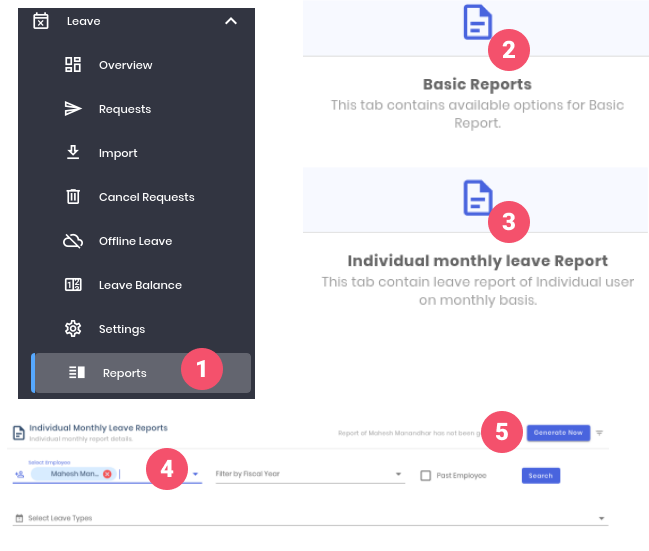
- Go to the ‘Leave’ on the sidebar and click on the ‘Reports’.
- Click on the ‘Basic Reports’.
- Click on the ‘Individual Monthly Leave Report’.
- Select ‘Employee’.
- Click on the ‘Generate Now’ button.
# Yearly Leave Report
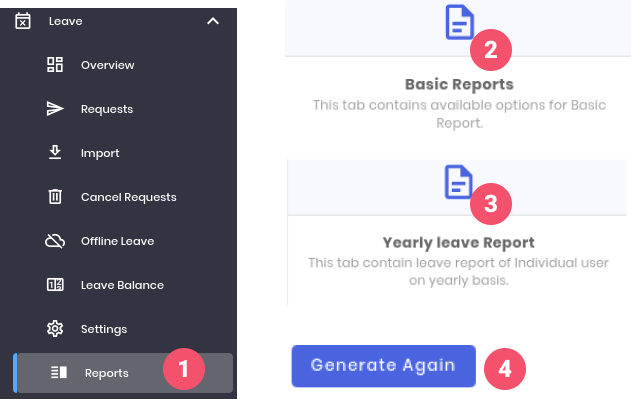
- Go to the ‘Leave’ on the sidebar and click on the ‘Reports’.
- Click on the ‘Basic Reports’.
- Click on the ‘Yearly Leave Report’.
- To generate a report again click on the ‘Generate Again’ button.
# Individual Leave Balance
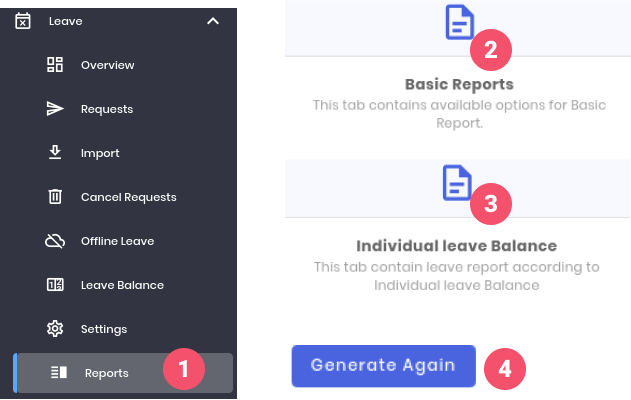
- Go to the ‘Leave’ on the sidebar and click on the ‘Reports’.
- Click on the ‘Basic Reports’.
- Click on the ‘Individual Leave Balance’.
- To generate a report again click on the ‘Generate Again’ button.
# Irregularity
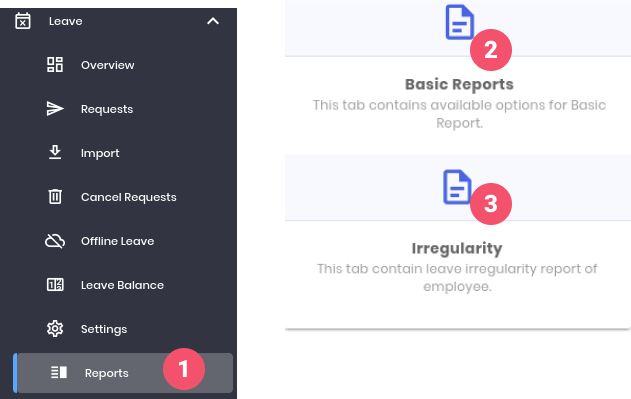
- Go to the ‘Leave’ on the sidebar and click on the ‘Reports’.
- Click on the ‘Basic Reports’.
- Click on the ‘Irregularity’.
# Recurrence Leave
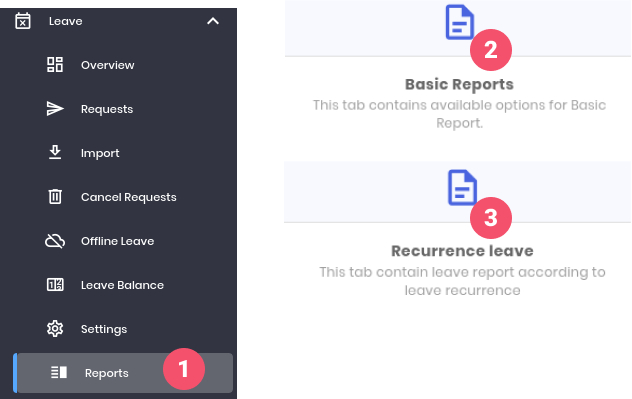
- Go to the
‘Leave’ on the sidebar and click on the‘Reports’ . - Click on the
‘Basic Reports’ . - Click on the
‘Recurrence Leave’ .
# Gender Report
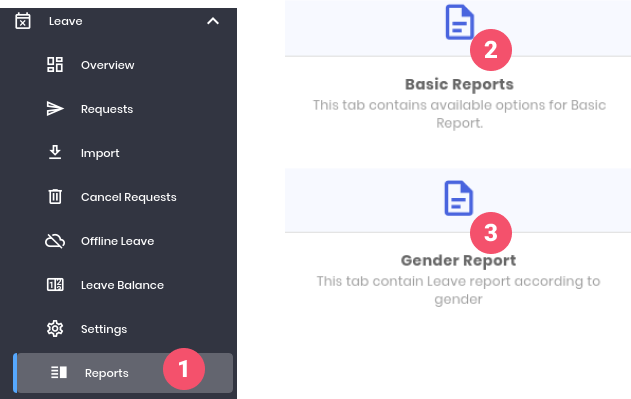
- Go to the ‘Leave’ on the sidebar and click on the ‘Reports’.
- Click on the ‘Basic Reports’.
- Click on the ‘Gender Report’.
# Age Report
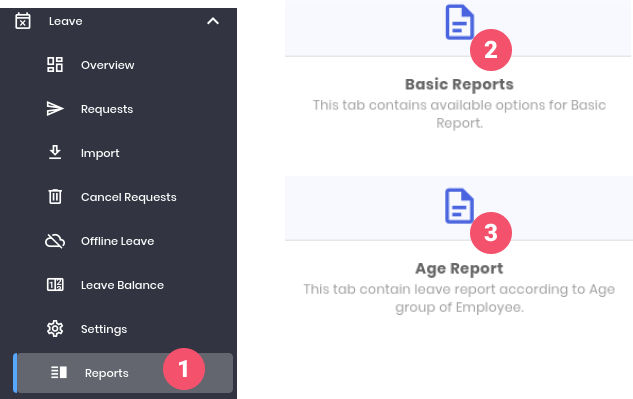
- Go to the
‘Leave’ on the sidebar and click on the‘Reports’ . - Click on the
‘Basic Reports’ . - Click on the
‘Age Report’ .
# Branch Report
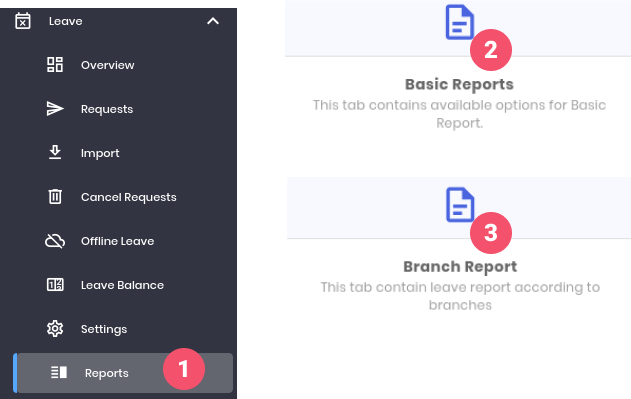
- Go to the ‘Leave’ on the sidebar and click on the ‘Reports’.
- Click on the ‘Basic Reports’.
- Click on the ‘Branch Report’.
# Employment Level Report
 1. Go to the **‘Leave’** on the sidebar and click on the **‘Reports’**.
2. Click on the **‘Basic Reports’**.
3. Click on the **‘Employment Level’**.
1. Go to the **‘Leave’** on the sidebar and click on the **‘Reports’**.
2. Click on the **‘Basic Reports’**.
3. Click on the **‘Employment Level’**.
# Employment Type Report

- Go to the ‘Leave’ on the sidebar and click on the ‘Reports’.
- Click on the ‘Basic Reports’.
- Click on the ‘Employment Type’.
# Marital Status Report
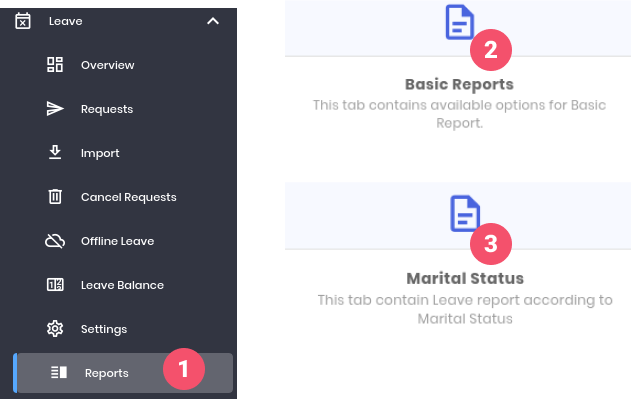
- Go to the ‘Leave’ on the sidebar and click on the ‘Reports’.
- Click on the ‘Basic Reports’.
- Click on the ‘‘Marital Status’’.
# Compensatory Leave Report
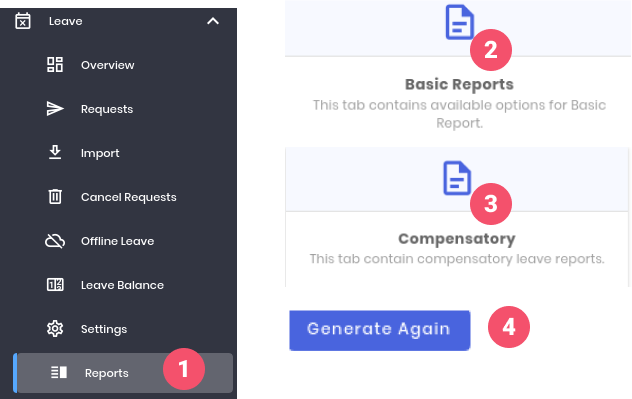
- Go to the ‘Leave’ on the sidebar and click on the ‘Reports’.
- Click on the ‘Basic Reports’.
- Click on the ‘‘Compensatory’’.
- To generate a report again click on the ‘Generate Again’ button.
# Carry Forward Leave Report
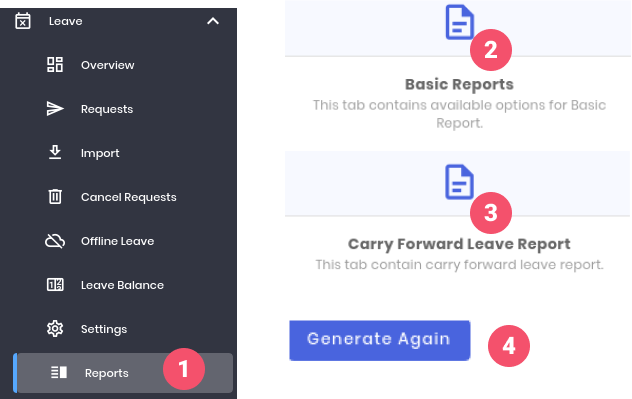
- Go to the ‘Leave’ on the sidebar and click on the ‘Reports’.
- Click on the ‘Basic Reports’.
- Click on the ‘Carry Forward Leave Report’.
- To generate a report again click on the ‘Generate Again’ button.
# Summarized Yearly Leave Report
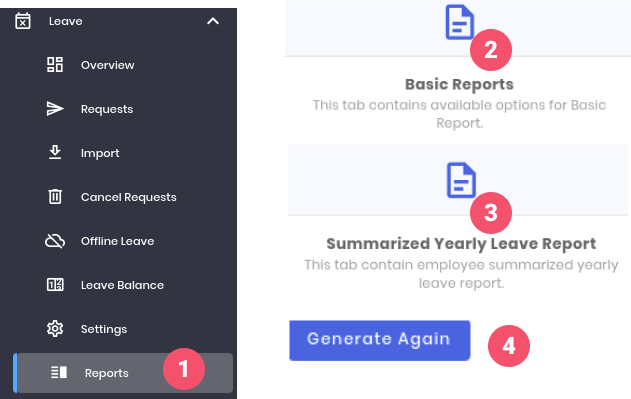
- Go to the ‘Leave’ on the sidebar and click on the ‘Reports’.
- Click on the ‘Basic Reports’.
- Click on the ‘Summarized Yearly Leave Report’.
- To generate a report again click on the ‘Generate Again’ button.
# Payroll
# Overview
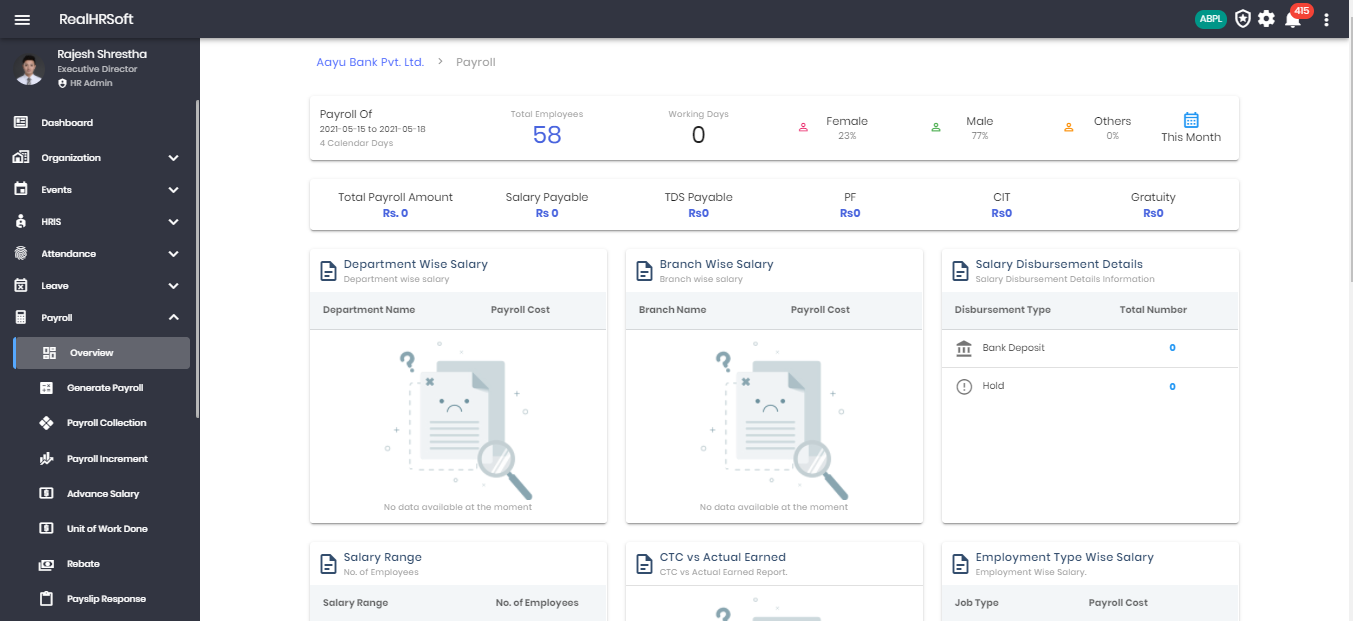
- Go to “Payroll” in the sidebar. Click on “Overview”
- Displays the Payroll for the current month.
- Displays the total employees for which the Payroll will be generated.
- Displays the number of working days for which the Payroll will be generated.
- Displays the percentage of Female employees
- Displays the** percentage of Male employees**
- Displays the percentage of employee of Other gender.
- Click on the Calendar above “This Month” to select the time period for the display of Payroll
- Displays the Total Payroll Amount for the selected time period.
- Displays the Salary Payable for the selected time period.
- Displays the TDS Payable for the selected time period.
- Displays the PF for the selected time period.
- Displays the CIT for the selected time period.
- Displays the Gratuity for the selected time period.
- Displays the Department wise salary for the selected time period.
- Displays the Branch wise salary for the selected time period.
- Displays the Salary Disbursement Details Information for the selected time period. i.e Total Number for each Disbursement type.
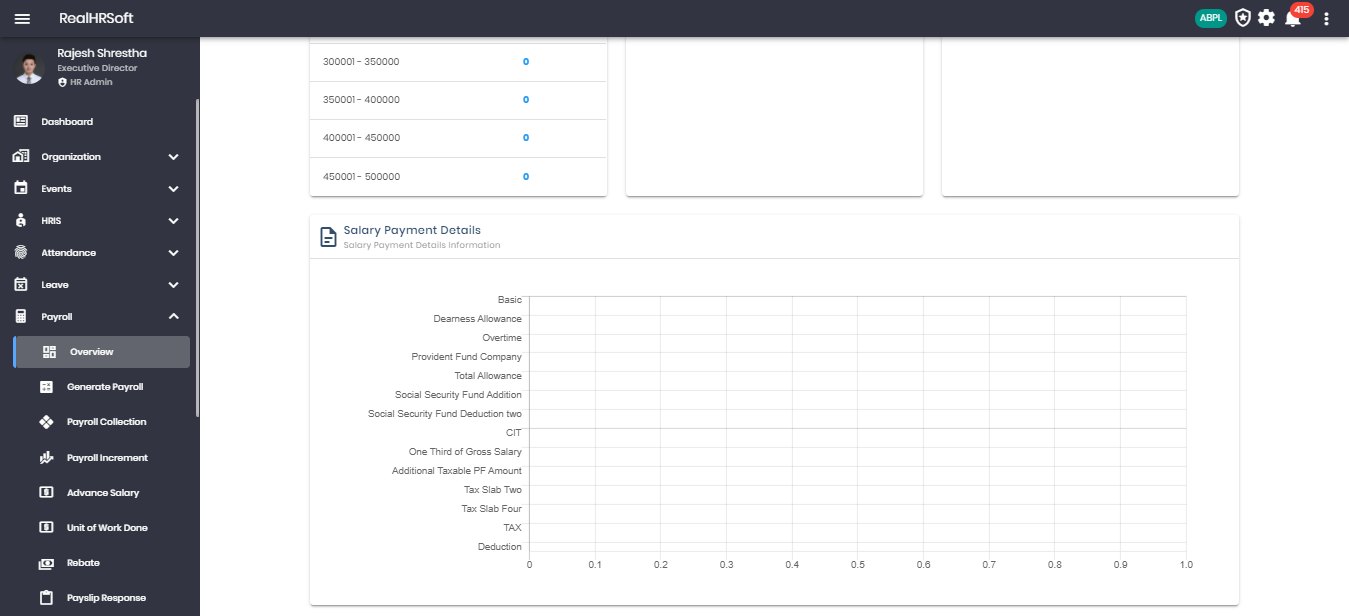
- Displays the Number of employees within the given salary range.
# Generate Payroll
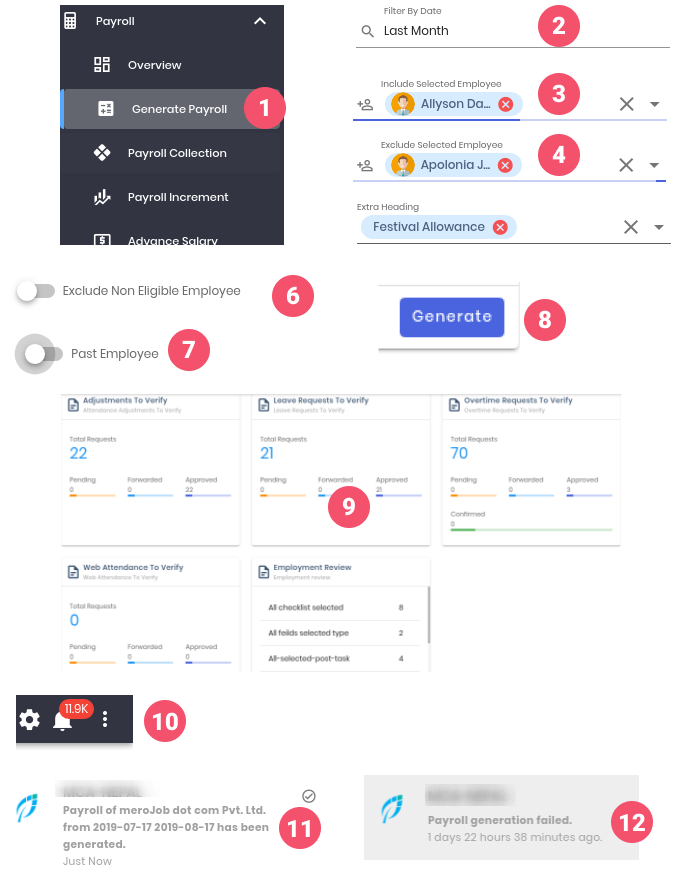
- Navigate to “Generate Payroll” from the sidebar.
- Select date range of the payroll generation.
- Select employee in “Include Selected Employee” to generate payroll of selected employees.
- Select employee in “Exclude Selected Employee” to excluded employees from payroll generation.
- Add an “extra heading” type in this field which is required to calculate while generating payroll.
- Enable “Exclude Non Eligible Employee” to exclude employees who are not eligible for payroll for a given date range.
- Enable “Past Employee” to generate payroll of past employees.
- Click on the “Generate” button.
- Error log is displayed if there are any pending requests for selected date range.
- Payroll generation is notified through notification.
- Clicking on the Successfully generated notification, will be redirected to “Payroll Collection” page.
- Clicking on the failed generation process notification, an error message will be displayed on the generation page.<
# Payroll Collection
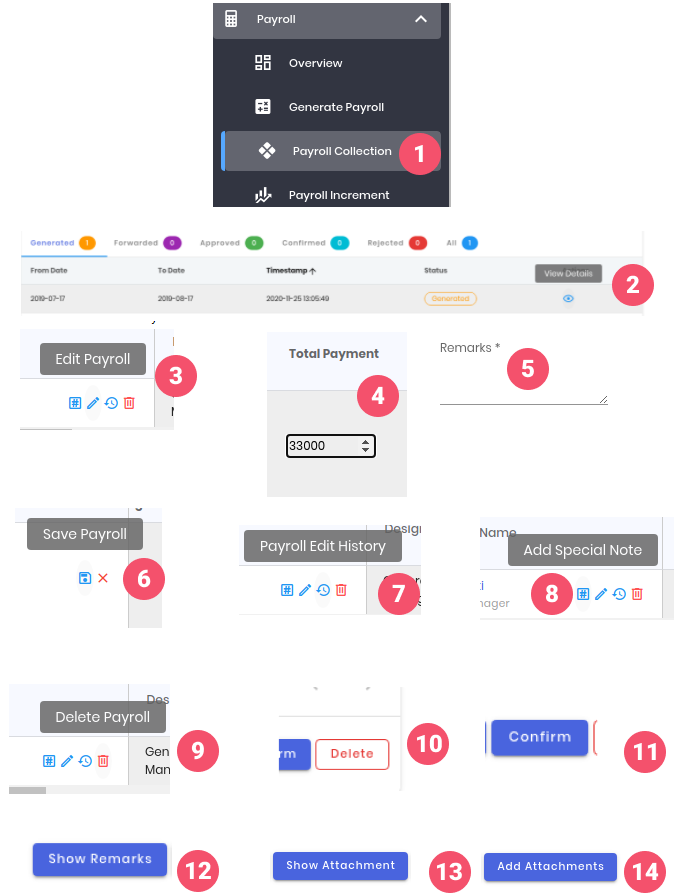

- Navigate to “Payroll Collection” from the sidebar.
- In the “Generated” tab click on the “View details” icon in the Action column.
- Click on the “Edit Payroll” icon to change the generated payroll amounts.
- Change the “heading amount value”.
- Enter the “Remarks”.
- Click on “Save Payroll” icon
- Click on the “Payroll Edit History” icon to view the edit history.
- Click on the “Add Special Note” icon to add a special note to individual users payroll.
- Click on the “Delete” icon to delete individual users generated payroll.
- Click on the “Delete” button to delete all the generated payroll.
- Click on the “Confirm” button to confirm the generated payroll.
- Click on the “Show Remarks” to view the approval process remarks.
- Click on the “Show Attachment” to view the attachment added to the payroll.
- Click on the “Add Attachment” to add attachments to the payroll.
- Click on the “Add Special Note” to add notes in the generated payroll.
- Click on the “Generate” button to generate a report.
- Click on the “Download” button to download the generated report.
# Payroll Increment
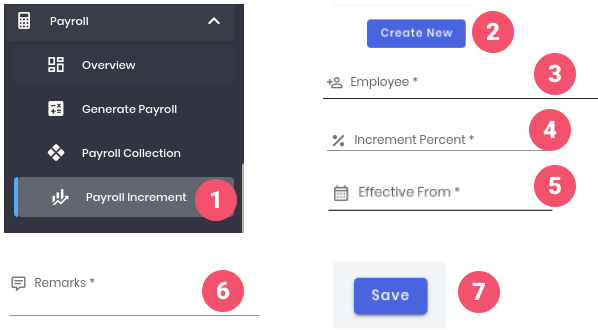
- Navigate to “Payroll Increment” from the sidebar.
- Click on the “Create New” button.
- Select the name of the employee for the increment.
- Enter the increment percentage.
- Select the effective date.
- Enter the remarks.
- Click on the “Save” button to save the detail.
# Advance Salary
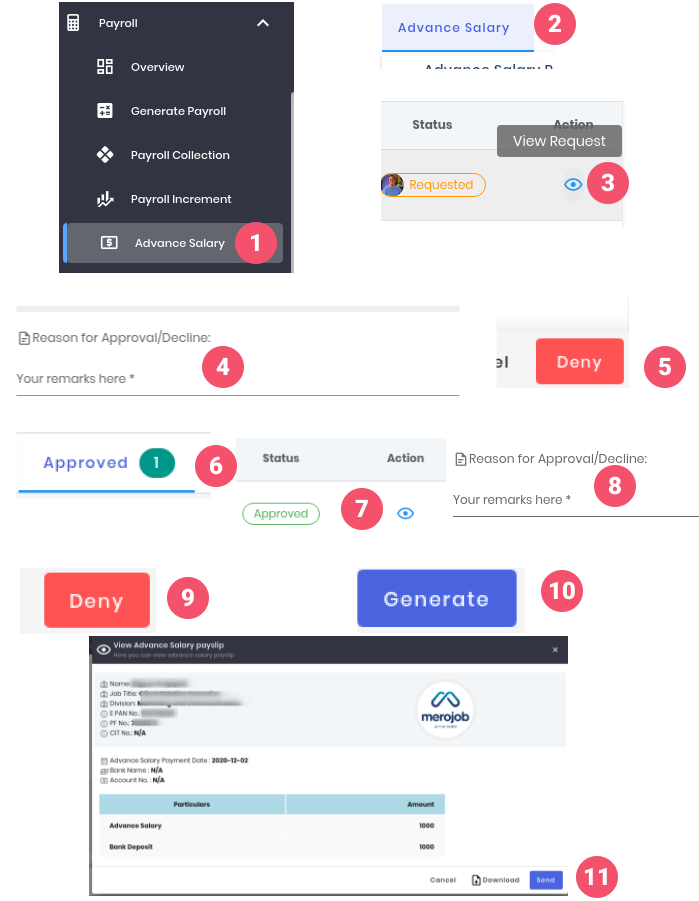
 1. Navigate to **“Advance Salary”** from the sidebar.
2. Click on the **“Advance Salary”** tab to view the advance say request list.
3. In the **“Requested”** tab click on the **“View Request”** icon from the Action column.
4. Enter the **“Remarks”**.
5. Click on the **“Deny”** button to deny the request.
6. Click on the **“Approved”** tab to view the list of the approved requests.
7. Click on the **“View Request”** icon from the action column.
8. Enter the **“remarks”** for decline.
9. Click on the **“Deny”** button to deny the request.
10. Click on the **“Generate”** icon to confirm the request and Generate the payslip.
11. Click on the **“Send”** button to send the payslip and **“Download”** button to download the payslip.
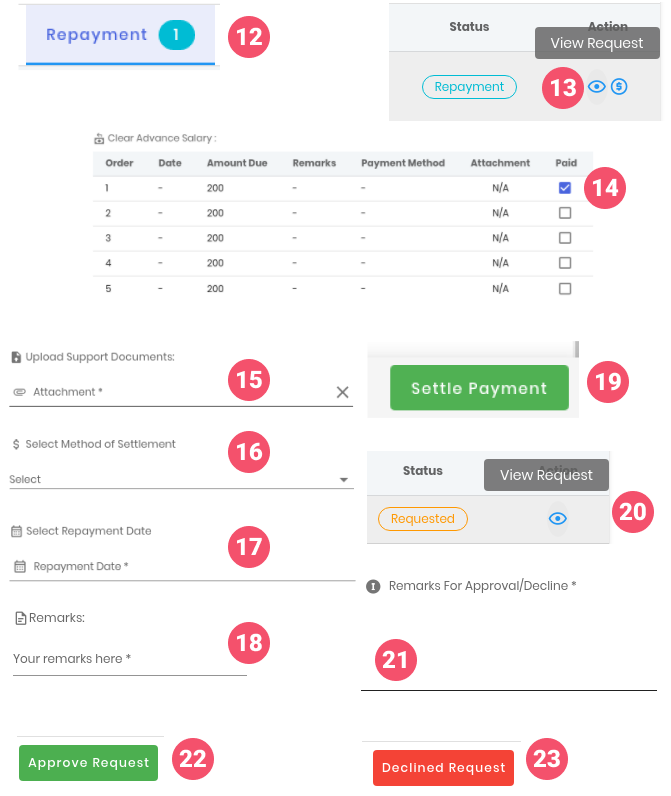
12. Click on the **“Repayment”** tab to view the approved advance request for the repayment process.
13. Click on the **“View Request”** icon from the Action column.
14. Check the Paid column checkbox for manual repayment.
15. Select the **“Attachment”**.
16. Select the **“Method of Settlement”**. I.e. Cash/ Cheque.
17. Select the **“Repayment Date”**.
18. Enter the **“Remarks”**.
19. Click on the **“Settle Payment”** button.
20. Click on the **“View Request”** icon from the Action column to view the request and repayment details.
21. Enter the **“Remarks”** for Approval/ Denial.
22. Click on the **“Approve Request”** to approve the request.
23. Click on the **“Declined Request”** to decline the request.
1. Navigate to **“Advance Salary”** from the sidebar.
2. Click on the **“Advance Salary”** tab to view the advance say request list.
3. In the **“Requested”** tab click on the **“View Request”** icon from the Action column.
4. Enter the **“Remarks”**.
5. Click on the **“Deny”** button to deny the request.
6. Click on the **“Approved”** tab to view the list of the approved requests.
7. Click on the **“View Request”** icon from the action column.
8. Enter the **“remarks”** for decline.
9. Click on the **“Deny”** button to deny the request.
10. Click on the **“Generate”** icon to confirm the request and Generate the payslip.
11. Click on the **“Send”** button to send the payslip and **“Download”** button to download the payslip.
12. Click on the **“Repayment”** tab to view the approved advance request for the repayment process.
13. Click on the **“View Request”** icon from the Action column.
14. Check the Paid column checkbox for manual repayment.
15. Select the **“Attachment”**.
16. Select the **“Method of Settlement”**. I.e. Cash/ Cheque.
17. Select the **“Repayment Date”**.
18. Enter the **“Remarks”**.
19. Click on the **“Settle Payment”** button.
20. Click on the **“View Request”** icon from the Action column to view the request and repayment details.
21. Enter the **“Remarks”** for Approval/ Denial.
22. Click on the **“Approve Request”** to approve the request.
23. Click on the **“Declined Request”** to decline the request.
# Unit of Work Done
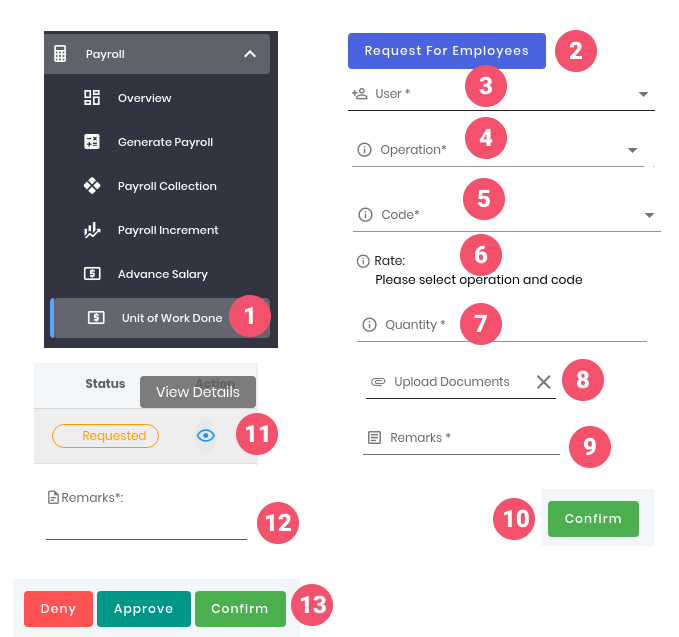
- Navigate to “Unit of Work Done” from the sidebar.
- Click on the “Request for Employee” button.
- Select the required user.
- Select the preferred operation.
- Select the preferred code.
- Will display automatically after the selection of operation and code.
- Enter the quantity.
- Select the required documents.
- Enter the remarks.
- Click on the “Confirm” button.
- In the “Requested” tab click on the “View Details” icon from the Action column.
- Enter the required “Remarks”.
- Click on the “Deny” button to deny the request, “Approve” button to approve the request and “Confirm” button to confirm the request.
# Rebate
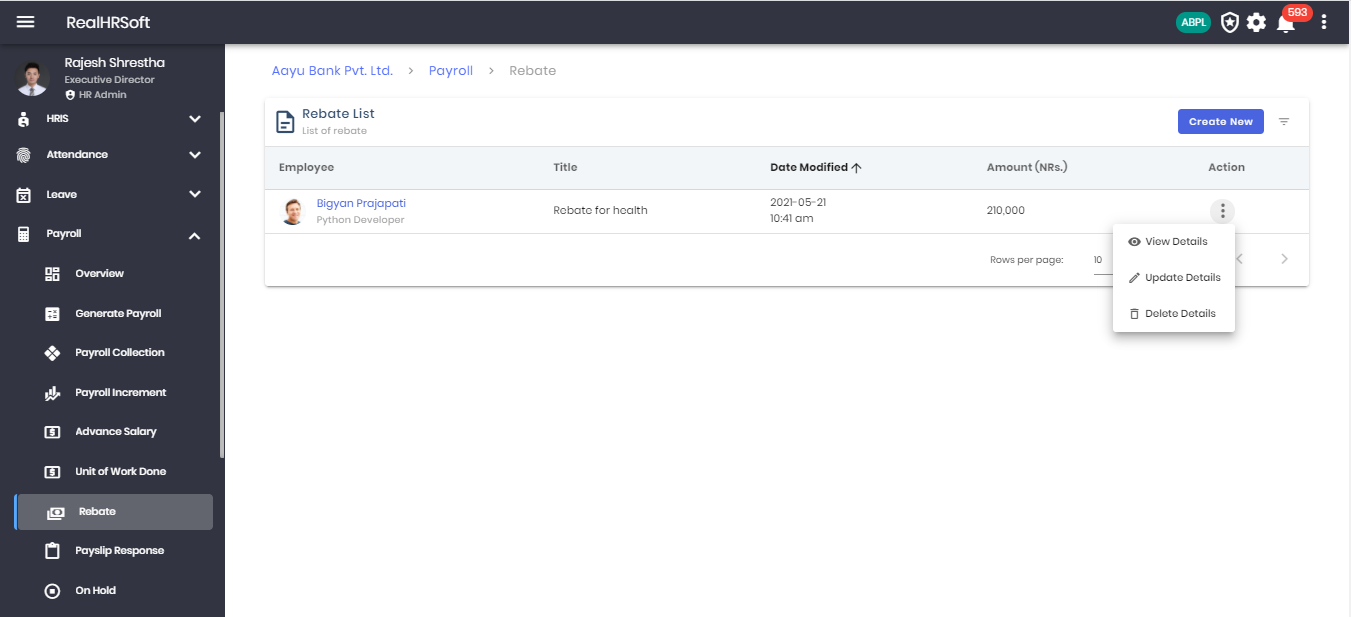
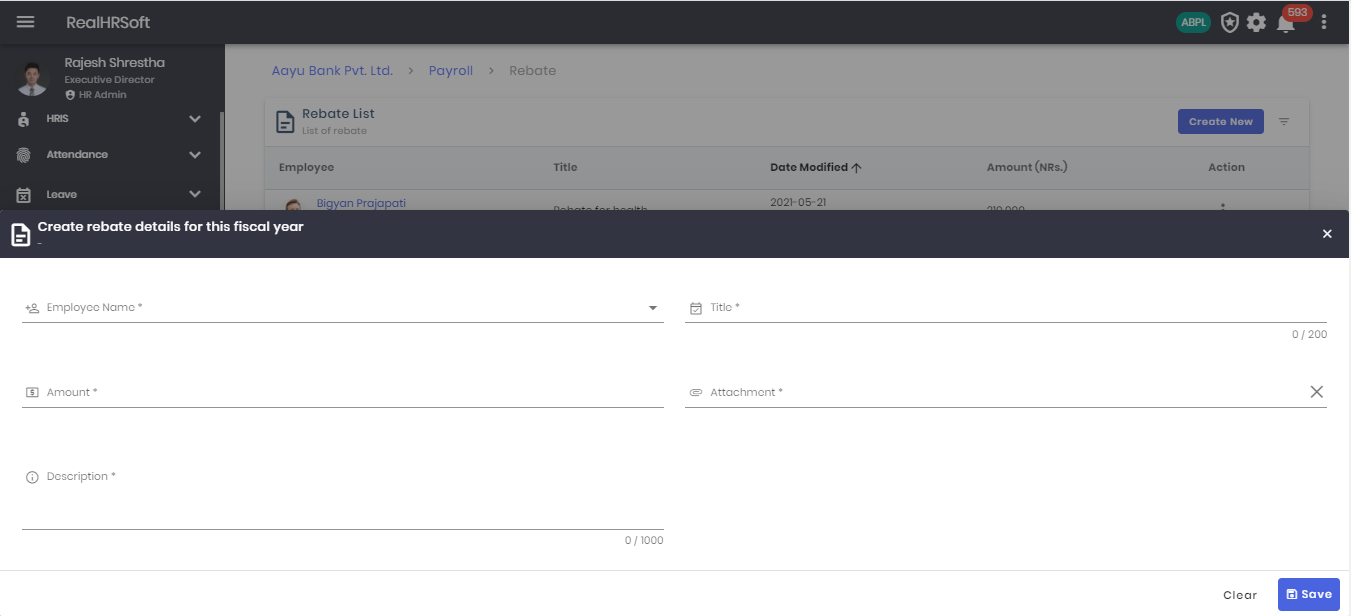
The platform allows the HR to save the documents that would allow rebates in the payroll.
- Go to “Payroll” in the sidebar. Click on “Rebate” to view the list of the employees with their rebate.
- Click on the “Update Detail” action button to change the details about the rebate for the employee.
- Click on the “View Detail” action button to view the details about the rebate for the employee.
- Click on the “Delete Detail” action button to delete the details about the rebate for the employee.
- Click on “Create New” to add a new rebate for an employee with supporting documents.
# Payroll Response
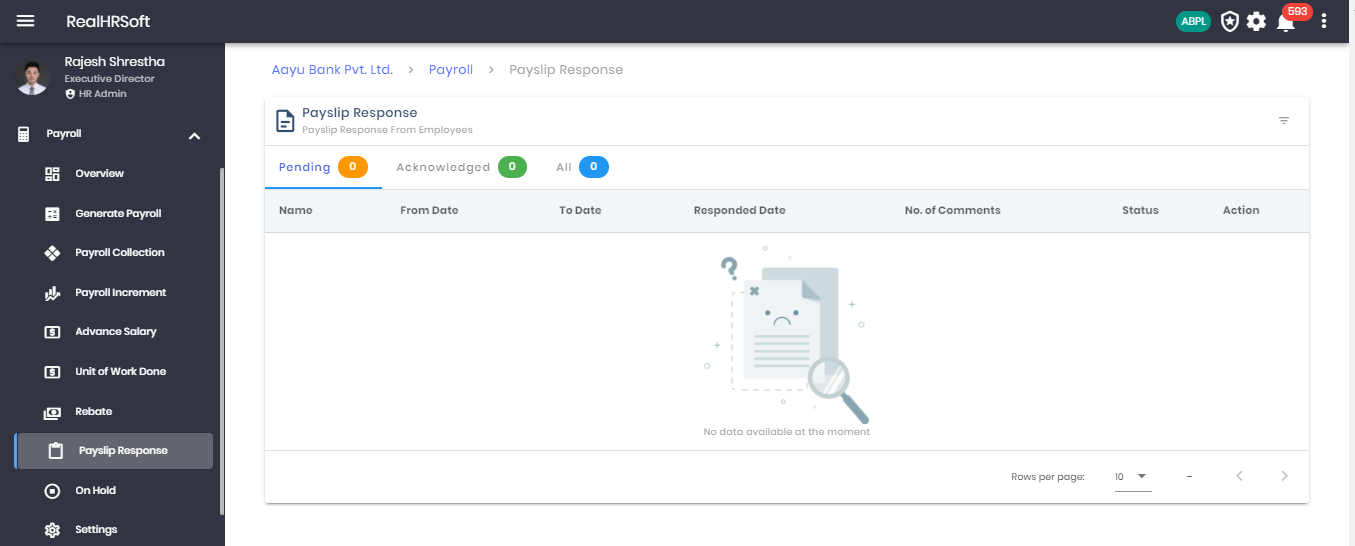
The platform allows the users to acknowledge the payslip generated for them. In case they have any issue with the generated payroll, they can reply back with the same.
- Go to “Payroll” in the sidebar. Click on “Payroll Response” to view the list of the employees with their payroll response. There is a separate list for “Acknowledged” payslip.
# On Hold
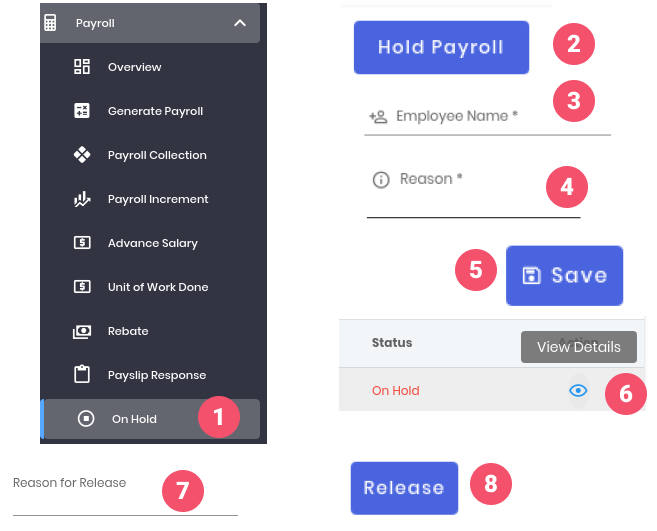
- Navigate to the Payroll >> On Hold.
- Click on the “Hold Payroll” button.
- Select the employee name whose payroll is to be held.
- Enter the reason.
- Click on the “Save” button.
- Click on the “View Details” icon from the Action button for data with status “On Hold”.
- Enter reason for release to release the payroll.
- Click on the “Release” button.
# Settings
# Payroll Headings
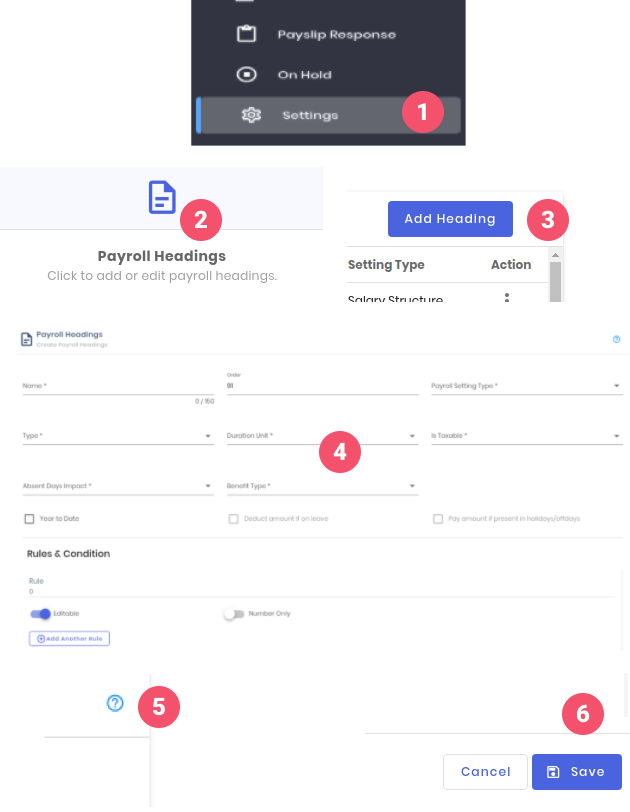
- Click on Payroll on the sidebar and Settings page from the sidebar.
- Click on the ‘Payroll Headings’.
- Click on the ‘Add Headings’ button.
- Fill the Payroll heading creation form.
- Click on the Help icon to get the information about the heading types.
- Click on the ‘Save’ button.
# Payroll Packages
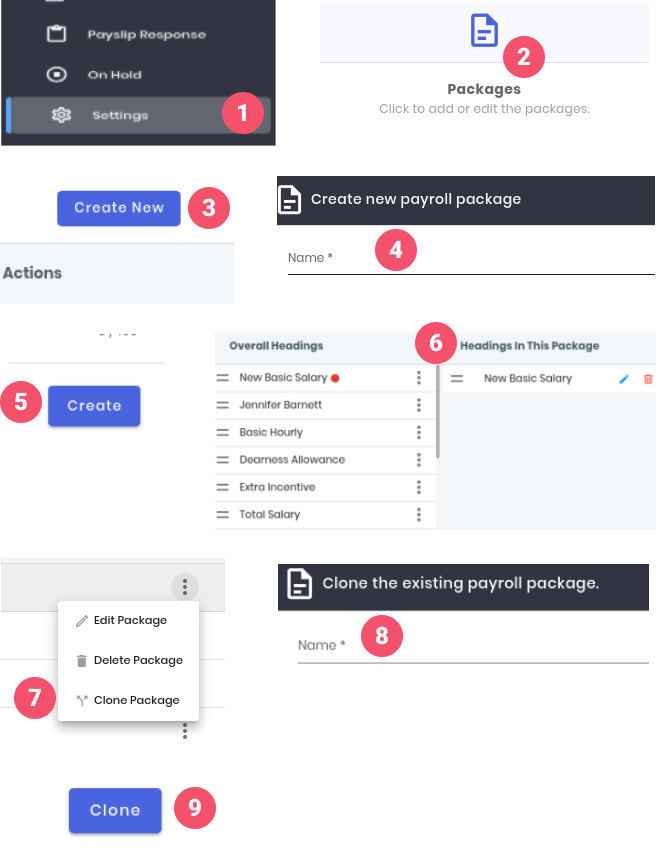
- Click on Payroll on the sidebar and Settings page from the sidebar.
- Click on the “Packages”.
- Click on the “Create New” button.
- Fill the Payroll package creation form.
- Click on the “Create” button.
- Drag the required heading from “Overall Heading” column to “Headings In this package” column.
- Click on the “Clone Package” option.
- Enter the package name.
- Click on the “Clone” button.
# Assign Package
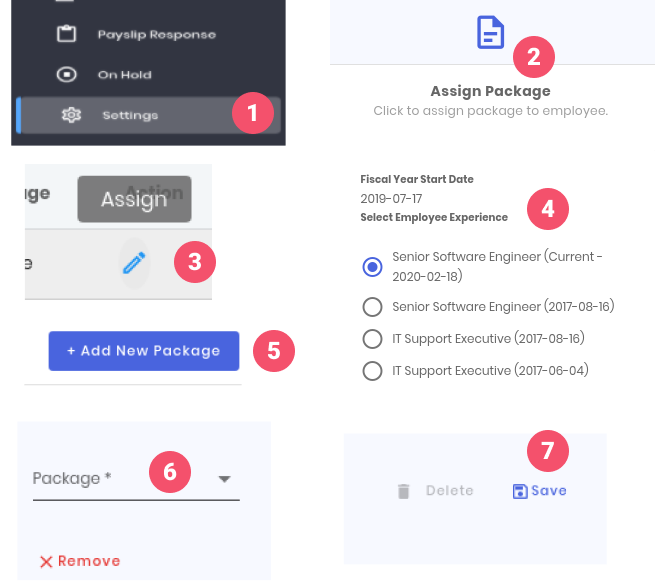
- Click on Payroll on the sidebar and Settings page from the sidebar.
- Click on the “Assign Package”.
- Click on the “Assign” icon.
- Choose the experience to add the package for.
- Click on the “Add New Package” button.
- Select the required package in the “Package” field.
- Click on the “Save” button.
# Payroll Approval
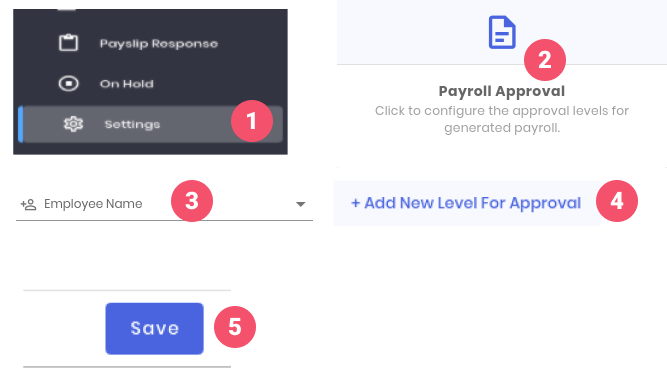
- Click on Payroll on the sidebar and Settings page from the sidebar.
- Click on the “Payroll Approval”.
- Select preferred employee in the “Employee Name” field.
- Click on “Add New Level for Approval” to add multiple approval levels.
- Click on the “Save” button.
# Report Settings
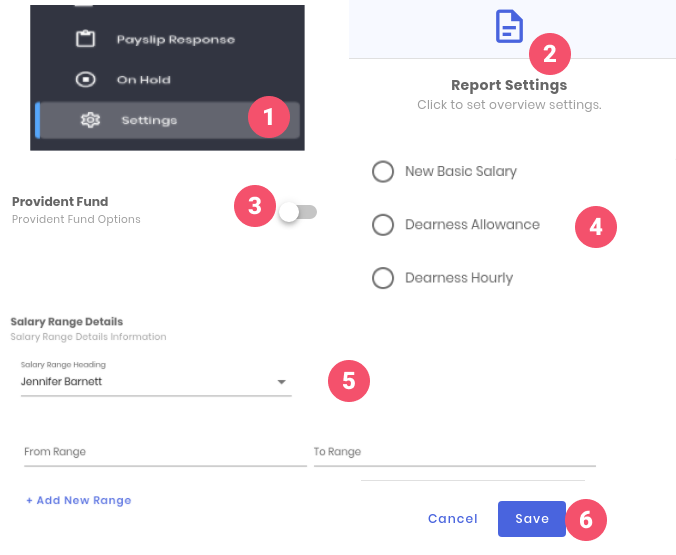
- Click on Payroll on the sidebar and Settings page from the sidebar.
- Click on the “Report Settings”.
- Enable “Toggle” of the preferred settings.
- Choose the preferred Headings for the report.
- For Salary Range Details
- Click on the “Save” button.
# Payroll Tax Report Settings
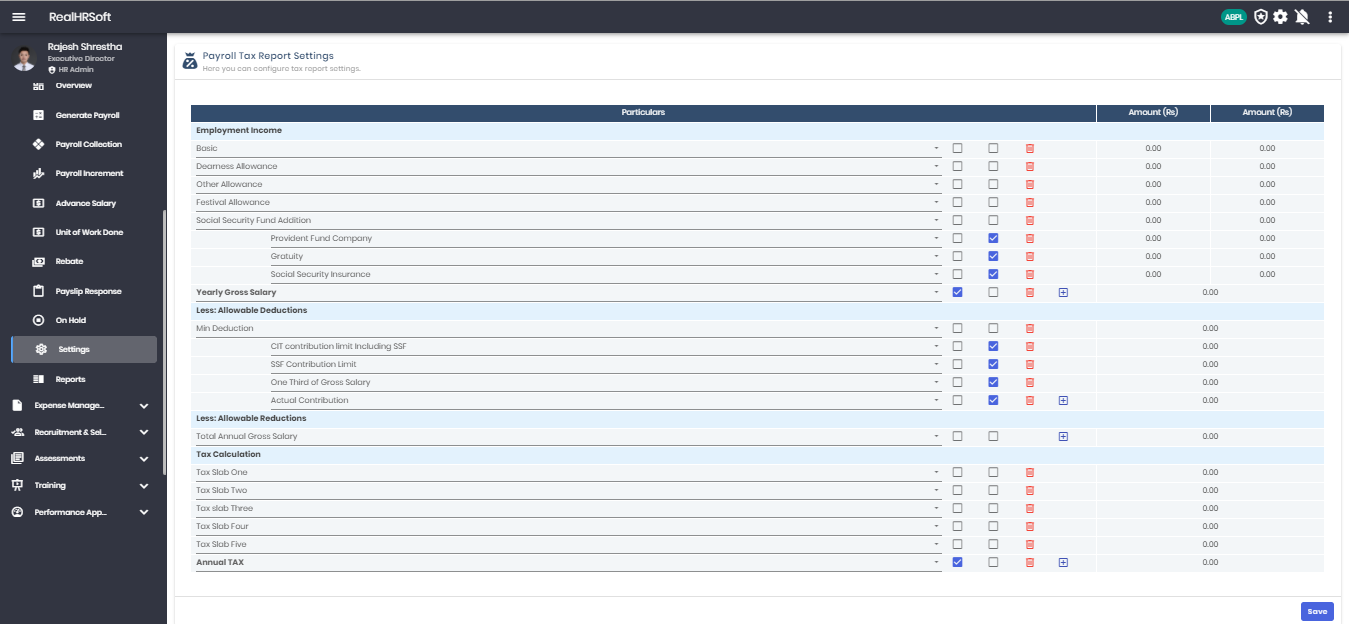
- Go to “Settings” in the sidebar under Payroll. Click on “Payroll Tax Report Settings” for the above page. The page allows you to configure tax report settings.
- Checkbox to bold the heading
- Checkbox to nest the heading
- Checkbox to delete the heading
- Click on Save button to finalise the headers displayed on the tax report.
# Payroll Settings
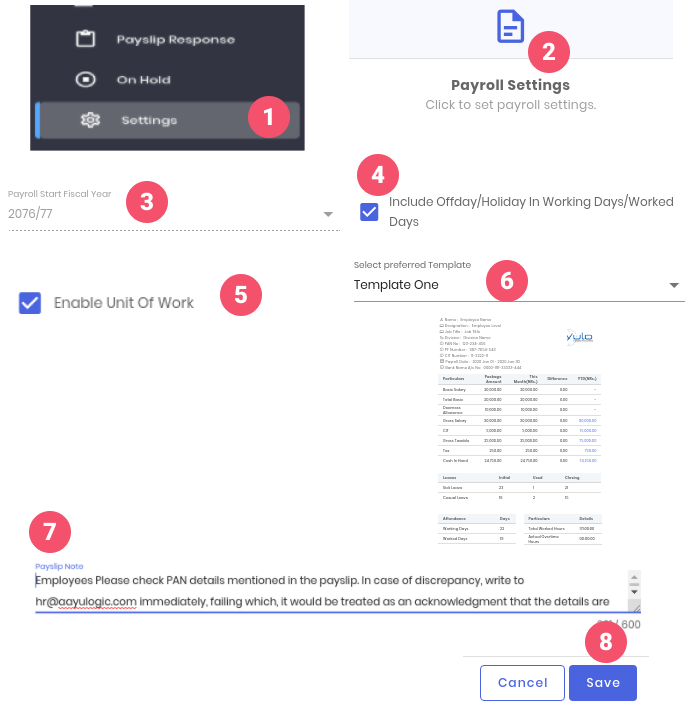
- Click on Payroll on the sidebar and Settings page from the sidebar.
- Click on the “Payroll Settings”.
- Select preferred fiscal year in “Payroll Start Fiscal Year”.
- Enable “Include Off-day/ Holiday in working Days/ Worked Days” to count holidays and off-days as working days/ worked days during payroll calculation
- Enable “Enable Unit of Work” to allow payroll calculation as per the unit of work done settings.
- Select “Preferred Template” format to view the payslip.
- Enter “Payslip Note” which is to be displayed in the generated payslip.
- Click on the “Save” button.
# Pre-Tax Settings

- Click on Payroll on the sidebar and Settings page from the sidebar.
- Click on the “Pre-Tax Settings”.
- Click on the “Create New” button.
- Fill the necessary details in the form.
- Click on the “Save” button.
# Advance Salary Settings
- Click on Payroll on the sidebar and Settings page from the sidebar.
- Click on the “Advance Salary Settings”.
- Click on the “Eligibility Settings”
- Fill the necessary details in the form.
- Click on the “Amount Settings”.
- Fill the necessary details in the form.
- Click on the “Disbursement Settings”.
- Fill the necessary details in the form.
- Click on the “Approval Settings”
- Fill the necessary details in the form.
- Click on the “Save” button.
# Unit of Work Done Settings
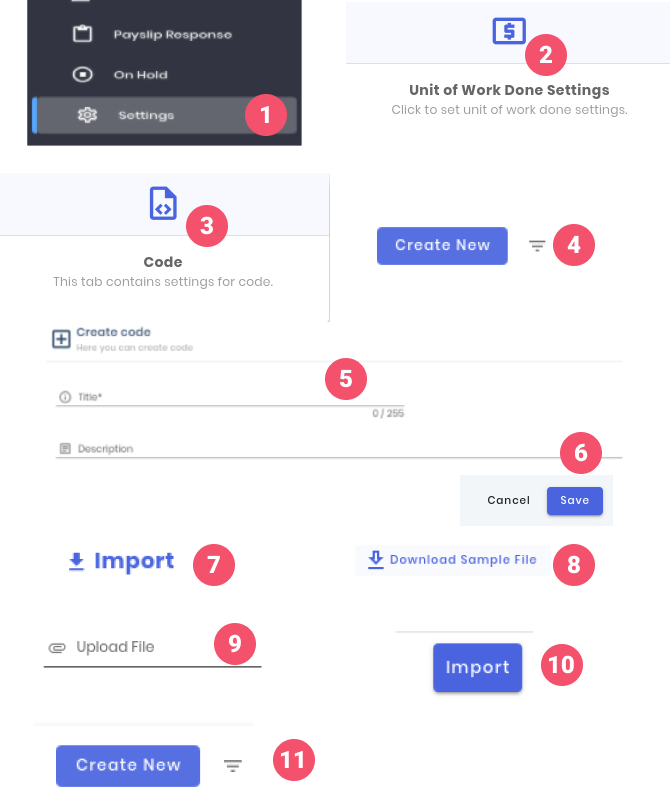
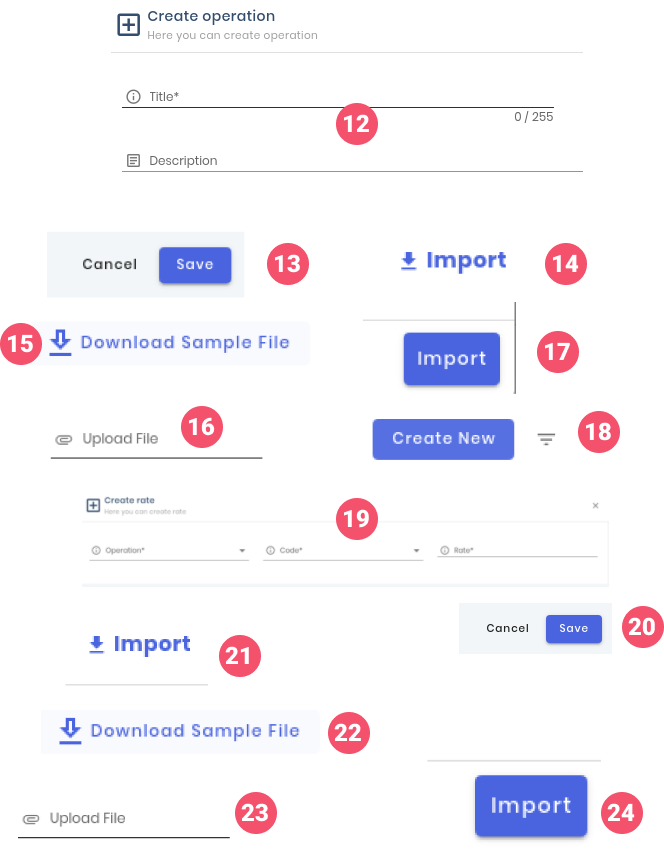
- Click on Payroll on the sidebar and Settings page from the sidebar.
- Click on the “Unit of Work Done Settings”.
- Click on the “Code”.
- Click on the “Create New” button.
- Fill the necessary details in the form.
- Click on the “Save” button.
- To Import the code.Click on the “Import” button.
- Click on the “Download Sample File” to download the sample file.
- Choose the updated sample file in “Upload File”.
- Click on the “Import” button.
- Click on the “Operation”. Click on the “Create New” button.
- Fill the necessary details in the form.
- Click on the “Save” button.
- To Import the Operation. Click on the “Import” button.
- Click on the “Download Sample File” to download the sample file.
- Choose the updated sample file in “Upload File”.
- Click on the “Import” button.
- Click on the “Rate”. Click on the “Create New” button.
- Fill the necessary details in the form.
- Click on the “Save” button.
- To Import the Rate.Click on the “Import” button.
- Click on the “Download Sample File” to download the sample file.
- Choose the updated sample file in “Upload File”.
- Click on the “Import” button.
# Reports
# General Information Report
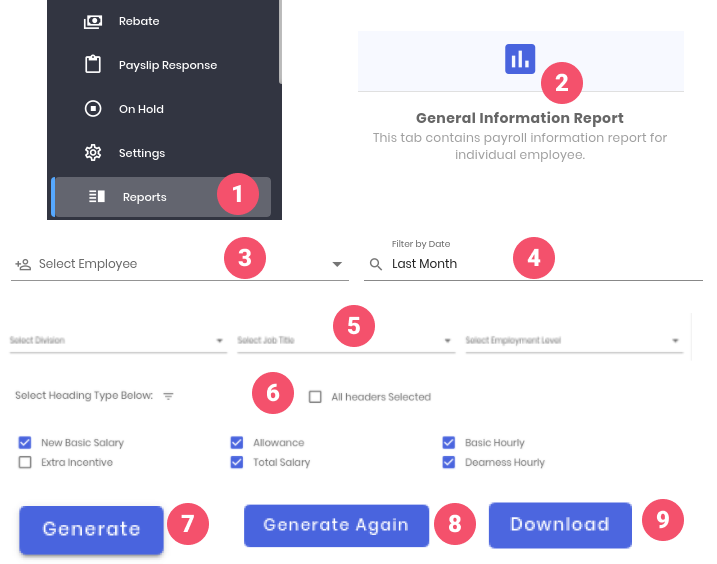
- Navigate to Payroll >> Reports to view the reports.
- Click on the “General Information Report”.
- Select the Employee whose report is to be generated.
- Select the preferred date range for the report generation.
- Select preferred Branch, Division, Job Title and Employment level to filter the report.
- Check preferred heading for report generation. Check “All headers selected” to choose all headings.
- Click on the “Generate” button to generate the report.
- Click on the “Generate Again” button to generate the export report.
- Click on the “Download” button to download the generated export report.
# Package Wise Salary Report
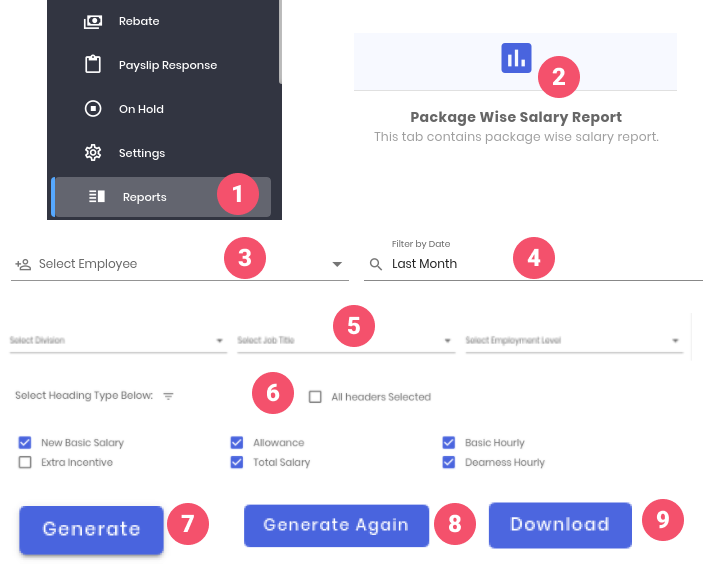
- Navigate to Payroll >> Reports to view the reports.
- Click on the “Package Wise Salary Report”.
- Select the Employee whose report is to be generated.
- Select the preferred date range for the report generation.
- Select preferred Branch, Division, Job Title and Employment level to filter the report.
- Check preferred heading for report generation. Check “All headers selected” to choose all headings.
- Click on the “Generate” button to generate the report.
- Click on the “Generate Again” button to generate the export report.
- Click on the “Download” button to download the generated export report.
# Budget Forecasting Report
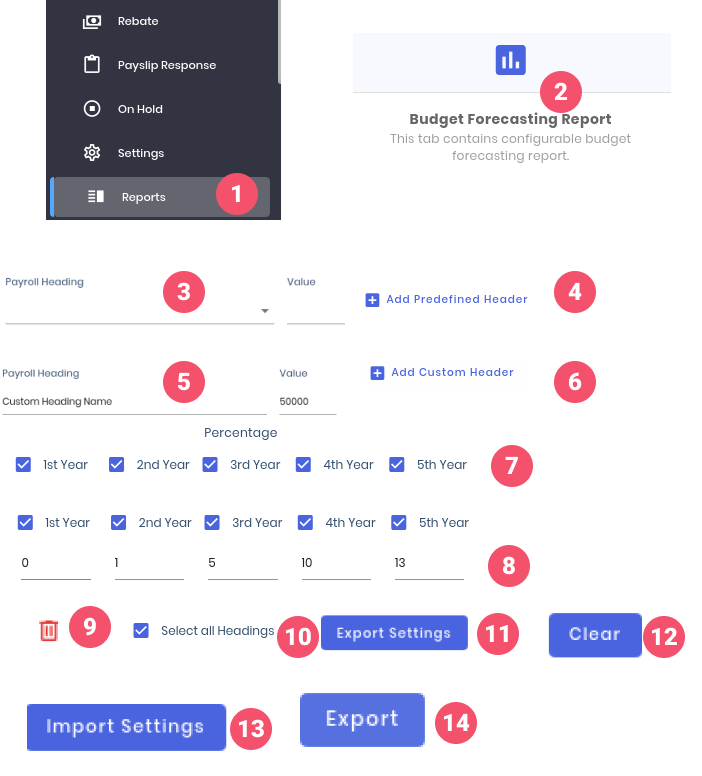
- Navigate to Payroll >> Reports to view the reports.
- Click on the “Budget Forecasting Report”.
- Select preferred “Payroll Heading” for the report. Amount entered in the heading rule while creating the heading is populated by default in the “Value” field.
- Click on the “Add Predefined Header” to add selected predefined heading in the report.
- Enter custom heading name and value in “Payroll Heading” and value field.
- Click on the “Add Custom Header” to add the created custom heading to report.
- Check 1st, 2nd, 3rd, 4th and 5th year to enable incremental values as per the years in percentage.
- Enter the incremental percentage below the respective year fields as per which the amount displayed in the reports are incremented.
- Click on the “Delete” icon to remove the added heading.
- Check “Select all Headings” to generate a report of all the created headings which consists of amount value in the rule section.
- Click on the “Export Settings” button to export the settings. Settings are exported in json format.
- Click on the “Clear” button to clear the selected settings.
- Click on the **“Import Settings” **to import the previously exported settings. Select the settings file which is to be imported.
- Click on the **”Export” **button to export the generated report.
# Yearly Payslip Report
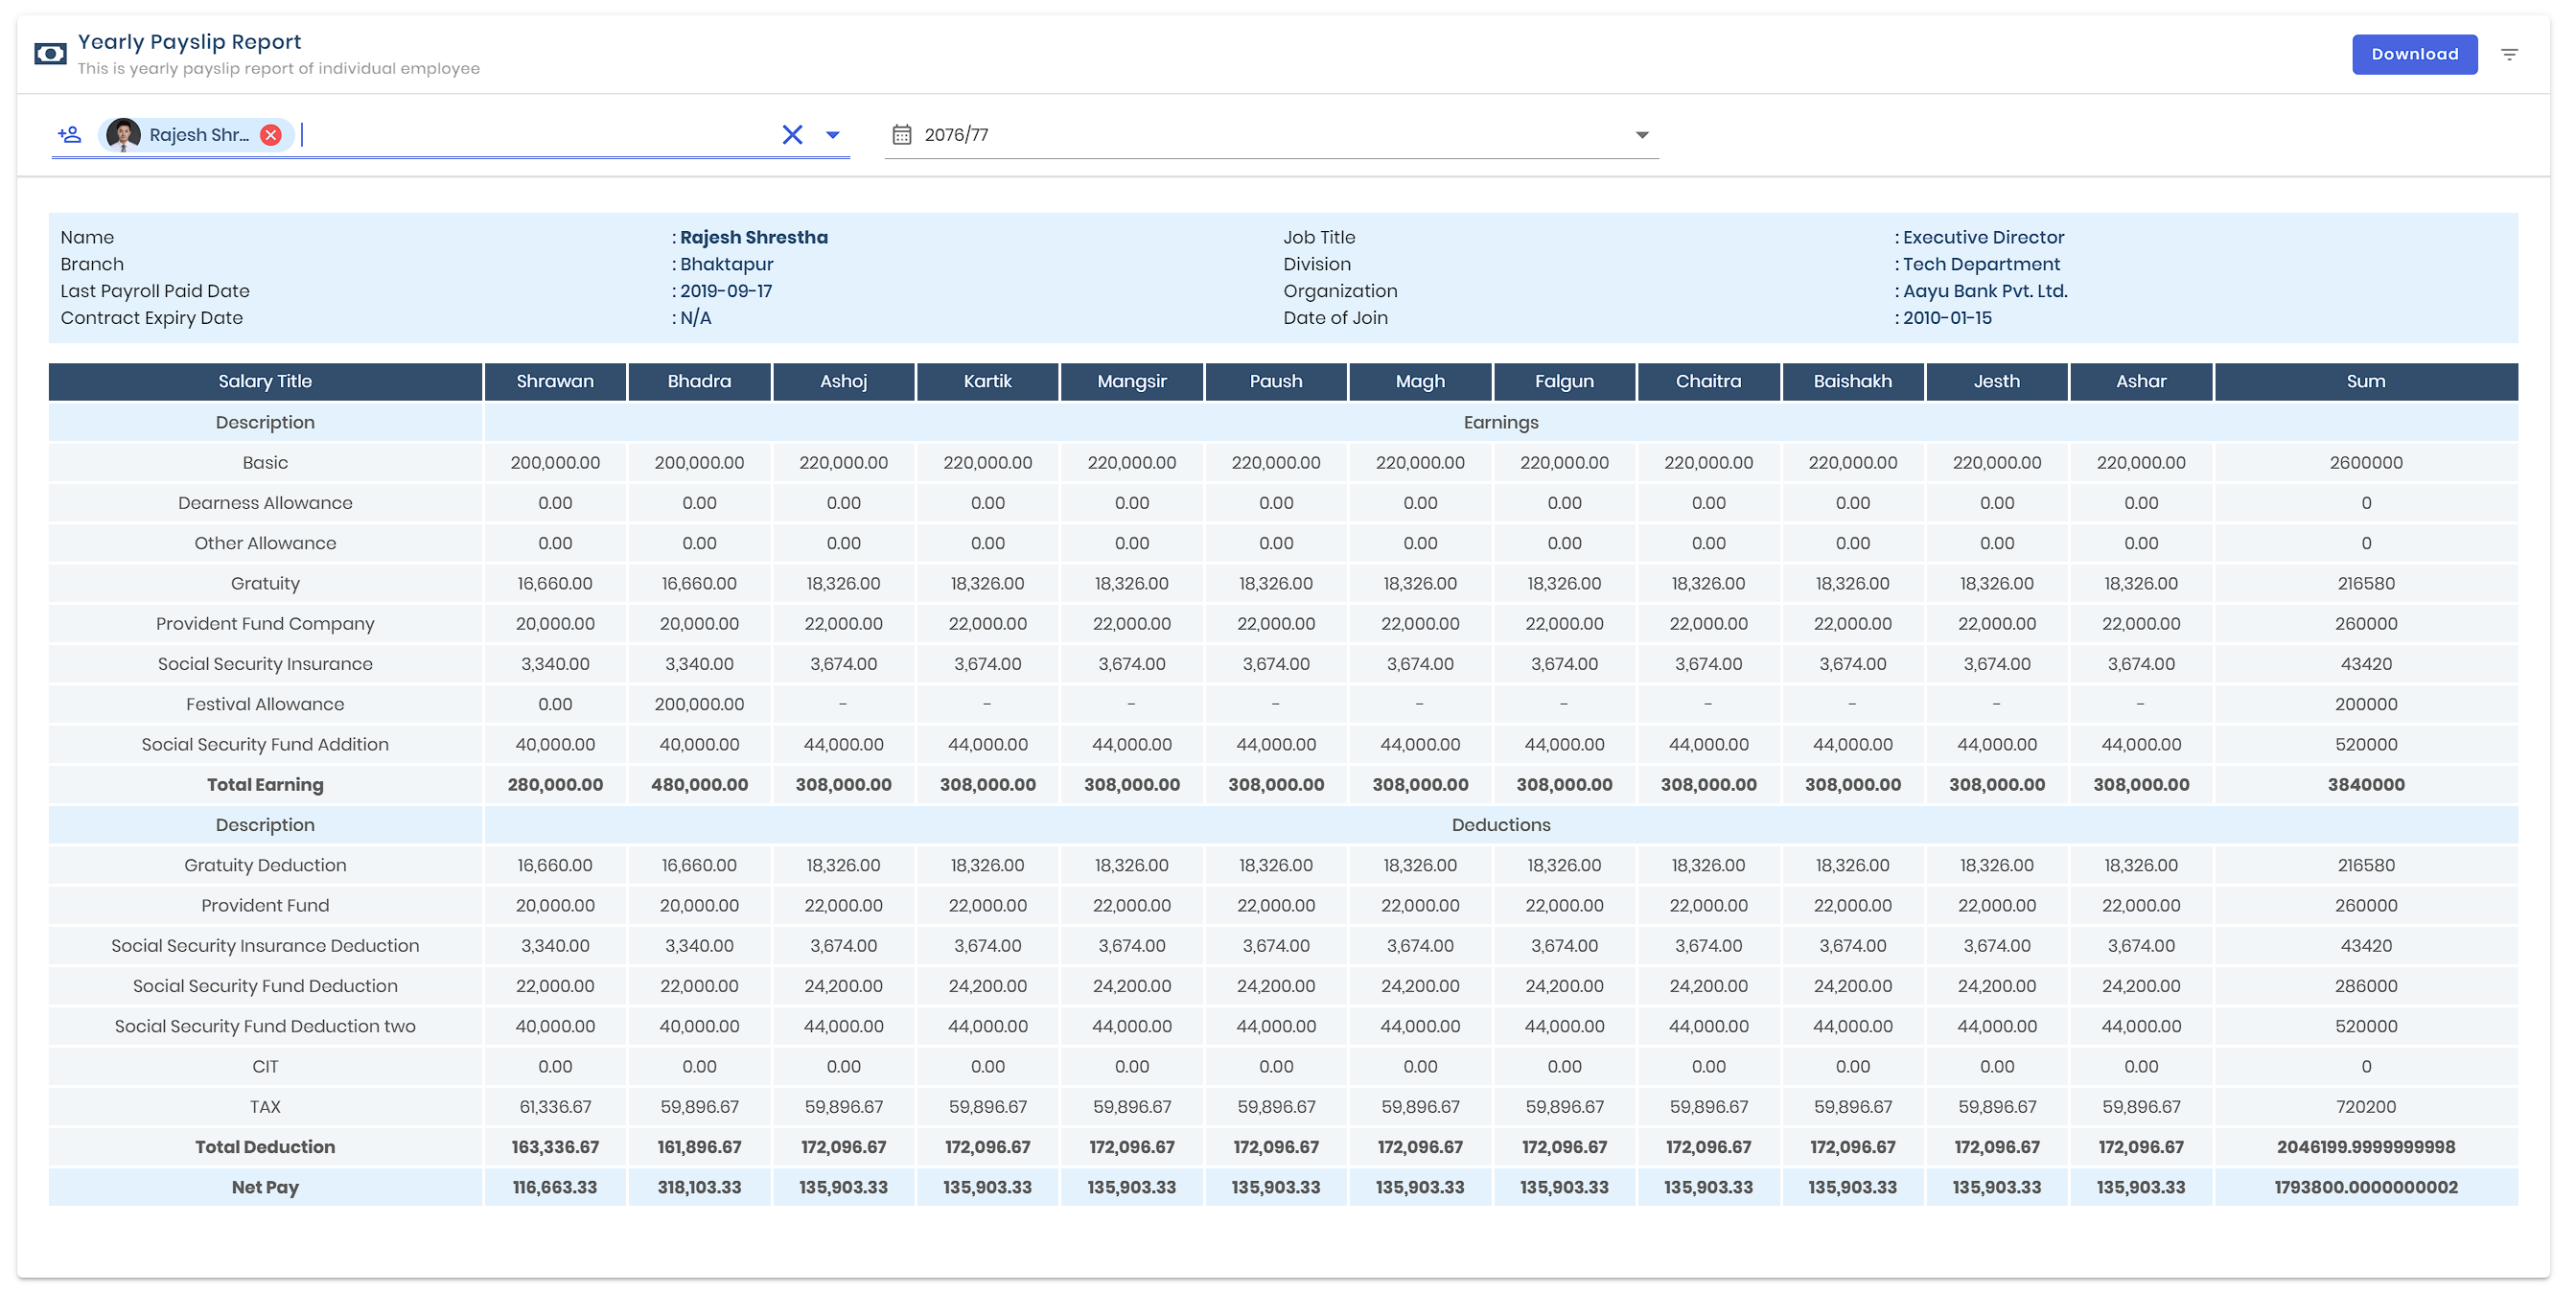
# Expense Management
# To set Level of approval
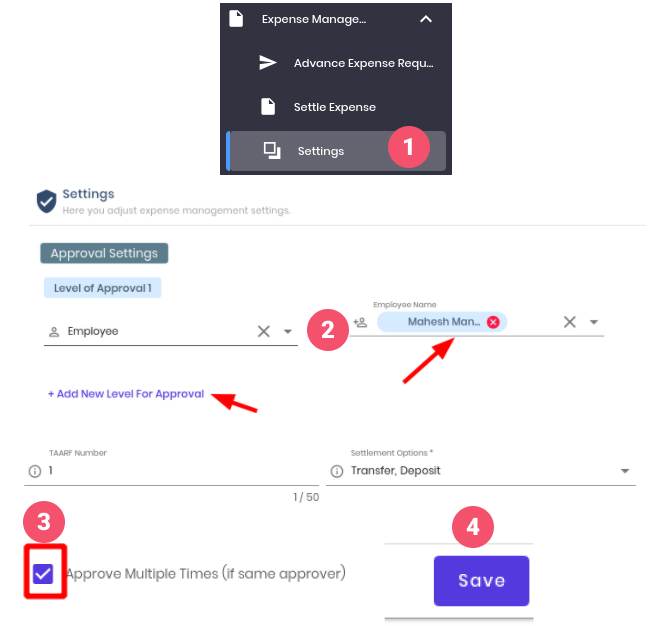
- Click on Expense Management on the side bar and then click on Settings.
- Select the name as approver. Multiple level approver can be select by clicking add new level for approval.
- For multiple time approval. Select approve multiple time check box.
- Click on Save.
# Managing Advance Expense Requests
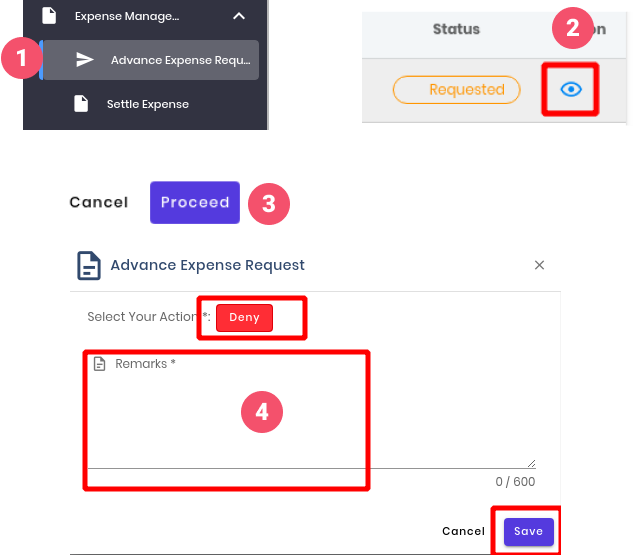
- Click on Expense Management on the side bar and then click on Advance Expense Request
- Click on the Eye icon under Actions to view requests.
- Click on Proceed.
- Add remarks and Click on Save. HR admin can only deny the advance expense request.
# Settle Expense
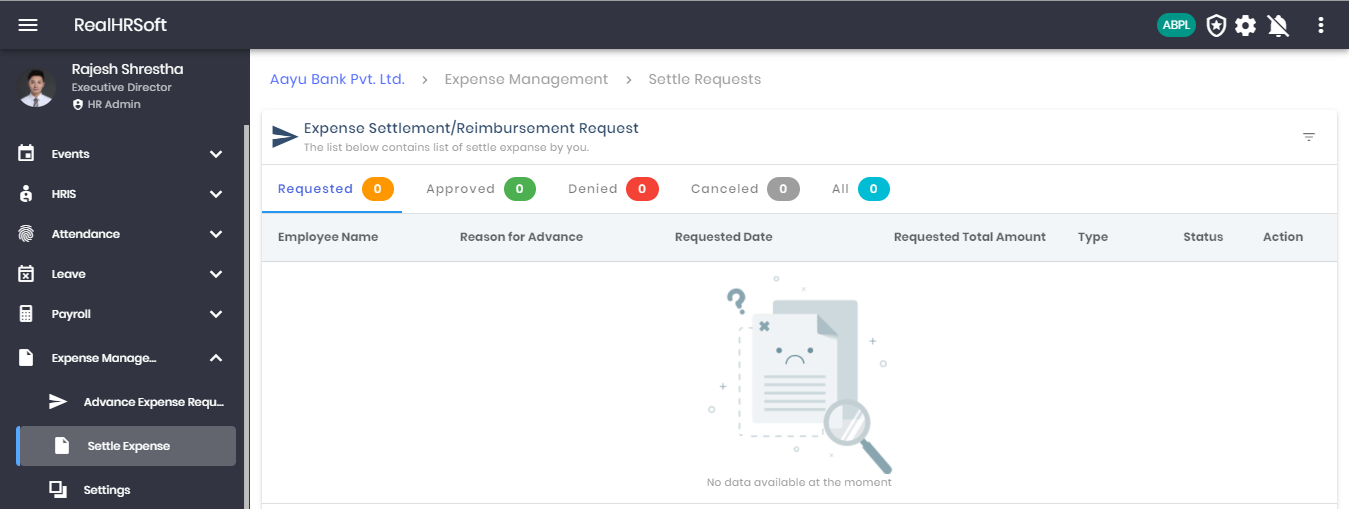
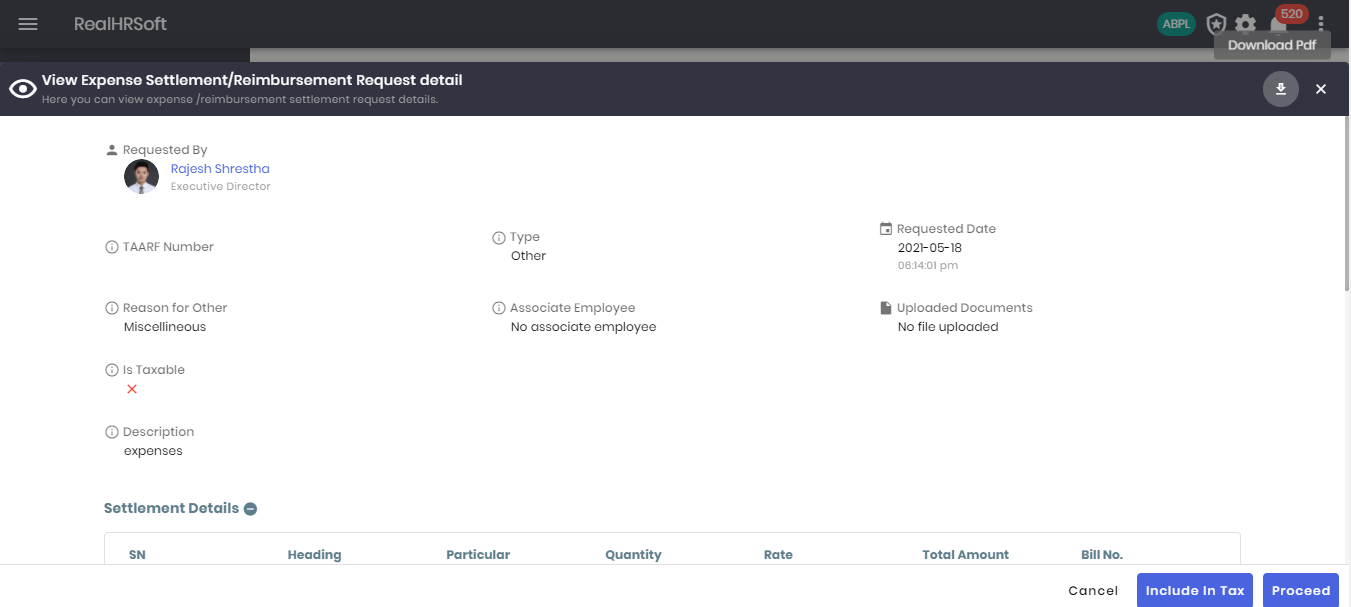
- Go to “Expense Management” in the sidebar. Click on “Settle Expense”
- Displays the list of “Requested” expenses that is to be cleared by you.
- Displays the list of “Approved” expenses that is to be cleared by you.
- Displays the list of “Denied” expenses that are made by the employees.
- Displays the list of expenses that were later “Canceled” by the employees.
- Displays the complete list of “Settle expenses”
- View the Detail of the expense claim made by the employees.
- Click on the download button to download the claim in a pdf file
- View the detailed information about the expense including the employee information, expense detail, settlement detail, signature, approval list.
- Click on “Include in Tax” to link the expense to payroll
- Click on proceed to accept/deny and settle the expense.
# Recruitment & selection
# Vacancy List
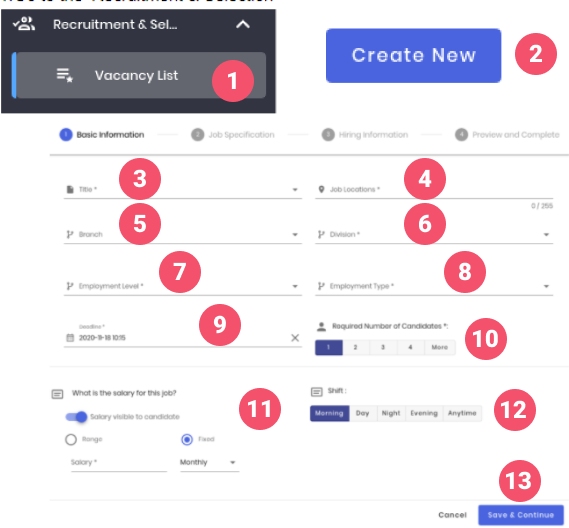
- Go to the ‘Recruitment & Selection’ on the sidebar and click on the ‘Vacancy List’.
- Click on the ‘Create New’ button.
- Enter ‘Title’.
- Enter ‘Job Location’.
- Select ‘Branch’.
- Select ‘Division’.
- Select ‘Employment level’.
- Select ‘Deadline’.
- Select ‘Required Number of Candidates’.
- Select option ‘Salary visible to candidate’ if salary needs to be visible.
- Select ‘Range’ salary and Enter ‘Minimum Salary’ and ‘Maximum Salary’ or Select ‘Fixed’ salary and Enter ‘Salary’.
- Select ‘Shift’.
- Click on the ‘Save and Continue’ button.
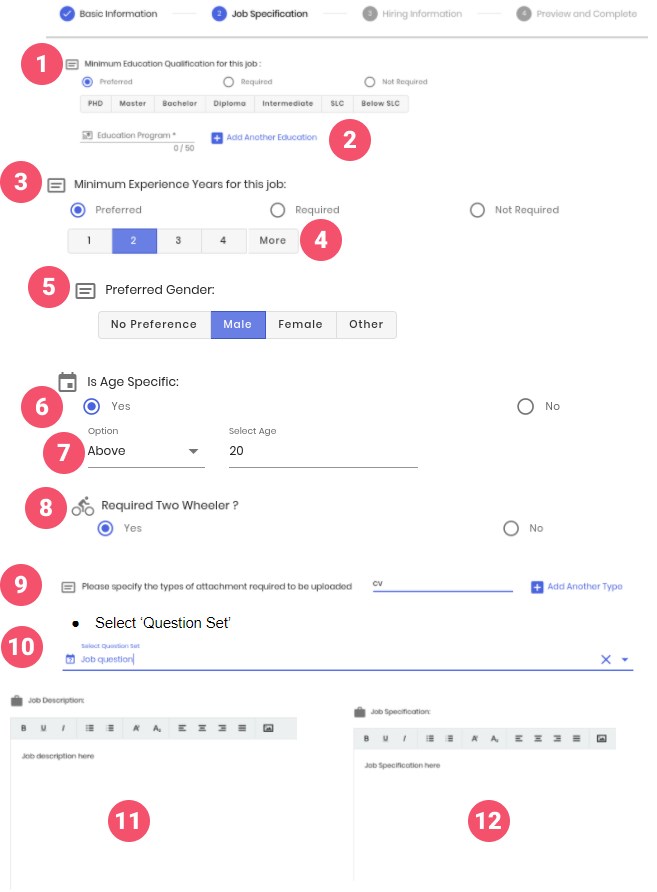
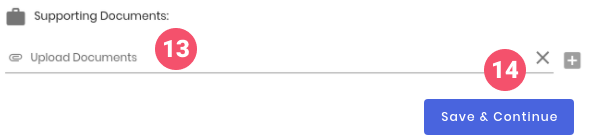
In Job Specification page ,perform the following actions:
- Select ‘Preferred/Required/Not Required For ’Minimum Education Qualification For this Job’.
- If Preferred/Required is selected, Enter ‘Education Program’ and to add another education program click on the ‘Add Another Education’ button.
- Select ‘Preferred/Required/Not Required for ’Minimum Experience Years For this Job’.
- If Preferred/Required is selected, Select ‘Experience year’.
- Select ‘Preferred Gender’.
- Select ‘Yes/No’ for ‘Is Age Specific’.
- If “Yes’,Select ‘Above/Below’ for Option and Enter ‘Age’.
- Select ‘Yes/No’ for “Required Two Wheeler’.
- Enter ‘Please specify the types of attachment required to be uploaded’ and to add another attachment type click on the ‘Add Another Type’ button.
- Select ‘Question Set’
- Enter ‘Job Description’.
- Enter ‘Job Specification’.
- Upload ‘Supporting Document’ and click on the ‘+’ button to add.
- Click on the ‘Save & Continue‘ button.
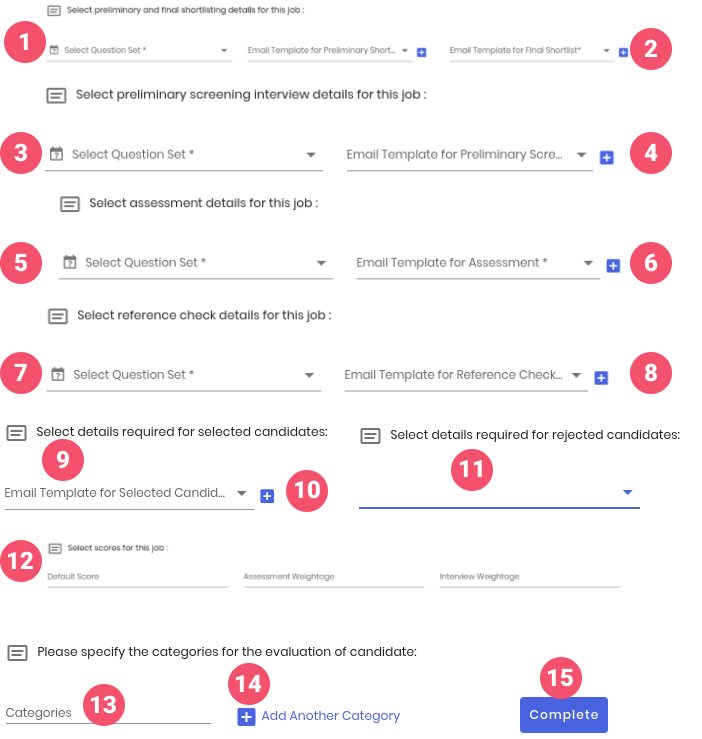
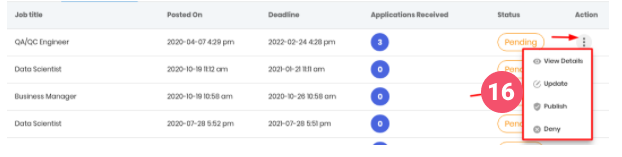
In hiring information,perform the following actions:
- Select **‘Question Set’,’Email Template for Preliminary Shortlist’,’Email Template for Final Shortlist’ **for preliminary and final shortlist stage.
- To create a new email template ,click on the ‘+’ button.
- Select ‘Question Set’,’Email Template for Preliminary Screening Interview’ for preliminary screening stage.
- To create a new email template ,click on the ‘+’ button.
- Select ‘Question Set’,’Email Template for Assessment’ for assessment stage.
- To create a new email template ,click on the ‘+’ button.
- Select ‘Question Set’,’Email Template for Reference Check’ for interview stage.
- To create a new email template ,click on the ‘+’ button.
- Select ‘Email Template for Selected Candidates’
- To create a new email template ,click on the ‘+’ button.
- Select ‘Details required for rejected candidates’
- Enter ‘Default Score’,’Assessment Weightage’,’Interview Weightage’.
- Enter ‘Categories’ for the job.
- Click on the ‘Add Another Category’ button to add a new category.
- In preview and complete ,verify all the informations and click on the ‘Complete’ button.
- The job created can be published,denied, viewed, updated by clicking on the preferred feature on the action button.
# Externer Interviewer List
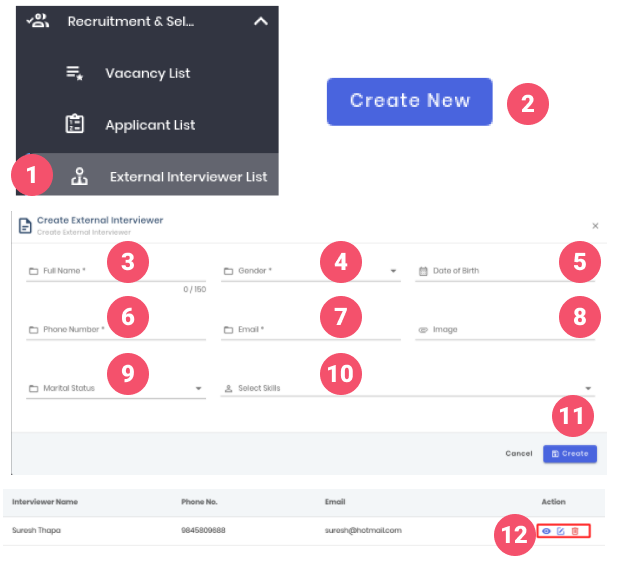
- Go to ‘Recruitment & Selection’ on the sidebar and click on the ‘External Interviewer List’.
- Click on the ‘Create New’ button.
- Enter ‘Full Name’.
- Select ‘Gender’.
- Select ‘Date Of Birth’.
- Enter ‘Phone Number’.
- Enter ‘Email’.
- Upload ‘Image’.
- Select ‘Marital Status’.
- Select ‘Skills’.
- Click on the ‘Create’ button.
- External interviewer Details can be viewed,updated and Deleted by clicking on the icon of the respective action.
# Letter Template
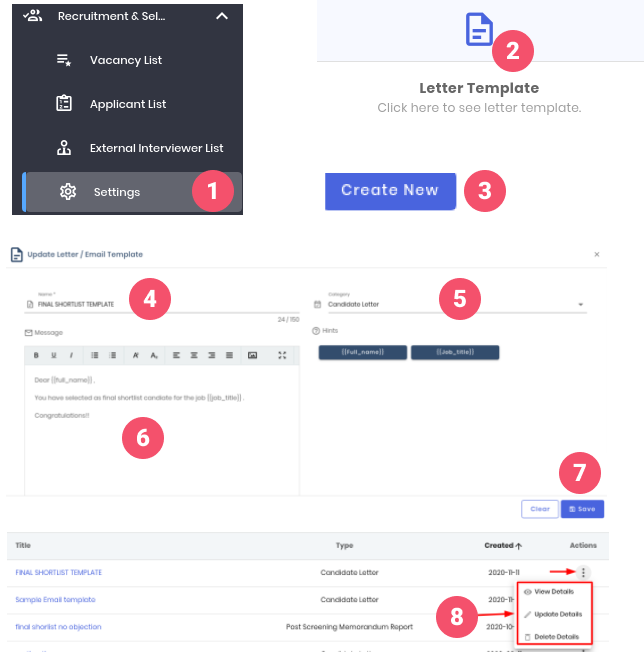
- Go to ‘Recruitment & Selection’ on the sidebar and clicked on the ‘Settings’.
- Click on the ‘Letter Template'
- Click on the ‘Create New’ button.
- Enter ‘Name’ for email/letter template.
- Select ‘Category’ for email/letter template.
- Enter ‘Message’ by using hints for specific categories.
- Click on the ‘Save’ button
- The letter/email template created can be viewed, updated,deleted by clicking on the preferred feature on the action button.
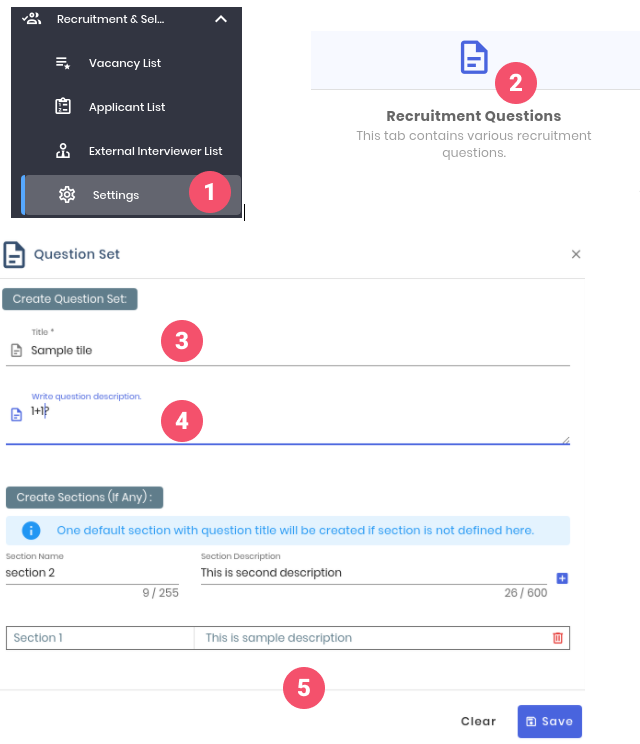
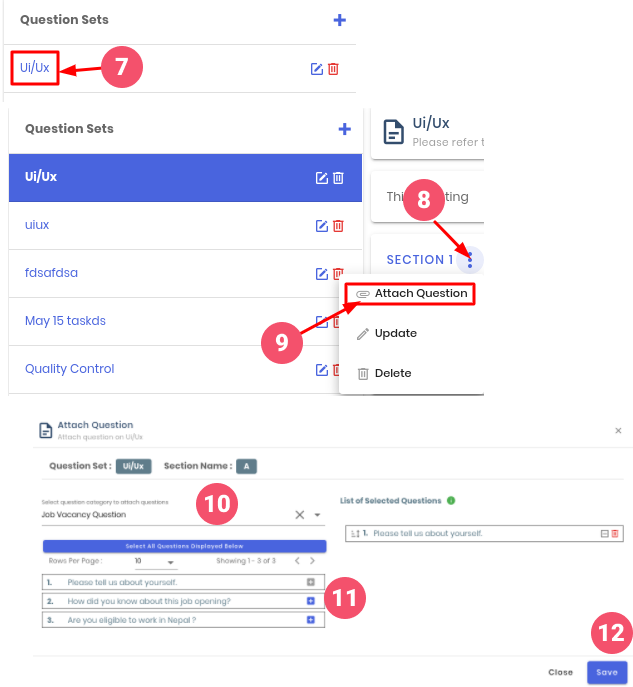
- Go to ‘Recruitment & Selection’ on the sidebar and clicked on the ‘Settings’.
- Click on the ‘Recruitment Questions'.
- Enter ‘Title’ for the question set.
- Enter ‘description’ for the question set.
- To create a section,Enter ‘Section Name’ , ‘Section Description’ and click on the **‘+’ **button.
- Click on the ‘Save’ button.
- To add question in a question set:
- Click on the ’Title of the Question set’ where questions need to be added.
- Click on the ‘3-dot’ menu near the section.
- Click on the ‘Attach Question’ to attach questions on that section
- Select ‘Question Category to attach questions’.
- Click on the ‘+’ button to add suitable questions from the selected question category.
- Click on the ‘Save’ button.
# Application list - Application received
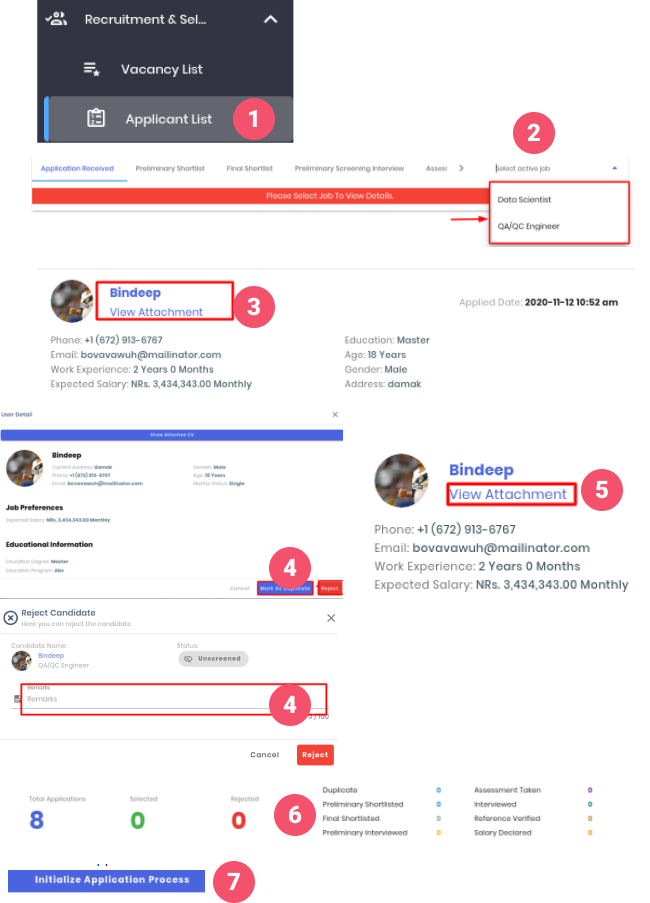
- Go to the ‘Recruitment & Selection’ on the sidebar and click on the ‘Applicant List’.
- Select ‘Active Job’ for which recruitment and selection process is to be performed
- To view the candidate click on the ‘Name’ of the Candidate.
- Candidates can be marked as duplicate or rejected by clicking on the ‘Mark As Duplicate’ and ‘Reject’ button respectively.Remarks must be entered while rejecting the candidate.
- Attachment can be viewed by clicking on the ‘View Attachment’ button.
- Status of candidates for the job are shown on the status menu.
- After marked as duplicate and rejection of candidates ,candidates are initialized for further process by clicking on the ‘Initialize Application Process’.
# Application list - Preliminary Shortlist
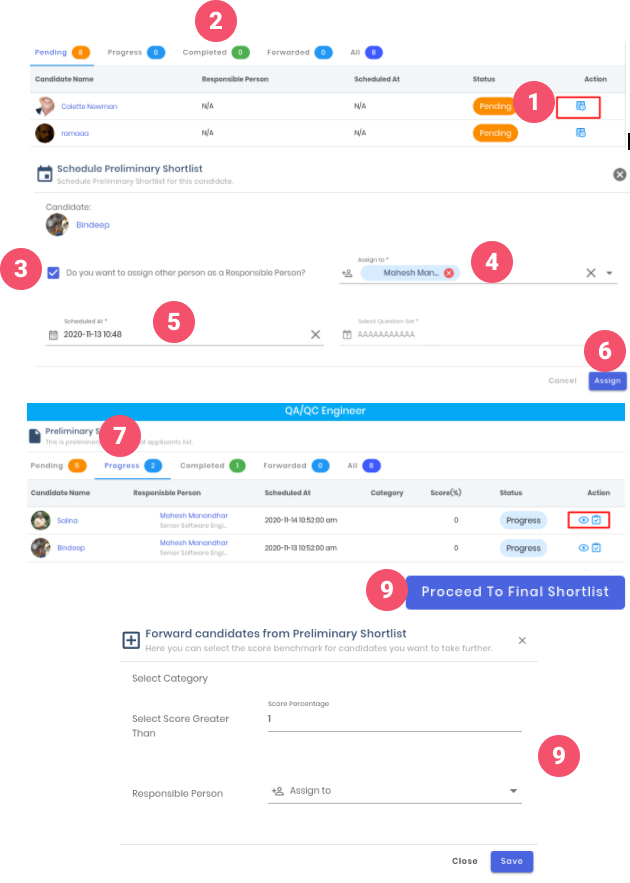
- To Schedule Preliminary Shortlist click on the ‘Schedule Preliminary Shortlist’ button on the action column of the respective candidate.
- Candidate moves to the ‘Completed’ tab.
- To assign screening to responsible persons check on the ‘Do you want to assign other person as a responsible person’ checkbox.
- Enter ‘Assign to’
- Enter ‘Scheduled At’
- Click on the ‘Assign’ button.
- When Responsible person fill up the question answer form and sends a response, HR Verifies the response from the ‘Progress’ tab by viewing scores and complete the Preliminary shortlist process by clicking on the ‘Complete Preliminary Shortlist’ button on the action column of respective candidate.
- To Proceed to Final Shortlist Step candidates can proceed to the final shortlist step by clicking on the ‘Proceed To Final Shortlist’ button.
- Enter ‘category’ ‘score’ filters and ‘responsible person’ for the candidates you want to take further and click on the ‘Save’ button.
# Application list - Final Shortlist
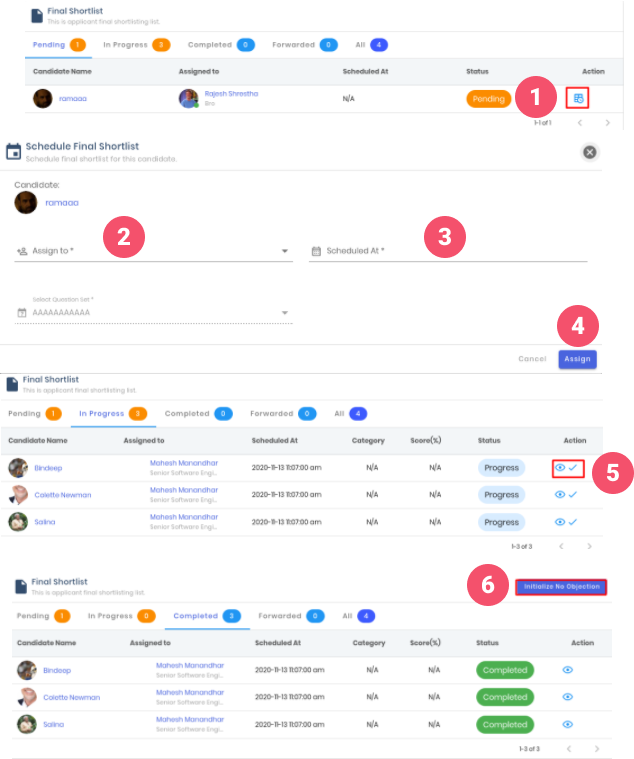
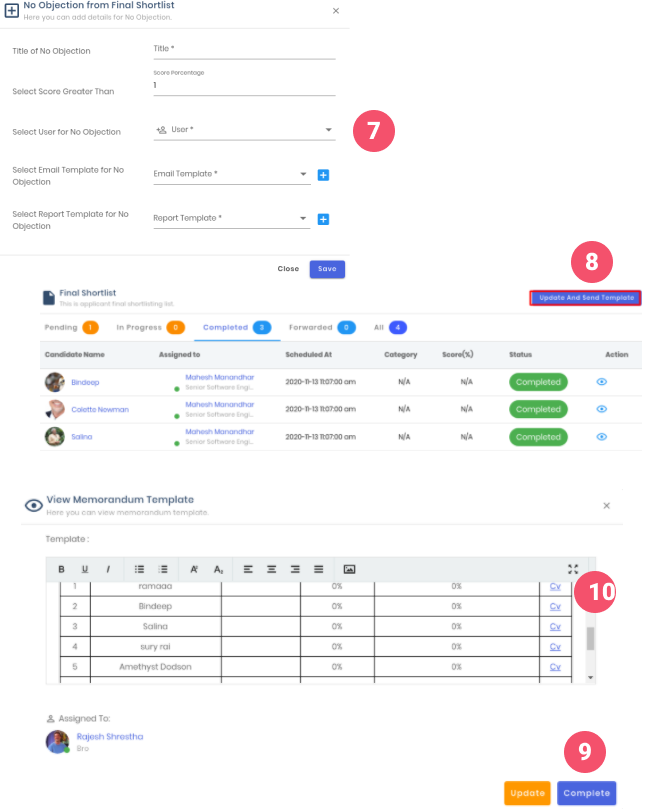
In this step,Candidates Final Shortlist is updated with the respective responsible person and question set Responsible person fills up the question answer Form and HR verifies the response and sets Final Shortlist as completed.
HR initializes No-Objection with a responsible person. Responsible Person verifies No-Objection. Candidates with Final Shortlist verified, status set to shortlisted who fall under the score and category mentioned in No-Objection. Now those who are not selected,status set to rejected. PreScreening Interview with email_template_id mentioned in hiring info of the job for those candidates whose status is shortlisted or who are successfully forwarded.
- To Schedule Final Shortlist click on the ‘Schedule Final Shortlist’ button on the action column of the respective candidate.
- To assign screening to responsible persons. Enter ‘Assign to’
- Enter ‘Scheduled At’
- Click on the ‘Assign’ button.
- When Responsible person fills up the question answer form and sends a response,HR Verifies the response from the ‘Progress’ tab by viewing scores and complete the final shortlist process by clicking on the ‘Complete Final Shortlist’ button on the action column of the respective candidate.
- To Proceed Preliminary Screening Interview Step, HR initializes No Objection with a responsible person. Click on the ‘Initialize No Objection’ button.
- Enter ‘Title’,Select ‘Score’ filter ,select ‘User for no objection’,Select ‘email template’,select ‘report template’ for no objection.Click on the ‘Save’ button to save no objection.
- Click on the ‘Update And Send Template’.
- Check the template,other details in no objection.Click on the ‘Update’ button for necessary update and click on the ‘Complete’ button to complete no objection. When the ‘complete’ button is clicked ,no objection is sent to the responsible person.
- If the responsible person ‘Clear/Verified’ no objection,candidates are forwarded to next step.if the responsible person ‘object/reject’ no objection, HR needs to initialize no objection again.
# Assessment
# Prepare Assessment Question Sets
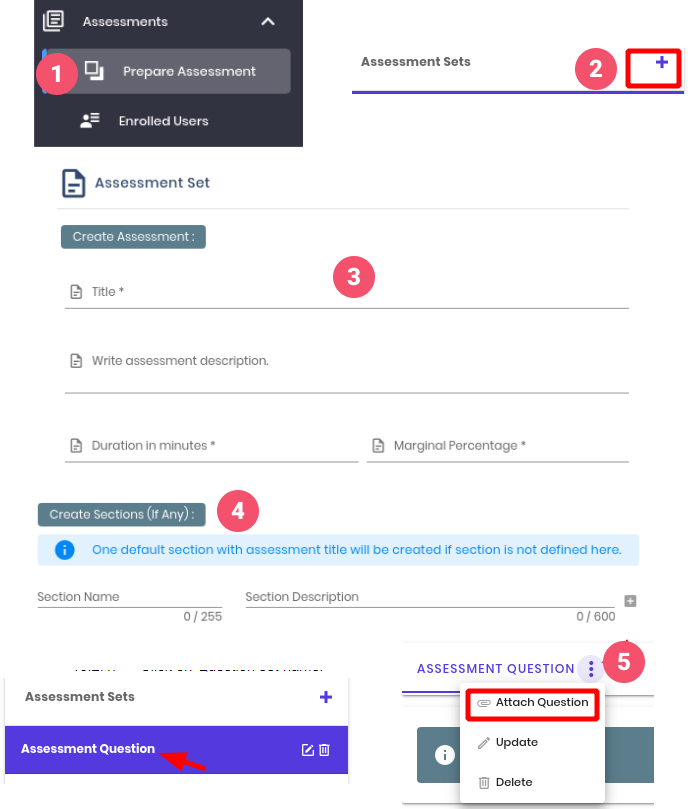
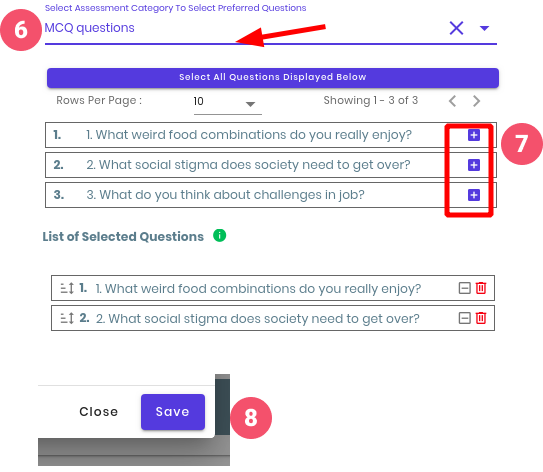
- Click on Prepare Assessment.
- Click on plus icon to add sets.
- Enter Title,description,Duration and Marginal (passing) Percentage.
- Question Sections for set can be created.(optional)
- Click on Three dot icon and then select attach question option
- Select Question Category then click on plus icon to add questions.
- Selected Questions can be viewed on the right side preview.
- Click on Save.
# Reviewing Assessment Enrolled User

- Click on Assessments on the sidebar and then click on Enrolled Users.
- Click on the review icon to review Assessment taken by employees.
- Assessment details taken by the user can be viewed now like below.
# To view Training assigned to user
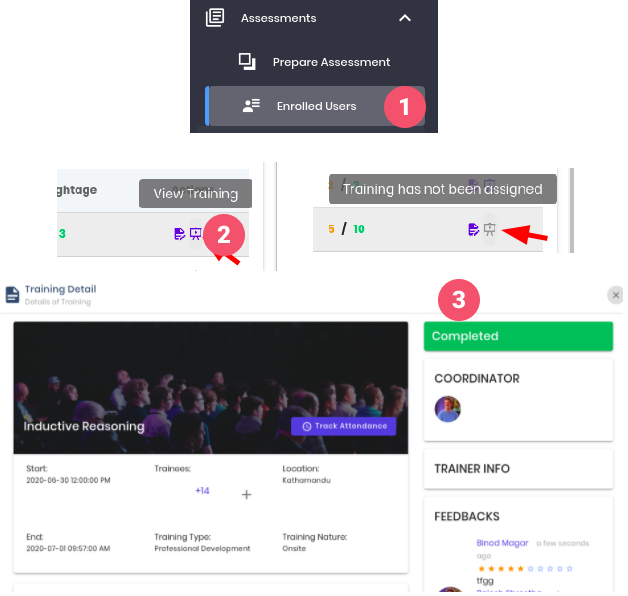
- Click on Assessments on the sidebar and then click on Enrolled Users.
- Click on the review icon to review Assessment taken by employees.
- Assessment details taken by the user can be viewed now like above.
# Training
# All Trainings
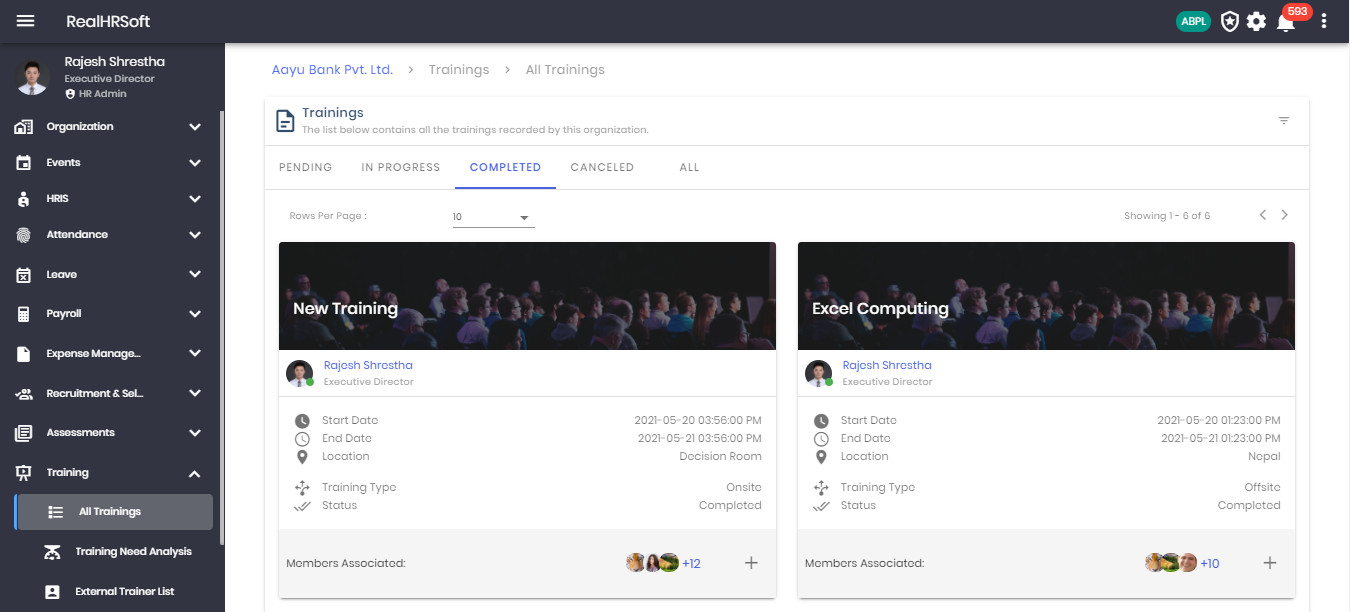
The platform allows the HR to create and track trainings. They may assign it for a list of employees or keep it open for all employees to join (pending approval) based on their interest.
- Go to “Training” in the sidebar. Click on “All Trainings” to view the list of all the trainings recorded by this organization. The list can be divided based on their current status.
# Training Need Analysis
# Training Request
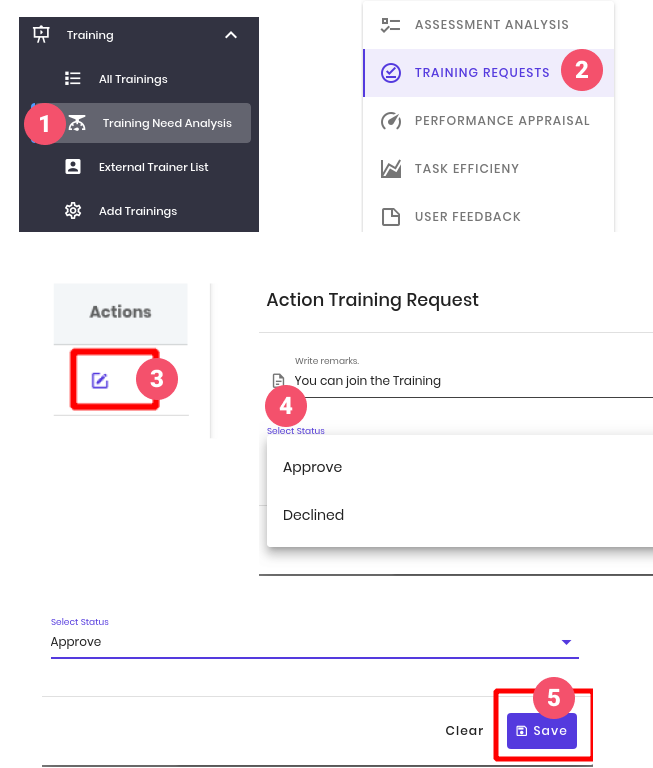
- Click on training on the side bar and then click on Training Need Analysis.
- Click on Training Request.
- Click on the Edit icon under Actions.
- Enter remarks, select Approve/Decline for the requests.
- Click on Save.
# Training Need Analysis
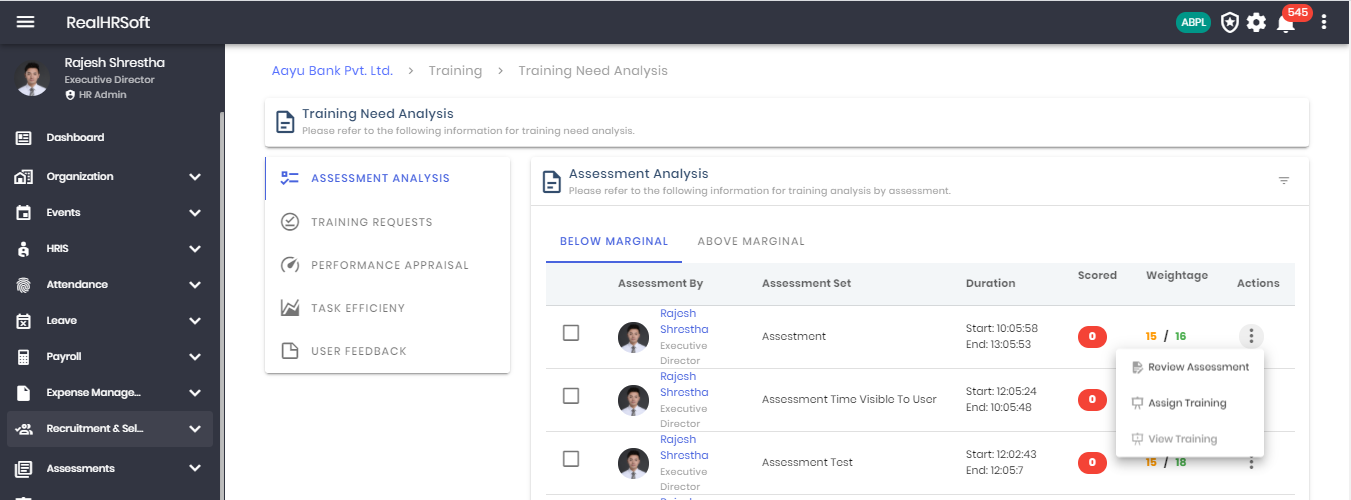
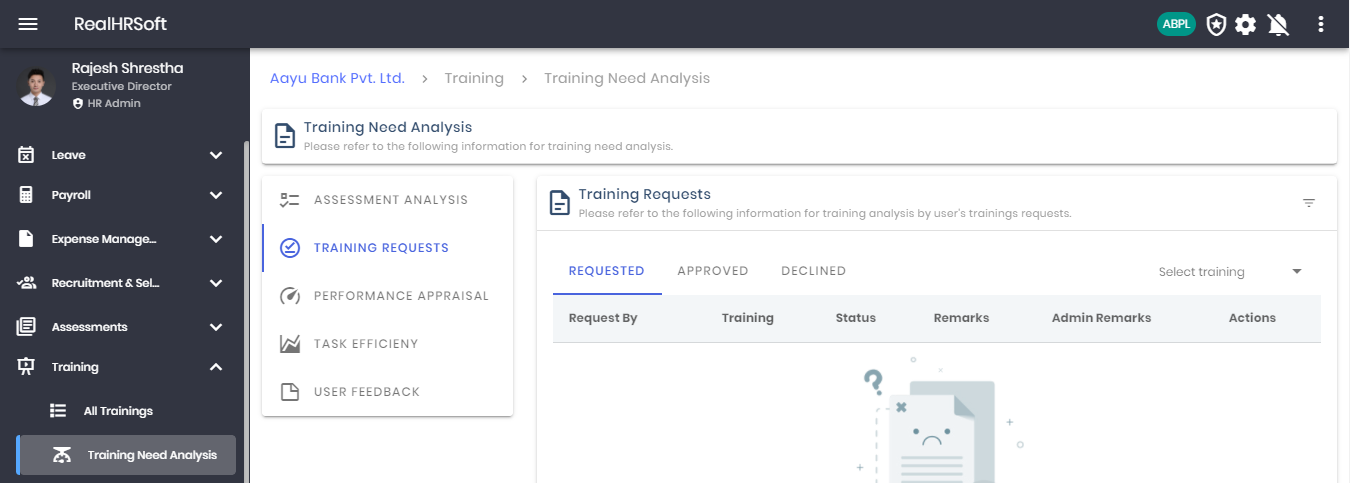
- Go to “Training” in the sidebar. Click on “Training Need Analysis”. Currently the platform allows training need analysis via Assessment Analysis or Training Request
- Click on “Assessment Analysis” displays the list of employees and their assessment details. The list is divided into “Below Marginal” and “Above Marginal” to quickly filter employees based on their performance.
- Click on “Action Button” to “Review Assignment” or “Assign Training”.
- Click on “Training Request” to view the list of employees that have requested for a training module. You may assign or reject them the training.
# External Trainer List
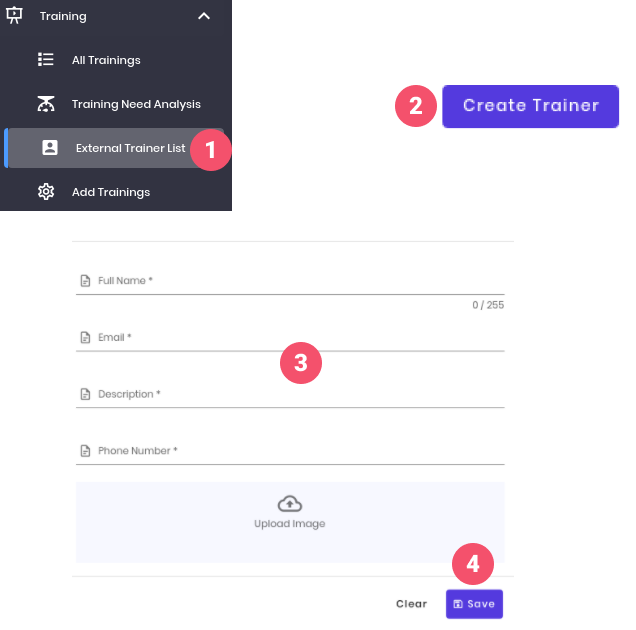
- Click on Training on the sidebar and then click on external trainer list.
- Click on Create Trainer button.
- Enter Full Name, Email,Description,phone,image
- Click on Save.
# Add Trainings
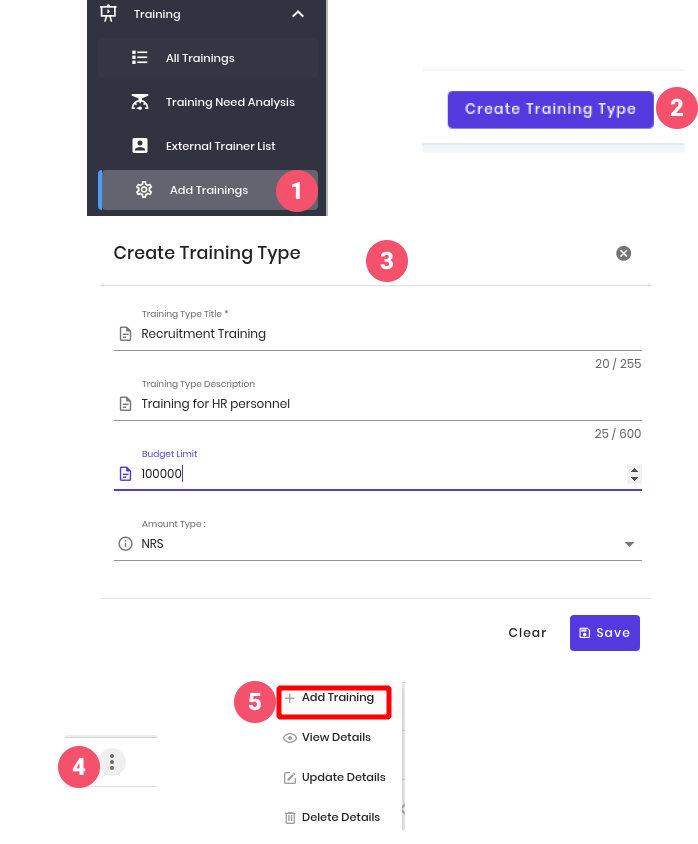
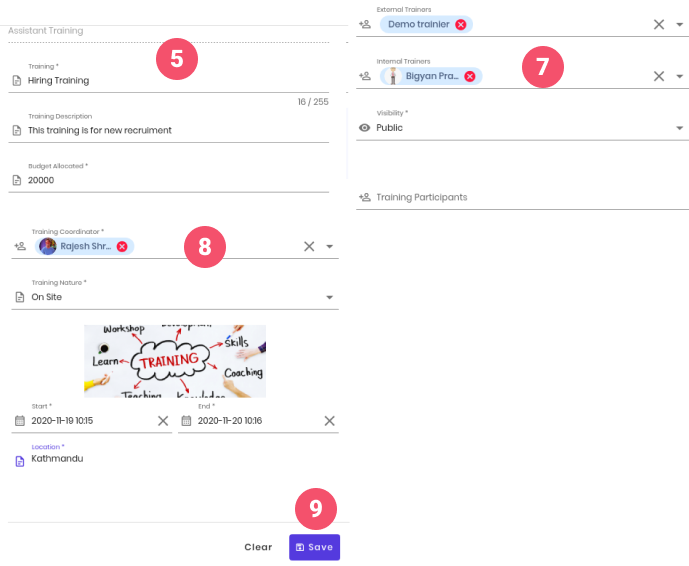
- Click on Training on the sidebar and then click on Add Training
- Create the Training type at first by clicking Create Training Type.
- Enter training title,description,budget,amount type and click on save
- Click on the three dots icon
- click on the add training option.
- Enter training name,description,budget allocated.
- Select external and internal trainer,visibility,training participants.
- Select Training Coordinator,nature,start & end date,location
- Click on Save.
# Task
# Task Overview


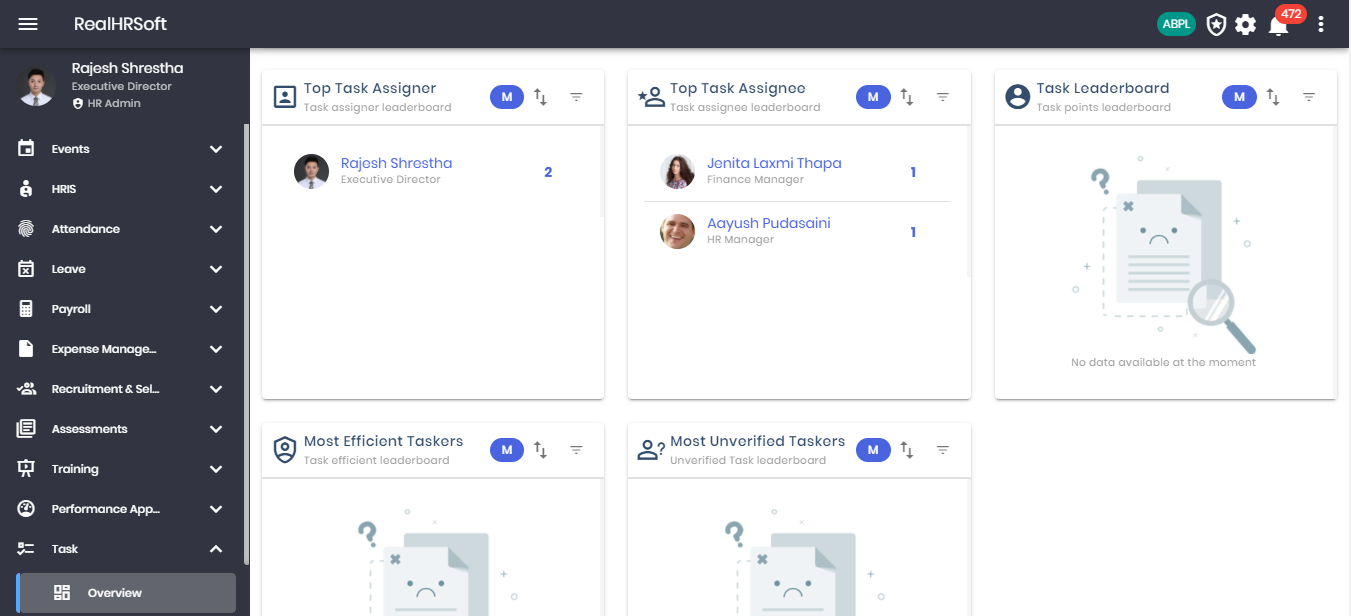
- Go to “Task” in the sidebar. Click on “Overview” for a summary of the task within the organization.
- Click on the number above “Recent Task” to display the list of recently assigned task within the organization.
- Click on the number above “Critical” to display the list of tasks with priority marked as Critical within the organization.
- Click on the number above “Major” to display the list of tasks with priority marked as Major within the organization.
- Click on the number above “Minor” to display the list of tasks with priority marked as Minor within the organization.
- Click on the number above “All task” to display the list of all tasks within the organization.
- Displays the overview of all tasks created within the organization based on their current status. Clicking on the numbers will display the list of task within the specific criteria. E.g. Tasks that are currently in “Pending” state and are already delayed i.e. passed their set deadline.
- Displays the information on “Recent Activities” within the tasks.
- Displays a summarized table on the list of Result Area By Priority for this month. You may also filter the table on date using the filter button.
- Displays the “Top Task Assigner” for the month, you may also sort it based on “Least Task Assigner” or filter it for different date ranges.
- Displays the “Top Task Assignee” for the month, you may also sort it based on “Least Task Assignee” or filter it for different date ranges.
- Displays the “Task Point Leaderboard” for the month, you may also sort it based on “Least Task Point Leaderboard” or filter it for different date ranges.
- Displays the “Most Efficient Taskers” for the month, you may also sort it based on “Least Efficient Taskers” or filter it for different date ranges.
- Displays the “Most Verified Taskers” for the month, you may also sort it based on “Least Verified Taskers” or filter it for different date ranges
# Settings
# To create a Result area
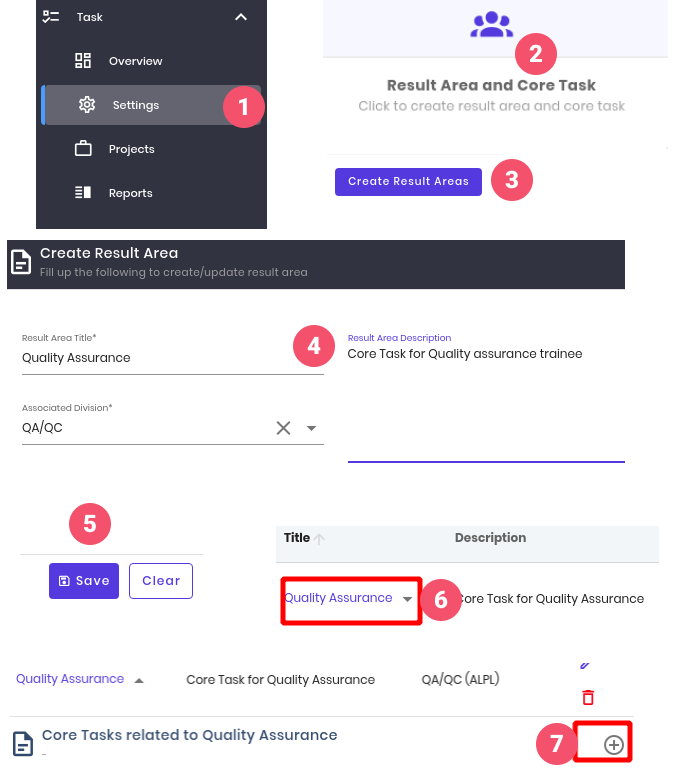
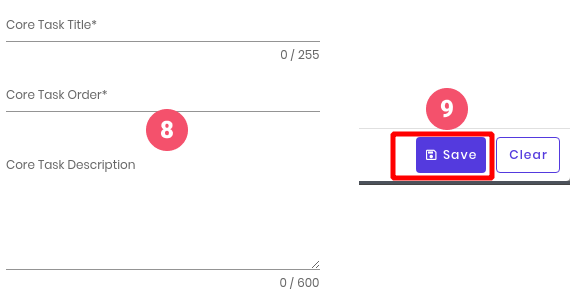
- Click on Task and and then click on settings
- Click on Result Area and core task.
- Click on Create Result Areas.
- Enter Result Area Title, Associated Division, description.
- Click on Save.
- After the Result area is created, we create core tasks by clicking on the name of result area you want to create core task for.
- Click on plus icon(+) to create core task.
- Enter core task title,task order,descriptions.
- Click on Save.
# Assign Core Task
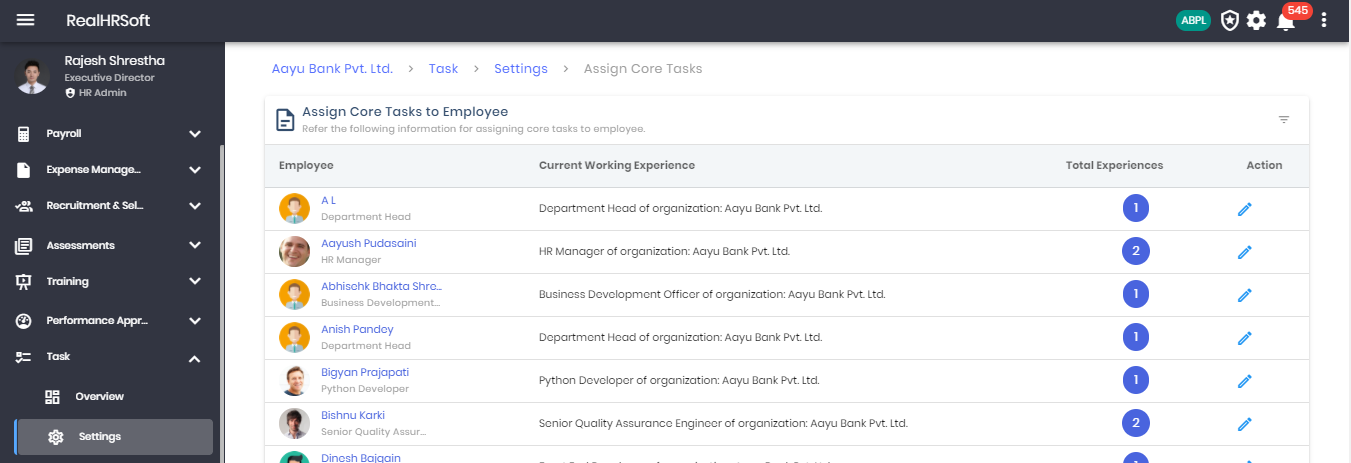
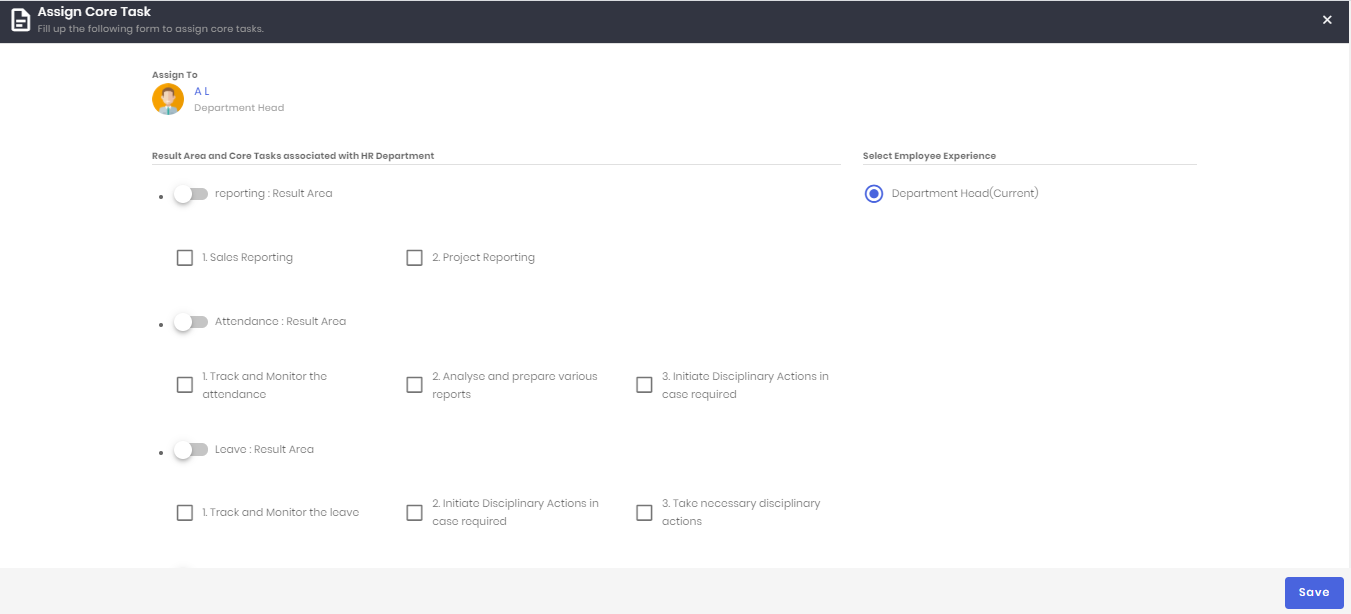
- Go to “Task” in the sidebar. Click on “Settings” followed by “Assign Core Task”
- Displays the list of employees along with the information required to assigning core tasks to employees.
- You may filter the list based on Division or search for individual employee using the filter button.
- Click on the “Action Button” to display the list of core tasks.
- Displays the Result Area and Core Tasks associated with each department. You may also select the experience for which the core task is assigned.
- Easily assign the “Result Area” and “Core Task” from the list by sliding the switch and checkbox.
# Result Area & Core Task
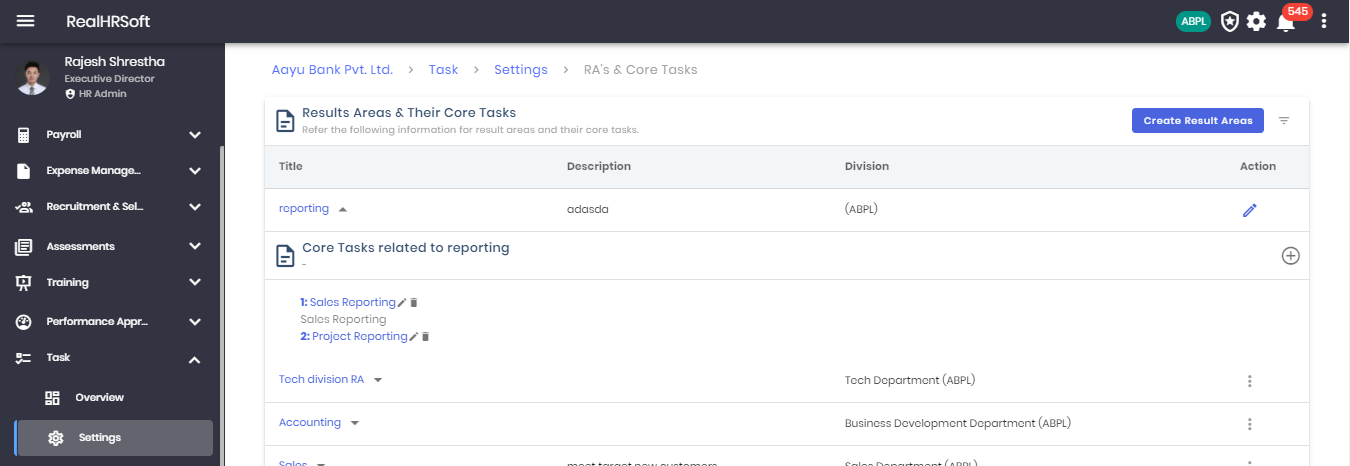
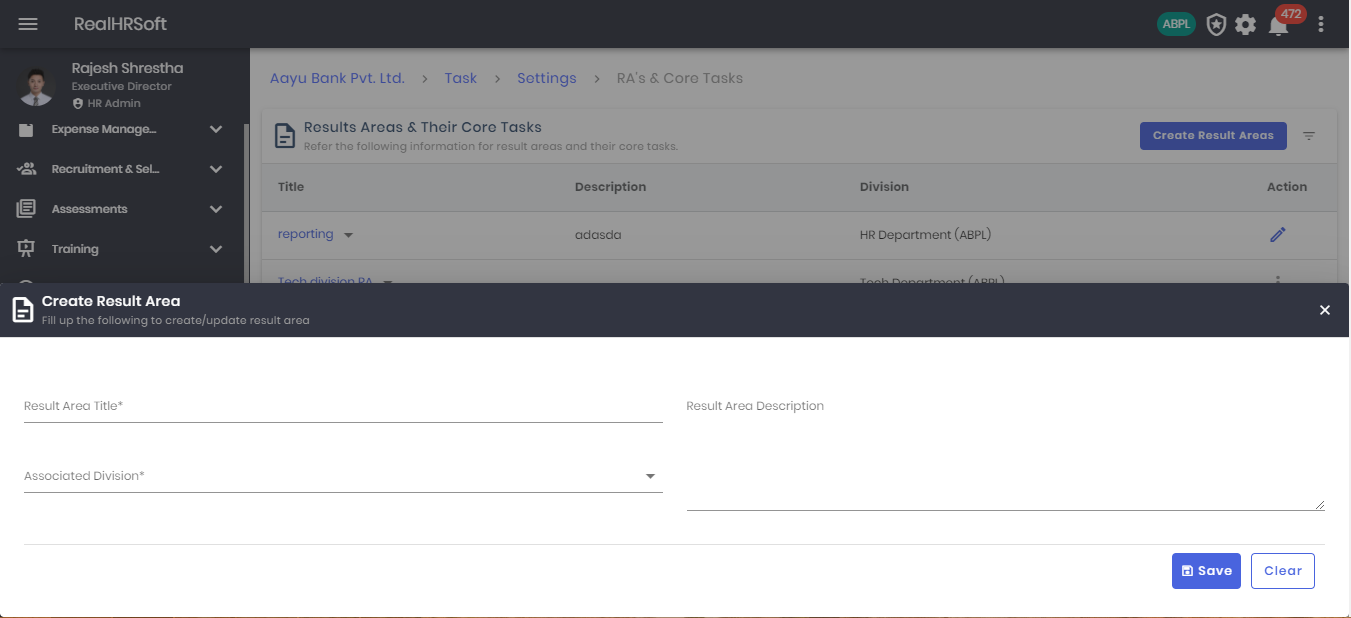
- Go to “Task” in the sidebar. Click on “Settings” followed by “Result Area & Core Task”
- Displays the list of all “Result Areas” along with its description and division. Filter the list based on Division or search for a particular title.
- Click on “Create Result Area” to create a new result area and assign it to a particular division and provide a description for the same.
- Click on the down arrow beside each title to display the list of core task related to the particular result area. You may also add, edit or delete a core task for the same.
# Task Assign Settings
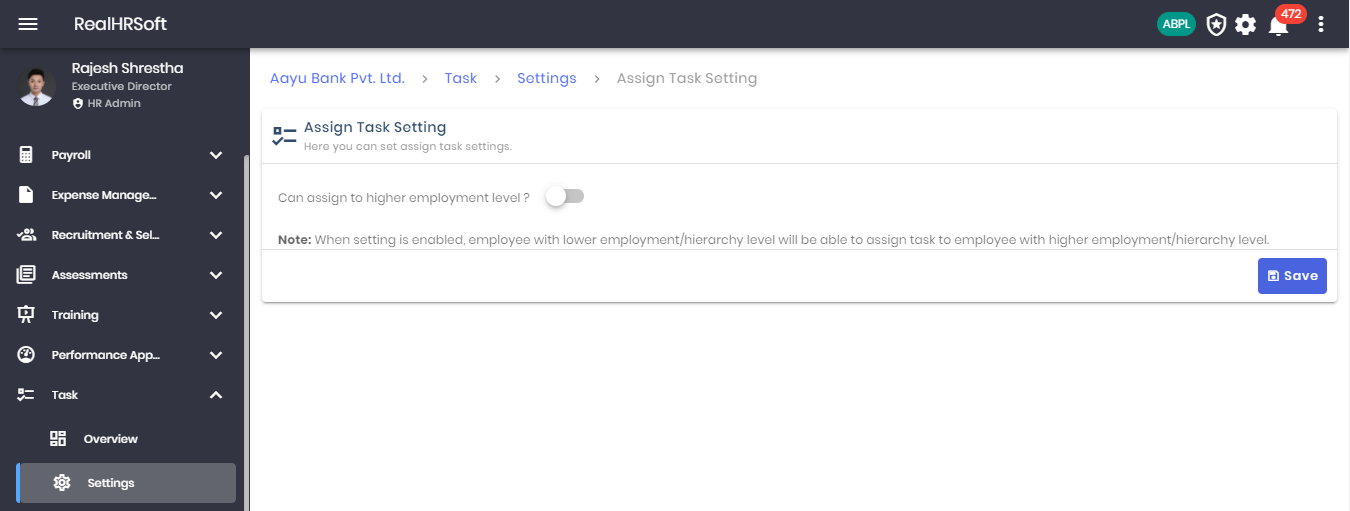
- Go to “Task” in the sidebar. Click on “Settings” followed by “Assign Task Setting”
- Allows you to assign task settings. i.e. Allow assignment of tasks to a higher employment level.
# Project : To create a Task Project
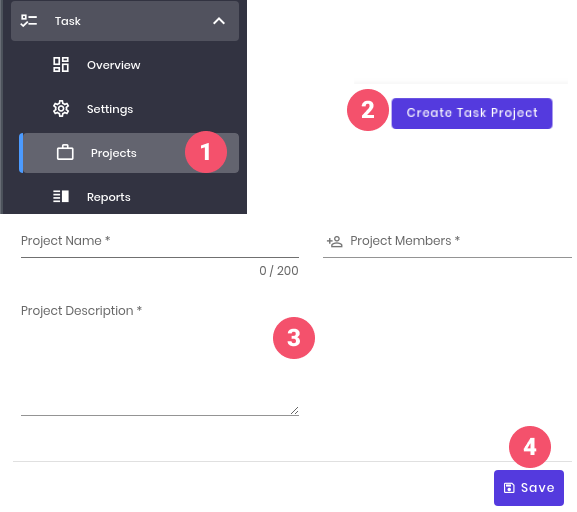
- Click on Task and and then click on Projects
- Click on Create Task Project
- Enter Project name, description, select project members
- Click on Save.
# Reports
# View and download all task report
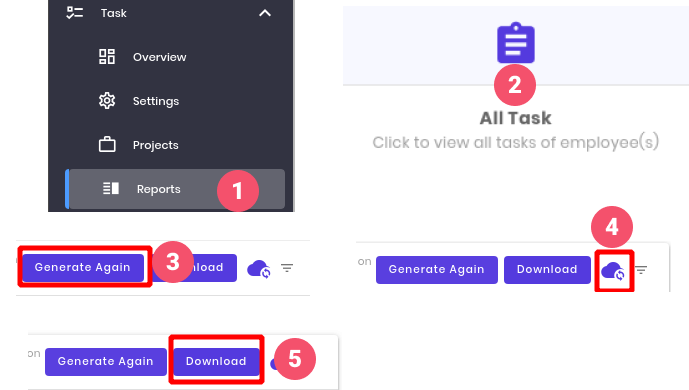
- Click on Task and click on Reports.
- Click on All Task.
- Click on Generate to generate the report.
- Click on Refresh icon to see if new report has been generated.
- Click on Download to download after the report has been generated.
# Task Approval
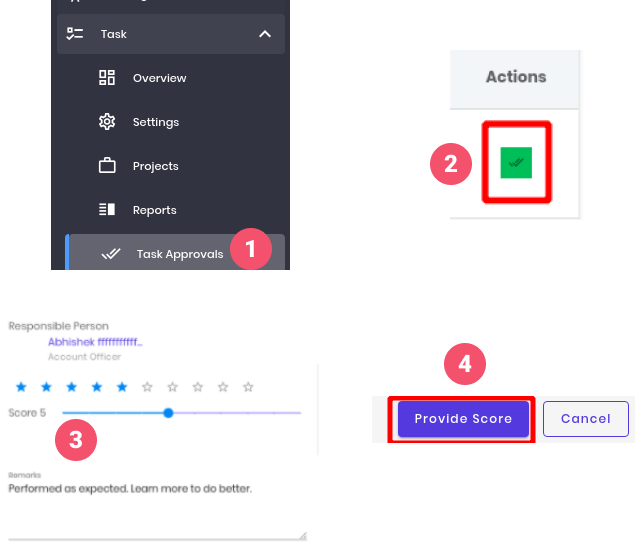
- Click on Task in the sidebar and then click on Task Approvals.
- Click on the double tick icon under actions to verify task.
- Review score and remarks from supervisor.You can change the scores as well.
- Click on the Provide Score button.
# Common Settings

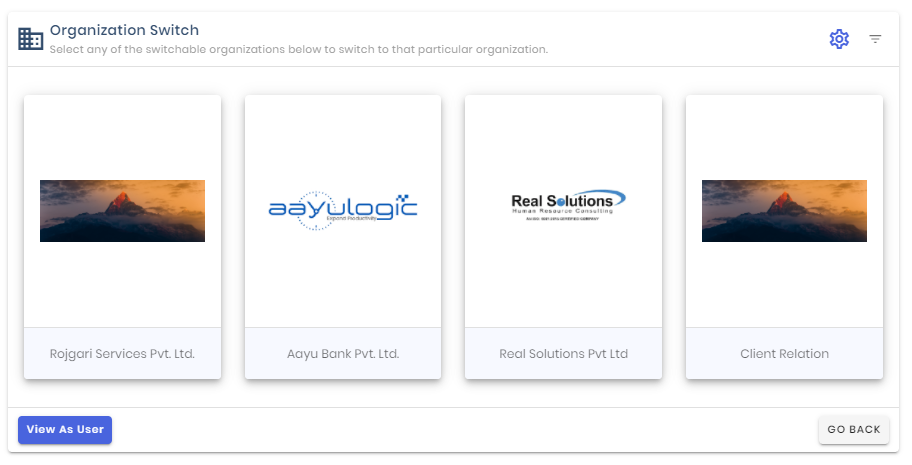
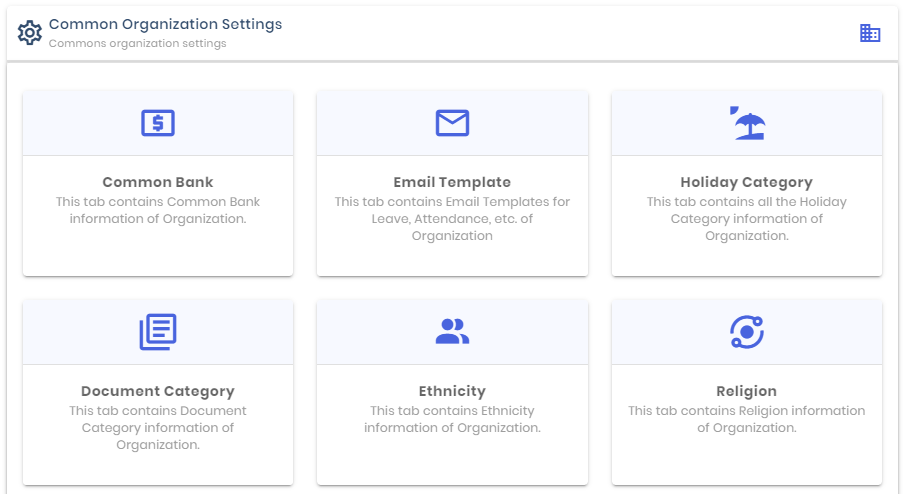
- Click on Switch Organization
- Click on Settings Icon
- Now you are Common Settings
# Common Bank
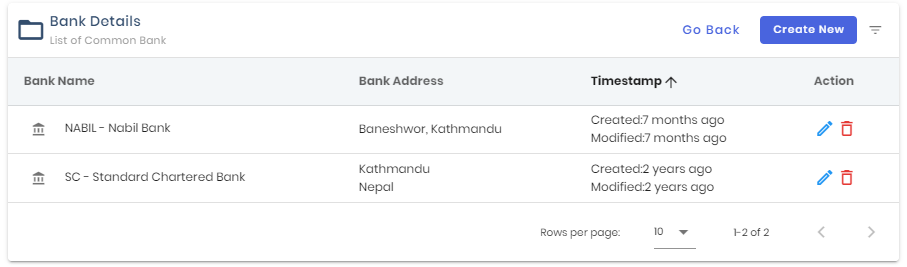
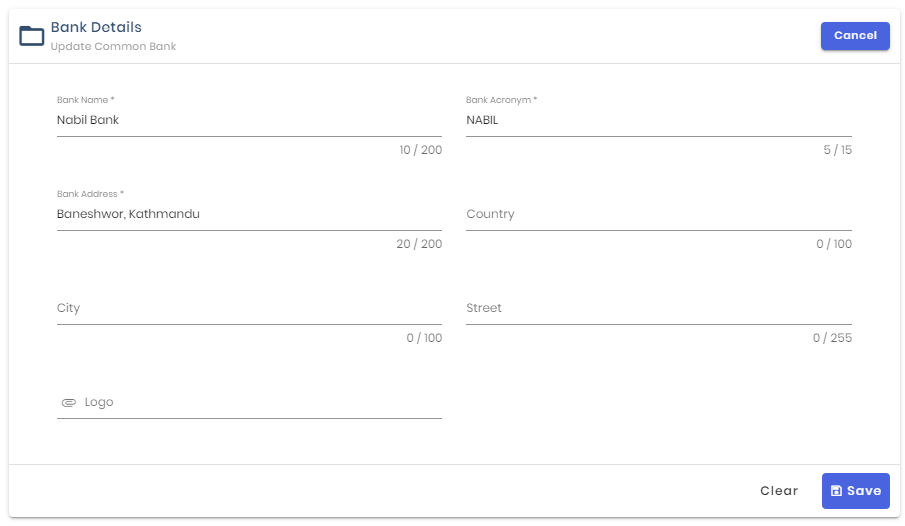
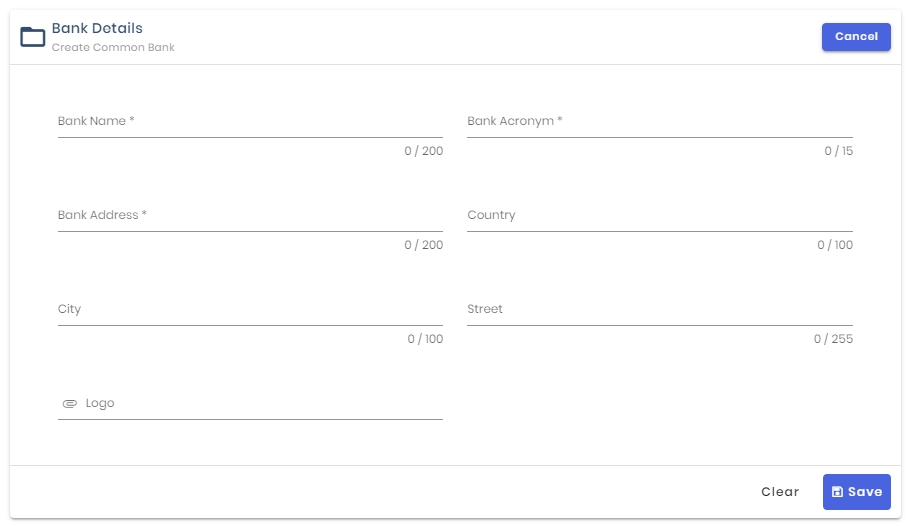
- Click on “Switch Organization’ and click on “Common Settings” to view the list of settings. Select “Common Bank” to view the list of common bank details.
- Click on “Create New” to create and enter details regarding a new bank.
- Click on the “Update” action button to update the details regarding the existing bank. You may also delete the bank from the delete action bu
# Email Template
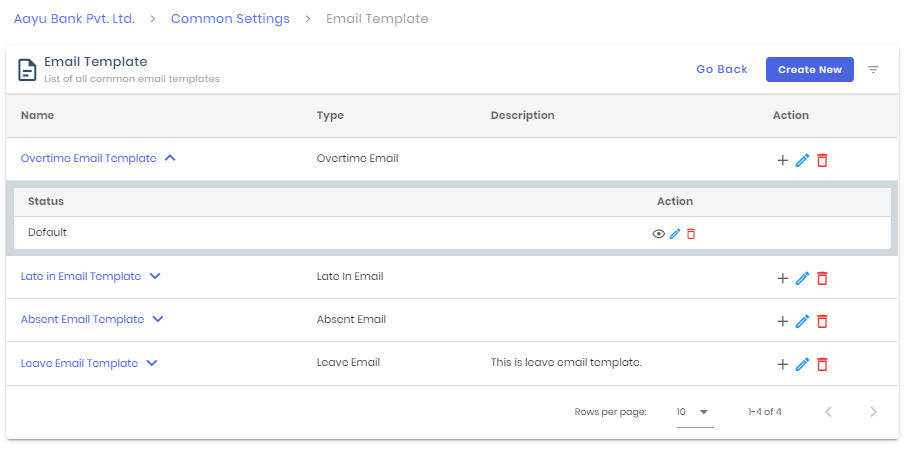
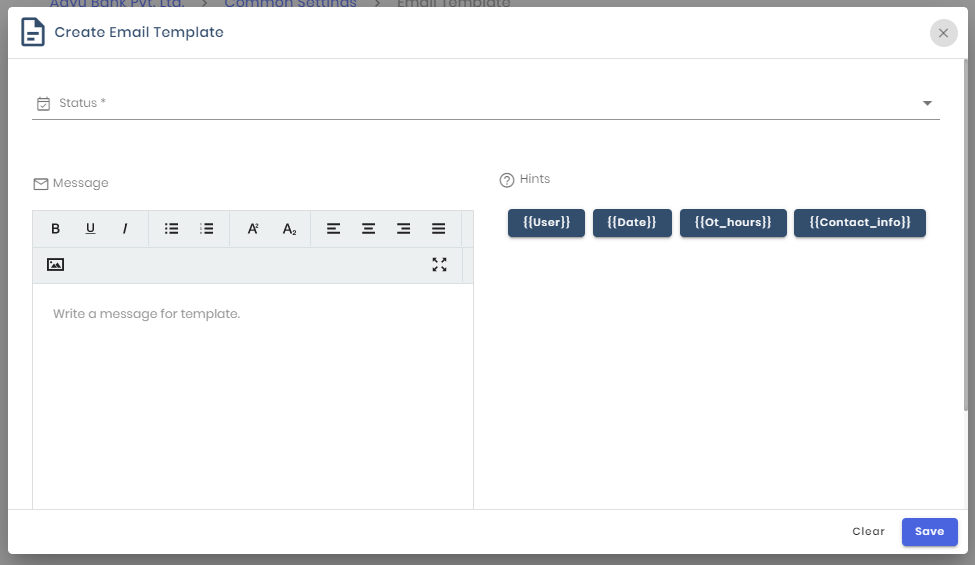
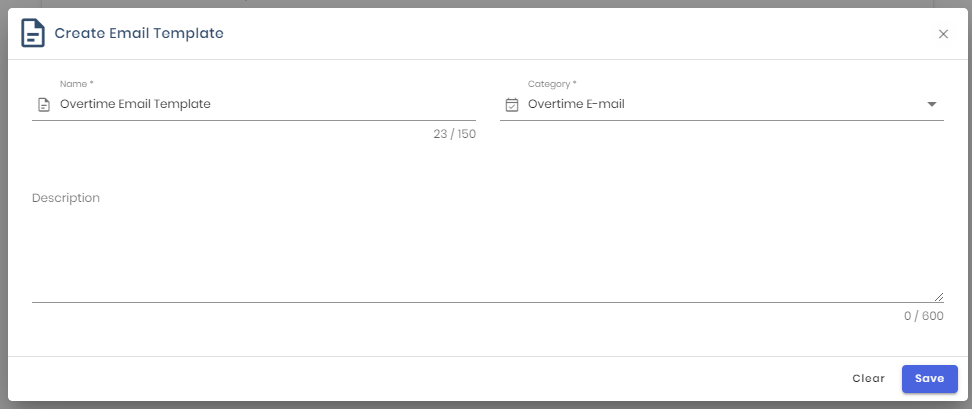
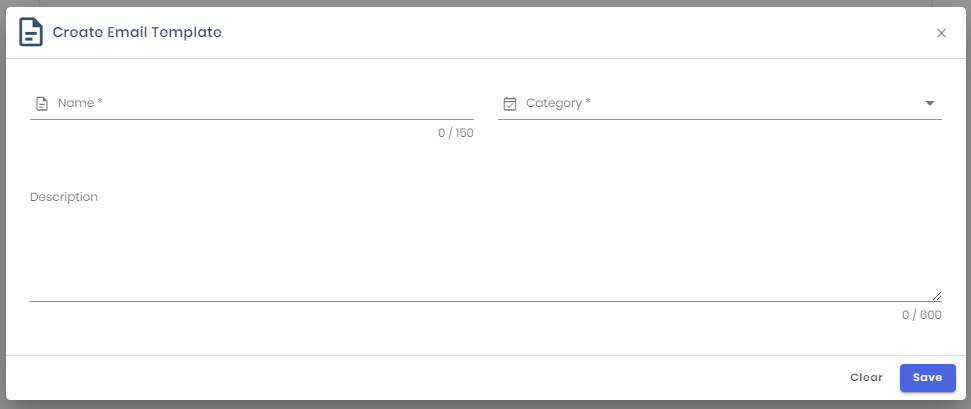
- Click on “Switch Organization’ and click on “Common Settings” to view the list of settings. Select “Email Template” to view the list of email templates for Leave, Attendance, etc of the organization.
- Click on “Create New” to create a new email template and assign it to a particular category e.g. Late Email, Absent Email etc.
- Click on the name of each template to view the list of email templates for each. Click on “View Detail, Update Detail, Detail Detail” for each to view the email template or edit/delete it”
- Click on the action button to “Add New Template”, “Update” or “Delete” the template.
- Using the “Create Email Template” you may easily create a new email template with the desired message. Few hints are provided too.
# Holiday Category
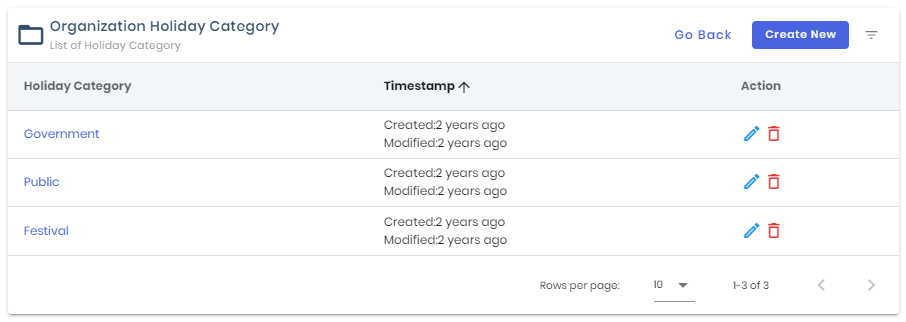
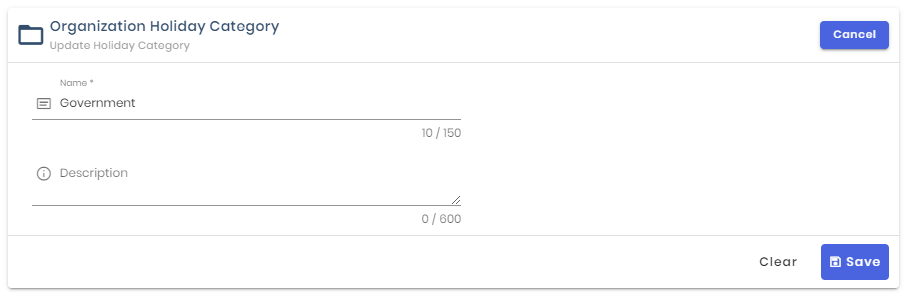
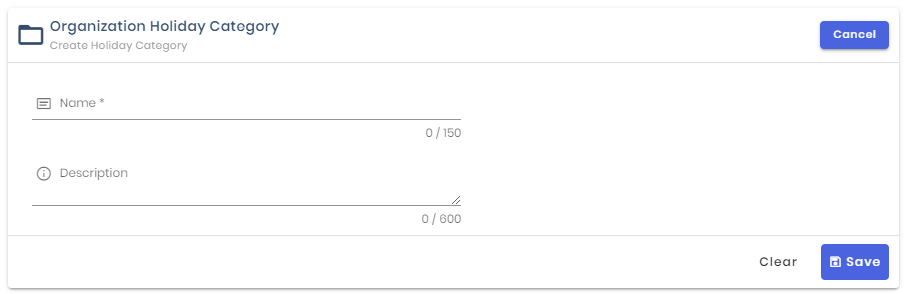
- Click on “Create New” to create a new holiday category and its description.
- Click on the action button to “Update” or delete the holiday category.
# Document Category
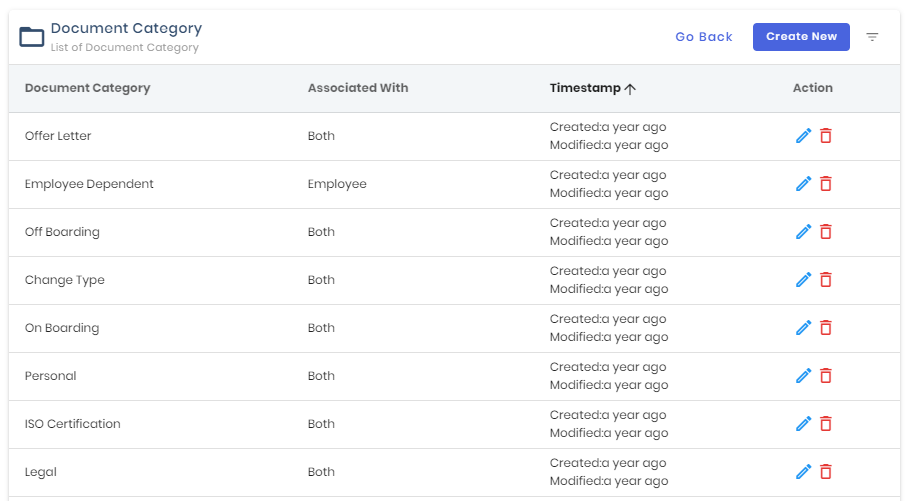
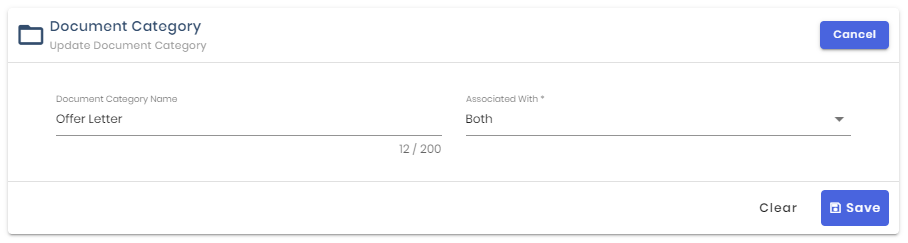
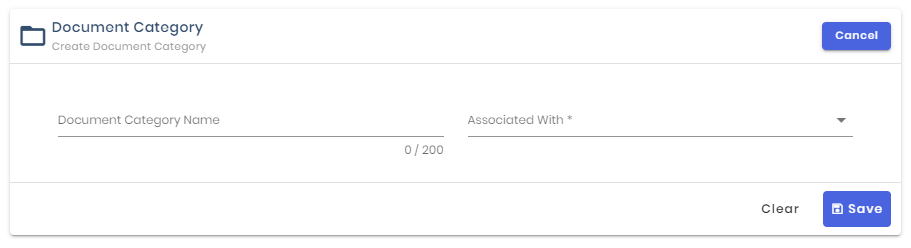
- Click on “Create New” to create a new common document and associate it with the organization, employees or both.
- Click on the action button to “Update” or delete the common holiday.
# Ethnicity
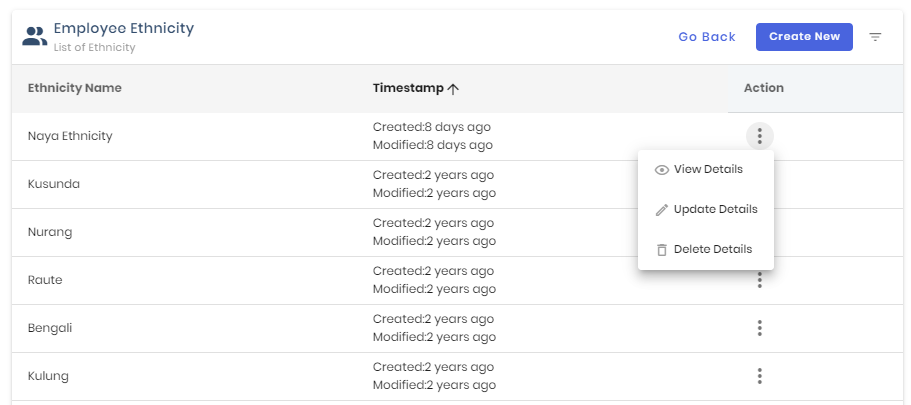
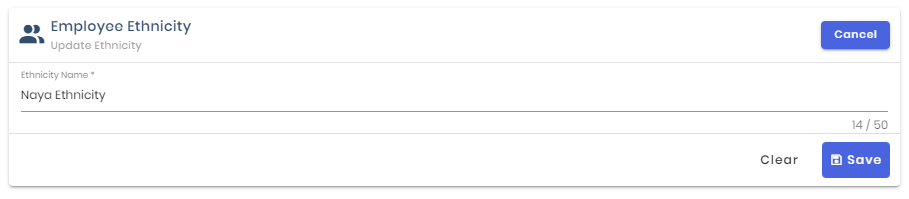
- Click on “Create New” to create a new ethnicity that can be used within the organization.
- Click on the action button to View, Update or Delete the ethnicity.
# Religion
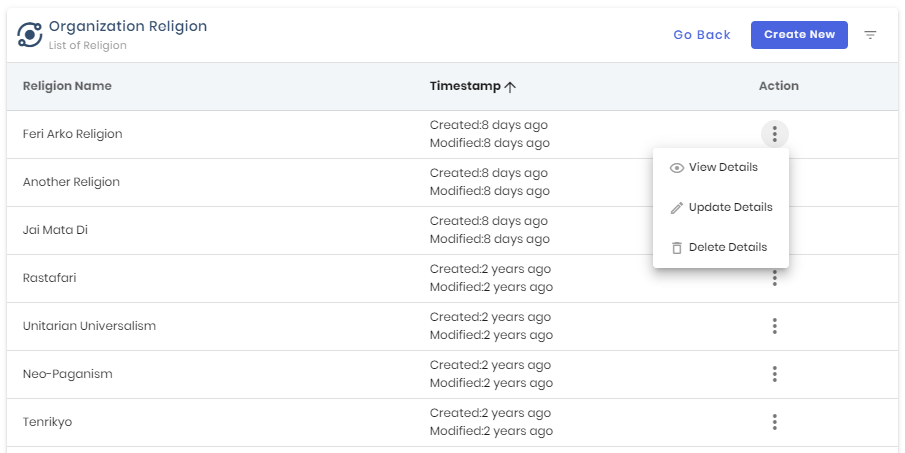
- Click on “Create New” to create a new religion that can be used within the organization.
- Click on the action button to View, Update or Delete the existing religion.
# ID Card Sample
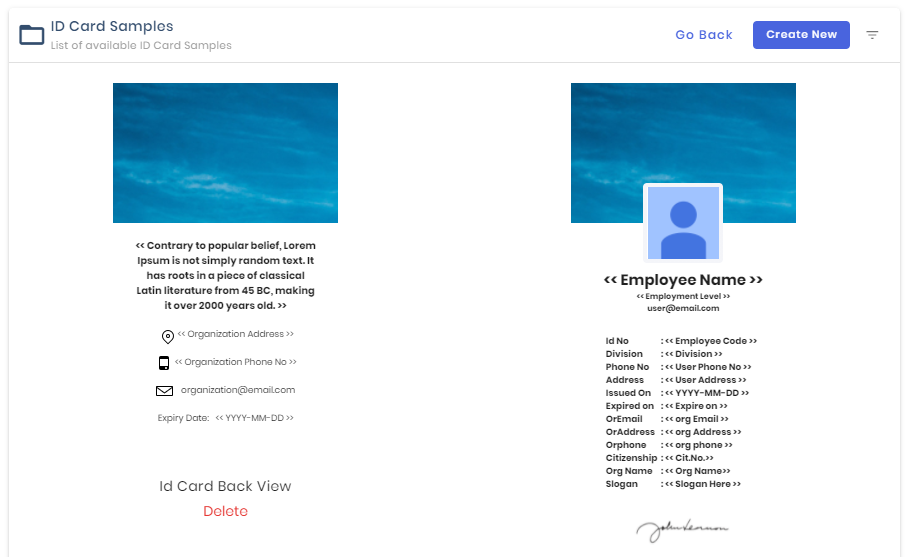

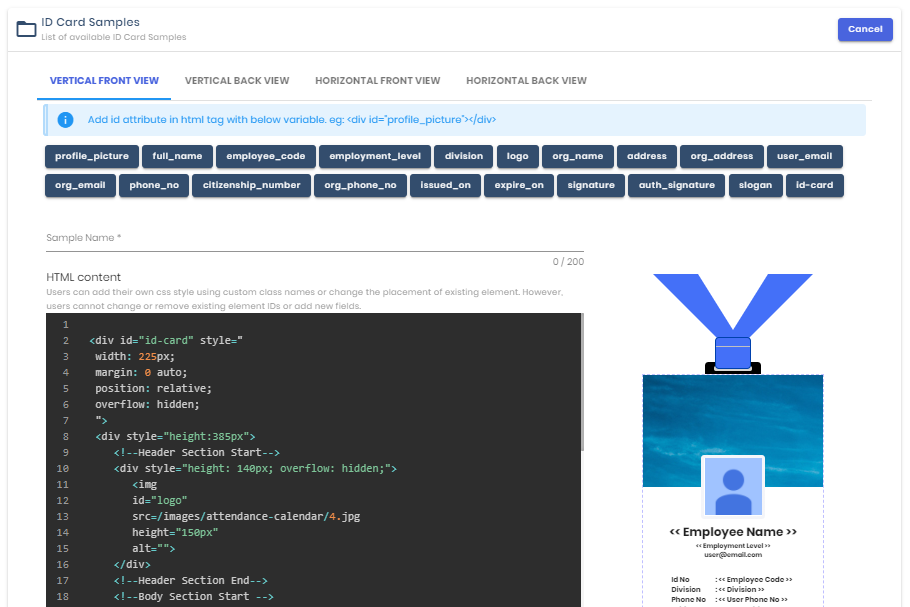
- Click on “Switch Organization’ and click on “Common Settings” to view the list of settings. Select “ID Card Sample” to view the list of available ID Card Samples that will be used in the organization.
- Click on “Delete” to remove any of the samples. Click on filter to search for a specific sample.
- Click on “Create New” to create a new ID Card Sample.
- Select the different view of the ID Card Sample.
- You may edit the HTML content to add their own css style using custom class names or change the placement of existing elements. However, users cannot change or remove existing element IDs or add new fields.
# Equipment Category
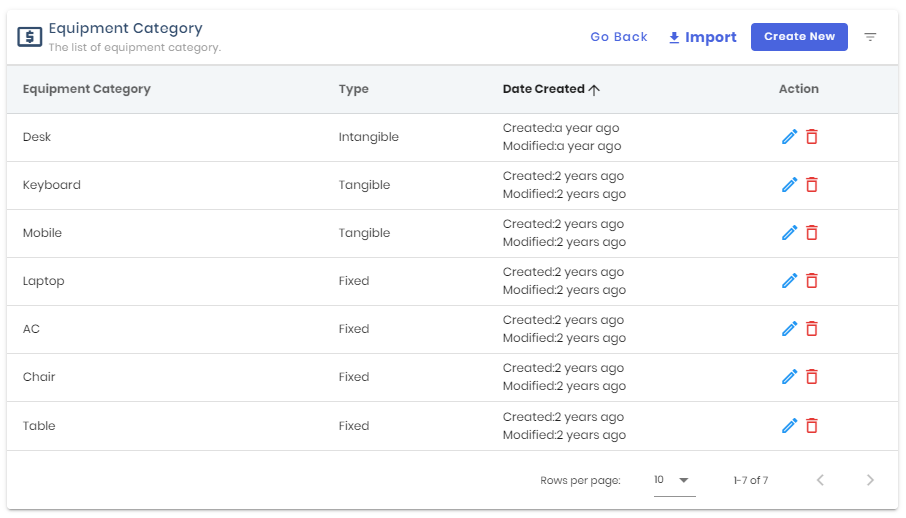


- Click on “Switch Organization’ and click on “Common Settings” to view the list of settings. Select “Equipment Category” to view the list of available ID Card Samples that will be used in the organization.
# Exchange Rate
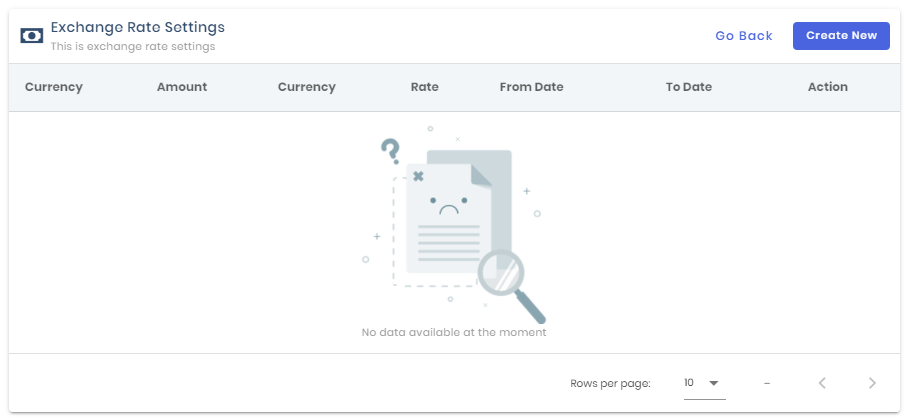
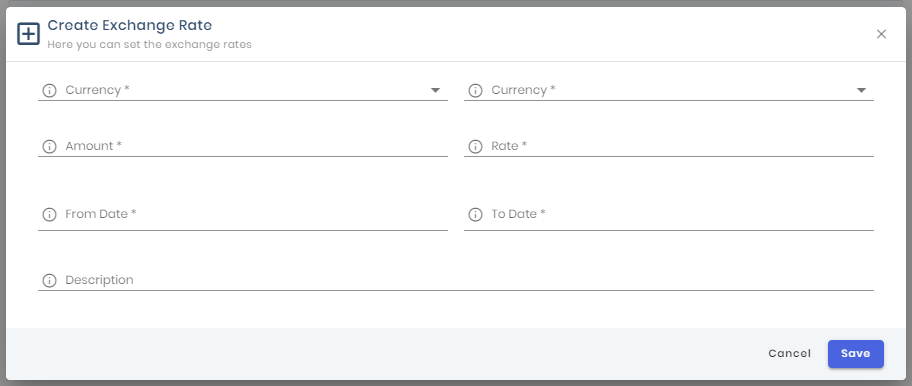
- Click on “Switch Organization’ and click on “Common Settings” to view the list of settings. Select “Exchange Rate” to set the exchange rate
# Noticeboard
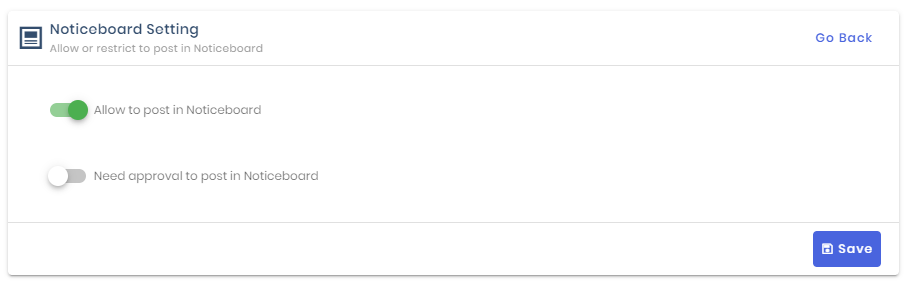
- Click on “Switch Organization’ and click on “Common Settings” to view the list of settings. Select “Noticeboard”
- Enable "Allow to post in Noticeboard" to enable users to post on Noticeboard
- Enable "Need a approvalto post in Noticeboard" to restrict users to post on Noticeboard without Approval
# SMTP Server

- Click on “Switch Organization’ and click on “Common Settings” to view the list of settings. Select “SMTP Server”
- Fill the required filled to be able to send email via desired email address.
- This Email will be used to send email notification to users i.e. Absent, Leave, Over-time Email
# Manage Permission
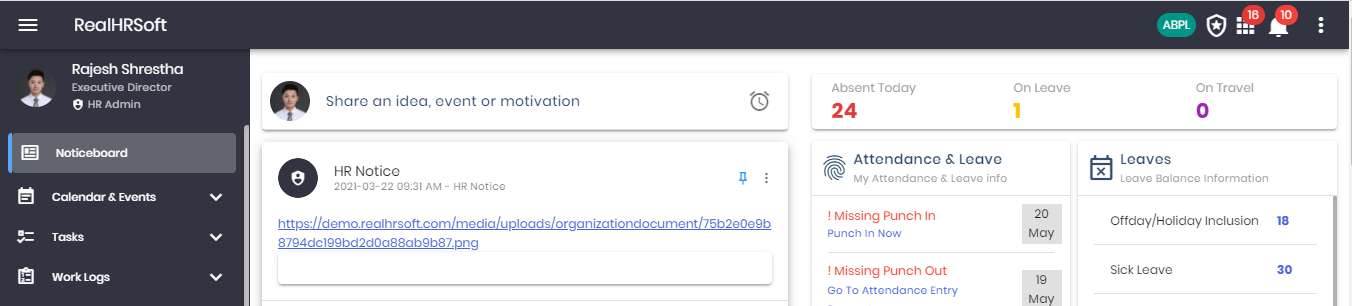
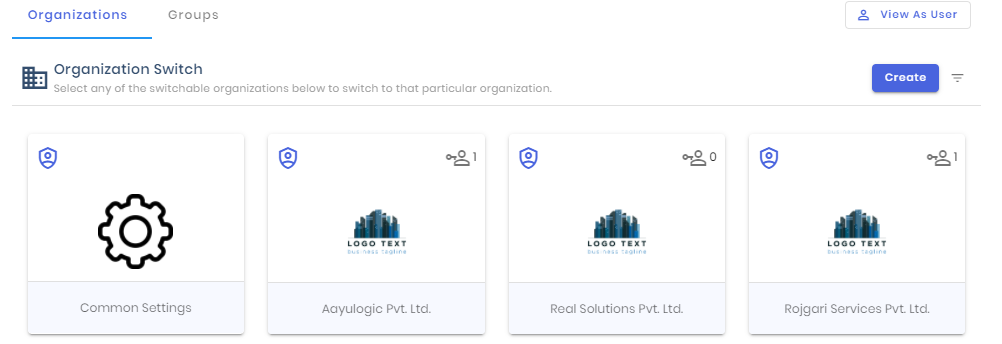
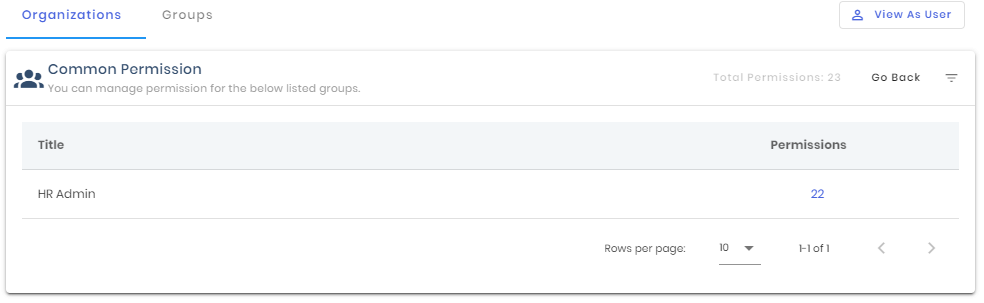
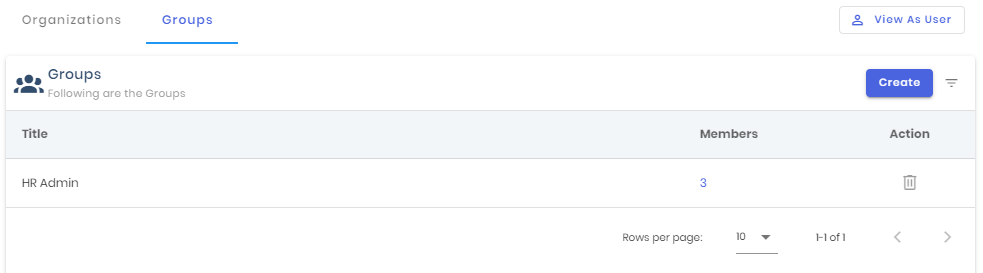
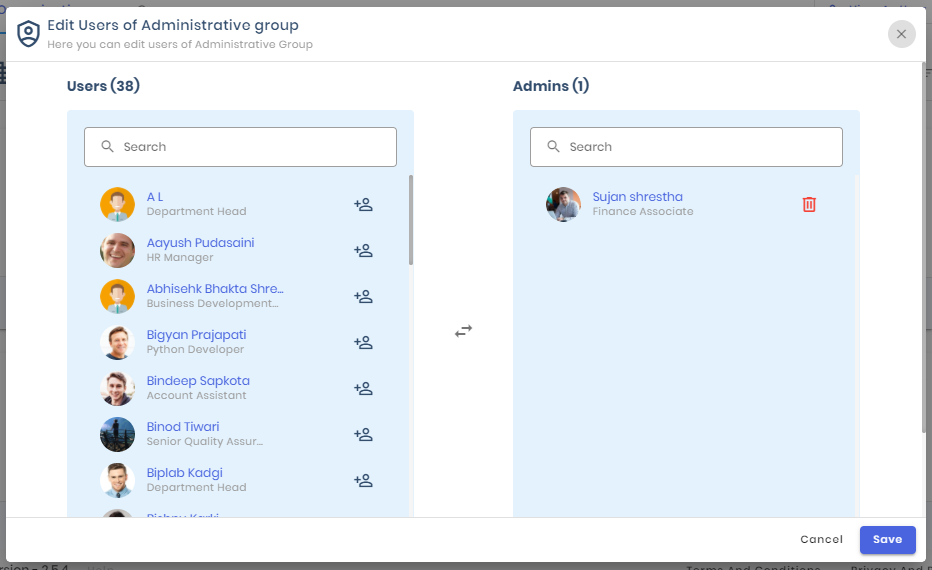
- Click on Shield Icon near left to Switch Organization
- Click on Desired Organization to Set the permission
- Here user can set permisson as required. Permission Can be set to Individual employee or to the Group of Employee
# RealHRSoft Setup Process
- Create Fiscal year
- Create Division
- Create Employment Level
- Create Employment Type
- Create Job Title
- Create Branch
- Create Employment Review
- Create Add Employee / Import Employee
- Create Assign Supervisor
- Create Working Shift
- Create Leave Policies
- Creat Holidays
- Add Attendance Device
- Assigin Attendance Settings
- Assign Leave
- Common Settings
- Creating Result area
# Prerequisite for Onboarding Pre/Post task
- Create RA and core task
- Goto >> Task >> Settings >> Result Area and Core task.
- Click on the “Create Result Areas” button.
- Enter the details as per the Associated division to create the Result area and “Save”
- Click on the triangle icon to expand the column.
- Click on the “+” icon.
- Enter the details and “Save” to add the core task.
- Assign RA and core task
- Goto >> Task >> Settings >> Assign Core task.
- Click on the “Action” icon of the preferred user.
- Select Associated RA and Core tasks for the user as per the employment experience and “Save” to assign.
- Task Template
- Goto HRIS >> Settings >> Task Templates.
- Select Off Boarding tab.
- Click on the “Create New” button to create a template category.
- Click on the created template category.
- Click on the “Create New” button.
- Enter the details and “Save” to add the templates.
# Attendance and Leave Prerequisite
- Prerequisite for the employees to be able to apply for leave:
- HR >> Organization >> Settings >> Fiscal Year >> Create Fiscal Year.
- HR >> Leave >> Settings >> Master Setting >> Create leave master setting, and leave rules should be added for the required leave types.
- HR >> Leave >> Settings >> Master Setting >> Leave Types >> Leave Rules >> Assign leave rules to employees.
- HR >> Leave >> Settings >> Leave Balance >> Add leave balance for the employees
- Prerequisite for the employees to be able to apply for credit hour:
- HR >> Leave >> Settings >> Master Setting >> Leave Types >> Create the leave rule with the category 'Credit Hour'.
- HR >> Leave >> Settings >> Master Setting >> Leave Types >> Leave Rule >> Assign leave rules to employees.
- HR >> Attendance >> Settings >> Credit Hour Settings >> Create the credit hour setting with required options.
- HR >> Attendance >> Settings >> Individual Attendance Settings >> Assign the credit hour setting created in step 2, to the employees.
- Prerequisite for special leave and LWP
- HR >> Leave >> Settings >> Master Setting >> Leave Types >> While creating leave type, turn on the switch for "Set Multi Level Approval"
- HR >> Leave >> Settings >> Master Setting >> Leave Types >> Leave Rule >> Assign leave rule created in step 1, to the employees.
- HR >> Leave >> Settings >> Leave Approval >> Set the approver for the special leave and LWP.
- Prerequisite for the employees to be able to apply for Pre-Approval Overtime:
- HR >> Attendance >> Settings >> Overtime >> Here create overtime setting with 'Prior Approval Required' true.
- HR >> Attendance >> Settings >> Individual Attendance Settings >> Assign the overtime setting created in step 1, to the employees.
- Prerequisite for the employees to be able to claim Overtime:
- HR >> Attendance >> Settings >> Overtime >> Here create overtime setting.
- HR >> Attendance >> Settings >> Individual Attendance Settings >> Assign the overtime setting created in step 1, to the employees
- Prerequisite for attendance/overtime import
- HR >> Attendance >> Import >> Here, download the sample import file and edit the file with the proper data.
- Prerequisite for leave import
- HR >> Leave >> Import >> Here download the sample import file and edit the file with the proper data.
# Exit and Separation Management
- Prerequisite for User resignation:
- Create Resignation approval settings
- Goto HRIS >> Settings >> Resignation Approval.
- Set approval level.
- Add Resignation Terms and condition document
- Goto Organization >> Documents.
- Create a document with checkbox “For resignation” and “Is public” selected.
- Prerequisite for Exit interview:
- Add Exit interview Questionnaire
- Goto Organization >> Settings >> Questionnaire.
- Click on Exit interview tab
- Create a Question category clicking on the “+” icon.
- Click on the created category and click the “Create Questionnaire” button.
- Enter the details and “Save” to add the question.
- Create Exit interview question set
- Goto HRIS >> Settings >> Exit Interview Question Set.
- Create form by clicking on the “+” icon.
- Enter the details, select the Reference Category and choose the required questions from the list to add into the form.
- Prerequisite for Offboarding Pre/ Post task (Hand Over note):
- Create RA and core task
- Goto >> Task >> Settings >> Result Area and Core task.
- Click on the “Create Result Areas” button.
- Enter the details as per the Associated division to create the Result area and “Save”
- Click on the triangle icon to expand the column.
- Click on the “+” icon.
- Enter the details and “Save” to add the core task.
- Assign RA and core task
- Goto >> Task >> Settings >> Assign Core task.
- Click on the “Action” icon of the preferred user.
- Select Associated RA and Core tasks for the user as per the employment experience and “Save” to assign.
- Task Template
- Goto HRIS >> Settings >> Task Templates.
- Select Off Boarding tab.
- Click on the “Create New” button to create a template category.
- Click on the created template category.
- Click on the “Create New” button.
- Enter the details and “Save” to add the templates.
# Payroll Title Details
# PAYROLL TYPE DETAILS
Type1Cnst/Type2Cnst
When heading is added in type Type1Cnst/Type2Cnst, added amount is not divided into ratio. Example:
- If we add Rs 30 in heading type Type1Cnst/Type2Cnst, when generating salary for 1 day or 30 days it gives output Rs 30.
Amount added in heading type with Type1Cnst/Type2Cnst is not a taxable amount. To make it taxable it should be linked with type addition/deduction. Example:
- Add heading with type Type1Cnst/Type2Cnst i.e. Allowance
- Add heading with type Type1Cnst/Type2Cnst i.e. Basic Salary
- Add another heading with type Addition and taxable equal to Yes i.e. Taxable Salary
- In rule of Taxable Salary, enter “Basic_Salary+Allowance”
- In the above example, basic salary and allowance is not taxable amount but it is made taxable amount by summed up in taxable salary heading.
Heading created in type Type2Cnst can not be used directly in Type1Cnst rules & conditions and vice versa. Example
- Add heading with type Type2Cnst i.e. Basic Salary
- Add another heading with type Type1Cnst i.e. Taxable Salary
- In above example basic, salary can not be added in taxable salary rule & conditions.
Difference between Type1Cnst and Type2Cnst are:
Type1Cnst
- Type1Cnst is used for adding heading at the beginning which are to be made taxable after summed up. Example
- Add heading with type Type1Cnst i.e. Basic Salary
- Add heading with type Type1Cnst i.e. Allowance
- Add another heading with type Addition and taxable equal to Yes i.e. Taxable Salary
- In rule of Taxable Salary, enter “Basic_Salary+Allowance”
- In the above example, basic salary and allowance is not taxable amount but it is made taxable amount by summed up in taxable salary heading.
- When Type1Cnst is used for making heading, Duration unit is required. Available duration units are
- Hourly
- Monthly
- Daily
Type2Cnst
- Type2Cnst is especially used for displaying results. Example “Cash In Hand”
- When Type2Cnst is used for making heading, Duration unit is not required.
- Heading which are not taxable and need to be summed up in final salary are also created using Type2Cnst. Example
- Add heading with type Type2Cnst i.e. Sim Allowance
- Add another heading with type Type2Cnst i.e. Cash In Hand and add sim allowance in its rule
- In the above example, sim allowance is not taxable amount but it has to be shown in cash in hand.
# Addition/Deduction
- When heading is added in type Addition/Deduction, added amount is divided into ratio. Example
- If we add Rs 100 in heading type Addition/Deduction, when generating salary for X day it gives output Rs (100/working days in selected month)*X.
- Amount added in heading type with Addition/Deduction is a taxable amount if taxable is “Yes” else not taxable.
Example 1
- Add heading with type Addition/Deduction and taxable Yes i.e. Gross Salary
- In the above example, gross salary is treated as taxable amount and amount in it’s heading is also added in Annual Gross Salary for addition type and deducted in Annual Gross Salary for deduction type.
Example 2
- Add heading with type Addition/Deduction and taxable No i.e. Gross Salary
- In the above example, gross salary is treated as non taxable amount but amount in it’s heading is added in Annual Gross Salary for addition type and deducted in Annual Gross Salary for deduction type.
- Heading created in type Addition/Deduction can be used directly in Type1Cnst and Type2Cnst rules but not in Addition and Deduction type.
Example 1
- Add heading with type Addition/Deduction i.e. Allowance
- Add heading with type Type1Cnst i.e. Basic Salary with Allowance in Rule
- In the above example, allowance with type addition/deduction can be added in basic salary rule.
Example 2
- Add heading with type Addition/Deduction i.e. Allowance
- Add heading with type Type2Cnst i.e. Basic Salary with Allowance in Rule
- In the above example, allowance with type addition/deduction can be added in basic salary rule.
Example 3
- Add heading with type Addition/Deduction i.e. Allowance
- Add heading with type Addition/Deduction i.e. Basic Salary
- In the above example, allowance with type addition can not be added in basic salary rule with type addition or deduction itself.
When duration unit hourly is selected in type addition/deduction, hourly record must be selected. Hourly record list are
- Overtime - When overtime is selected, added amount in this heading is multiplied by confirmed overtime. If addition is used final amount should be added in annual gross salary and if deduction is used final amount should be deducted in annual gross salary.
- Total Hour Worked - When total hour worked is selected, added amount in this heading is multiplied by total hour worked. If addition is used final amount should be added in annual gross salary and if deduction is used final amount should be deducted in annual gross salary.
When duration unit daily is selected in type addition/deduction, added amount in rule is provided to employee by multiplying present days in selected time and amount in rule. If addition is used final amount should be added in annual gross salary and if deduction is used final amount should be deducted in annual gross salary.
# Extra Addition/Extra Deduction
- Heading added with type extra addition/extra deduction amount is not directly displayed in generate page. User should have to add manually after payroll generation.
Example
- Add heading with type extra addition/extra deduction, create package with that heading, assign package to employee and generate payroll.
- In extra heading control “Add” is available, Click on it to add extra heading amount.
- When heading is added in type Extra Addition/Extra Deduction, added amount is not divided into ratio.
Example
- If we add Rs 30 in heading type Extra Addition/Extra Deduction , when generating salary for 1 day or 30 days it gives output Rs 30.
- Amount added in heading type with Extra Addition/Extra Deduction is a taxable amount if taxable is “Yes” else not taxable.
Example 1
- Add heading with type Extra Addition/Extra Deduction and taxable Yes i.e. Bonus
- In the above example, bonus is treated as taxable amount and amount in it’s heading is also added in Annual Gross Salary for addition type and deducted in Annual Gross Salary for deduction type.
Example 2
- Add heading with type Extra Addition/Extra Deduction and taxable No i.e. Bonus
- In the above example, bonus is treated as non taxable amount and amount in it’s heading is added in Annual Gross Salary for addition type and deducted in Annual Gross Salary for deduction type.
- Heading created in type Extra Addition/Extra Deduction can be used directly in Addition, Deduction, Type1Cnst and Type2Cnst rules.
Example 1
- Add heading with type Extra Addition/Extra Deduction i.e. Bonus
- Add heading with type Addition or deduction i.e. Basic Salary with Bonus in its Rule
- In the above example, bonus with type extra addition/extra deduction can be added in basic salary rule. When Extra Addition/Extra Deduction heading is added in type Addition or Deduction it is now divided into ratio.
Example 2
- Add heading with type Extra Addition/Extra Deduction i.e. Bonus
- Add heading with type Type1Cnst or Type2Cnst i.e. Basic Salary with Bonus in its Rule
- In the above example, bonus with type extra addition/extra deduction can be added in basic salary rule.
# Rule & Condition
In Built Headings
- Annual Gross Salary
(__ANNUAL_GROSS_SALARY__)_ Annual gross salary is sum of estimated amount for respective fiscal year. _ It is displayed in tax deduction rule and condition only. * It can be used in rule & condition as__ANNUAL_GROSS_SALARY__*0.1- In above example annual gross salary is multiplied by 0.1.
- User can use any operator and operand in above example.
- Employee Current Step
(__EMPLOYEE_CURRENT_STEP__)- Employee current step is used to provide salary on the basis of step.
Example
X+(__EMPLOYEE_CURRENT_STEP__-1)*Y*XWhere X is basic salary for employment at step 1, Y is the ratio by which salary is to be increased in each change in steps and__EMPLOYEE_CURRENT_STEP__will provide current step of employee. LetX=10000andy = 0.1(increase by 10%). Above equation becomes10000(__EMPLOYEE_CURRENT_STEP__-1)*0.1*10000- Employee current step simply provide current steps of employee.
- Employee Marital Status
(__EMPLOYEE_MARITAL_STATUS__)- It is displayed in condition only.
- It can be used as
| Condition | Rule |
|---|---|
__EMPLOYEE_MARITAL_STATUS__==”single” | 1000 |
__EMPLOYEE_MARITAL_STATUS__==”married” | 2000 |
From above example for employee marital status equal to married, 1000 amount is provided and if employee marital status equal to married, 2000 amount is provided.
- Employee Id
(__EMPLOYEE_ID__)- It is displayed in condition only.
- It can be used as
| Condition | Rule |
|---|---|
__EMPLOYEE_ID__==1 | 1000 |
__EMPLOYEE_ID__==2 | 2000 |
From above example for employee id equal to 1, 1000 amount is provided and if employee id equal to 2, 2000 amount is provided.
- Employee Gender
(__EMPLOYEE_GENDER__)- It is displayed in condition only.
- It can be used as
| Condition | Rule |
|---|---|
__EMPLOYEE_GENDER__=="Female" | 1000 |
__EMPLOYEE_GENDER__=="Male" | 2000 |
From above example for gender equal to female, 1000 amount is provided and if gender equal to male, 2000 amount is provided.
- Employee Has Disabilities
(__EMPLOYEE_HAS_DISABILITIES__)- It is displayed in condition only.
- It can be used as
| Condition | Rule |
|---|---|
__EMPLOYEE_HAS_DISABILITIES__=="False" | 1000 |
__EMPLOYEE_HAS_DISABILITIES__=="True" | 2000 |
From above example for disabilities equal to false, 1000 amount is provided and if disabilities equal to true, 2000 amount is provided.
NOTE - We can also add other employee details as inbuilt heading if required. For that please consult with REALHRSOFT team.
# SSF Payroll Package Example
Payroll Headings Should be maintained serially as example below.
1. Basic Salary
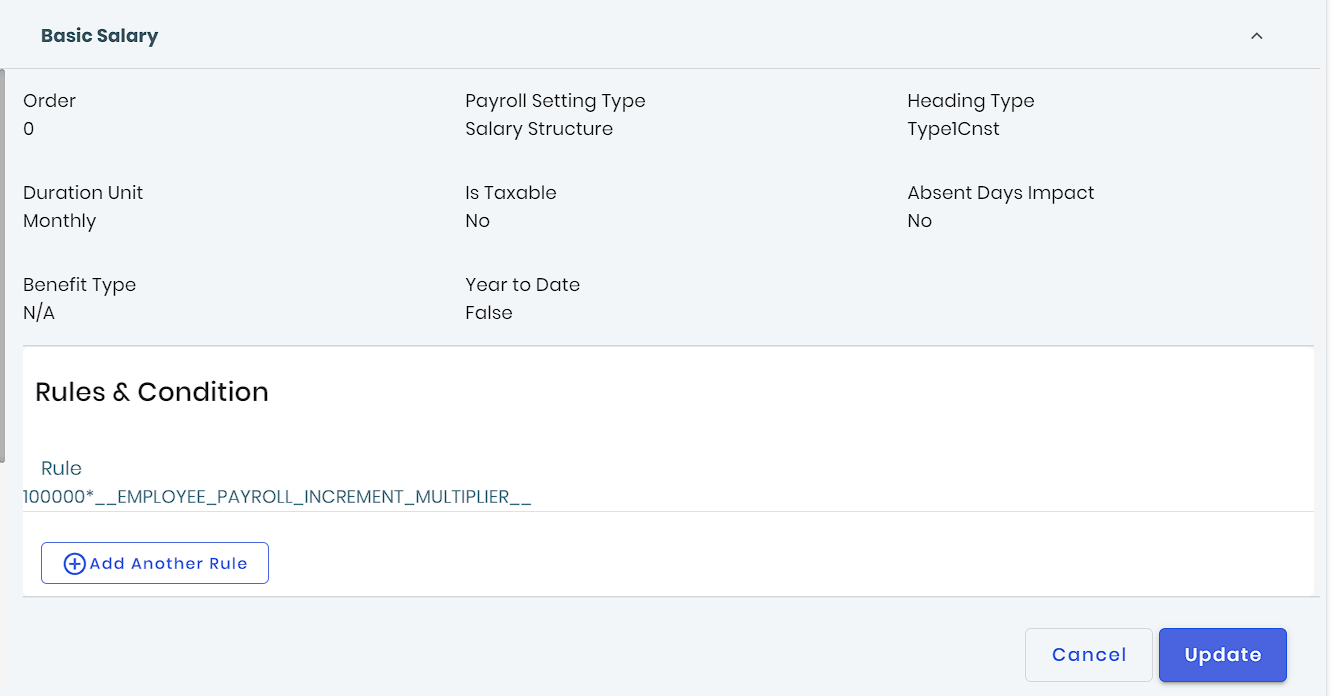
Rule:
100000*__EMPLOYEE_PAYROLL_INCREMENT_MULTIPLIER__
2. Basic
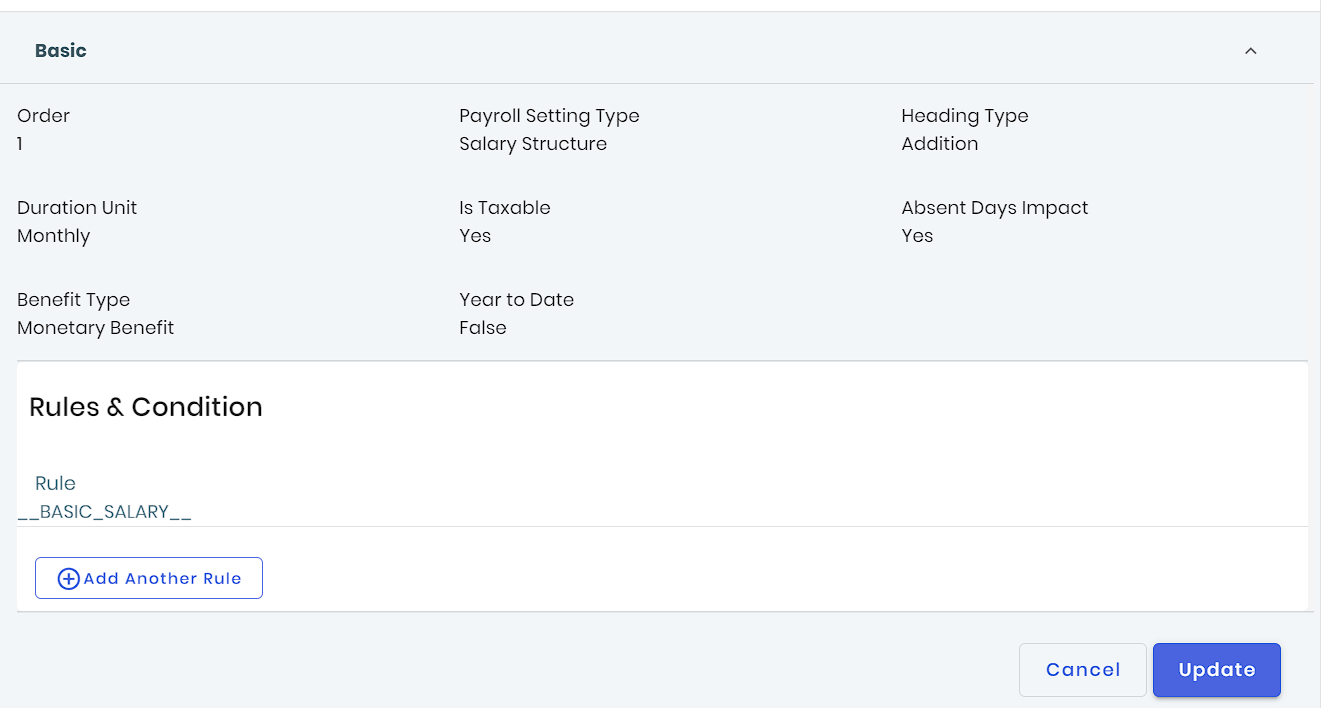
Rule:
__BASIC_SALARY__
3. Dearness Allowance

Rule:
0
4. Other Allowance
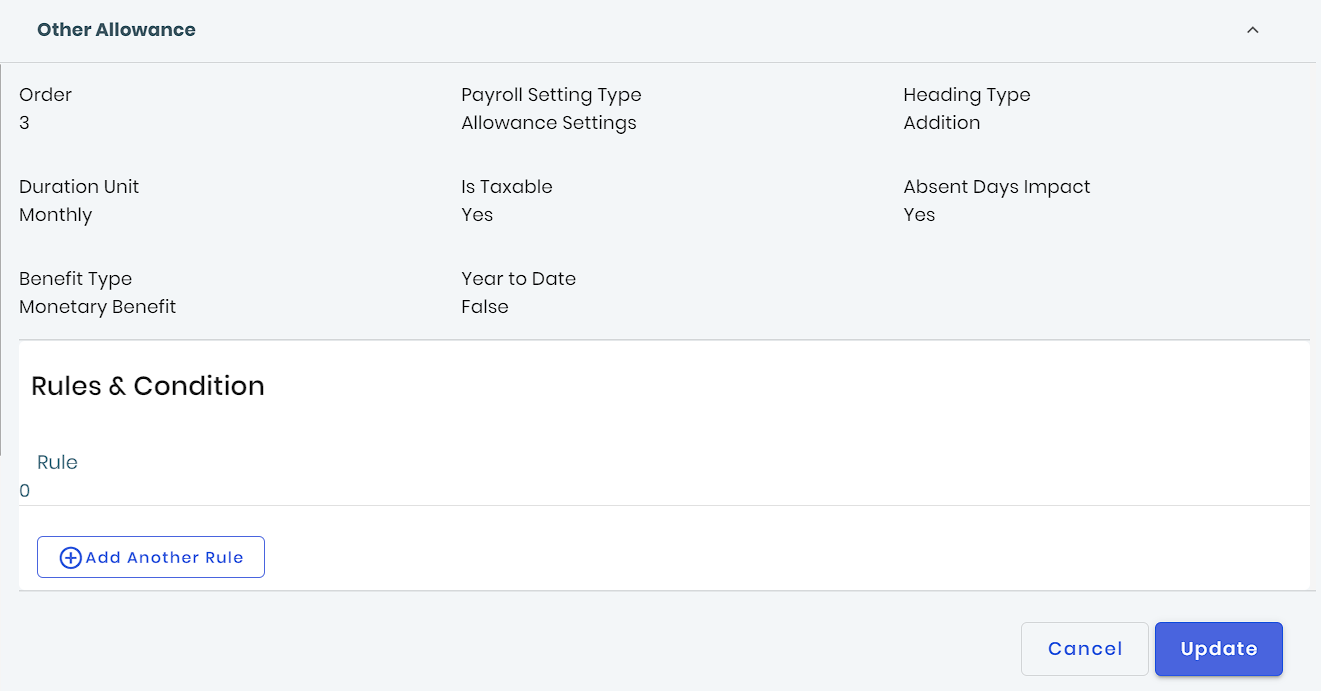
Rule:
0
5. Social Security Fund Addition

Rule:
__BASIC_SALARY__*0.20
6. Provident Fund Company
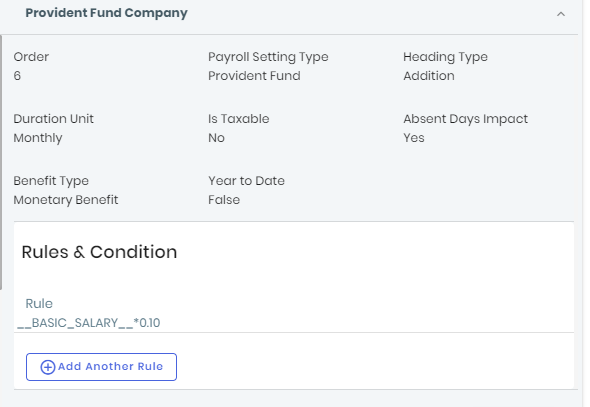
Rule:
__BASIC_SALARY__*0.10
7. Gratuity
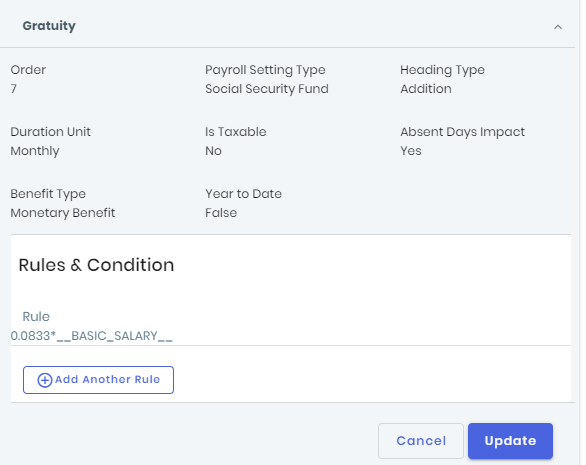
Rule:
0.0833*__BASIC_SALARY__
8. Social Security Insurance
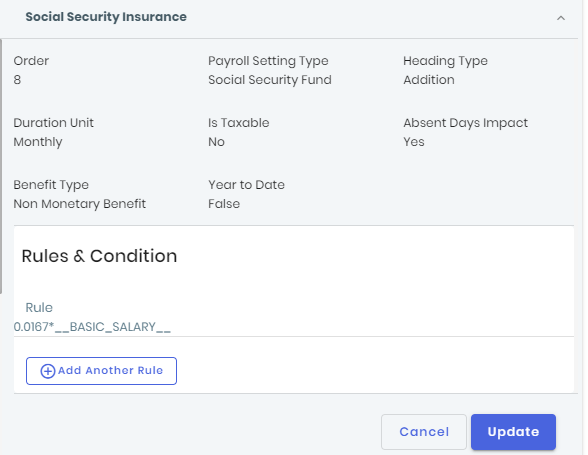
Rule:
0.0167*__BASIC_SALARY__
9. Total Allowance
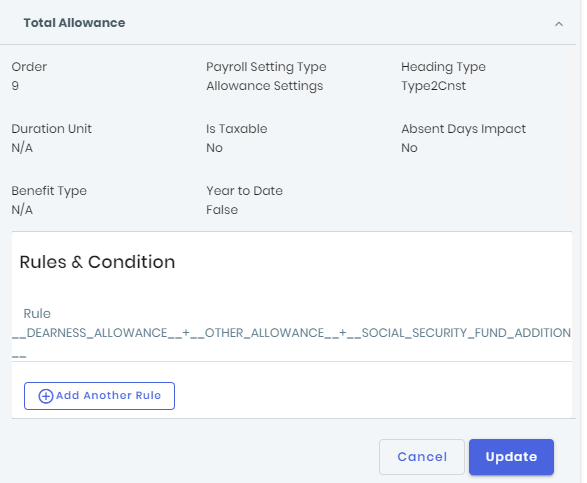
Rule:
__DEARNESS_ALLOWANCE__+__OTHER_ALLOWANCE__+__SOCIAL_SECURITY_FUND_ADDITION__
10. Festival Allowance
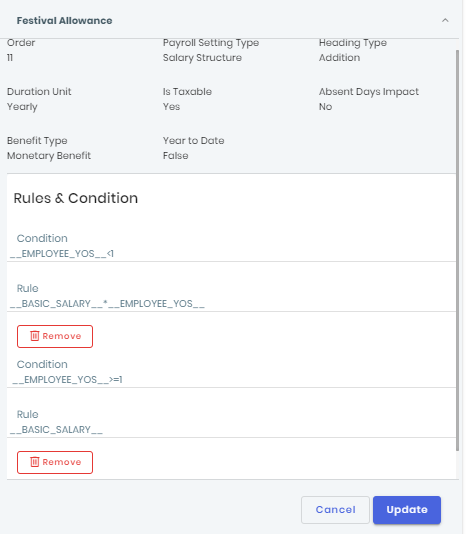
Condition 1:
__EMPLOYEE_YOS__<1Rule:
__BASIC_SALARY__*__EMPLOYEE_YOS__
Condition 2:
__EMPLOYEE_YOS__>=1Rule:
__BASIC_SALARY__
11. Gross Salary
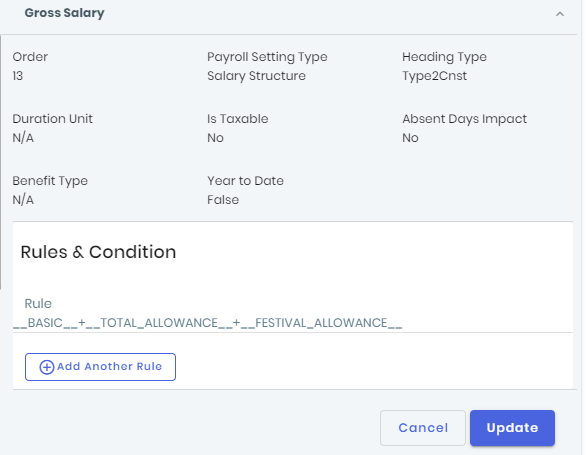
Rule:
__BASIC__+__TOTAL_ALLOWANCE__+__FESTIVAL_ALLOWANCE__
12. Yearly Gross Salary

Rule:
__ANNUAL_AMOUNT__(__BASIC__)+__ANNUAL_AMOUNT__(__TOTAL_ALLOWANCE__)+__ANNUAL_AMOUNT__(__FESTIVAL_ALLOWANCE__)
13. Social Security Fund Deduction

- Rule:
__BASIC_SALARY__*0.11
14. Provident Fund
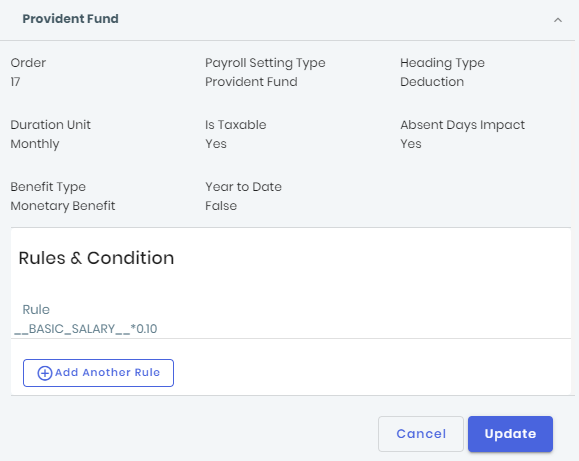
- Rule:
__BASIC_SALARY__*0.10
15. Gratuity Deduction
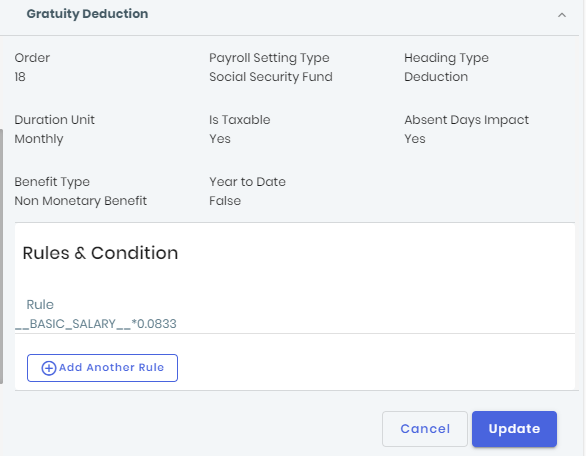
- Rule:
__BASIC_SALARY__*0.0833
16. Social Security Insurance Deduction
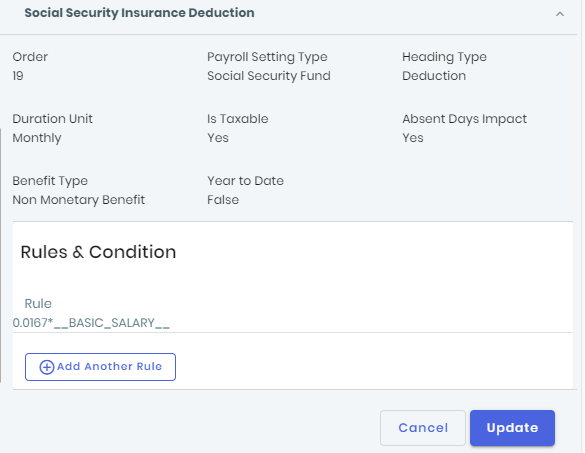
- Rule:
0.0167*__BASIC_SALARY__
17. Social Security Fund Deduction two
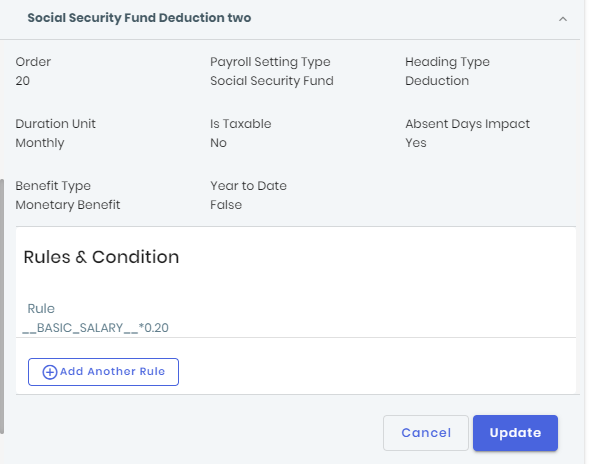
Rule:
__BASIC_SALARY__*0.20
18. Total Social Security Fund
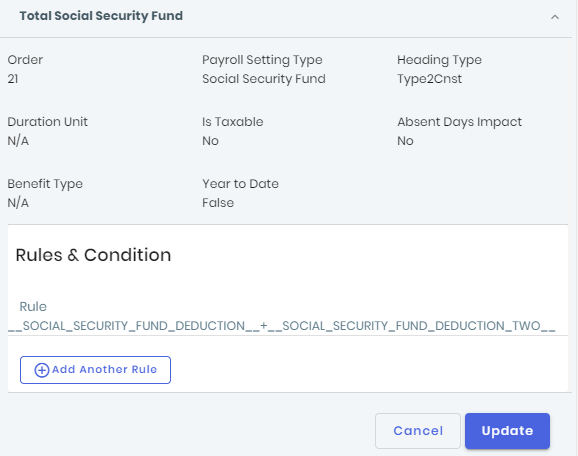
Rule:
__SOCIAL_SECURITY_FUND_DEDUCTION__+__SOCIAL_SECURITY_FUND_DEDUCTION_TWO__
19. CIT
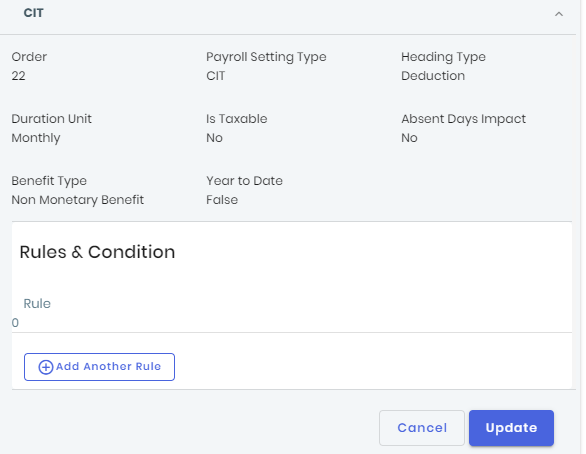
Rule:
0
20. Actual Contribution

Rule:
__ANNUAL_AMOUNT__(__SOCIAL_SECURITY_FUND_DEDUCTION__)+__ANNUAL_AMOUNT__(__SOCIAL_SECURITY_FUND_DEDUCTION_TWO__)+__ANNUAL_AMOUNT__(__CIT__)
21. One Third of Gross Salary
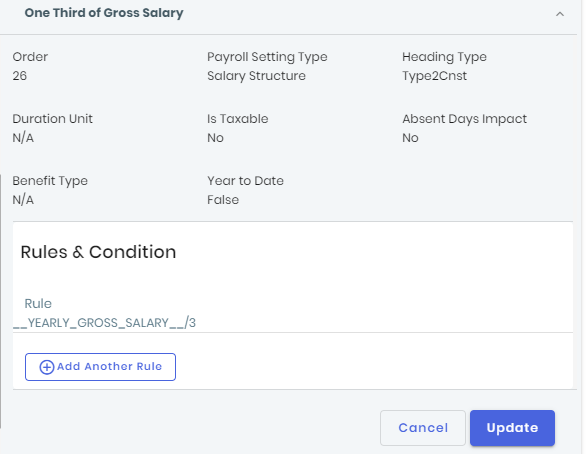
Rule:
__YEARLY_GROSS_SALARY__/3
22. CIT contribution limit Including SSF
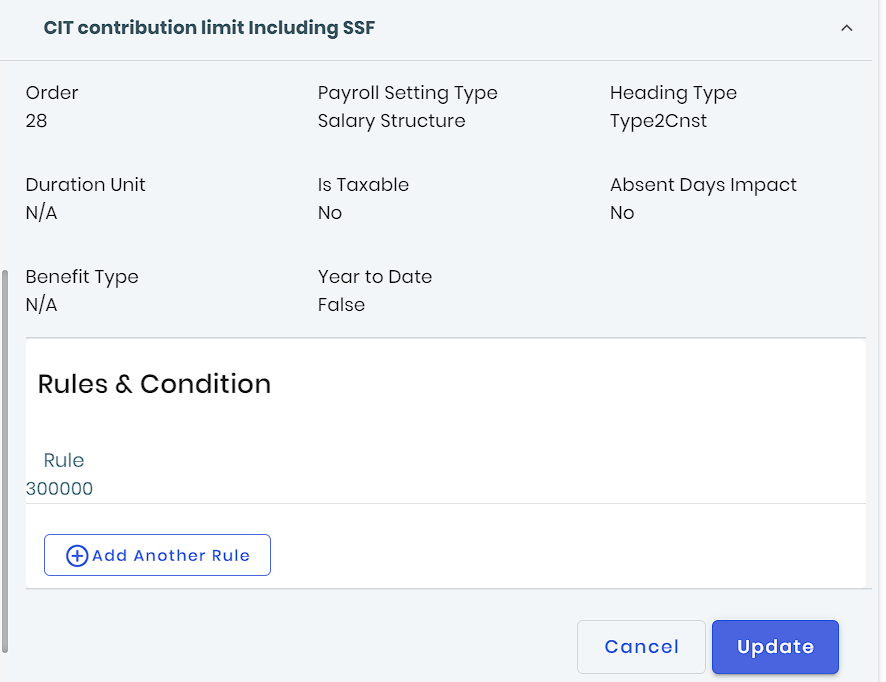
Rule:
300000
23. SSF Contribution Limit
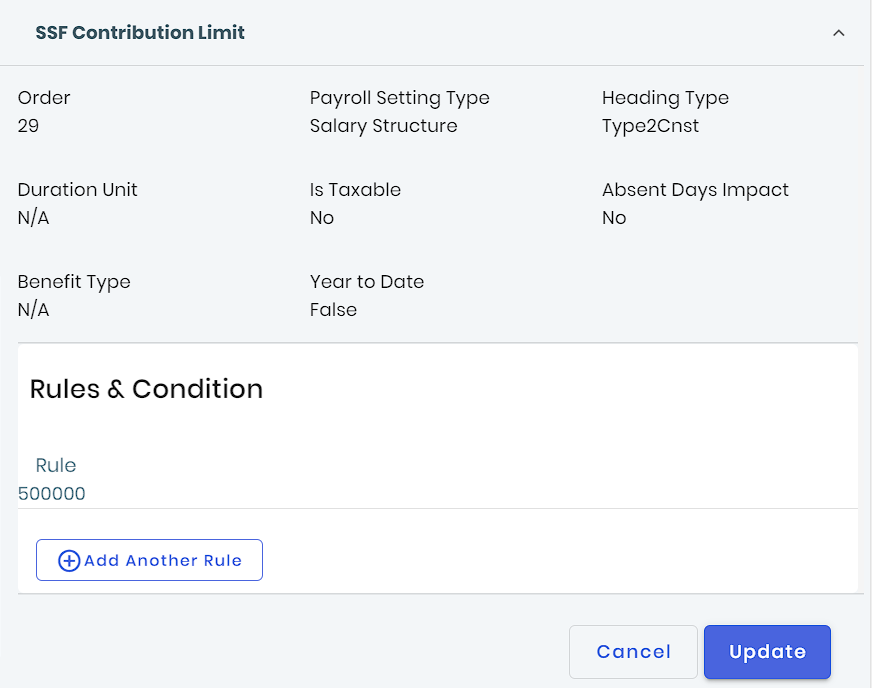
Rule:
500000
24. Min Deduction
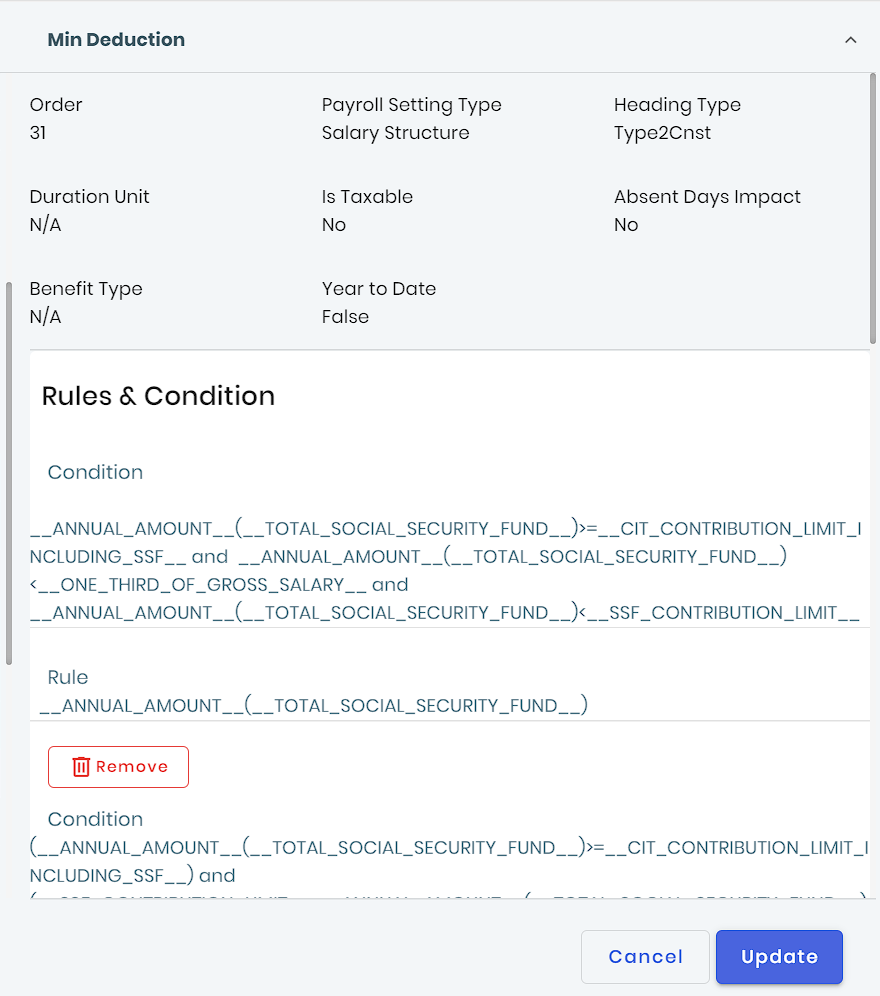
Condition 1:
__ANNUAL_AMOUNT__(__TOTAL_SOCIAL_SECURITY_FUND__)>=__CIT_CONTRIBUTION_LIMIT_INCLUDING_SSF__ and __ANNUAL_AMOUNT__(__TOTAL_SOCIAL_SECURITY_FUND__)<__ONE_THIRD_OF_GROSS_SALARY__ and __ANNUAL_AMOUNT__(__TOTAL_SOCIAL_SECURITY_FUND__)<__SSF_CONTRIBUTION_LIMIT__Rule 1:
__ANNUAL_AMOUNT__(__TOTAL_SOCIAL_SECURITY_FUND__)
Condition 2:
(__ANNUAL_AMOUNT__(__TOTAL_SOCIAL_SECURITY_FUND__)>=__CIT_CONTRIBUTION_LIMIT_INCLUDING_SSF__) and (__SSF_CONTRIBUTION_LIMIT__<__ANNUAL_AMOUNT__(__TOTAL_SOCIAL_SECURITY_FUND__)) and (__SSF_CONTRIBUTION_LIMIT__<__ONE_THIRD_OF_GROSS_SALARY__)Rule 2:
__SSF_CONTRIBUTION_LIMIT__
Condition 3:
(__ANNUAL_AMOUNT__(__TOTAL_SOCIAL_SECURITY_FUND__)>=__CIT_CONTRIBUTION_LIMIT_INCLUDING_SSF__) and (__ONE_THIRD_OF_GROSS_SALARY__<__ANNUAL_AMOUNT__(__TOTAL_SOCIAL_SECURITY_FUND__)) and (__ONE_THIRD_OF_GROSS_SALARY__<__SSF_CONTRIBUTION_LIMIT__)Rule 3:
__ONE_THIRD_OF_GROSS_SALARY__
Condition 4:
(__ANNUAL_AMOUNT__(__TOTAL_SOCIAL_SECURITY_FUND__)<__CIT_CONTRIBUTION_LIMIT_INCLUDING_SSF__) and ((__ANNUAL_AMOUNT__(__TOTAL_SOCIAL_SECURITY_FUND__)+__ANNUAL_AMOUNT__(__CIT__))<__ONE_THIRD_OF_GROSS_SALARY__) and ((__ANNUAL_AMOUNT__(__TOTAL_SOCIAL_SECURITY_FUND__)+__ANNUAL_AMOUNT__(__CIT__))<__CIT_CONTRIBUTION_LIMIT_INCLUDING_SSF__)Rule 4:
__ANNUAL_AMOUNT__(__TOTAL_SOCIAL_SECURITY_FUND__)+__ANNUAL_AMOUNT__(__CIT__)
Condition 5:
(__ANNUAL_AMOUNT__(__TOTAL_SOCIAL_SECURITY_FUND__)<__CIT_CONTRIBUTION_LIMIT_INCLUDING_SSF__) and (__CIT_CONTRIBUTION_LIMIT_INCLUDING_SSF__<(__ANNUAL_AMOUNT__(__TOTAL_SOCIAL_SECURITY_FUND__)+__ANNUAL_AMOUNT__(__CIT__))) and (__CIT_CONTRIBUTION_LIMIT_INCLUDING_SSF__<__ONE_THIRD_OF_GROSS_SALARY__)Rule 5:
__CIT_CONTRIBUTION_LIMIT_INCLUDING_SSF__
Condition 6:
(__ANNUAL_AMOUNT__(__TOTAL_SOCIAL_SECURITY_FUND__)<__CIT_CONTRIBUTION_LIMIT_INCLUDING_SSF__) and (__ONE_THIRD_OF_GROSS_SALARY__<(__ANNUAL_AMOUNT__(__TOTAL_SOCIAL_SECURITY_FUND__)+__ANNUAL_AMOUNT__(__CIT__))) and (__ONE_THIRD_OF_GROSS_SALARY__<__CIT_CONTRIBUTION_LIMIT_INCLUDING_SSF__)Rule 6:
__ONE_THIRD_OF_GROSS_SALARY__
25. Additional Taxable PF Amount
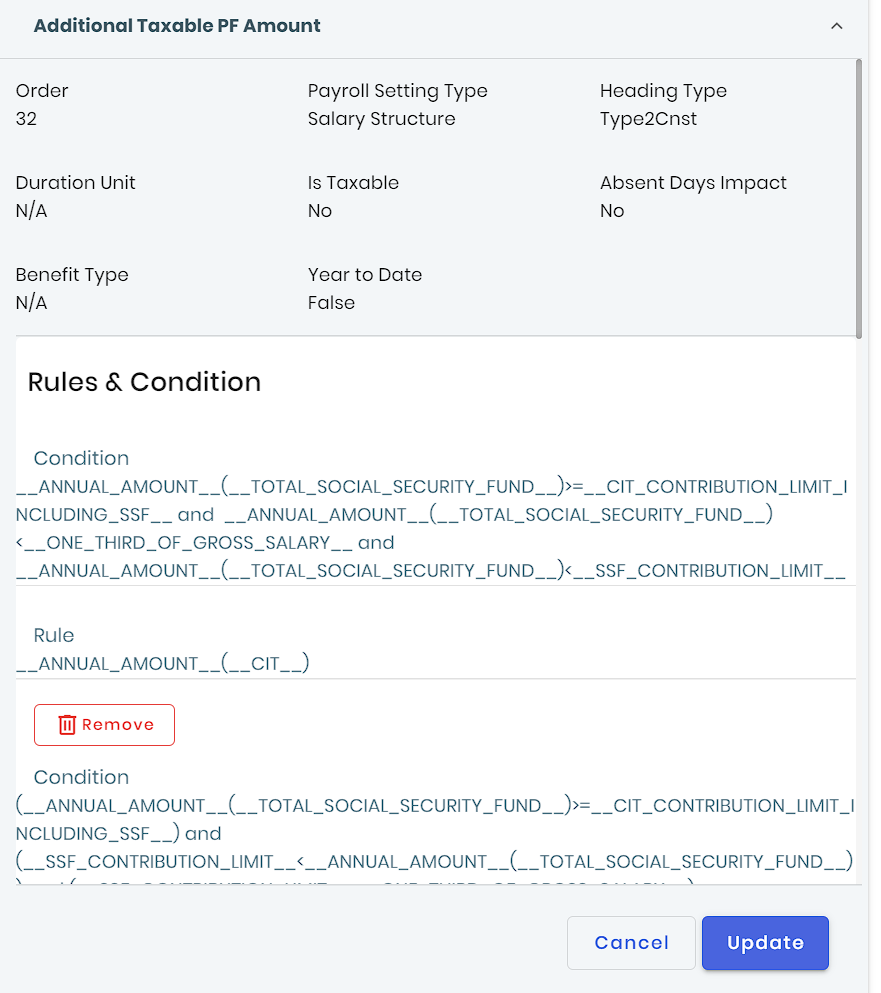
Condition 1:
__ANNUAL_AMOUNT__(__TOTAL_SOCIAL_SECURITY_FUND__)>=__CIT_CONTRIBUTION_LIMIT_INCLUDING_SSF__ and __ANNUAL_AMOUNT__(__TOTAL_SOCIAL_SECURITY_FUND__)<__ONE_THIRD_OF_GROSS_SALARY__ and __ANNUAL_AMOUNT__(__TOTAL_SOCIAL_SECURITY_FUND__)<__SSF_CONTRIBUTION_LIMIT__- Rule 1:
__ANNUAL_AMOUNT__(__CIT__)Condition 2:
(__ANNUAL_AMOUNT__(__TOTAL_SOCIAL_SECURITY_FUND__)>=__CIT_CONTRIBUTION_LIMIT_INCLUDING_SSF__) and (__SSF_CONTRIBUTION_LIMIT__<__ANNUAL_AMOUNT__(__TOTAL_SOCIAL_SECURITY_FUND__)) and (__SSF_CONTRIBUTION_LIMIT__<__ONE_THIRD_OF_GROSS_SALARY__)Rule 2:
__ANNUAL_AMOUNT__(__CIT__)+__ANNUAL_AMOUNT__(__TOTAL_SOCIAL_SECURITY_FUND__)-__SSF_CONTRIBUTION_LIMIT__
Condition 3:
(__ANNUAL_AMOUNT__(__TOTAL_SOCIAL_SECURITY_FUND__)>=__CIT_CONTRIBUTION_LIMIT_INCLUDING_SSF__) and (__ONE_THIRD_OF_GROSS_SALARY__<__ANNUAL_AMOUNT__(__TOTAL_SOCIAL_SECURITY_FUND__)) and (__ONE_THIRD_OF_GROSS_SALARY__<__SSF_CONTRIBUTION_LIMIT__)Rule 3:
__ANNUAL_AMOUNT__(__CIT__)+__ANNUAL_AMOUNT__(__TOTAL_SOCIAL_SECURITY_FUND__)-__ONE_THIRD_OF_GROSS_SALARY__
Condition 4:
(__ANNUAL_AMOUNT__(__TOTAL_SOCIAL_SECURITY_FUND__)<__CIT_CONTRIBUTION_LIMIT_INCLUDING_SSF__) and (__ACTUAL_CONTRIBUTION__<__ONE_THIRD_OF_GROSS_SALARY__) and (__ACTUAL_CONTRIBUTION__<__CIT_CONTRIBUTION_LIMIT_INCLUDING_SSF__)Rule 4:
0
Condition 5:
(__ANNUAL_AMOUNT__(__TOTAL_SOCIAL_SECURITY_FUND__)<__CIT_CONTRIBUTION_LIMIT_INCLUDING_SSF__) and (__CIT_CONTRIBUTION_LIMIT_INCLUDING_SSF__< __ACTUAL_CONTRIBUTION__) and (__CIT_CONTRIBUTION_LIMIT_INCLUDING_SSF__<__ONE_THIRD_OF_GROSS_SALARY__)Rule 5:
__ACTUAL_CONTRIBUTION__-__CIT_CONTRIBUTION_LIMIT_INCLUDING_SSF__
Condition 6:
(__ANNUAL_AMOUNT__(__TOTAL_SOCIAL_SECURITY_FUND__)<__CIT_CONTRIBUTION_LIMIT_INCLUDING_SSF__) and (__ONE_THIRD_OF_GROSS_SALARY__<__ACTUAL_CONTRIBUTION__) and (__ONE_THIRD_OF_GROSS_SALARY__<__CIT_CONTRIBUTION_LIMIT_INCLUDING_SSF__)Rule 6:
__ACTUAL_CONTRIBUTION__-__ONE_THIRD_OF_GROSS_SALARY__
26. Total Annual Gross Salary
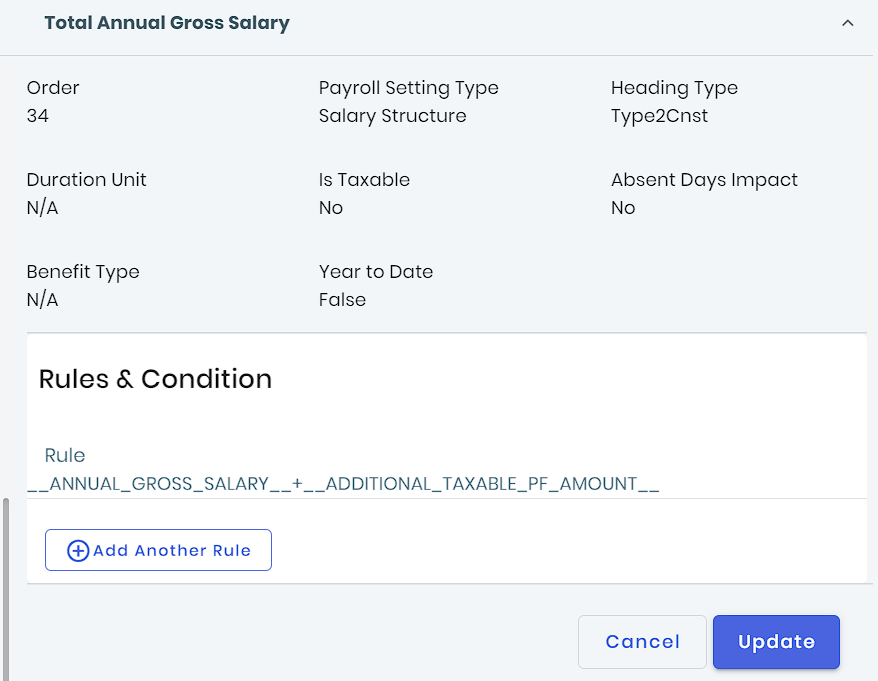
Rule:
__ANNUAL_GROSS_SALARY__+__ADDITIONAL_TAXABLE_PF_AMOUNT__
27. Tax Slab Two
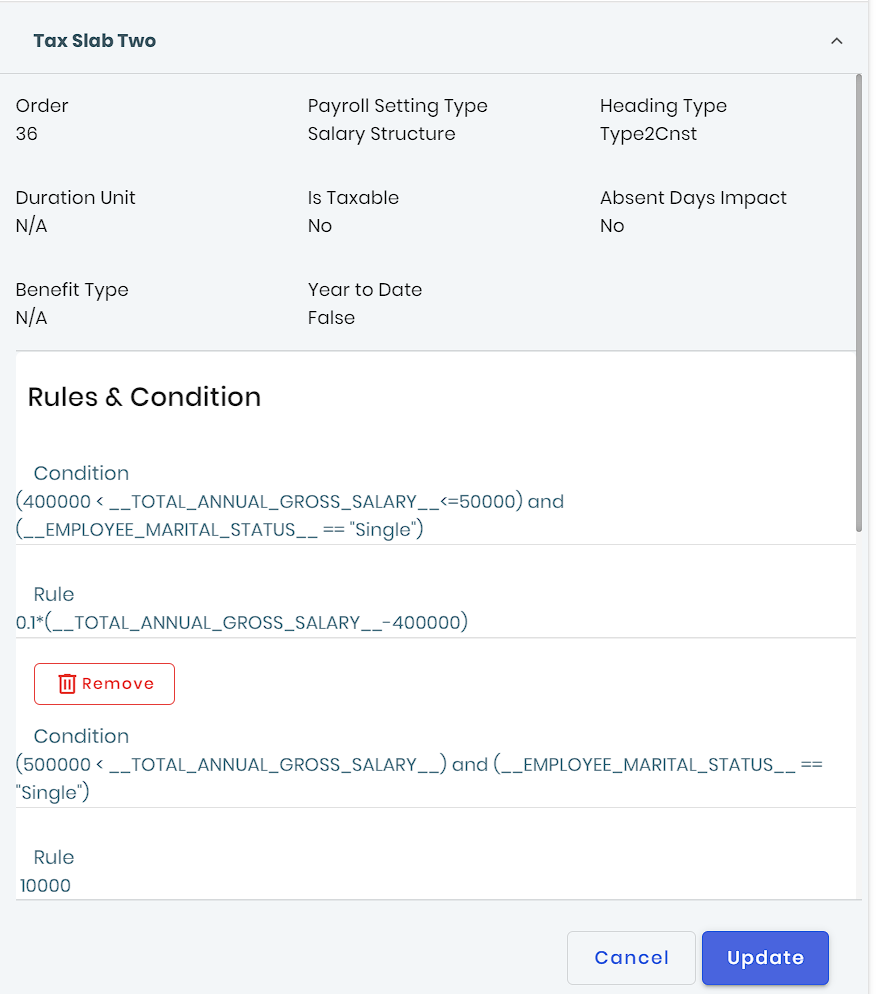
Condition 1:
(400000 < __TOTAL_ANNUAL_GROSS_SALARY__<=50000) and (__EMPLOYEE_MARITAL_STATUS__ == "Single")Rule 1:
0.1*(__TOTAL_ANNUAL_GROSS_SALARY__-400000)
Condition 2:
(500000 < __TOTAL_ANNUAL_GROSS_SALARY__) and (__EMPLOYEE_MARITAL_STATUS__ == "Single")Rule 2:
10000
Condition 3:
(450000 < __TOTAL_ANNUAL_GROSS_SALARY__<= 550000 ) and (__EMPLOYEE_MARITAL_STATUS__ == "Married")Rule 3:
0.1 * ( __TOTAL_ANNUAL_GROSS_SALARY__-450000)
Condition 4:
(550000 < __TOTAL_ANNUAL_GROSS_SALARY__) and (__EMPLOYEE_MARITAL_STATUS__ == "Married")Rule 4:
10000
28. Tax slab Three
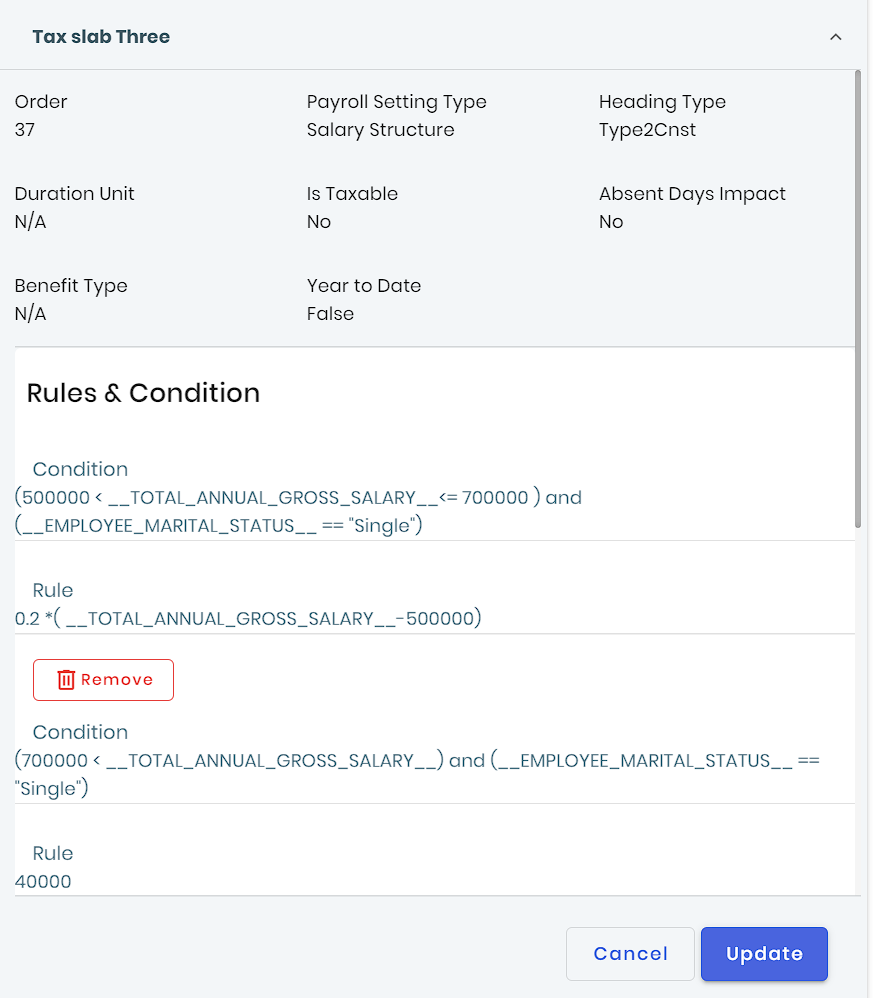
Condition 1:
(500000 < __TOTAL_ANNUAL_GROSS_SALARY__<= 700000 ) and (__EMPLOYEE_MARITAL_STATUS__ == "Single")Rule 1:
0.2 *( __TOTAL_ANNUAL_GROSS_SALARY__-500000)
Condition 2:
(700000 < __TOTAL_ANNUAL_GROSS_SALARY__) and (__EMPLOYEE_MARITAL_STATUS__ == "Single")Rule 2:
40000
Condition 3:
(550000 < __TOTAL_ANNUAL_GROSS_SALARY__<= 750000 ) and (__EMPLOYEE_MARITAL_STATUS__ == "Married")Rule 3:
0.2 *( __TOTAL_ANNUAL_GROSS_SALARY__-550000)
Condition 4:
(750000 < __TOTAL_ANNUAL_GROSS_SALARY__) and (__EMPLOYEE_MARITAL_STATUS__ == "Married")Rule 4:
40000
29. Tax Slab Four
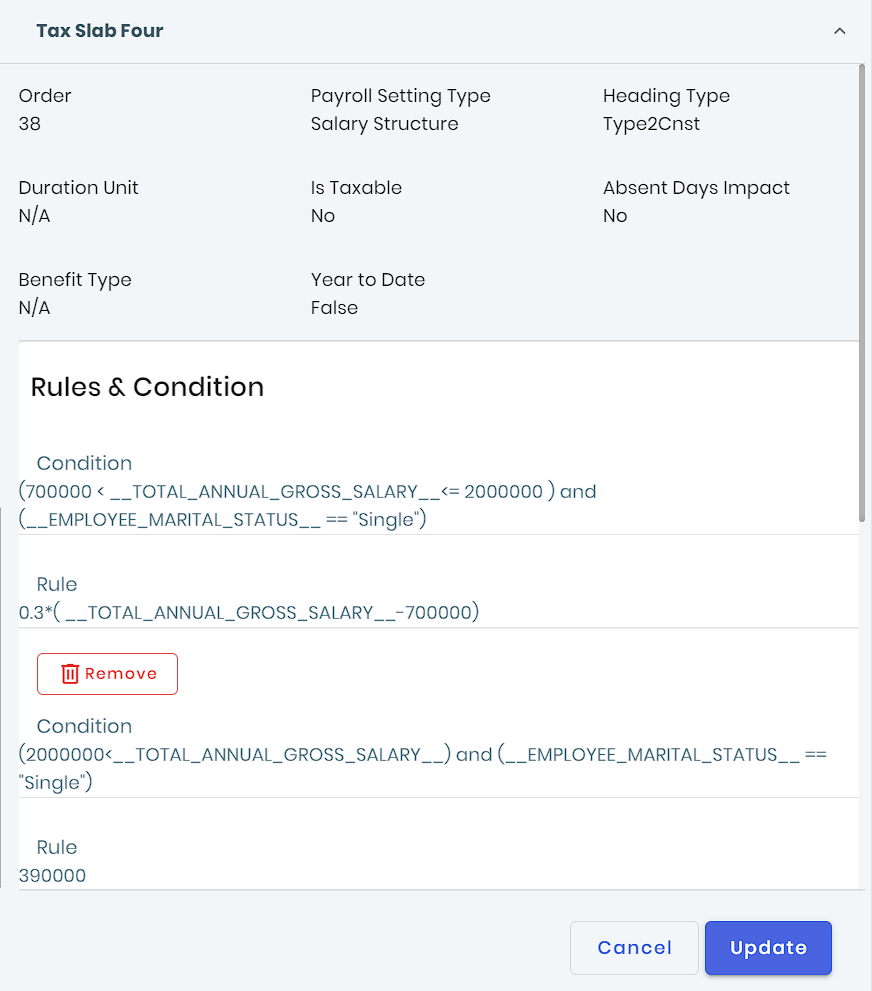
Condition 1:
(700000 < __TOTAL_ANNUAL_GROSS_SALARY__<= 2000000 ) and (__EMPLOYEE_MARITAL_STATUS__ == "Single")Rule 1:
0.3*( __TOTAL_ANNUAL_GROSS_SALARY__-700000)
Condition 2:
(2000000<__TOTAL_ANNUAL_GROSS_SALARY__) and (__EMPLOYEE_MARITAL_STATUS__ == "Single")Rule 2:
390000
Condition 3:
(750000 < __TOTAL_ANNUAL_GROSS_SALARY__<= 2000000 ) and (__EMPLOYEE_MARITAL_STATUS__ == "Married")Rule 3:
0.3*( __TOTAL_ANNUAL_GROSS_SALARY__-750000)
Condition 4:
(2000000 < __TOTAL_ANNUAL_GROSS_SALARY__) and (__EMPLOYEE_MARITAL_STATUS__ == "Married")Rule 4:
375000
30. Tax Slab Five
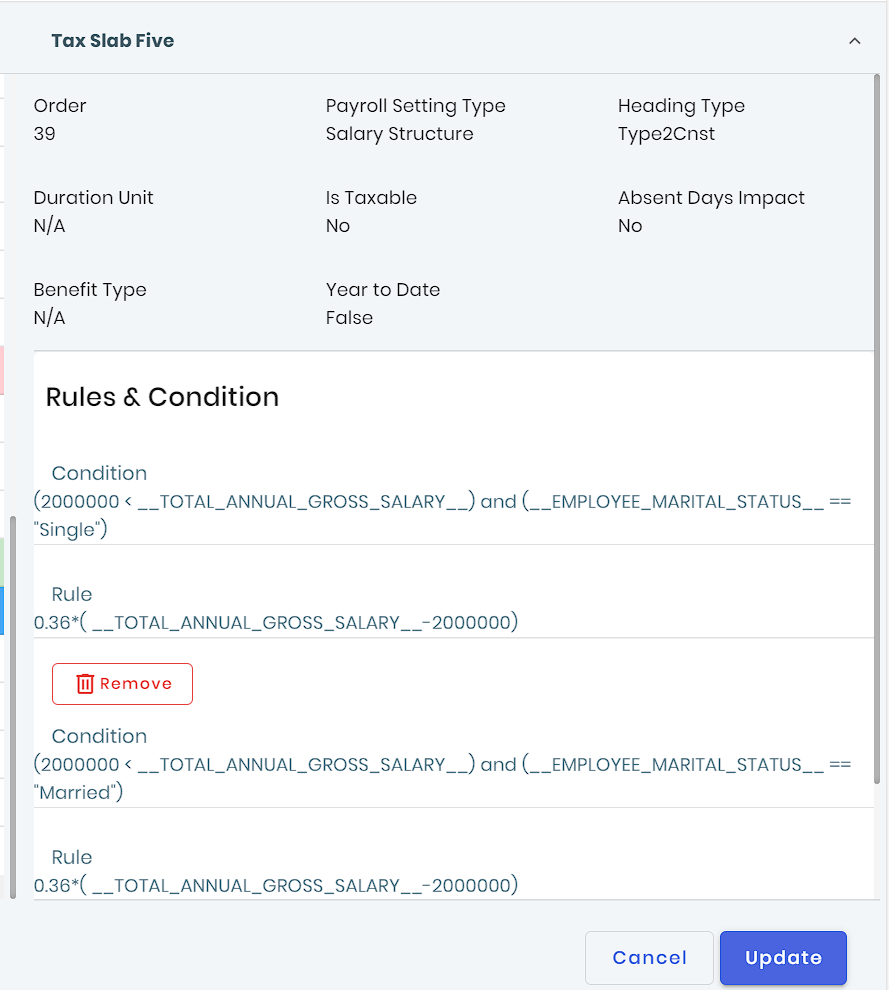
Condition 1:
(2000000 < __TOTAL_ANNUAL_GROSS_SALARY__) and (__EMPLOYEE_MARITAL_STATUS__ == "Single")Rule 1:
0.36*( __TOTAL_ANNUAL_GROSS_SALARY__-2000000)
Condition 2:
(2000000 < __TOTAL_ANNUAL_GROSS_SALARY__) and (__EMPLOYEE_MARITAL_STATUS__ == "Married")Rule 2:
0.36*( __TOTAL_ANNUAL_GROSS_SALARY__-2000000)
31. TAX
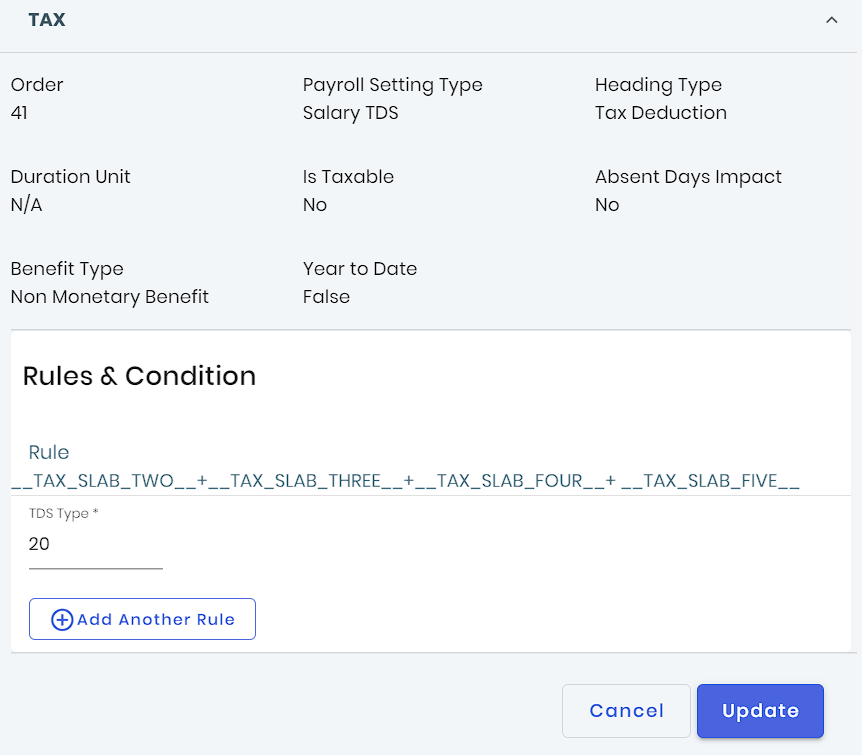
Rule:
__TAX_SLAB_TWO__+__TAX_SLAB_THREE__+__TAX_SLAB_FOUR__+ __TAX_SLAB_FIVE__TDS Type:
20
32. Tax Rebate
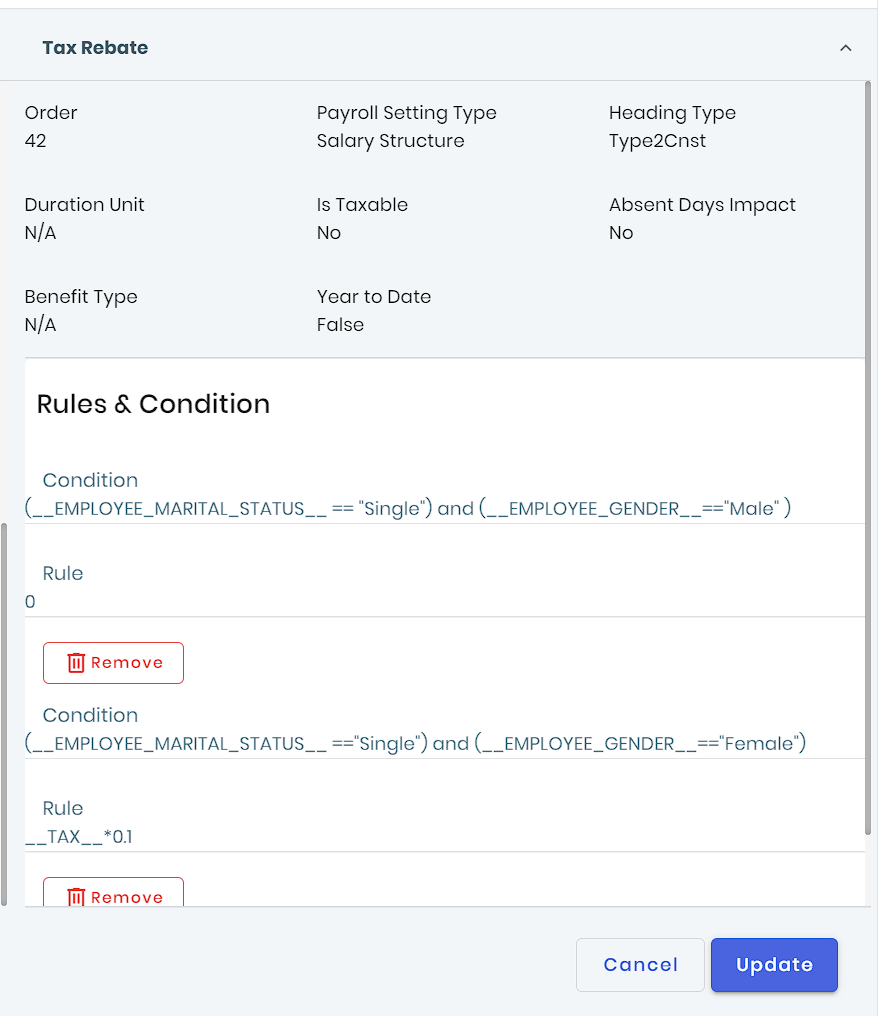
Condition 1:
(__EMPLOYEE_MARITAL_STATUS__ == "Single") and (__EMPLOYEE_GENDER__=="Male" )Rule 1:
0
Condition 2:
(__EMPLOYEE_MARITAL_STATUS__ =="Single") and (__EMPLOYEE_GENDER__=="Female")Rule 2:
__TAX__*0.1
33. Actual Tax
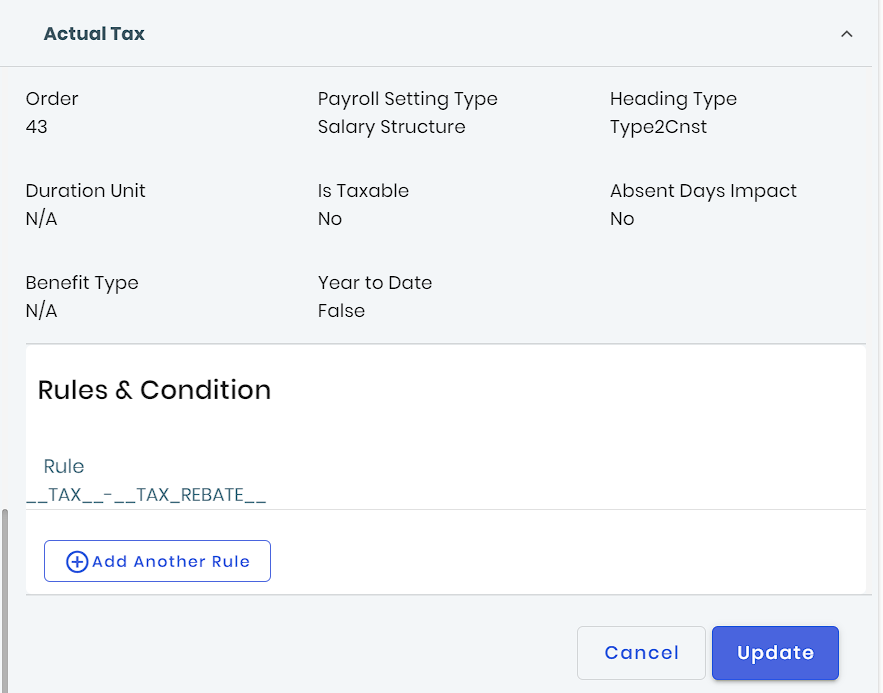
Rule:
__TAX__-__TAX_REBATE__
34. Cash In Hand

Rule:
__GROSS_SALARY__-__ACTUAL_TAX__-__CIT__-__SOCIAL_SECURITY_FUND_DEDUCTION__-__SOCIAL_SECURITY_FUND_DEDUCTION_TWO__
35. TDS Type
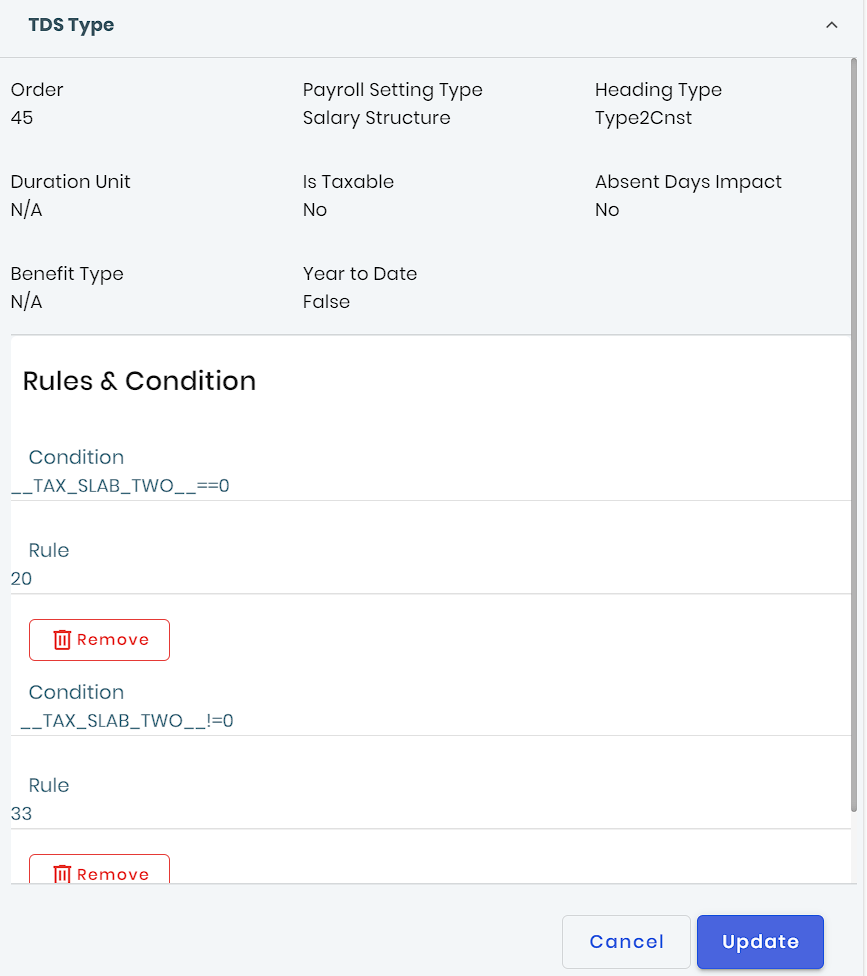
Condition 1:
__TAX_SLAB_TWO__==0Rule 1:
20
Condition 2:
__TAX_SLAB_TWO__!=0Rule 2:
33
36. Advance Salary Deduction

Rule:
0