# Normal User
# User Login
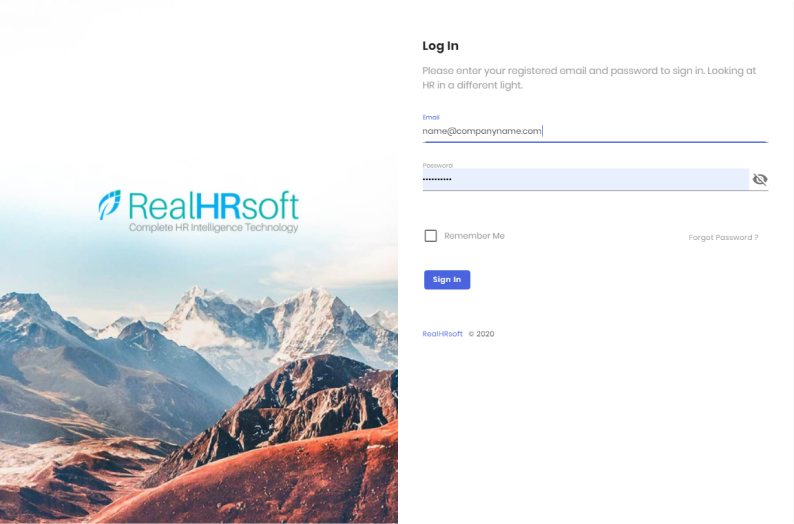
User Login :
- Enter the 'Email'
- Enter the 'Password'
- Check "Remember me" to remain signed in which you are idle. The platform is designed to log out when idle for a long time. This helps us keep the platform secure from unattended usage. Click on “Remember Me” to prevent automatic log out from the platform.
- Click on the 'Sign In' button.
# Forgot Password
Forget password :
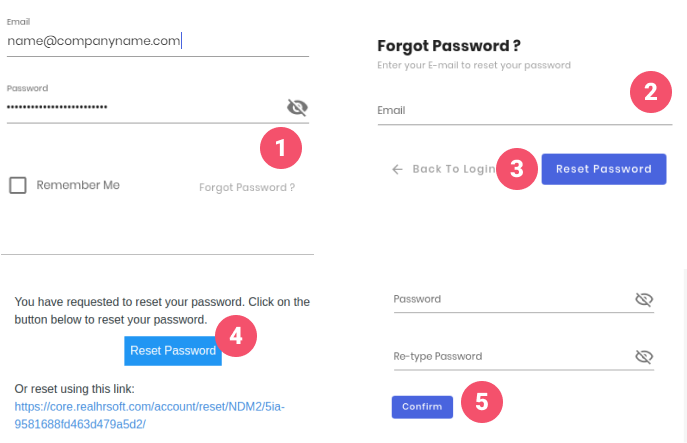
- Click on the 'Forgot Password?' button
- Enter the 'email address'**
- Click on the 'Reset Password' button
- Go to the inbox of your email, and open the email for 'Password Reset Link',there click on the 'Reset Password' button
- Fill 'Password' and 'Re-Type Password' then click on the 'Confirm' button
# Noticeboard
# How To Post On The Noticeboard
How To Post On The Noticeboard :
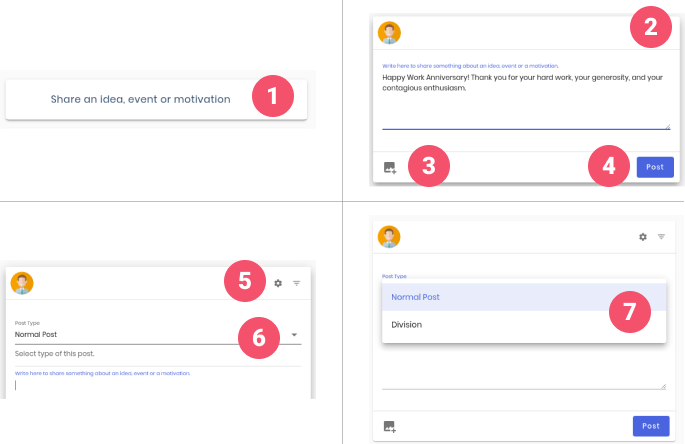
- Click on the 'Share an idea, event or motivation'
- Enter the text
- Click on the 'add image' icon if you want to include an image
- Click on the 'Post' button
- Click on the 'setting' icon to post a division notice
- Click on the dropdown menu
- Select the 'Division Notice'

- Click on the 'Clock' button to view your scheduled posts.
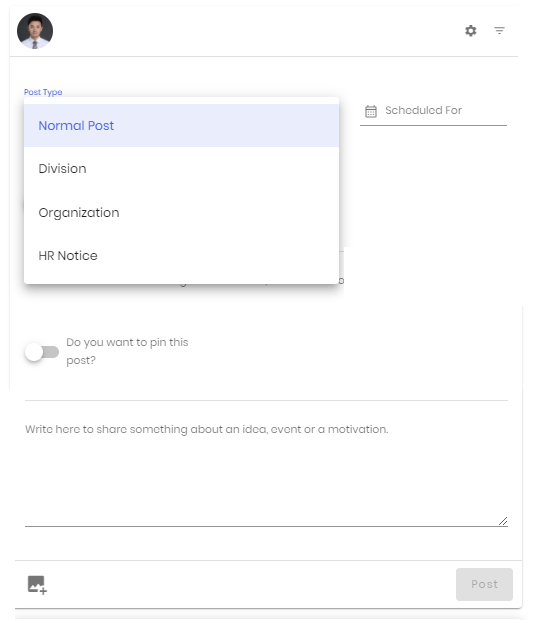
- You may create 4 different types of posts:
- Normal Post: These are ideas, motivation or other posts that you would like to share within your company.
- Division: These are ideas, motivation or other posts that you would like to share within your assigned division
- Organization: These are ideas, motivation or other posts that you would like to share within the organization.
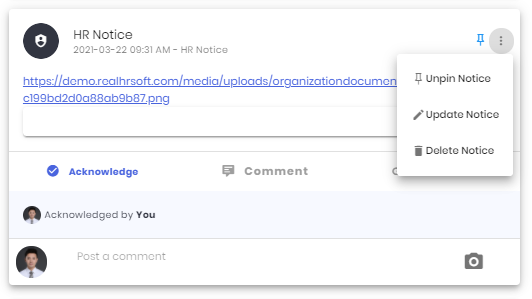
- HR Notice: These are posts created by the HR of the organization, these are different from other posts as the 'Like' interaction button is replaced by “Acknowledge” button. This can be used to collect acknowledgement from your workforce on any HR related topics.
- Use the “Schedule” button to schedule your post for a particular time and date.
- Enable “Pin Post” if you would like the post to be pinned (stay on top) of the noticeboard.
- The posts created by the users have the options to:
- Unpin Notice: Unpin the notice from the noticeboard. This will reset the position of the post based on it’s date of origin.
- Update Notice: This can be used to make changes to the earlier post.
- Delete Notice: Thi can be used to delete the posts made by the user. Please note, only the creator and the company HR has the ability to delete the posts and comments.
- Write or comment with a picture on any post.
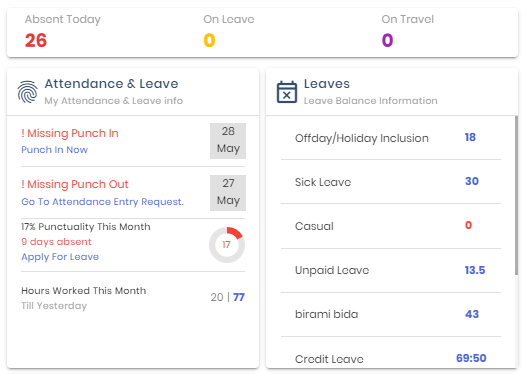
- The number below “Absent Today” represents the number of employees absent for the particular day. These are employees with missing log in information on the platform. Click on the number to view the list of absent employees.
- The number below “On Leave” represents the number of employees on leave for the particular day. Click on the number to view the list of employees on leave for the day.
- The number below “Travel” represents the number of employees travelling for the particular day. Click on the number to view the list of travelling employees.
- Displays the log in information for the day. You may also “Log In" by clicking on “Punch In Now” in case of missed log in (after shift starts).
- Displays the previous day’s log out information. You may apply for “Attendance Entry Adjustment” from here by clicking on “Go to Attendance Entry Request”
- Percentile attendance efficiency, this highlights the punctuality of the employee. You may apply for leave from here by clicking on “Apply for leave”
- Displays the number of hours worked this month. The number represents the Total Work hours & Expected work hours side by side
- Displays a summarized Leave Balance Information. You may also click on a number beside each of the leave balance categories to request for leave.
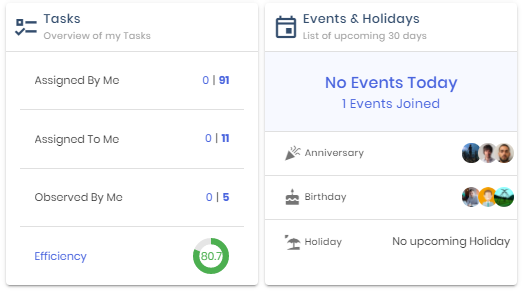
- Displays an overview of tasks. The number beside each of the fields indicates the number of today’s tasks and the total number of task. You may click on the number to land on the particular task page.
# View or change the profile details
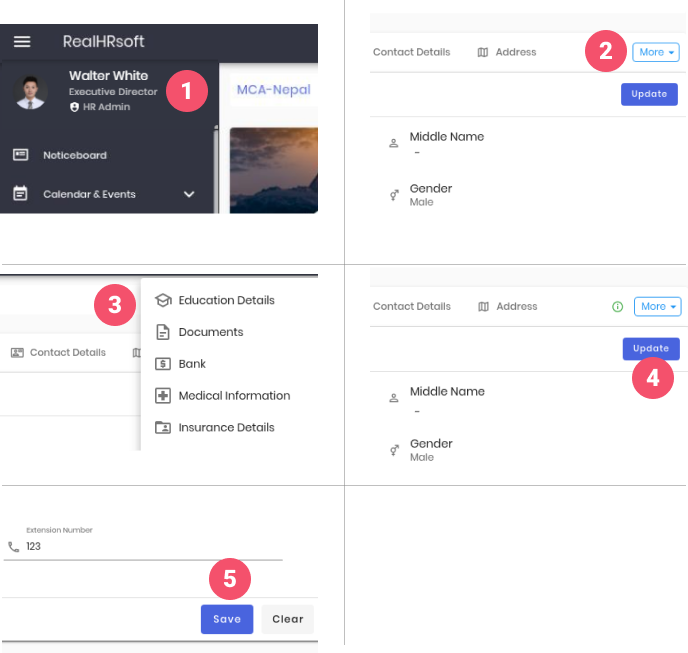
To view or change the profile details:
- Click on the ‘profile picture’
- Click on the 'More' button
- Click on one of the options you want to view/change
- Click on 'update/create new' button, update the profile details
- Click on 'save' button
# Calendar and Event
# Calendar
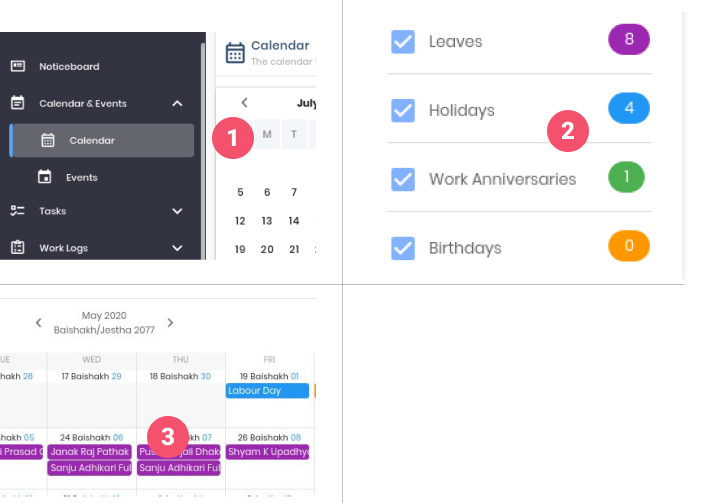
To View the calendar and events :
- Go to 'calendar & events' on the sidebar, Click on the Calendar
- Click on the name of the event to view the details of the event/holidays/birthdays/leaves etc.
- click on the checkbox to select the filters to display on the calendar
# Event
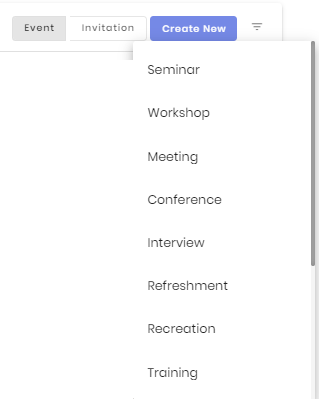
- List of different types of events that can be created in the platform.
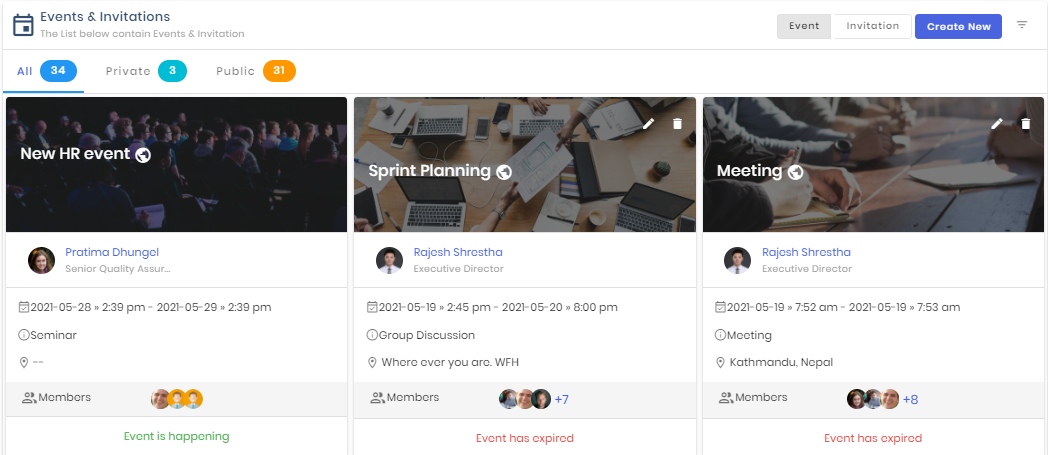
- List of events that have been created by the organization. Different list of Public & Private events can be seen. Public events are open to join throughout the organization and private events require an invite from the organizer.
- List of all events invitation. The list is further divided into Pending, Accepted, Maybe and Rejected invites.
- Displays the events and it’s details.
# Create an Event
How To Create an Event :
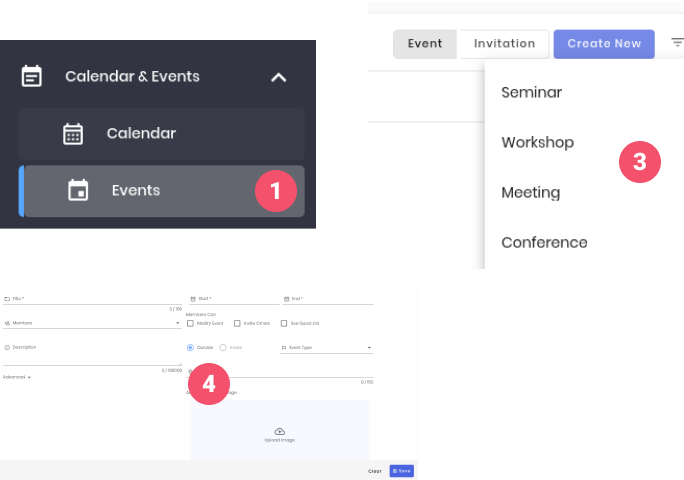
- Go to 'Calendar & Events' on the sidebar, click on the 'Events'
- Click on the 'Create New' button
- Select the ‘event type’ from the list
- Fill the form and click on the 'save' button
# Task
# Overview
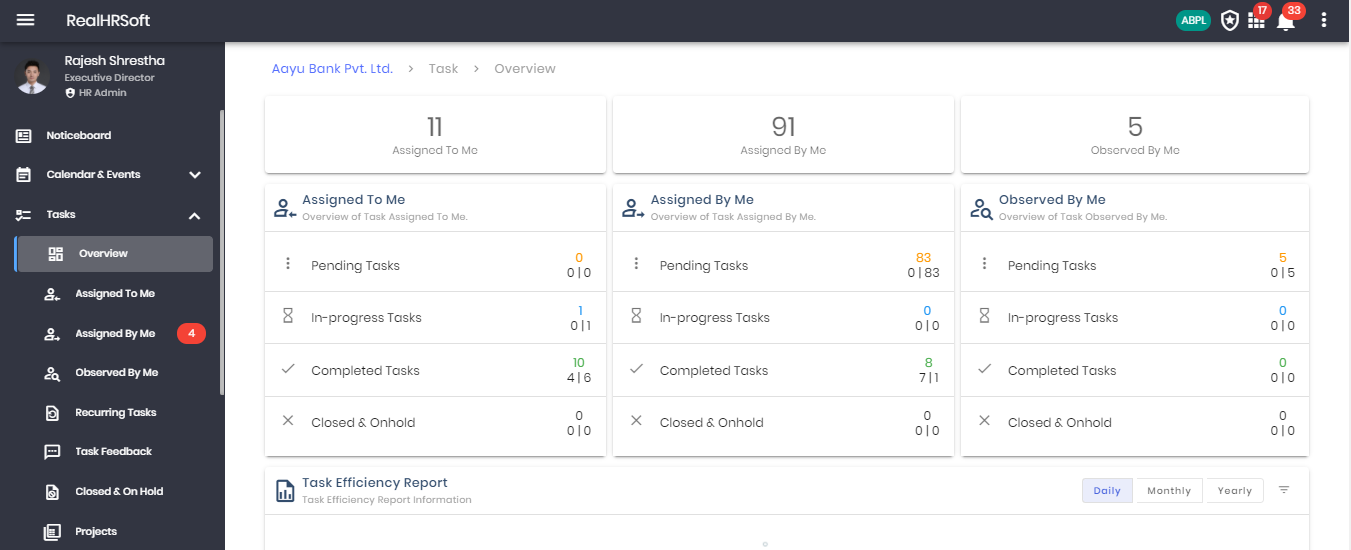
- Go to “Task” in the sidebar. Click on “Overview” for a summary of the task information related to the employee.
- The number above “Assigned to Me” displays the total number of tasks that have been assigned to the user
- The number above “Assigned by Me” displays the total number of tasks that have been assigned by the user.
- The number above “Observed by Me” displays the total number of tasks in which the user acts as an observer.
- Displays an overview of the task assigned to the user. The list is further divided into its current state i.e. Pending Task, Completed Task etc. The three following number indicate the total number of task in the current state and further division on its state i.e. on time or delayed. E.g. Total Pending Task, Pending Task On Time, Pending Task Delayed respectively.
- Displays an overview of the task assigned by the user. The list is further divided into its current state i.e. Pending Task, Completed Task etc. The three following number indicate the total number of task in the current state and further division on its state i.e. on time or delayed. E.g. Total Pending Task, Pending Task On Time, Pending Task Delayed respectively.
- Displays an overview of the task in which the user acts as an observer. The list is further divided into its current state i.e. Pending Task, Completed Task etc. The three following number indicate the total number of task in the current state and further division on its state i.e. on time or delayed. E.g. Total Pending Task, Pending Task On Time, Pending Task Delayed respectively.
- Displays the task efficiency report of the employee. This timeline of the report can be viewed for daily, monthly & yearly. It shows the Efficiency v/s Time bar chart.
# Assign To Me
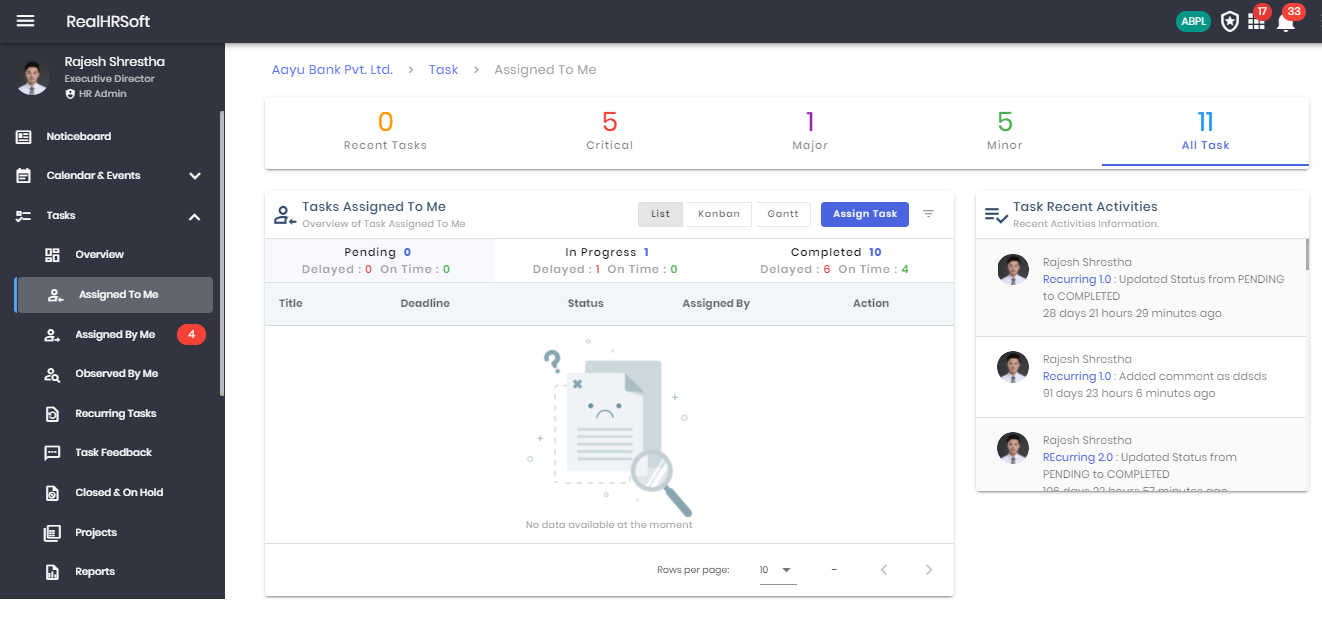
- Go to “Task” in the sidebar. Click on “Assigned to Me” for a summary of the task assigned to me.
- Click on the number above “Recent Task” for the most recent task assigned to me.
- Click on the number above “Critical” for the task marked as critical assigned to me.
- Click on the number above “Major” for the task marked as major assigned to me.
- Click on the number above “Minor” for the task marked as assigned to me
- Click on the number above “All Task” for the complete list of tasks assigned to me.
- Displays the overview of tasks assigned to me in multiple views i.e. List, Kanban or Gantt Chart. You may assign a new by clicking on the “Assign Task” button.
- Displays the task in its current state and further divided into the task against its deadline i.e Delayed or On Time.
- Displays all the recent activities related to the task for the user.
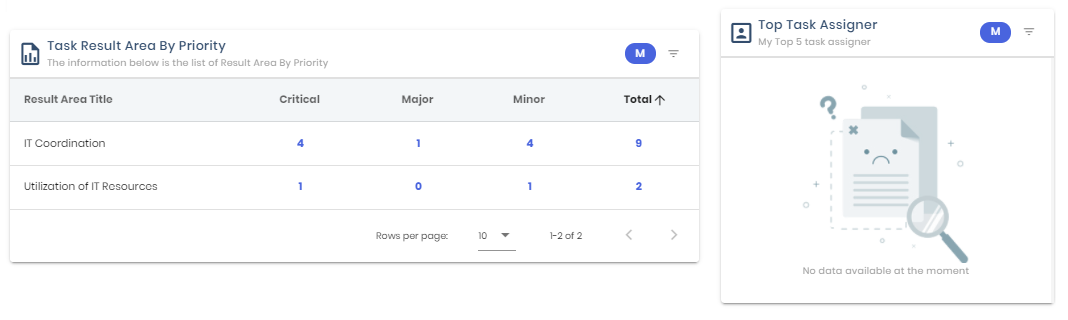
- Displays the top 5 task assigner leaderboard for the month. Click on the arrow button to sort on the basis of top task assigner or least task assigner.
- Displays list of Result Area By Priority for the month. You may also filter it by date.
# Assign By Me
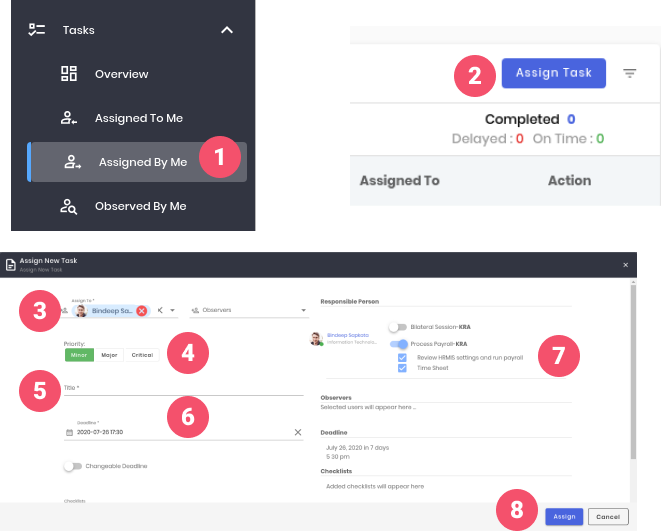
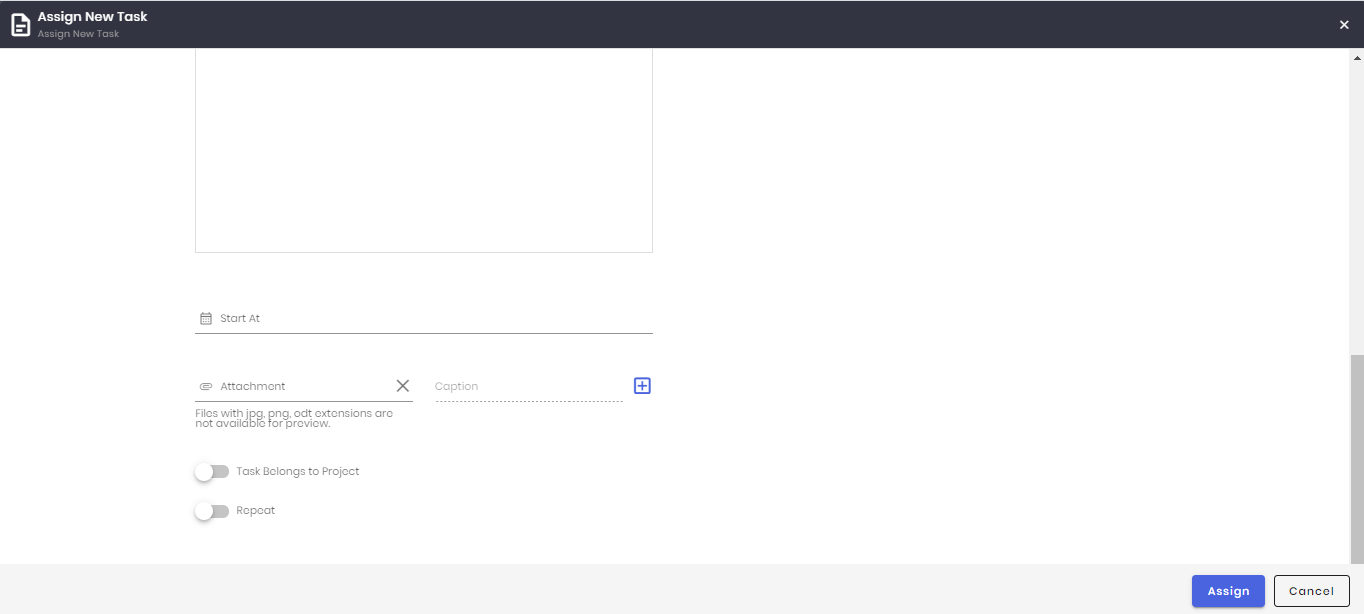
How to Assign Task:
- Go to 'Tasks' on the sidebar, click on the ‘Assigned By Me’
- Click ‘Assign Task’ button to open the form
- Select person to assign task
- Selct priority of the task
- Fill the task title
- Select deadline for the task, to provide detail of the task you can click on advance
- Select KRA
- Click on ‘Assign’ button to assign task.
# Observed By Me
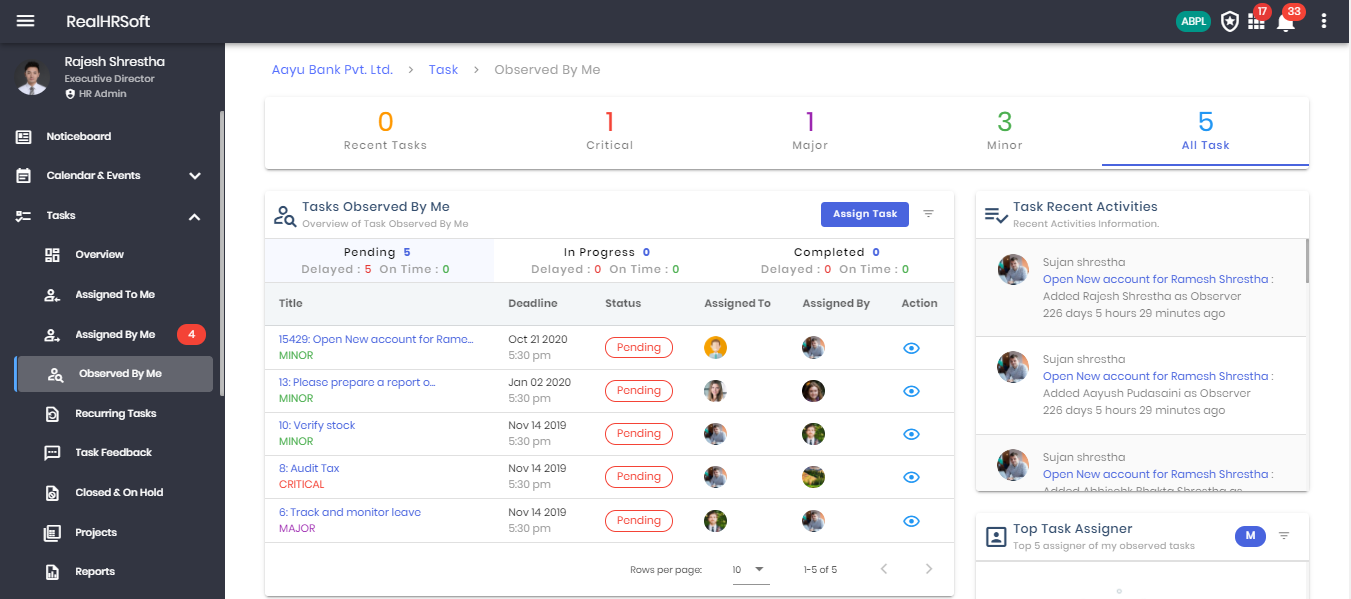
- Go to “Task” in the sidebar. Click on “Observed By Me” for a summary of the task observed by the employee.
- Click on the number above “Recent Task” for the most recent task observed by the employee.
- Click on the number above “Critical” for the task marked as critical observed by the employee.
- Click on the number above “Major” for the task marked as major observed by the employee.
- Click on the number above “Minor” for the task marked as observed by the employee
- Click on the number above “All Task” for the complete list of tasks observed by the employee.
- Displays the overview of tasks observed by the employee. You may assign a new by clicking on the “Assign Task” button. You may also search for a task based on it’s name, assign date, completed date, assigned to or assigned by using the search button beside the “Assign Task” button.
- Displays the task in its current state and further divided into the task against its deadline i.e Delayed or On Time.
- Displays all the recent activities related to the task for the user.
- Displays the top 5 task assigner leaderboard for the month. Click on the arrow button to sort on the basis of top task assigner or least task assigner.
# Recurring Tasks
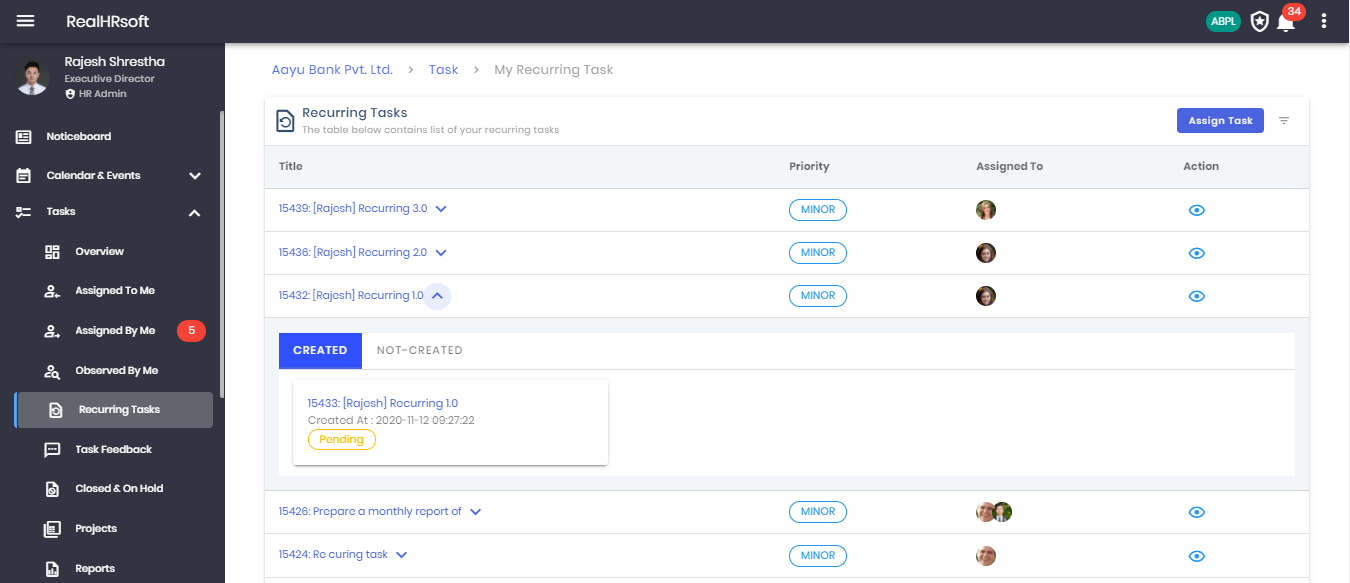
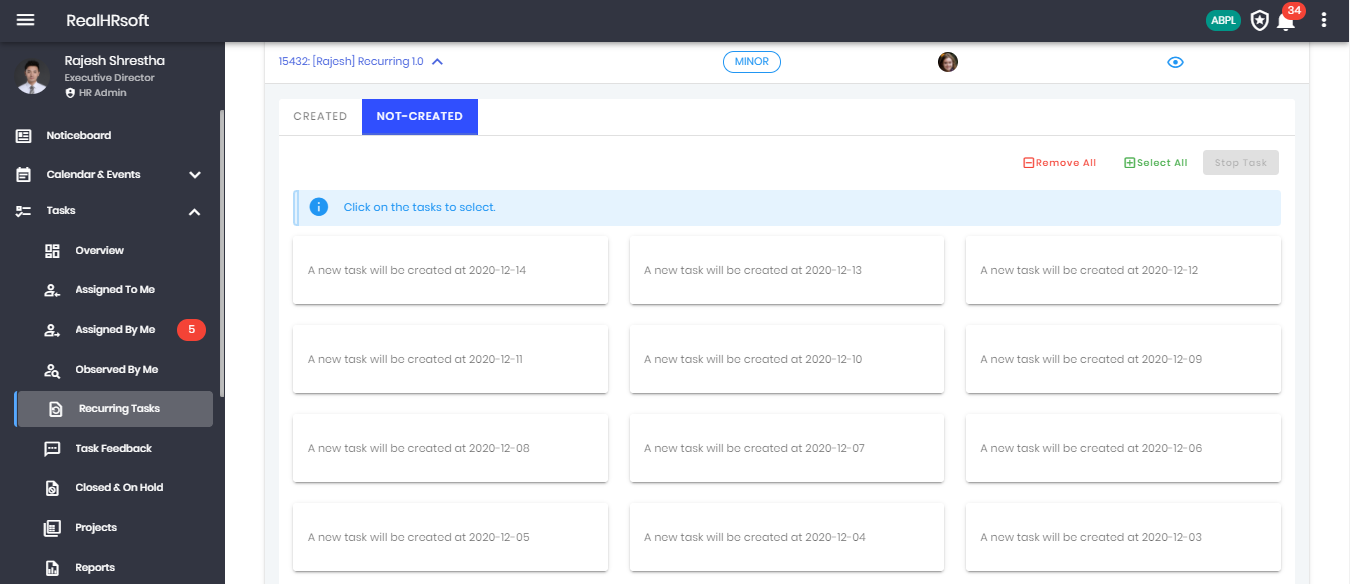
- Go to “Task” in the sidebar. Click on “Recurring Task” for a table that contains a list of recurring tasks. Recurring tasks can be used to assign, or observe a task that has to be repeated after a certain duration.
- Click on the arrow beside the task name to view the list of task that has been created and the list of task that are yet to be created. You may also view the date the task will be automatically created, assigned & observed as per the set value. You may also stop or delete them in case the task no longer needs to be created or stopped for the time.
- Click on the Task Name or the action button to view the details about the task.
- Recurring Tasks can be created by using the “Assign Task” button. Under the Advanced button you can enable the repeat task option.
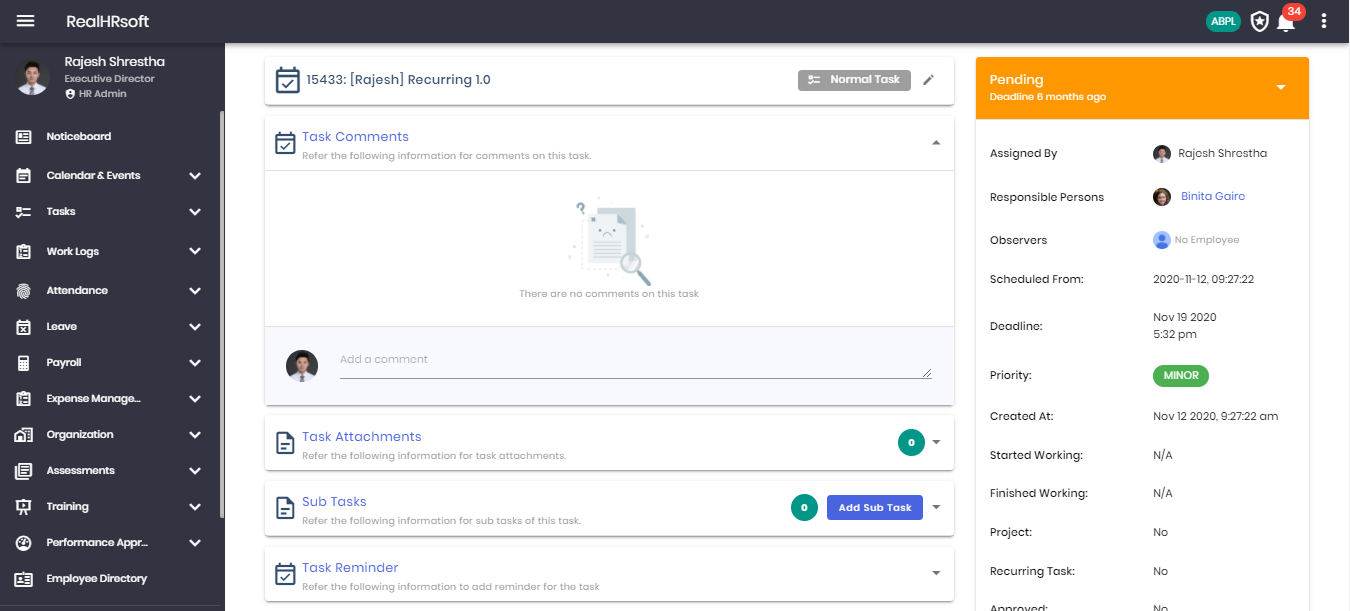
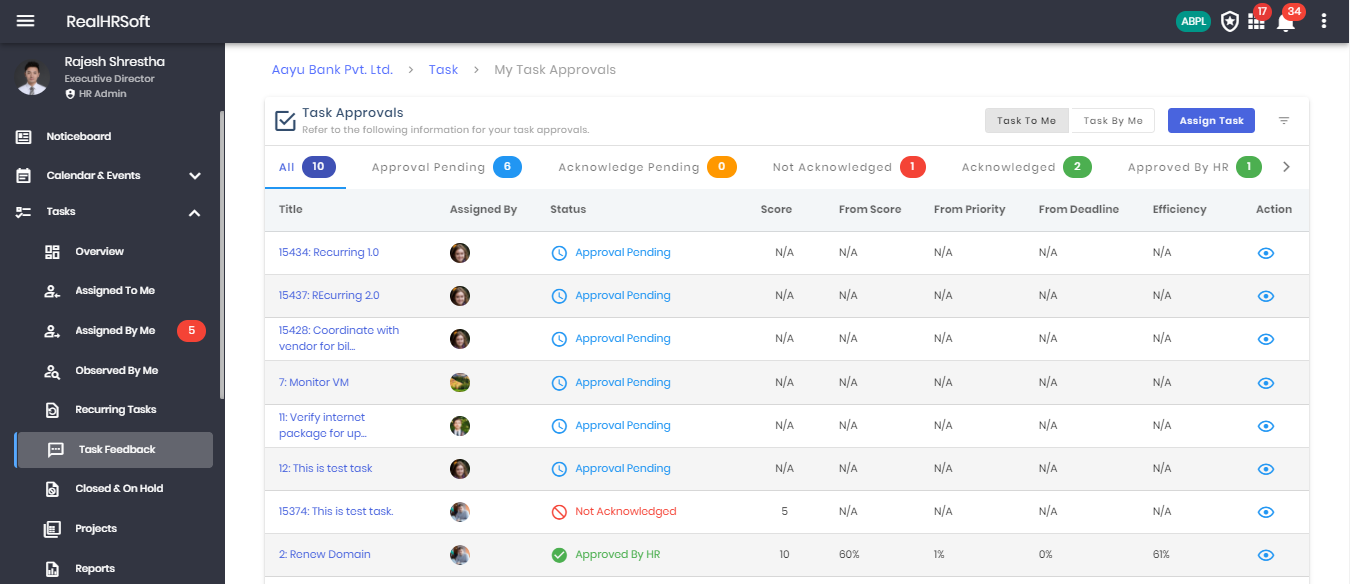
# Task Feedback

** After the completion of each task the task assigner has to provide a rating for the performance of the task. To ensure the rating matches the assignee’s work and expectation, the assignee has to acknowledge the score. The loop of rating and acknowledgement remains open for 3 rounds post which the HR has to approve the score. This helps us keep the feedback constructive and efficient.**
- Go to “Task” in the sidebar. Click on “Task Feedback” for a table that contains the information about task approvals that have been assigned to the employee. The list can be viewed for various stages ie. Approval Pending, Acknowledge Pending etc.
- Click on “Task by Me” to view the table that contains the information about task approvals that have been assigned by the employee. The list can be viewed for various stages ie. Acknowledged, Approved by HR etc.
- Click on “Assign Task” to create a new task and assign it to an employee.
# Closed & On Hold
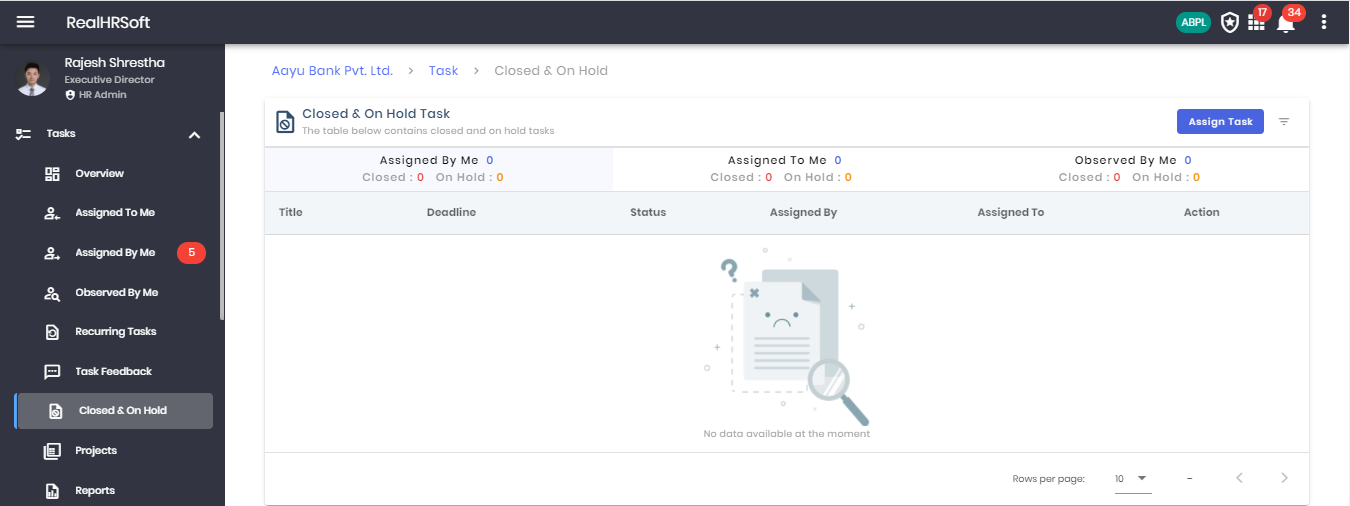
This feature comes handy when the task cannot be completed and has to be kept on hold or closed for the time being.
- Go to “Task” in the sidebar. Click on “Closed & On Hold” for a table that contains the closed & on hold task list.
- Click on “Assigned by Me” to view the list of tasks that have been assigned by the employee which have been moved to Closed & Hold, you may also view the number of task that are closed and on hold.
- Click on “Assigned to Me” to view the list of tasks that have been assigned to the employee which have been moved to Closed & Hold, you may also view the number of tasks that are closed and on hold.
- Click on “Observed by Me” to view the list of tasks that have been observed by the employee which have been moved to Closed & Hold, you may also view the number of tasks that are closed and on hold.
# Projects
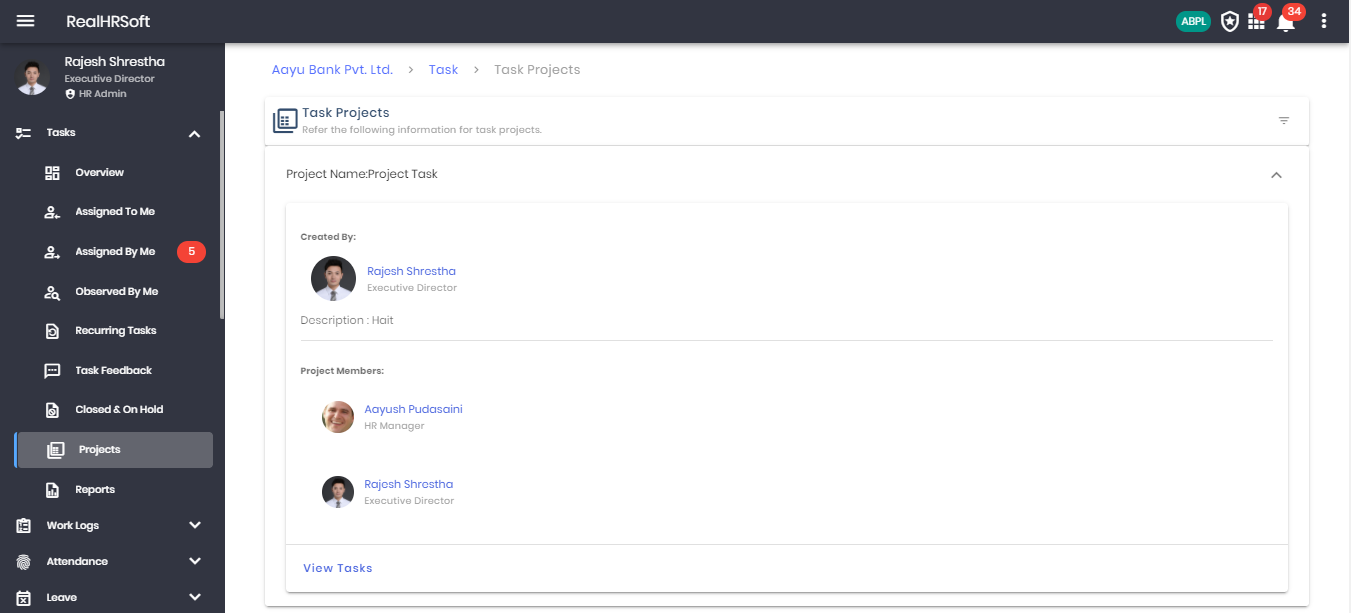
The companies that work on project basis, this feature allows you to group multiple tasks into a project.
- Go to “Task” in the sidebar. Click on “Project” for a list of projects.
- Click on individual project to view the details about the project along with all the associated tasks
# Reports
# Task Efficiency
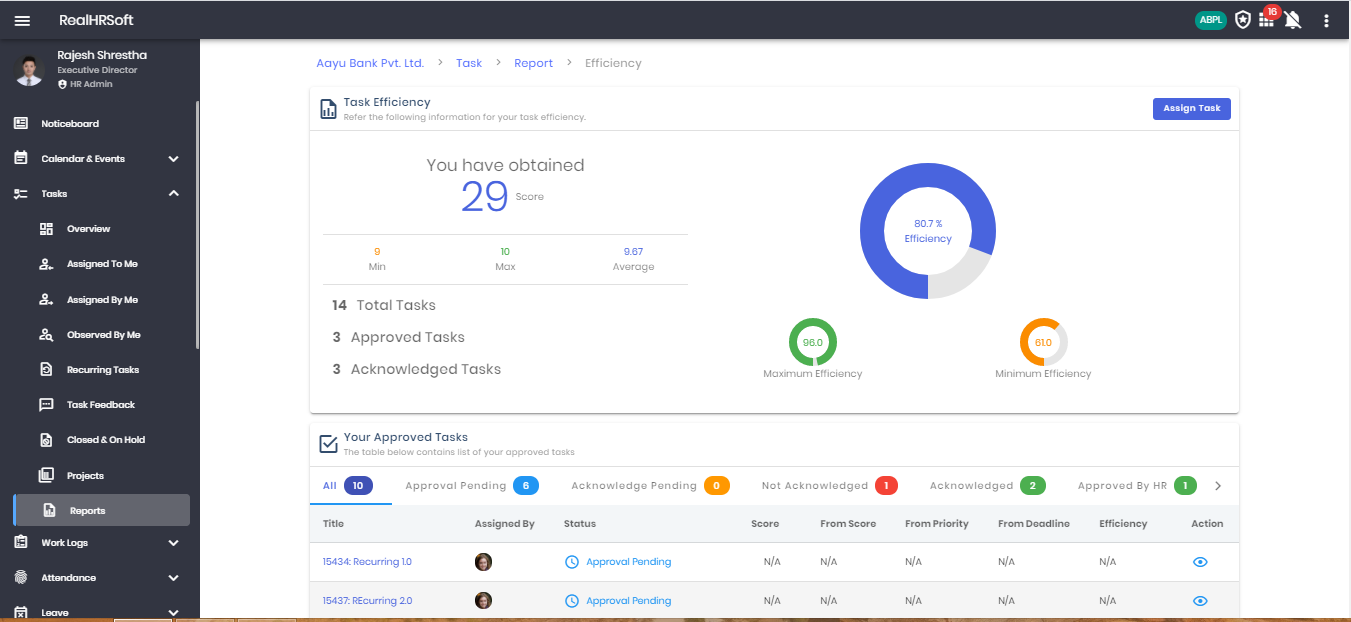
- The report gives the employees analysis of task efficiency. Additionally, it includes the list of all employees approved tasks along the various stages i.e. Approval Pending, Acknowledge Pending etc. The employees can also view details of each task using the action button.
- Employees can easily navigate and view their task efficiency report by going to the “Task” section in the sidebar and clicking on “Report” followed by “Task Efficiency”
# Worklog
# Leaderboard
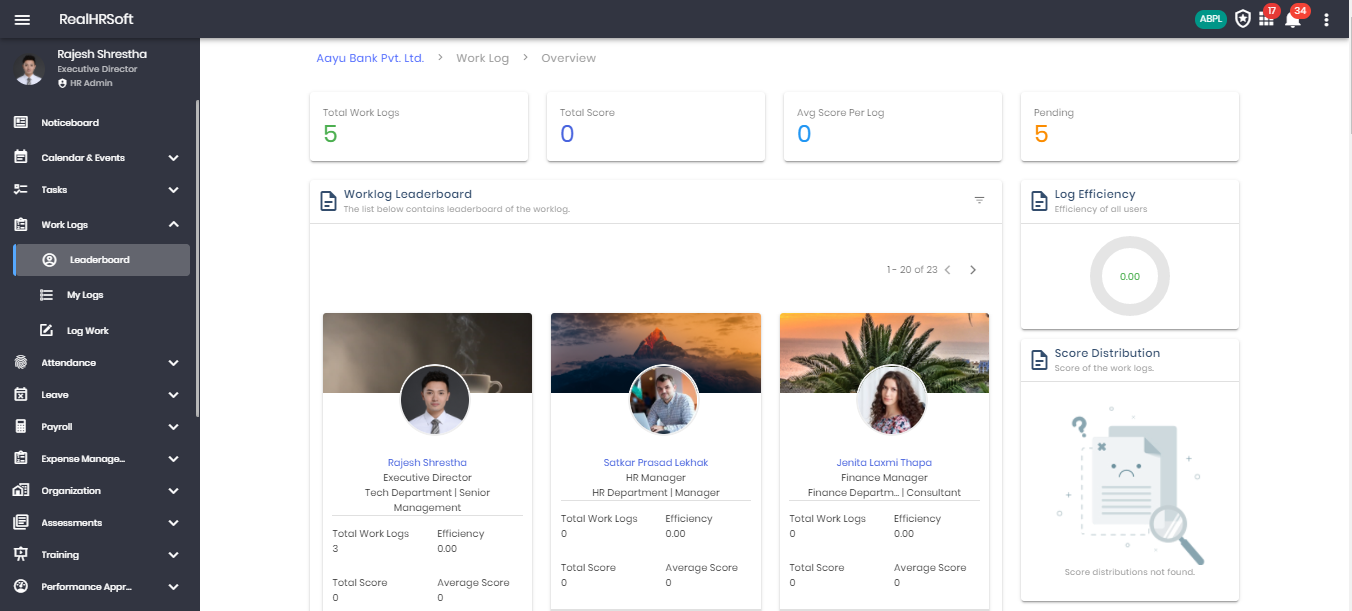
The Work Log feature is designed to help employee keep a note of the work done throughout the day. At the end, the employees may submit the same, which will be evaluated with a rating and comment by his supervisor. The rating of work log for each employee can be viewed within the organization however the supervisors comments are limited to his supervisor’s hierarchy. (Note: The work log feature cannot be accessed as an HR)
- Go to “Work Log” in the sidebar. Click on “Overview” to view the summary of Work Log within the organization.
- Displays the total number of Work Log that have been submitted by all the employees within the organization
- Displays the total score of Work Log within the organization
- Displays the average score of Work Log that have been submitted by all the employees within the organization
- Displays the total number of Work Log that are pending and yet to be evaluated by the supervisors.
- Displays the efficiency of Work Log for all the employees within the organization.
- Displays the score distribution of Work Log’s i.e. a timeline for work log scoring within the organization.
- Displays the leaderboard of the worklog i.e. basic information related to worklog for each of the employees.
# My Logs
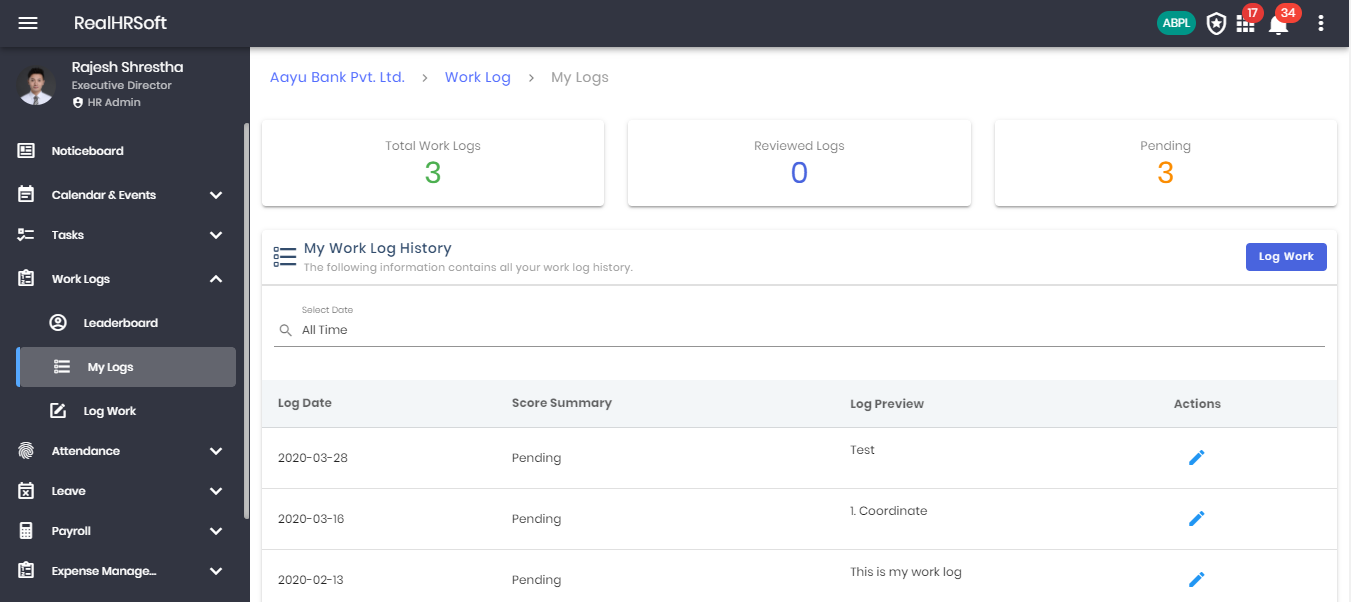
- Go to “Work Log” in the sidebar. Click on “My Logs” to view the summary of the Work Log for the employee.
- Displays the total number of Work Logs that have been submitted by the employee.
- Displays the total number of Work Logs that have been reviewed by his supervisor.
- Displays the total number of Work Logs that are yet to be reviewed by his supervisor.
- Displays the information related to all work log history submitted by the employee. You may search for a particular Work Log based on the date.
- Click on “Work Log” to create a new work log.
# Log Work
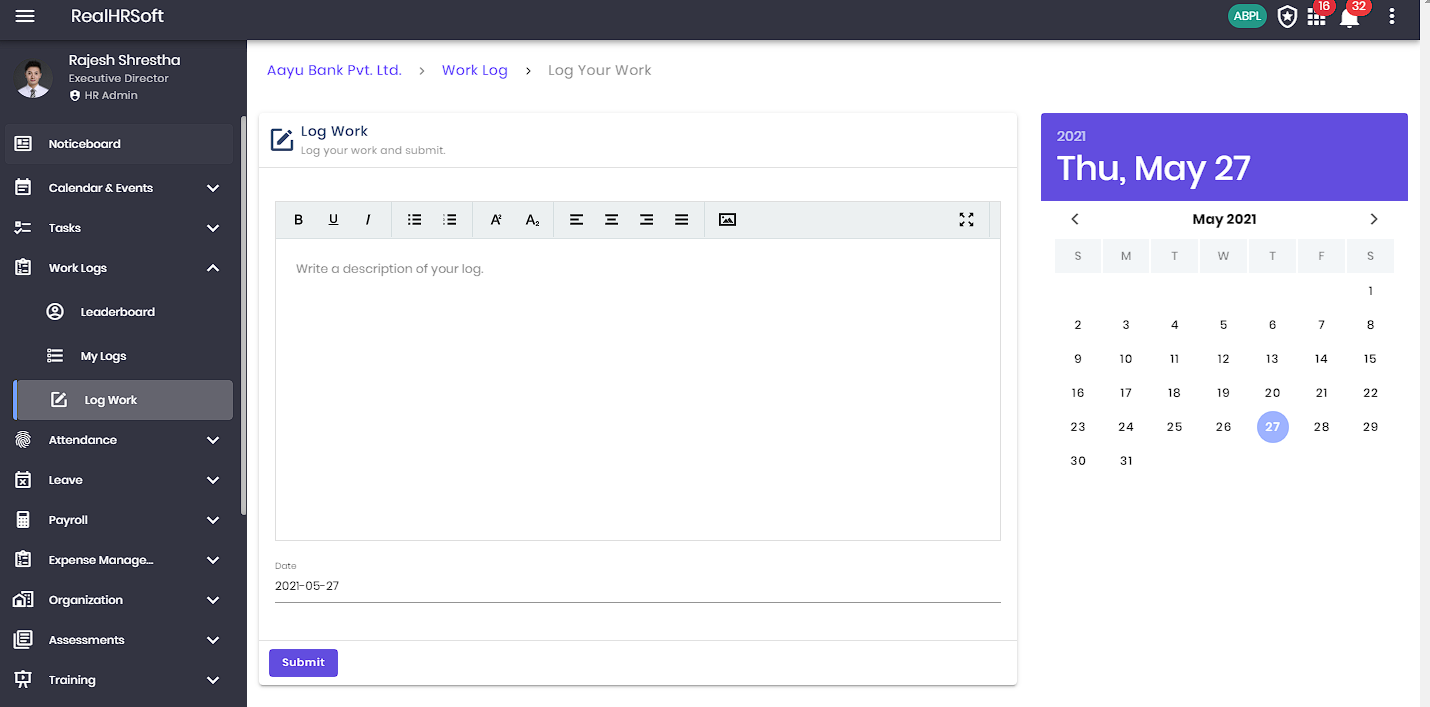
- Click on "Work Log" on left side of the Menu
- Click on "Log Work"
- Select the desired date to record your worklog
- Enter your worklog for desired date
- Click "Submit"
- Click On "My Logs" to view all your Worklogs
- Click On Leaderboard to view the score provided by supervisor
# Attendance
# Overview
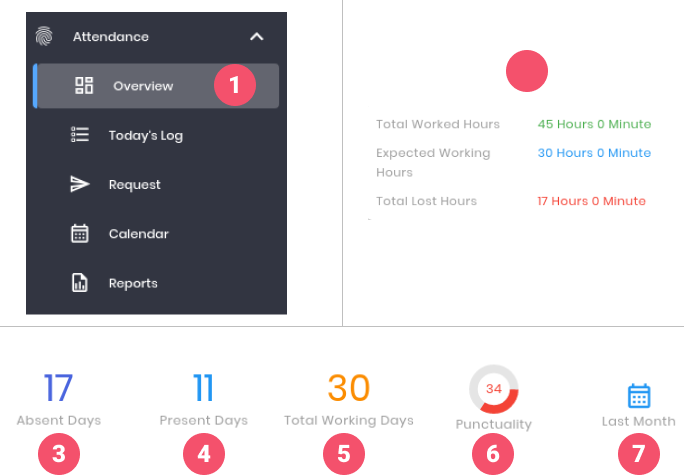
To view the Attendance details :
- Go to on the 'Attendance' on the sidebar, click on the 'Overview'
- Here, you can see the Total Worked Hours, Expected Working Hours and Total Lost Hours / Surplus Hours Details
- Here, you can see the Number of Absent Days
- Here, you can see the Number of Present Days
- Here, you can see the Number of Total Working Days
- Here, you can see the Punctuality
- Here, you can select the date filter

- Here, you can see the number of Attendance Adjustment which are 'Requested','Approved', 'Forwarded' and 'Denied'.
- Here, you can see your Attendance Behavior
- Here, you can see the Overtime Claim Request numbers which are in different status
- Here, you can see your Break In/Out Information
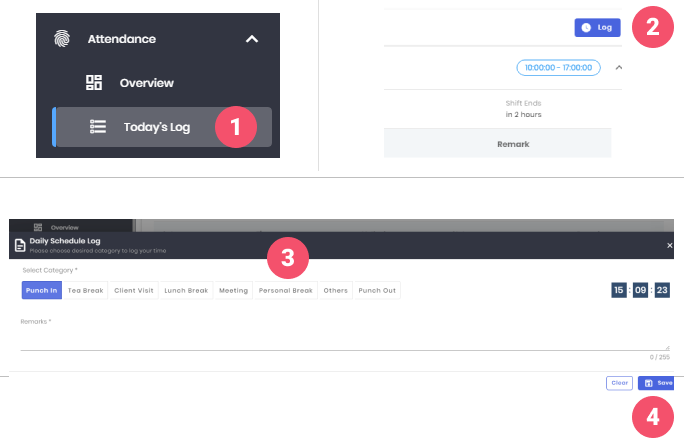
# Today's Log
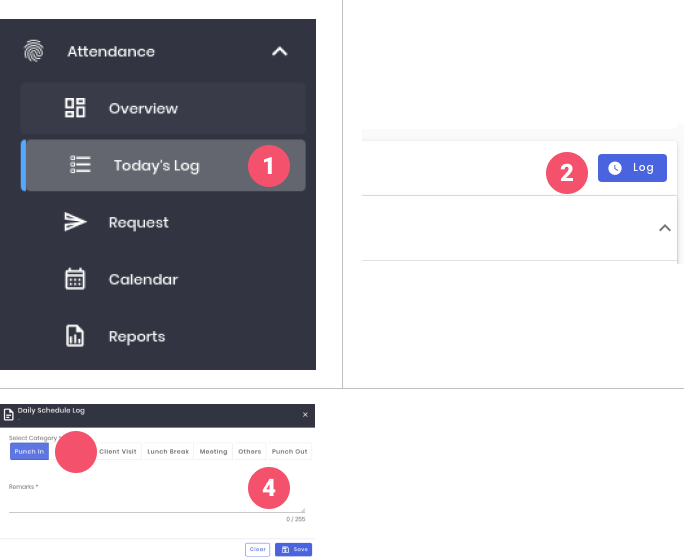
To Punch In/Punch Out or Break In/Out :
- Go to 'Attendance' on the sidebar, click on the 'Today's log'
- Click on the 'Log' button at the top right corner
- Select the option
- Enter the 'Remarks'
- Click on the 'Save' button
# Take Personal Breaks
For Personal Break-Out:
- To take the personal break, go to the Attendance >> Today’s Log page.
- Click on the ‘Log’ button on the top-right corner of the page to log the attendance entry.
- On the bottom sheet, select the category ‘Personal Break’ and enter the remarks.
- Click on the ‘Save’ button to save the personal break entry.
# Request
# Timesheet Request
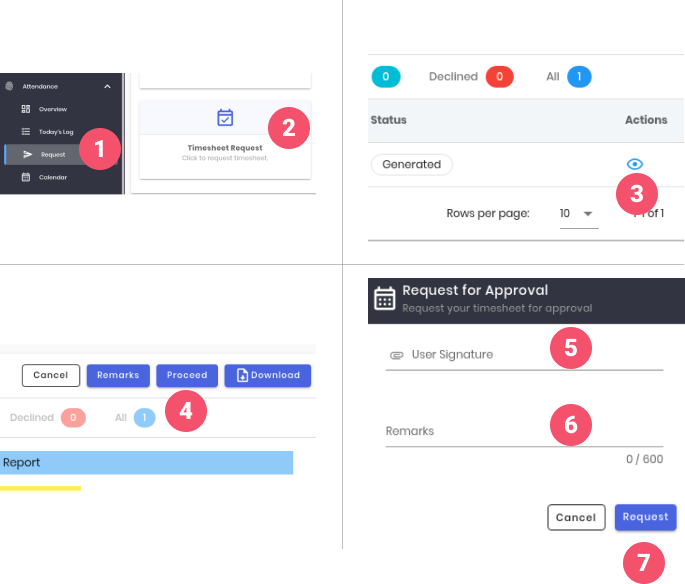
To Request for the Timesheet Approval Request :
- Go to 'Attendance' on the sidebar, click on the 'Request'
- Click on the 'Timesheet Request'
- Click on 'View Details' icon on Actions column
- Click on 'Proceed' button
- Select and upload the 'User Signature'
- Enter the 'Remarks'
- Click on the 'Request' button
# Credit Hour Request
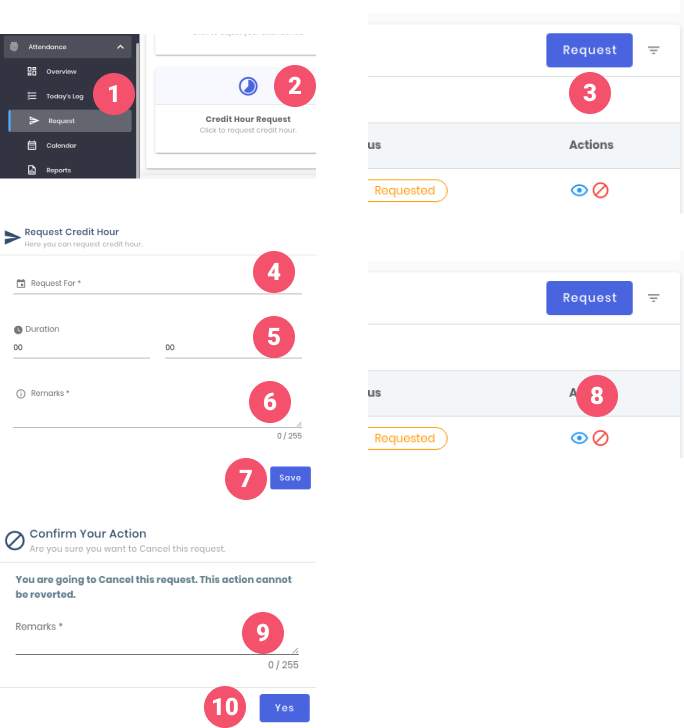
To Request for the Credit Hour :
- Go to 'Attendance' on the sidebar, click on the 'Request'
- Click on the 'Credit Hour Request'
- Click on the 'Request' button
- Select the ‘Date’
- Enter the ‘Duration’
- Enter the ‘Remarks’
- click on the 'Save' button
- To cancel the sent credit hour request, click on the 'Cancel' icon
- Enter the 'Remarks'
- Click on the 'Yes' button
# Travel Attendance Request
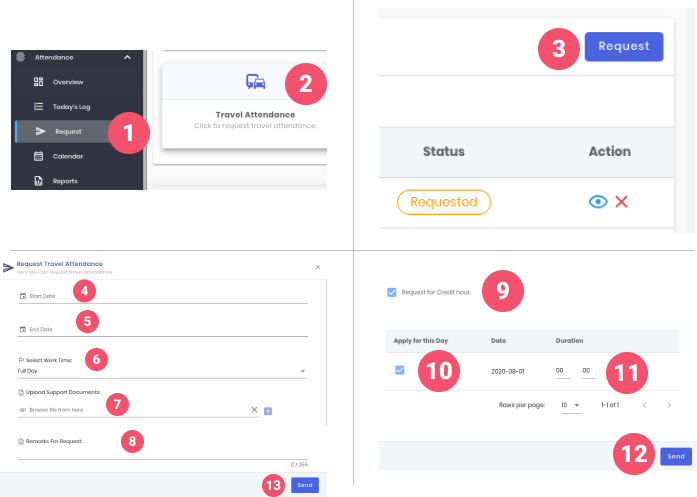
To Request for the Travel Attendance :
- Go to 'Attendance' on the sidebar, click on the 'Request'
- Click on the 'Travel Attendance'
- Click on the 'Request' button
- Select ‘Start date’
- Select ‘End Date’
- Select ‘Work Time’
- Upload the support document if any
- Enter the ‘Remarks’
- To request the credit hour for same day, click on the 'Request for Credit Hour' checkbox
- Click on the 'Apply for this Day'
- Enter the ‘Duration’
- Click on the 'Send' button
# Overtime Request
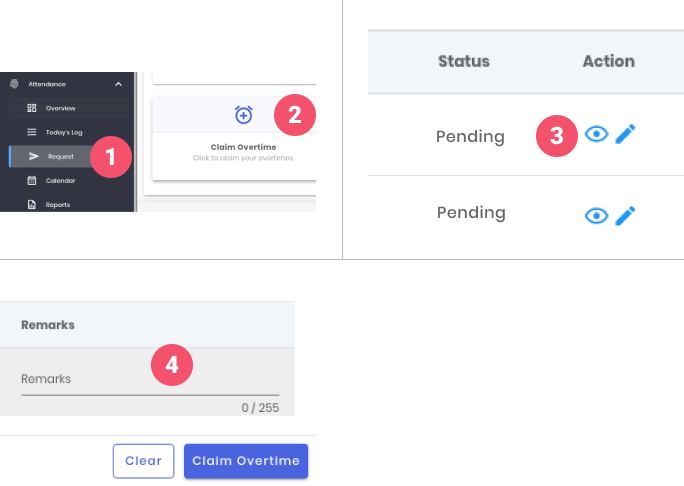
To Request for the Overtime Claims :
- Go to 'Attendance' on the sidebar, click on the 'Request'
- Click on the 'Claim Overtime'
- Click on ‘View details’ icon
- Enter the 'Remarks'
- click on the 'Claim Overtime' button
# Pre-Overtime Request
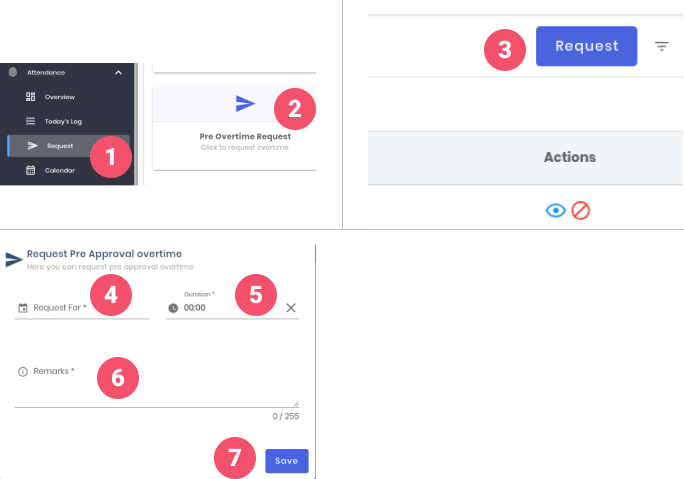
To Request for the Pre-Overtime :
- Go to 'Attendance' on the sidebar, click on the 'Request'
- Click on the 'Pre Overtime Request'
- Click on ‘Request’
- Select the ‘Request For’ Date
- Enter the ‘Duration’ for Pre-Overtime Request
- Enter the 'Remarks'
- Click on the 'Save' button
# Adjust Attendance Entries Request
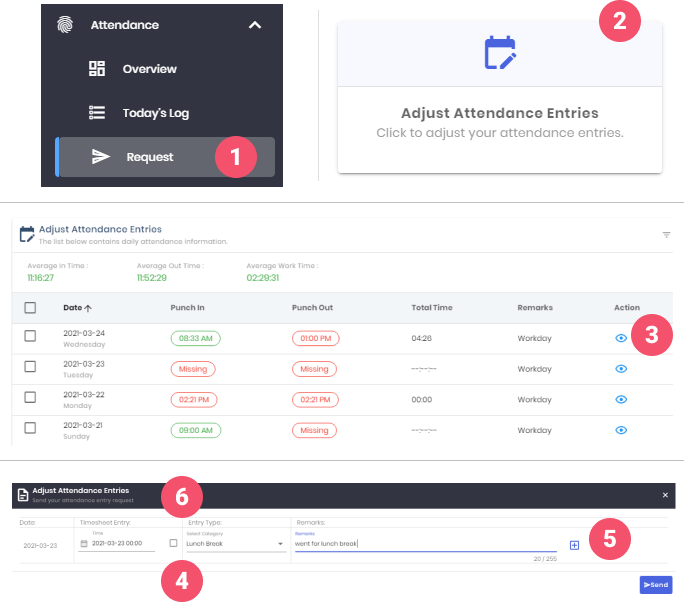
- To send the adjust attendance entry request, go to the Attendance >> Request page.
- Click on the ‘Adjust Attendance Entries’ tab.
- Click on the ‘Adjust Attendance Entry’ icon of the day (under action) which you want to adjust the attendance.
- Provide the time, select the category and enter the remarks then click on the ‘send’ button to send the adjust request.
- Click on the ‘+’ icon at the end of the remarks field to add other entries.
- If any employees have overnight shifts, then to change the date click on the checkbox besides the date field, and change the date.
# Calendar
# Attendance Adjustment

- To view and adjust the attendance go to the Attendance >> Calendar page.
- Click on the day on which you want to adjust the attendance
- Then click on the ‘Adjust Attendance’ button
- Provide the time, select the category and enter the remarks then click on the ‘send’ button to send the adjust request.
- Click on the ‘+’ icon at the end of the remarks field to add other entries.
- If any employees have overnight shifts, then to change the date click on the checkbox besides the date field, and change the date.
# Change the category of attendance entry

- To change the category of the attendance entry. [e.g. Change the category from ‘Lunch Break’ to ‘Personal Break’], go to the Attendance >> Calendar page.
- Click on the day on which you want to change the category of the attendance entry.
- Click on the ‘Edit’ icon of the entry you wish to change the category of the attendance entry.
- Select the desired category and enter the remarks,
- Then click the ‘Edit’ button to send the change request.
# Delete the attendance entry
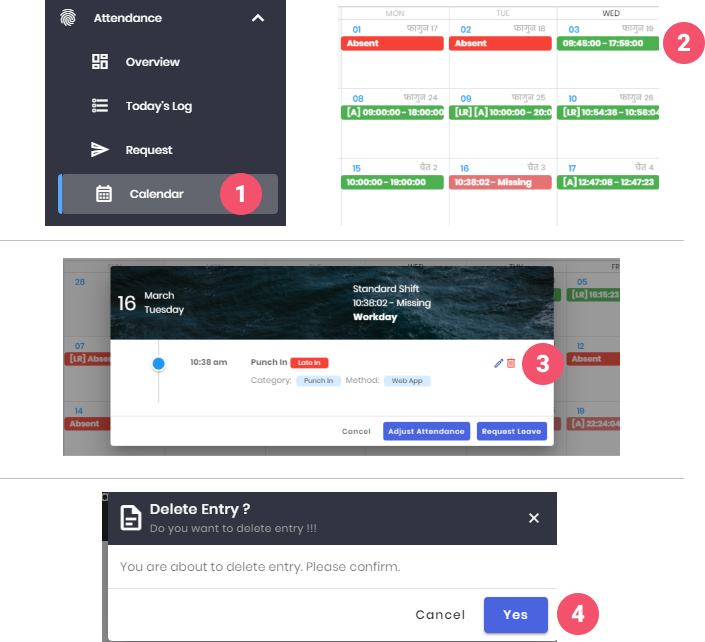
- To delete the attendance entry, go to the Attendance >> Calendar page.
- Click on the day on which you want to delete the attendance entry.
- Click on the ‘Delete’ icon of the entry you wish to delete the attendance entry.
- Click on the ‘Yes’ button of the confirmation box to confirm and send the delete request.
# Report
# Break In/Break Out
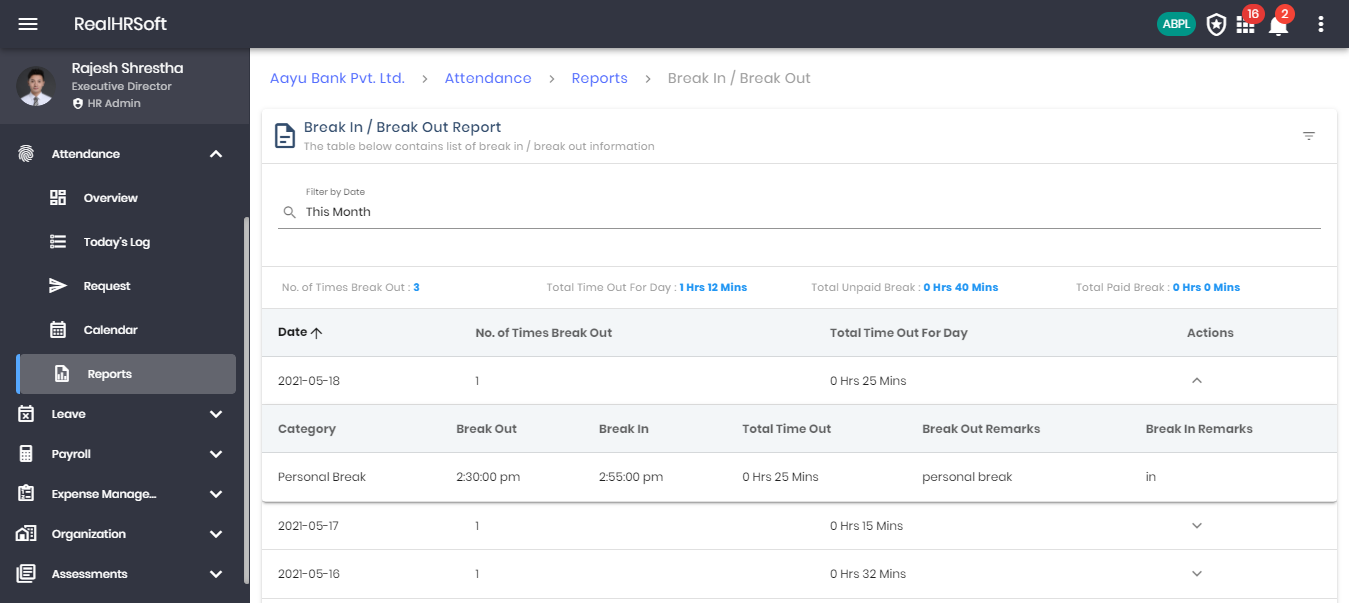
- The employees can view their Break In/Break Out attendance report from the platform. They may also filter it based on the date and view the details about the day too.
- Employees can easily navigate and view their Break In/Break Out report by going to the “Attendance” section in the sidebar and clicking on “Report” followed by “Break In/Break Out”
# Attendance Entry Report
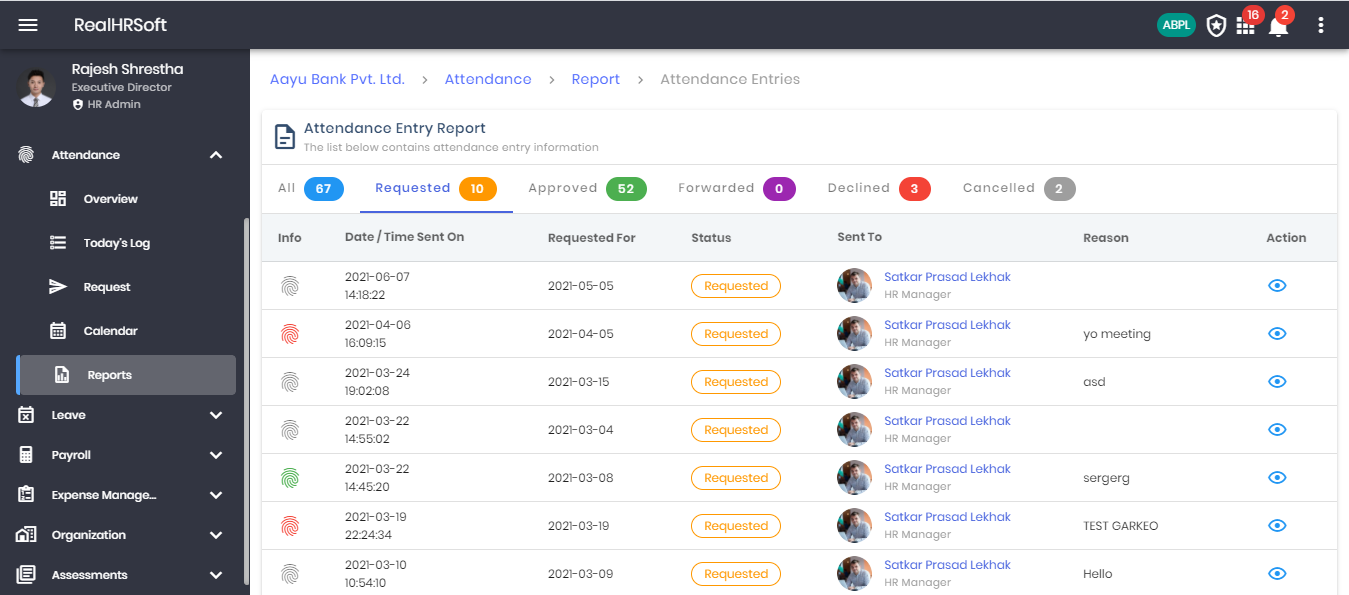
- The employees can view a report on their attendance entry requests along with their current status. They can also view the reason for their attendance entry by clicking on the action button.
- Employees can easily navigate and view their Attendance Entry report by going to the “Attendance” section in the sidebar and clicking on “Report” followed by “Attendance Entry Report”
# Overtime Claim History
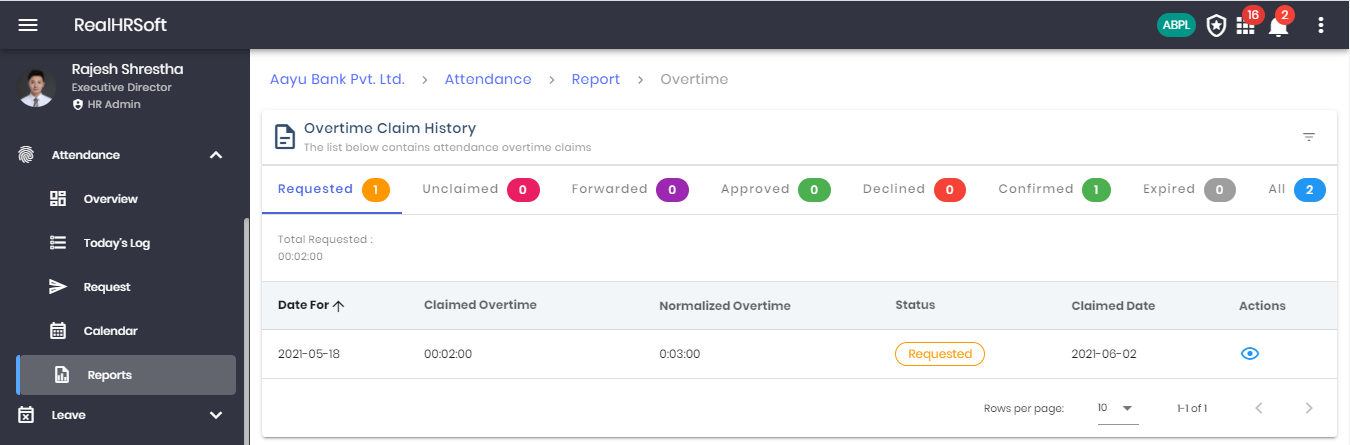
- The employees can view a report on their attendance overtime claim along with their current status. They can also view the detail of the attendance overtime by clicking on the action button.
- Employees can easily navigate and view their Overtime Claim History report by going to the “Attendance” section in the sidebar and clicking on “Report” followed by “Overtime Claim History”.
# Individual Daily Attendance
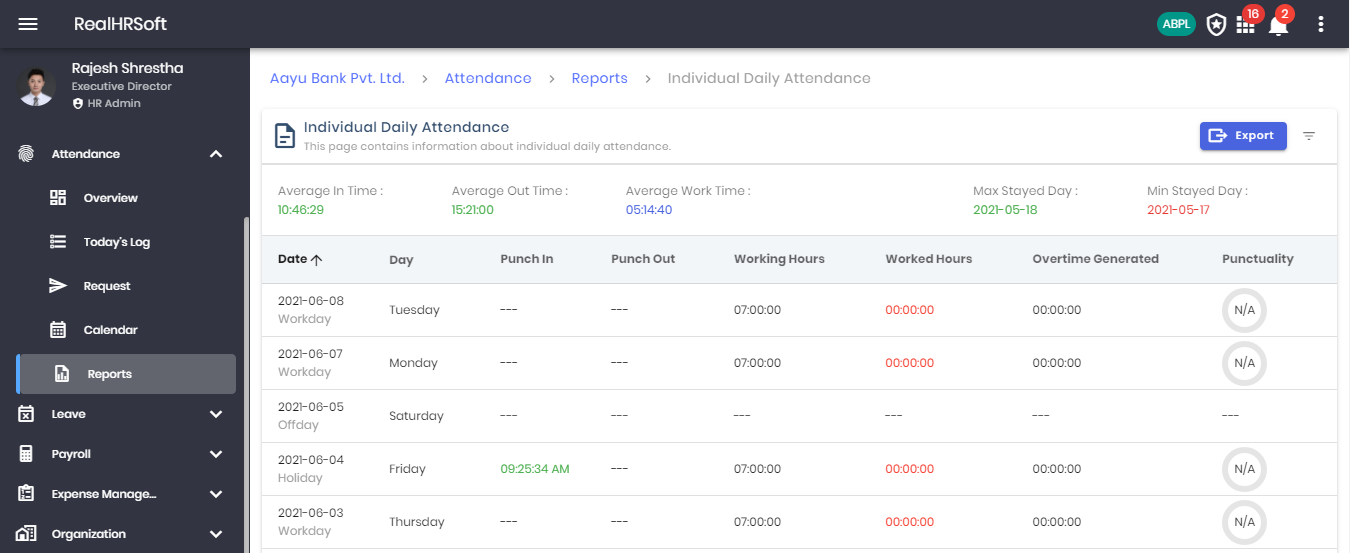
- Employees can view and export their daily attendance report from the platform. It gives you an overview of the individual employees average in-time, out time, work time along with the max stay day and min stay day too. Additionally, they can view their daily attendance information too.
- Employees can easily navigate and view their Individual Daily Attendance report by going to the “Attendance” section in the sidebar and clicking on “Report” followed by “Individual Daily Attendance”.
# Monthly Attendance
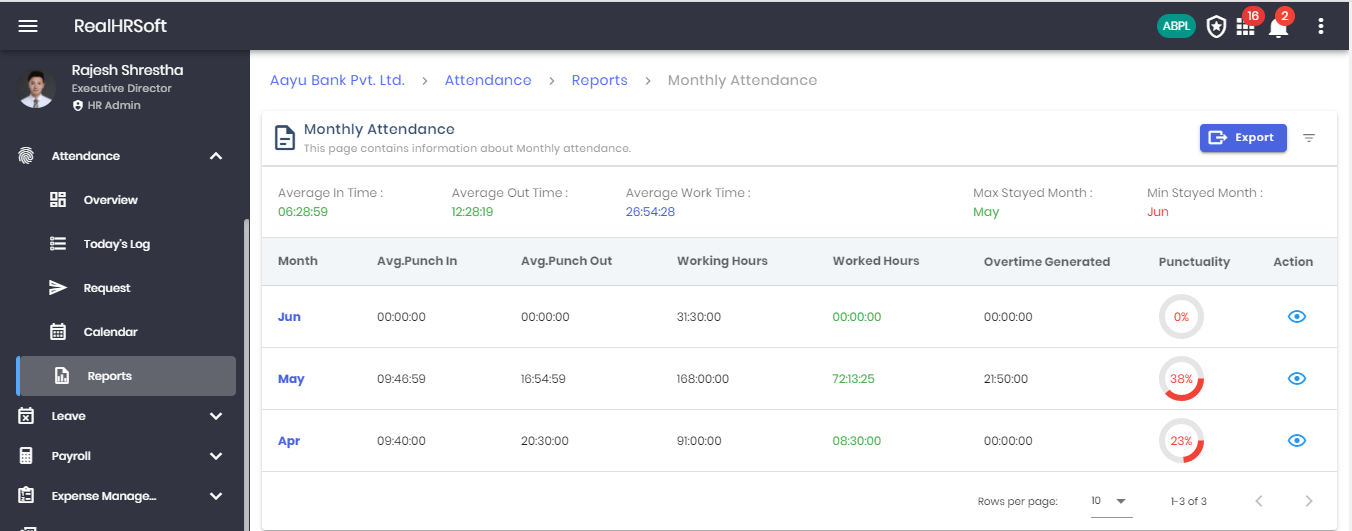
- Employees can view and export their monthly attendance report from the platform. It gives you an overview of the individual employees average in-time, out time, work time along with the max stay day and min stay day too for the entire month. Additionally, they can view their monthly attendance information too and clicking on the Action button will land on the daily attendance for the month.
- Employees can easily navigate and view their Monthly Attendance report by going to the “Attendance” section in the sidebar and clicking on “Report” followed by “Monthly Attendance”.
# Irregularities Report
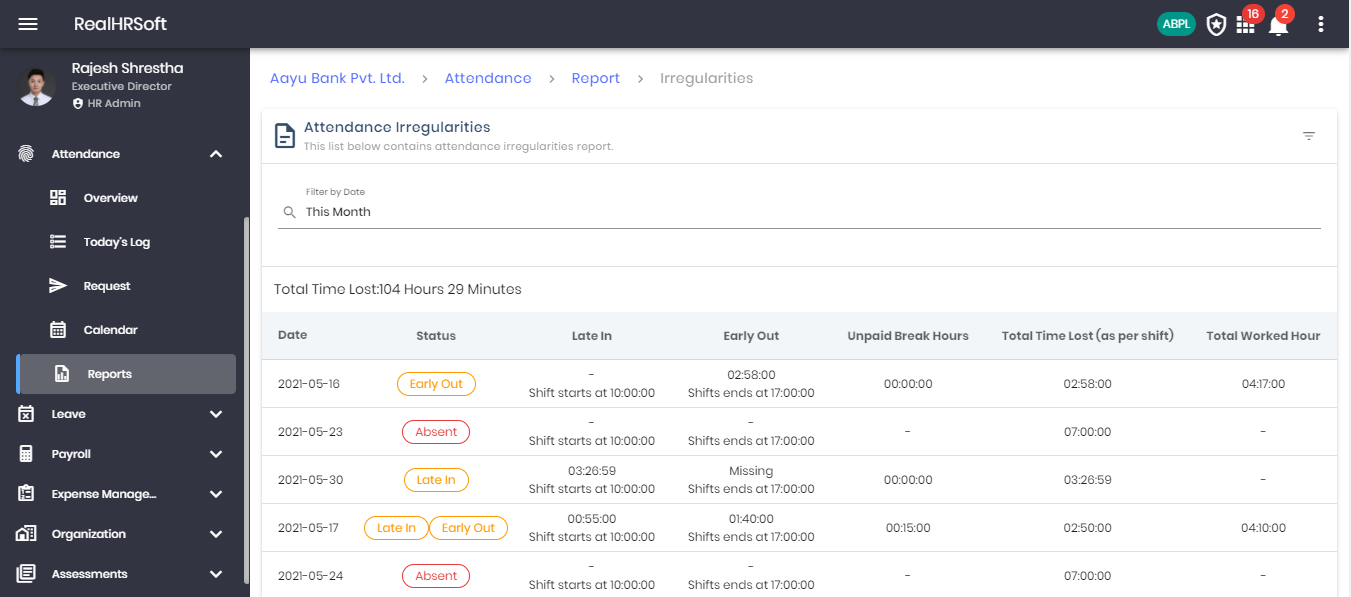
- Employees can view their attendance irregularities report from the platform. This shows the abnormalities in their attendance such as irregular punch in or punch out which may be caused due to human error or technological issue.
- Employees can easily navigate and view their Irregularities report by going to the “Attendance” section in the sidebar and clicking on “Report” followed by “Irregularities Report”.
# Travel Attendance Delete History
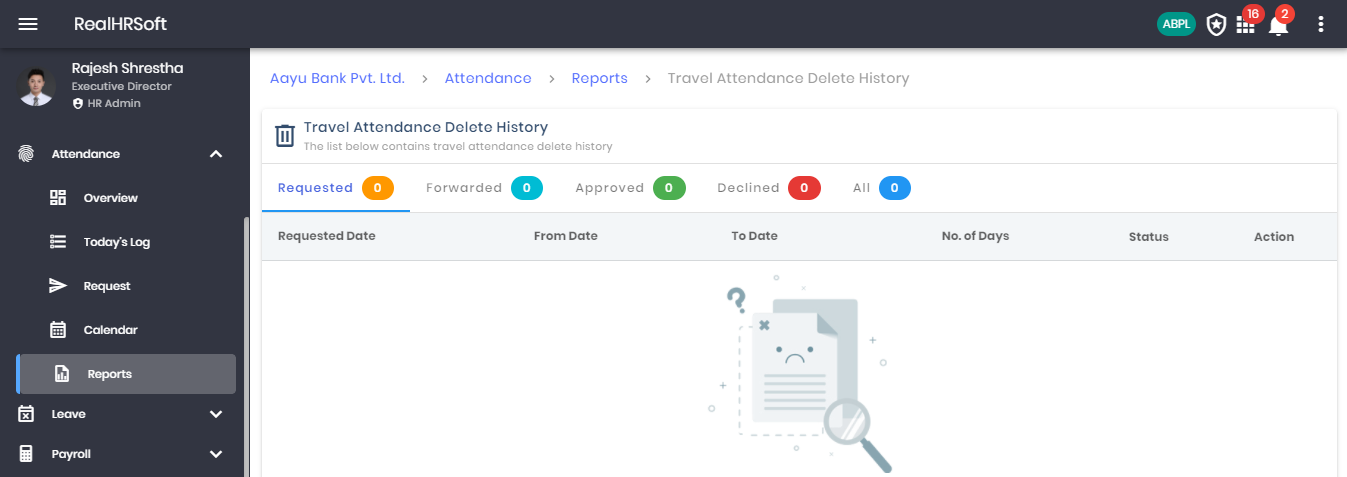
- Employees can view their list of Travel Attendance that have later been deleted using the platform. They can also view the current status of their delete request too.
- Employees can easily navigate and view their Travel Attendance Delete History report by going to the “Attendance” section in the sidebar and clicking on “Report” followed by “Travel Attendance Delete History”.
# Credit Hour Delete History
--
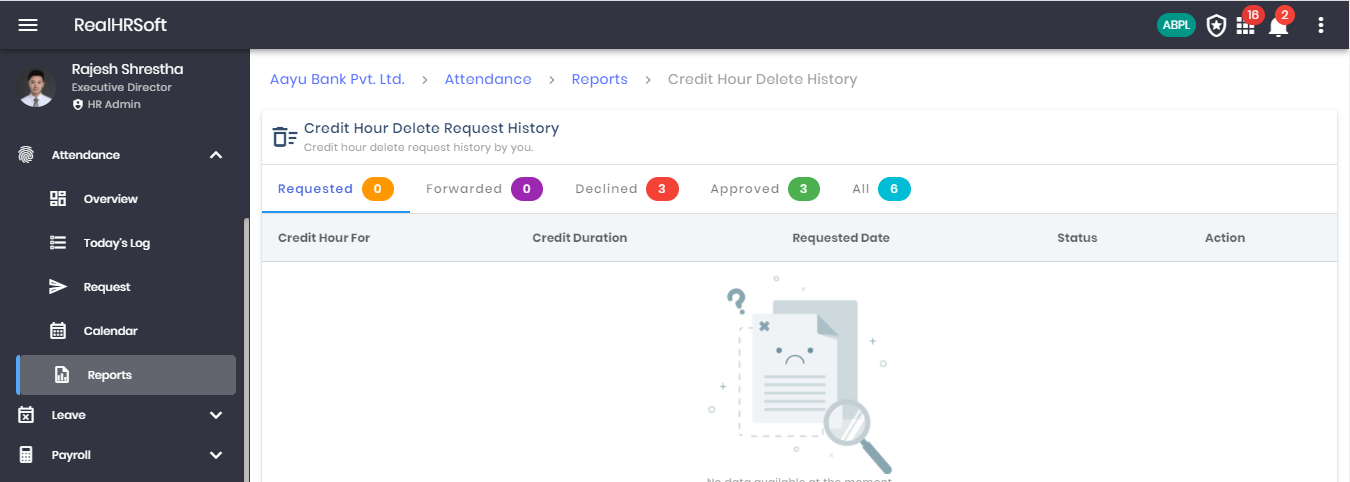
- Employees can view their list of Credit Hours that have later been deleted using the platform. They can also view the current status of their Credit Hour delete request too.
- Employees can easily navigate and view their Credit Hour Delete History report by going to the “Attendance” section in the sidebar and clicking on “Report” followed by “Credit Hour Delete History”.
# Attendance Penalty
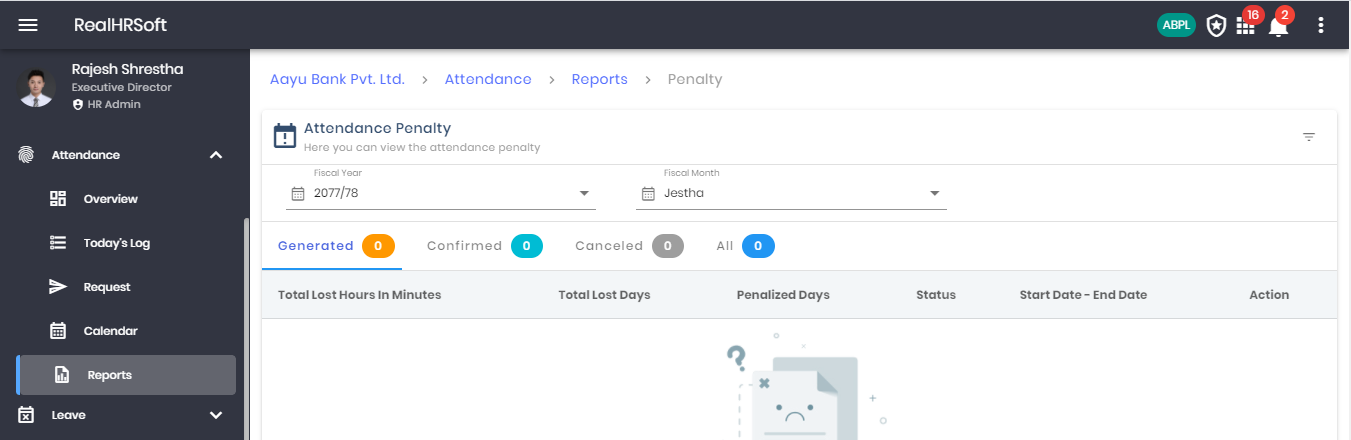
- The employees can view their attendance penalty from the platform. In case the organization has rules to penalize irregular employee attendance, an accumulated list of all such incidents can be viewed along with their current stage.
- Employees can easily navigate and view their Attendance Penalty report by going to the “Attendance” section in the sidebar and clicking on “Report” followed by “Attendance Penalty”.
# Web Attendance
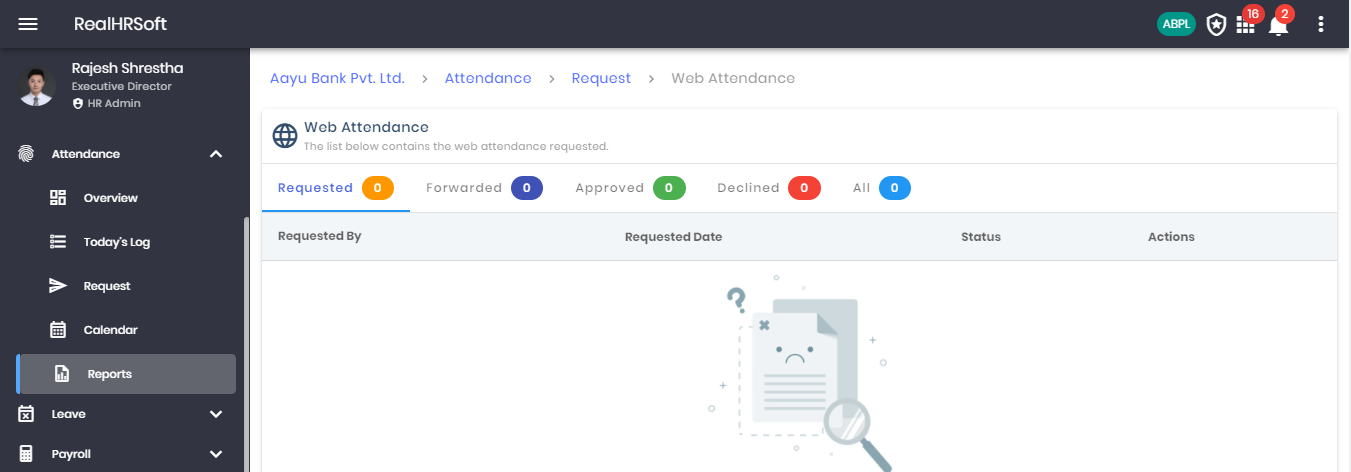
- Employees can view their web attendance request report along with the current status for the same using the platform.
- Employees can easily navigate and view their Web Attendance report by going to the “Attendance” section in the sidebar and clicking on “Report” followed by “Web Attendance”.
# Attendance Rooster Details
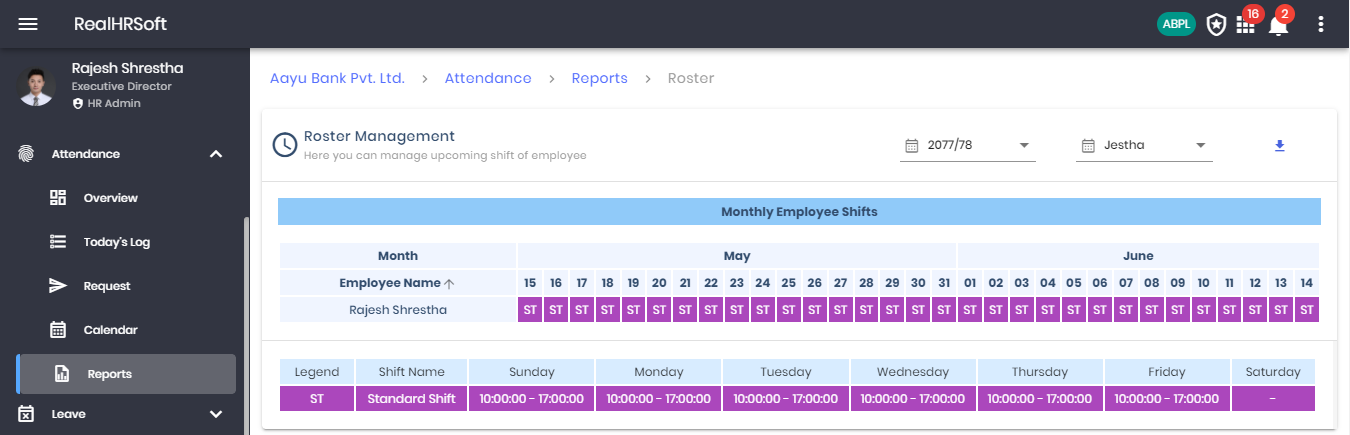
- Employees can view their attendance rooster details from the platform. They can view their upcoming shift details upto 30 days along with the past attendance shifts too.
- Employees can easily navigate and view their Attendance Rooster Details report by going to the “Attendance” section in the sidebar and clicking on “Report” followed by “Attendance Rooster Details”.
# Leave
# Overview
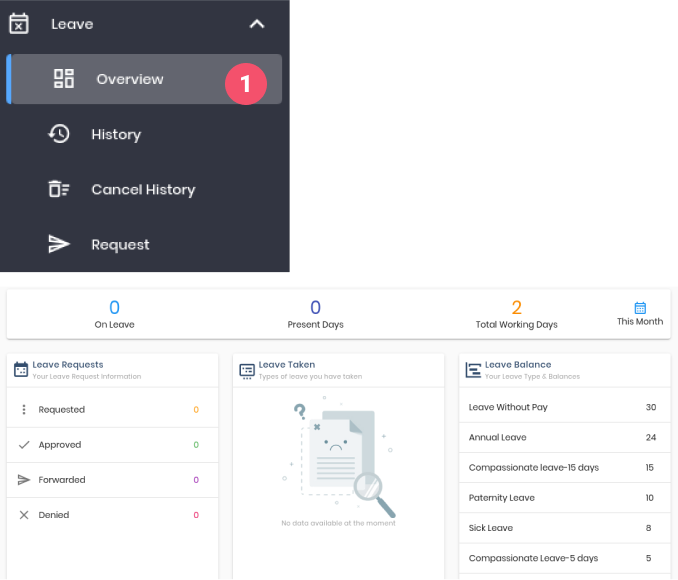
To view the Leave details :
- Go to 'Leave' on the sidebar, click on the 'Overview'
- Here, you can see the number of days of leave taken
- Here , you can see the number of present days
- Here, you can see the number of total working days
- Here, you can select the date filter
- Here, you can see the number of leaves which are 'Requested', 'Approved', 'Forwarded' and 'Denied'.
- Here, you can see the number of leaves taken on a particular categories
- Here, you can see the number of leave remaining
# History
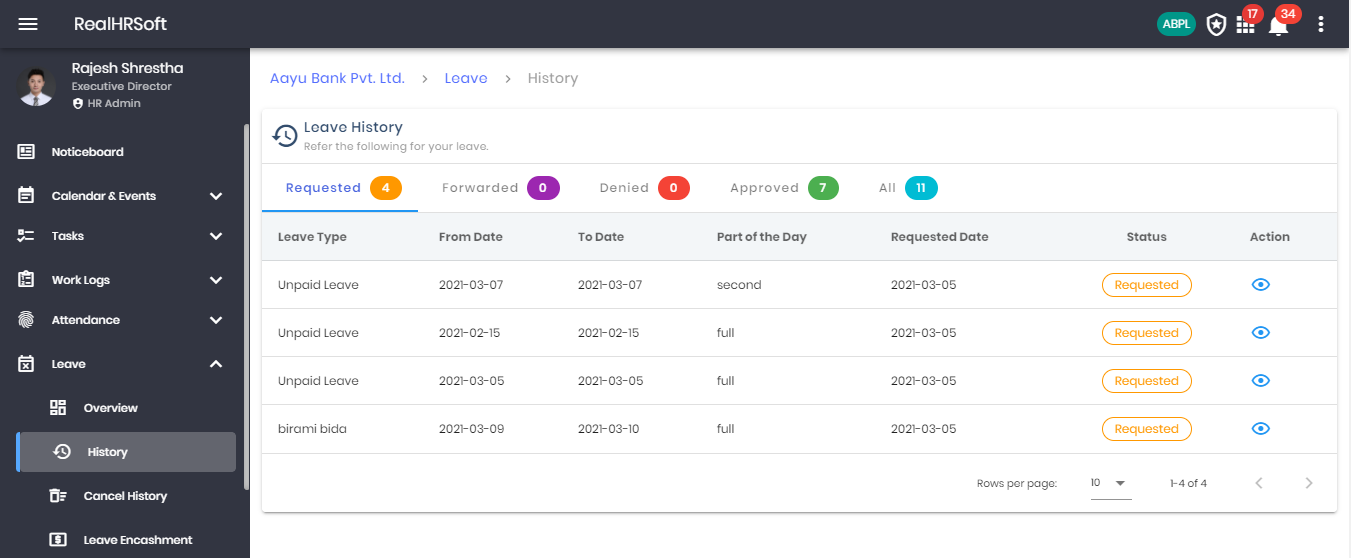
- Go to “Leave” in the sidebar. Click on “History” to view the list of your leave application history. The list can be further filter based on their status eg. Requested, Forwarded, Denied etc.
- Click on the Action button to view the full information regarding the leave.
# Cancel Leave Request
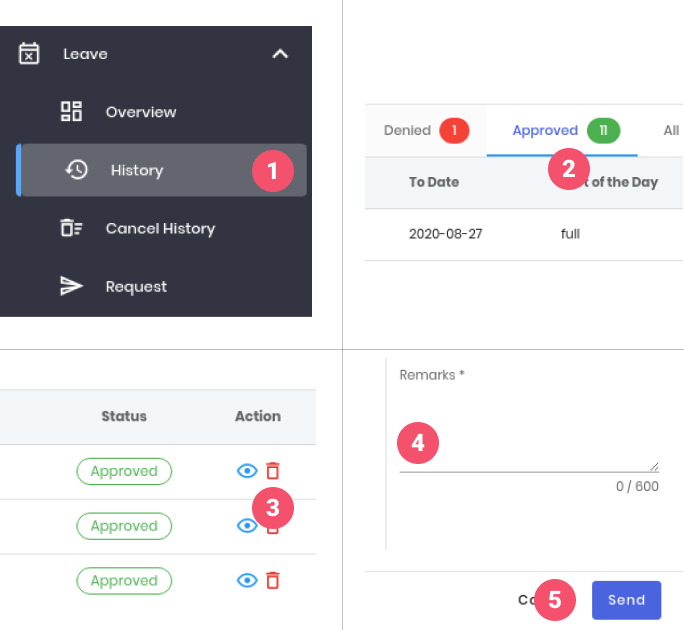
To Cancel Leave the approved leave :
- Go to 'Leave' on the sidebar, click on the 'History'
- Click on the 'Approved' tab
- Click on the 'Cancel' button
- Enter the 'Remarks'
- Click on the 'Send' button
# Leave Encashment
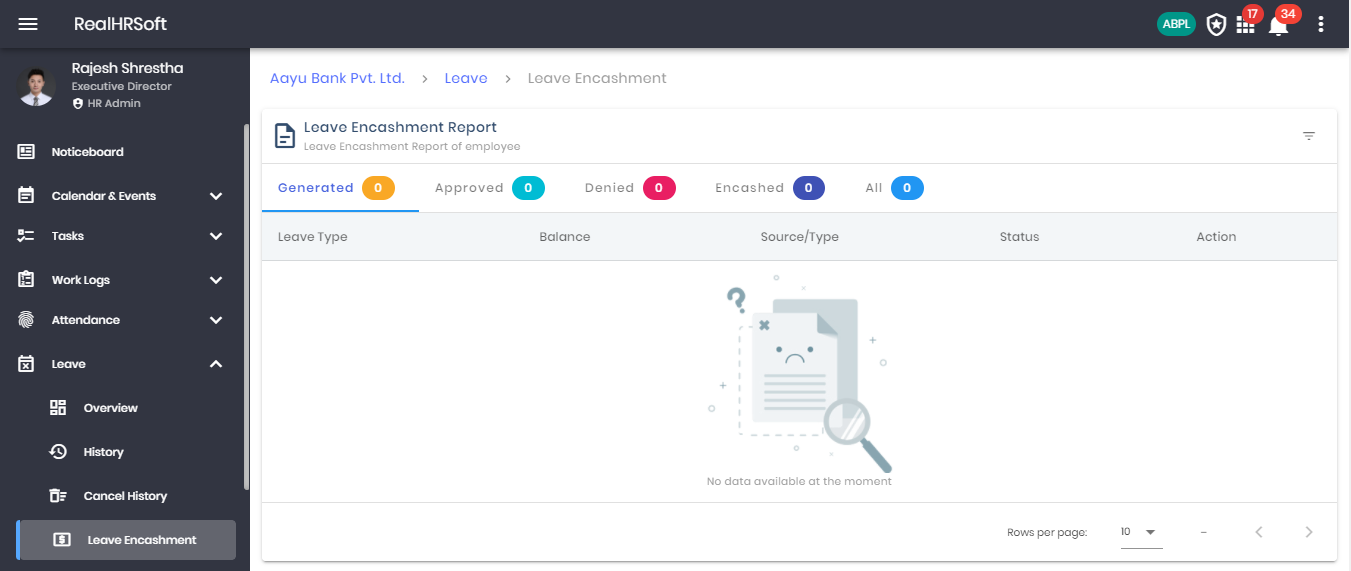
Few organizations have the policy to encash few of their leaves i.e. compensate the remaining number of leave into monetary benefit. The platform currently allows the users to view if such company policy are met and leave encashment is generated for the employee.
- Go to “Leave” in the sidebar. Click on “Leave Encashment” to view the list of the employees leave encashment report. The list can be further filter based on their current status i.e. Generated, Approved, Denied, Encashed or All.
# Leave Request
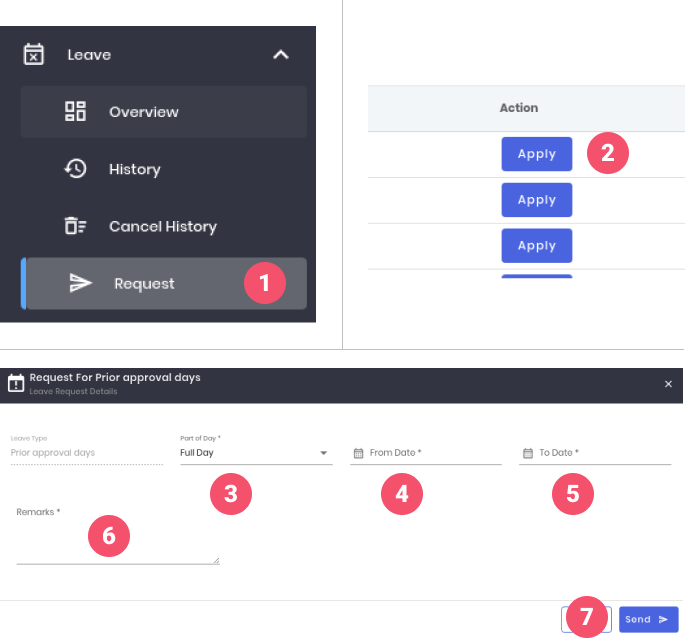
To send the Leave Request :
- Go to 'Leave' on the sidebar, click on the 'Request'
- Click on the 'Apply' button
- Select the 'Part of the day'
- Select 'From Date'
- Select 'To date'
- Enter 'Remarks'
- Click on the 'Send' button
# Payroll
# Payslip and Tax
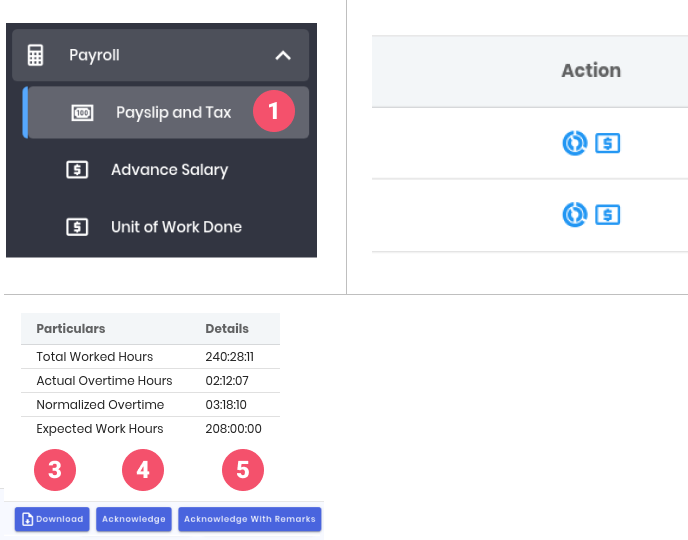
To Acknowledge the Payslip and View the Tax details :
- Go to 'Payroll' on the sidebar, click on the ‘Payslip and Tax’
- Click on the 'View Payslip' icon on the action column to view the payslip details
- Click on the 'Download' button to download the copy of the payslip
- Click on the 'Acknowledge' button to acknowledge the payslip
- Or Click on the 'Acknowledge With Remarks' button to acknowledge the payslip
# Advance Salary
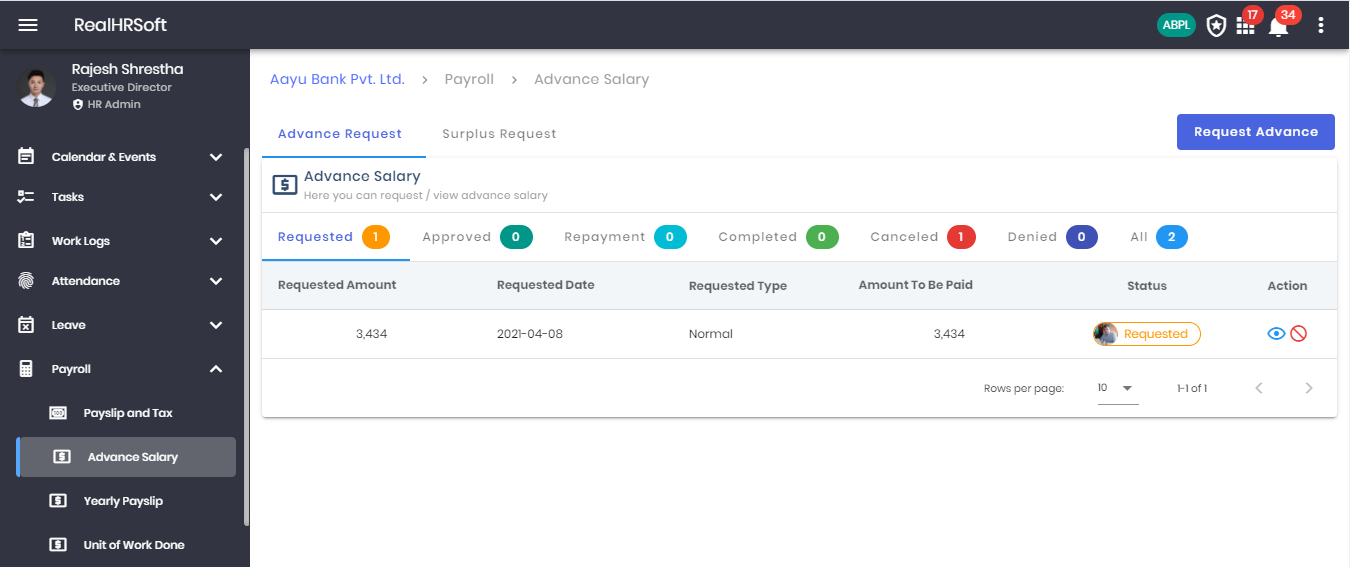
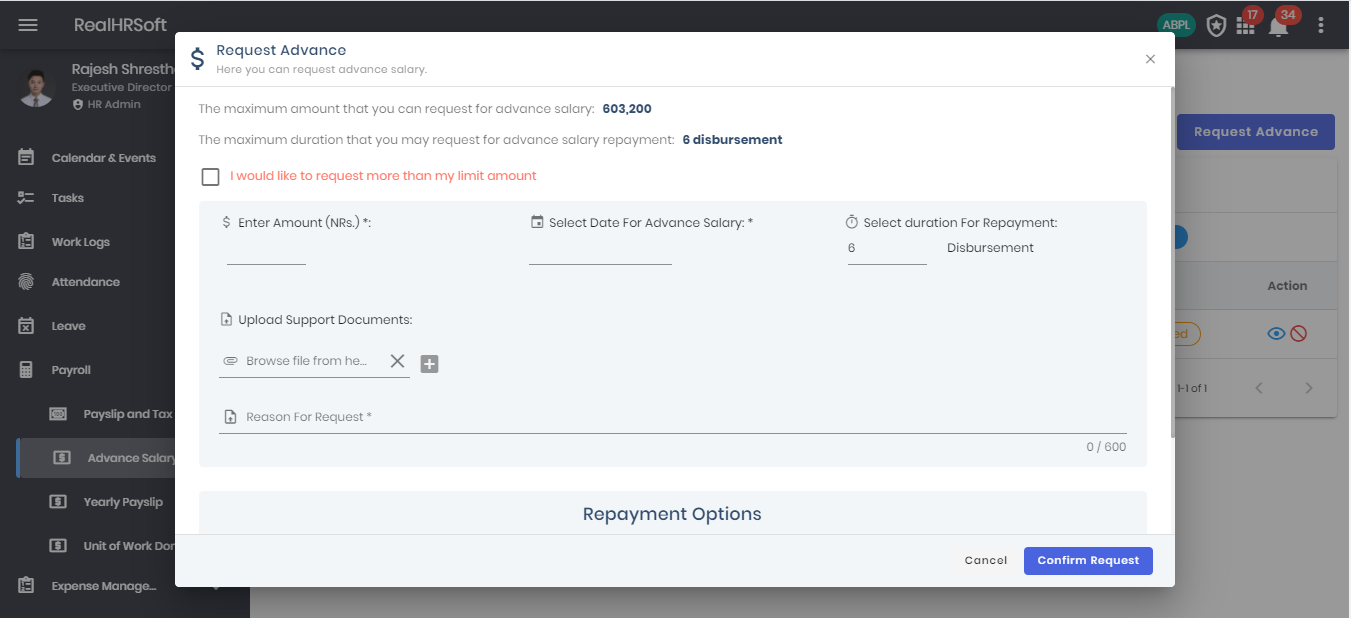
Using the platform the employees can request for Advance Salary. This feature along with the limit and other settings can be enabled/disabled for the employees by the HR. The employees can request and also track the current status of their request using the platform. The employees can request for the allotted limit for Advanced Salary as well as any surplus to the salary limit with valid reasons.
- Click on “Payroll” on the sidebar. Click on “Advanced Salary” to view the list of request for Advanced salary the employee. This list can be further filtered based on their current status of the request.
- Click on “Request Advance” to fill the form for Advance Salary request.
- Click on “Surplus Request” to track the advance salary which exceeds the limit set by the organization
- Click on View or Cancel action button to see the request detail or cancel your request.
- Fill the form with all the required information and the system will automatically calculate the repayment amount based on the number of repayment disbursements selected by the employee. However, the employee has the option to change the repayment installment amount.
# Yearly Payslip
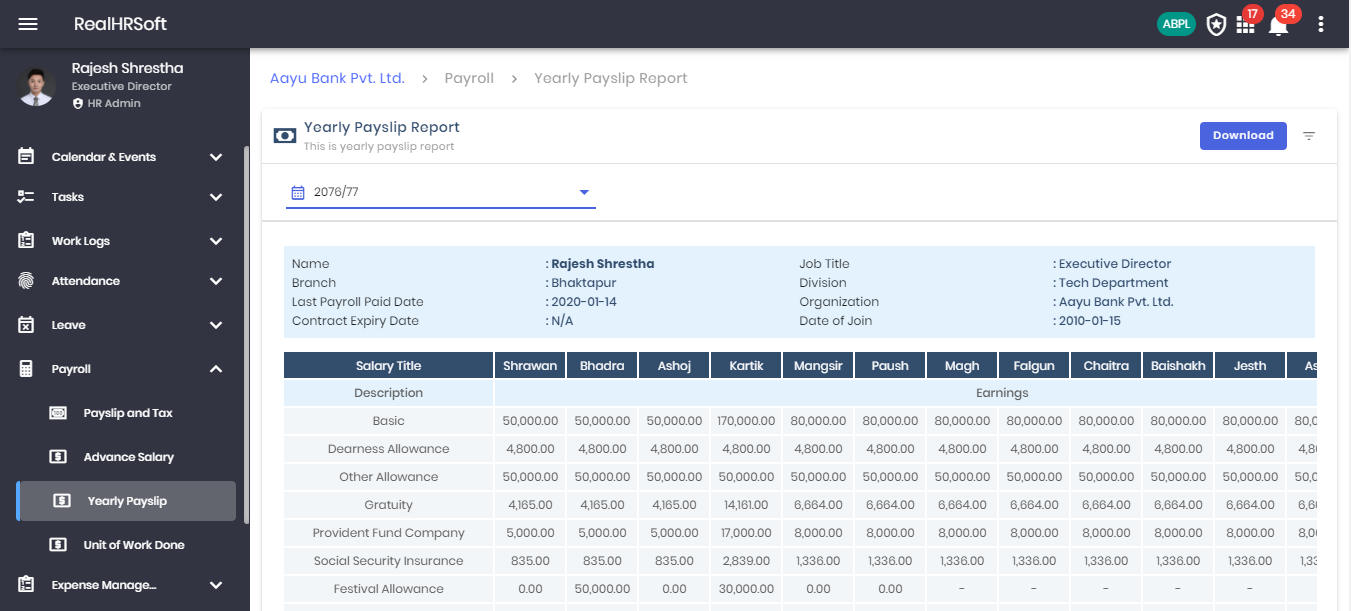
The employees have the ability to view and download their yearly payslip from the platform.
- Click on “Payroll” from the sidebar. Click on “Yearly Payslip” to view the payslip for the chosen fiscal year.
- Choose the “Fiscal Year” and view the payslip for months of the given fiscal year based on the company policy.
- Click on the “Download” button to save the payslip in PDF format for future reference.
# Unit Of Work Done
- Coming Soon
# Expense Management
# Request Advance
# Advance Expense Request
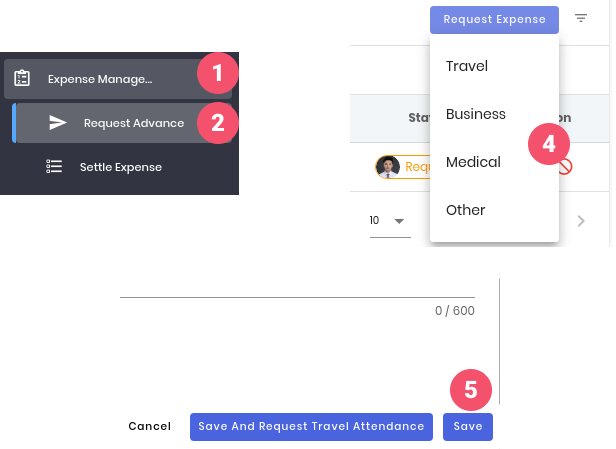
To send the Advance Expense Request:
- Click on the "Expense Management" on the sidebar
- Click on the "Request Advance"
- Click on the "Request Expense" Button
- Choose the appropriate expense type
- Fill up the form and click on the "Save" button
# Expense settlement request
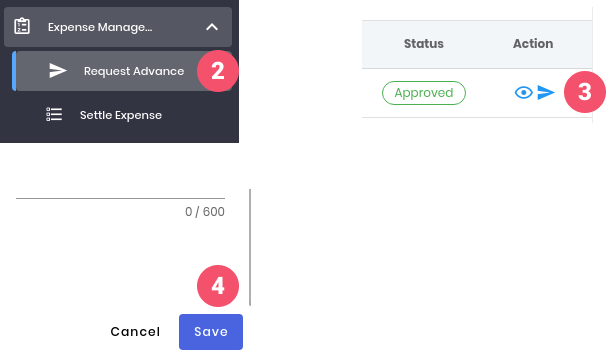
**To send an expense settlement request for the approved advance expense request **
- Click on the "Expense Management" on the sidebar
- Click on the "Request Advance"
- Click on the "Settle Expense" icon
- Fill the form and click on the "Save" button
# Settle Expense
# To Request a new settlement request
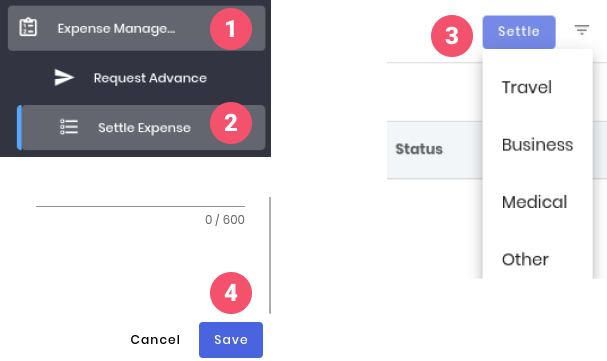
To Request a new settlement request which is not related with any advance expense requests
- Click on the "Expense Management” on the sidebar
- Click on t he "Settle Expense"
- Choose the appropriate settlement type
- Fill the form and click on the "Save" button
# Organization
# Overview
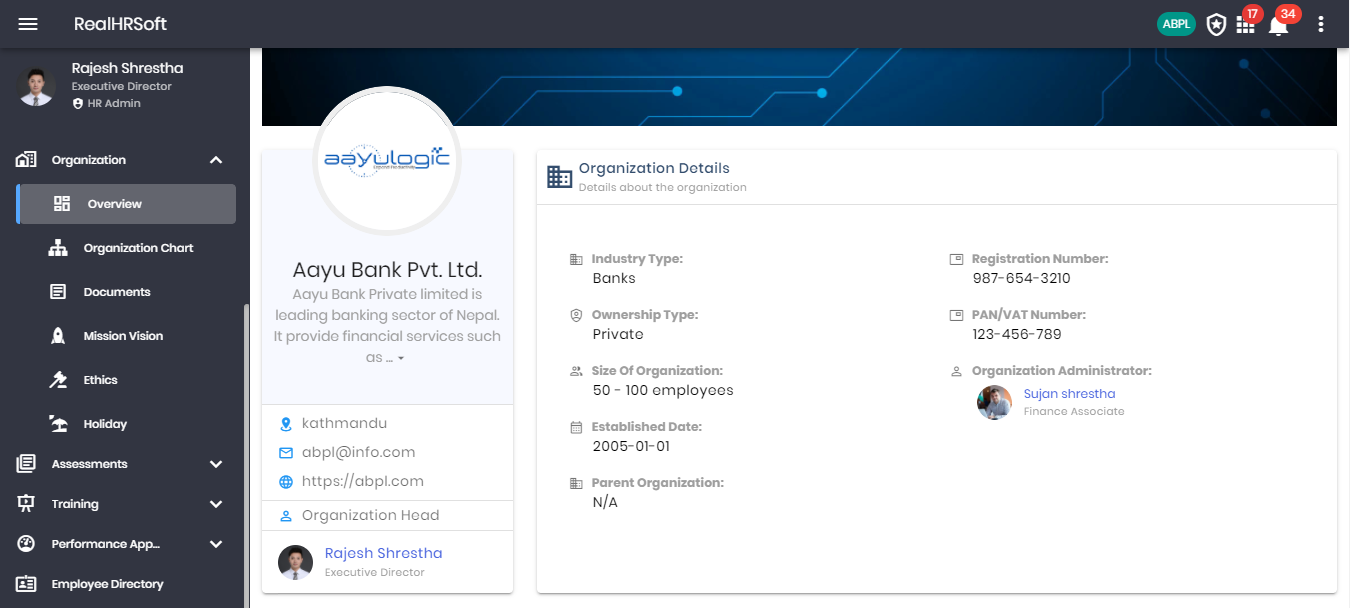
- Click on “Organization” in the sidebar. Click on “Overview” to view the basic details about the organization.
# Organization Chart
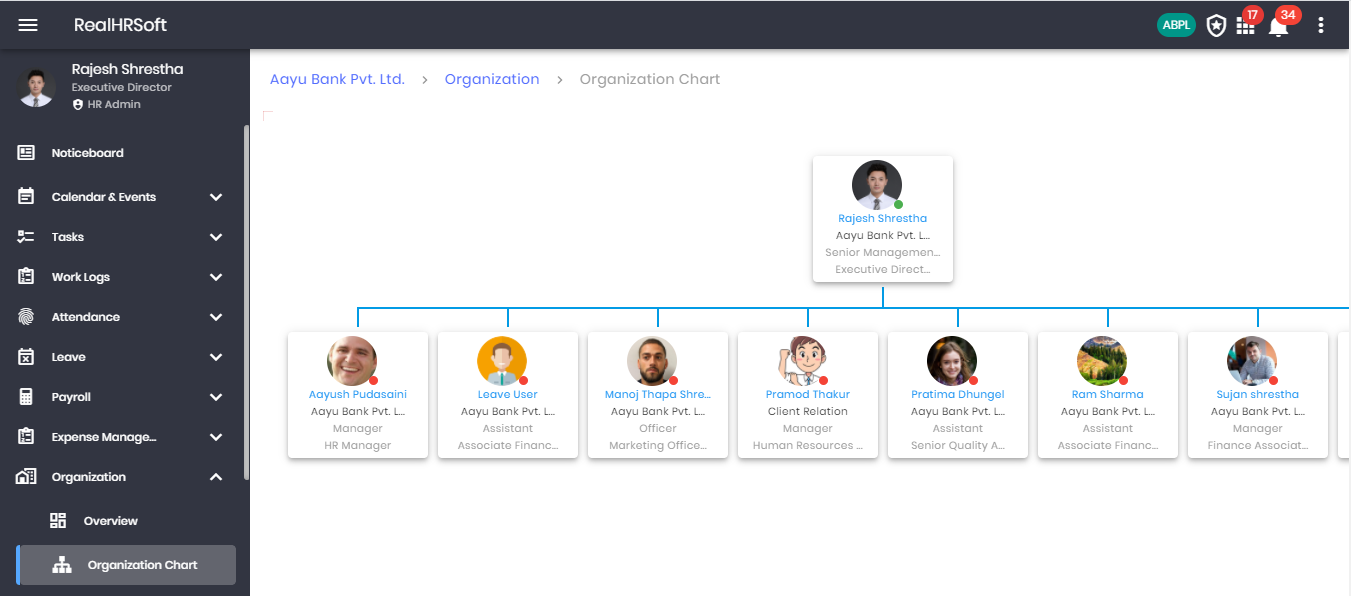
- Click on “Organization” in the sidebar. Click on “Organization Chart” to view the organization hierarchy.
- Click on the arrow button on either direction of the employee to view their team member, supervisor or colleague.
# Documents
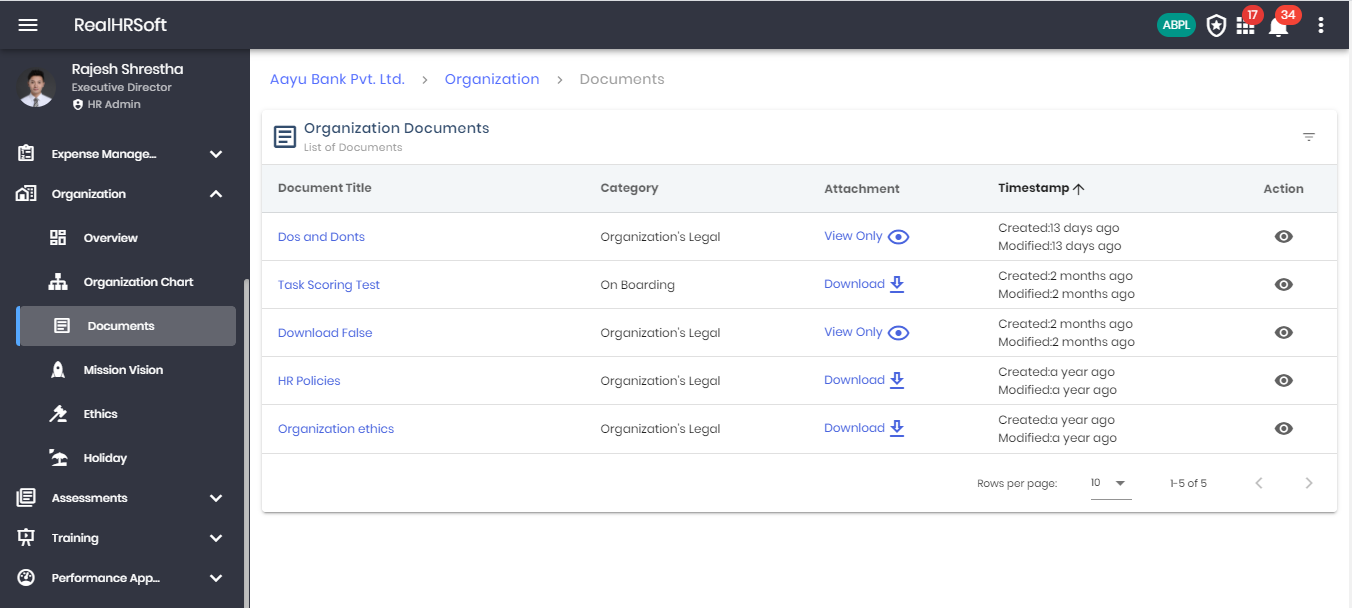
The HR of the organization can upload necessary documents for the employees to view and download from the platform.
- Click on “Organization” in the sidebar. Click on “Organization Document” to view the list of documents that have been shared within the organization.
- Click on the Attachment to either view or download it for future reference
# Mission Vision

- Click on “Organization” in the sidebar. Click on “Mission Vision” to view the list of organizations Mission & Vision.
# Ethics
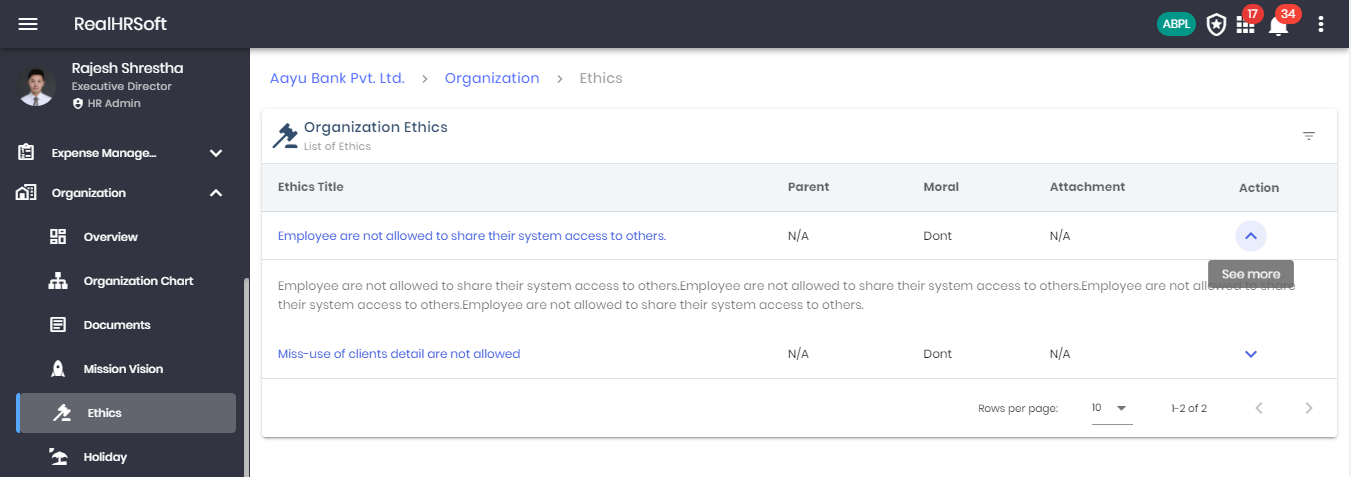
- Click on “Organization” in the sidebar. Click on “Mission Vision” to view the list of Organization Ethics. You may view the detail by clicking the action button and download attachments if present.
# Holiday
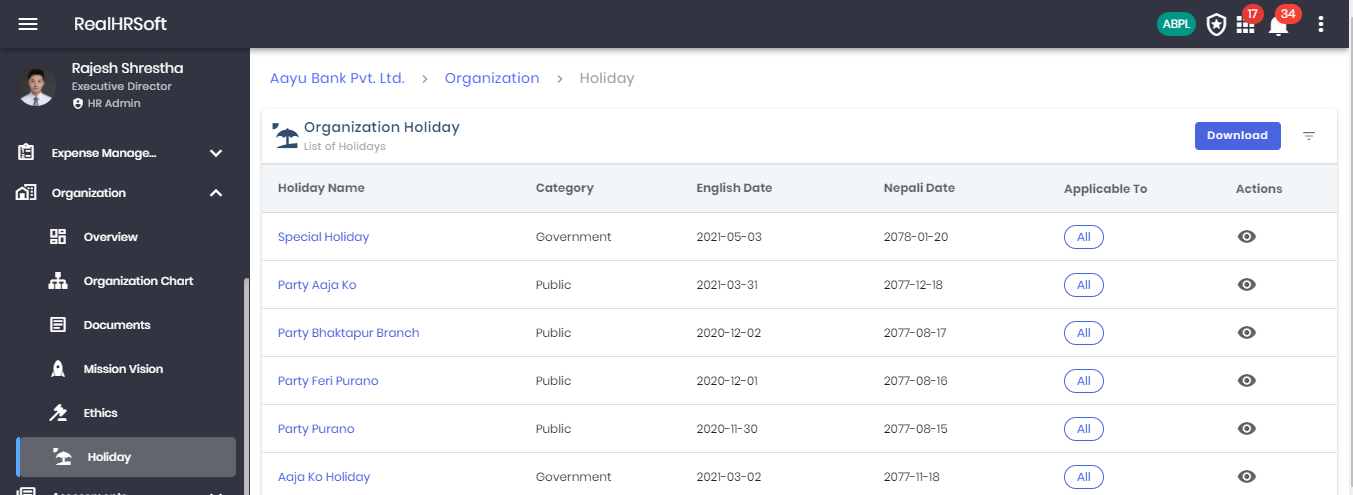
- Click on “Organization” in the sidebar. Click on “Holiday” to view the list of Organization Holidays. You may view the details by clicking the action button and download the holiday list too.
# Assessments
# New Assessments
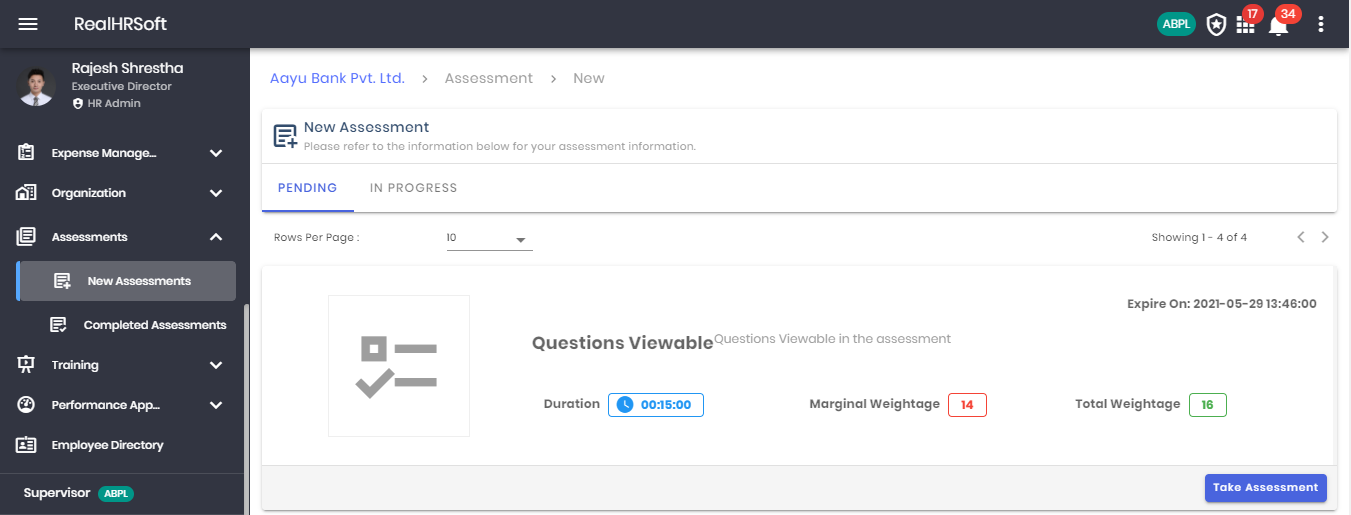
- Click on “Assessments” in the sidebar. Click on “New Assessments” to view the list of assigned assessments to the employee along with the details about the assessment.
- Click on “Take Assessment” to start your assessment.
- Click on “In Progress” tab to view the assessments that have been started and is yet to complete.
# Completed Assessments
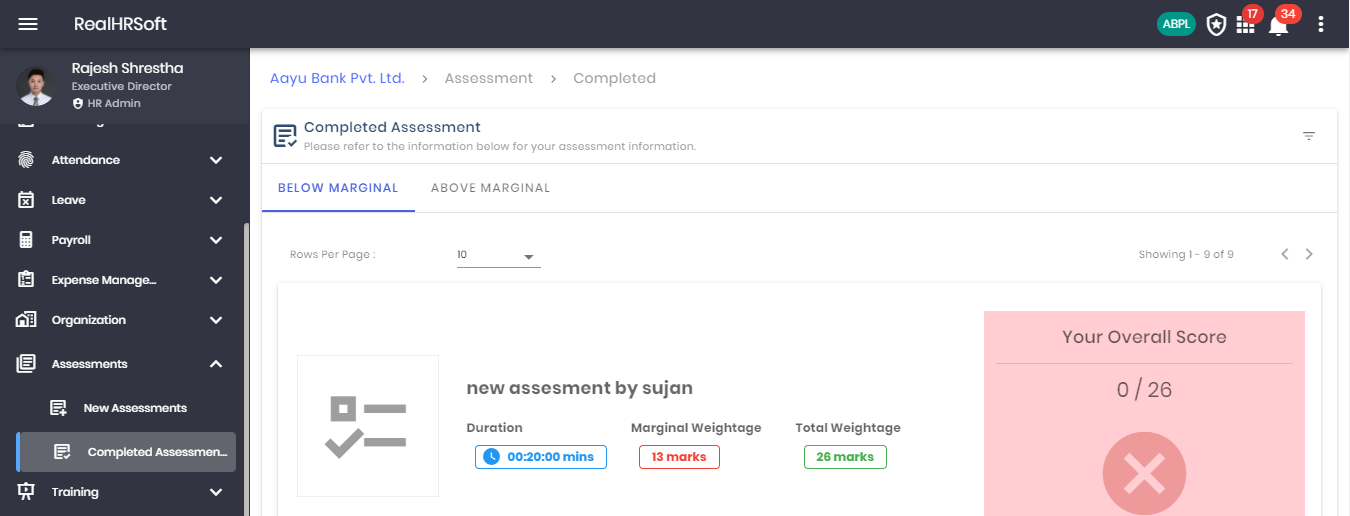
- Click on “Assessments” in the sidebar. Click on “Completed Assessment” to view the list of completed assessments along with the result and other details about the assessment.
- Click on “Above Margin” to view the list of assessment with results above margin
# Training
# Overview

Training Overview :
- Go to 'Training' on the sidebar, click on the ‘Overview’
- Click on the Training Name To view the details of the training
# Training Requests
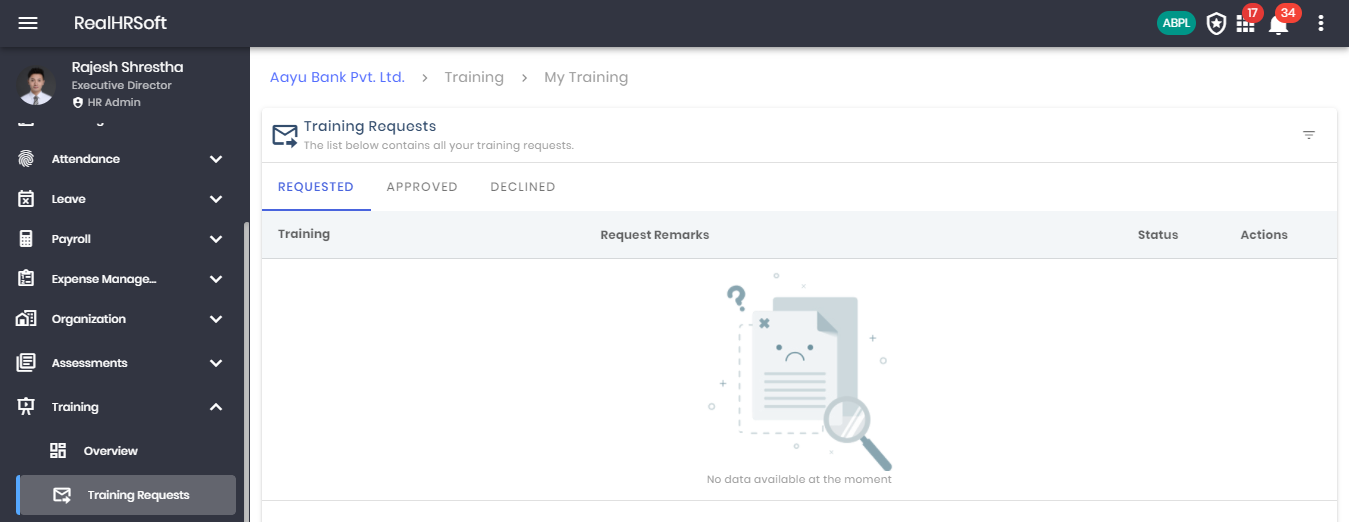
- Click on “Training” in the sidebar. Click on “Training Request” to view the list of Unassigned training with request from the employee. The list can be seen for their current stage i.e. Requested, Approved & Denied
# Employee Directory
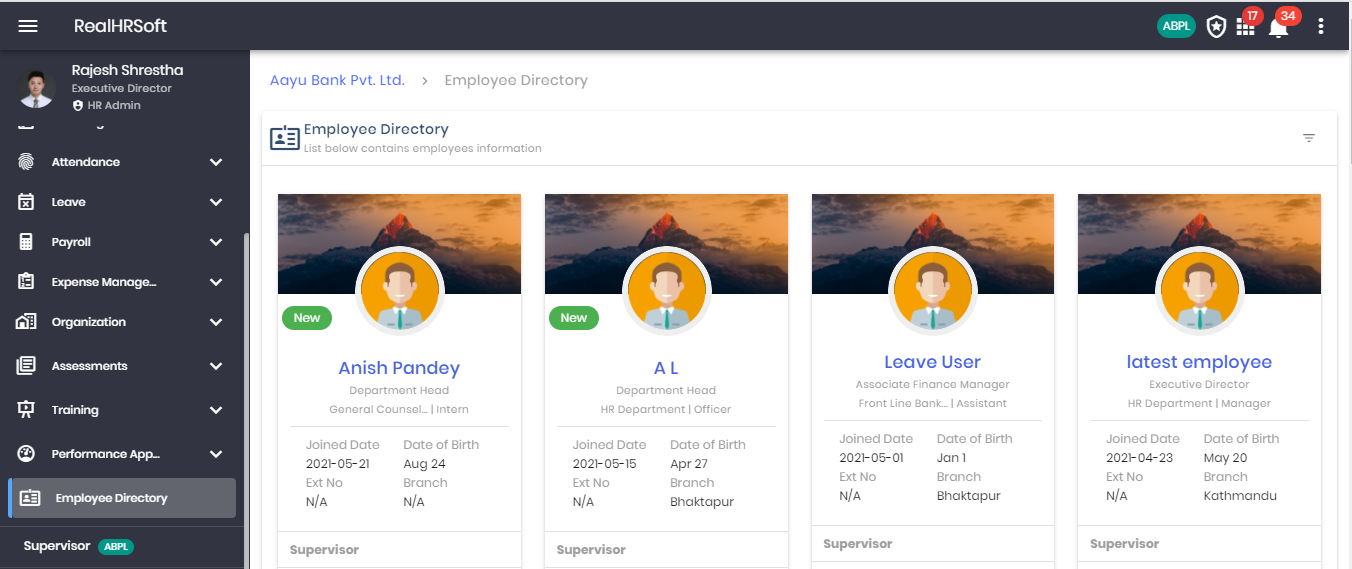
- Click on “Employee Directory” to view the basic information about the active employees within the organization.